Let's be honest, there's something truly special about a perfectly cooked prime rib. It's the kind of dish that makes you feel like a culinary rockstar, and it's guaranteed to impress even the pickiest eaters. But let's be real, tackling a 10-pound roast can feel daunting. I've been cooking prime rib for years, and I've learned a thing or two along the way. It's become my go-to dish for special occasions and family feasts, and it always brings a smile to everyone's faces. So, if you're ready to take your cooking skills to the next level and conquer this culinary challenge, I'm here to guide you through every step, from choosing the perfect cut to carving it like a seasoned pro. Grab your apron, sharpen your knives, and let's get started!
(Part 1) choosing the right cut: It’s All About the Bone
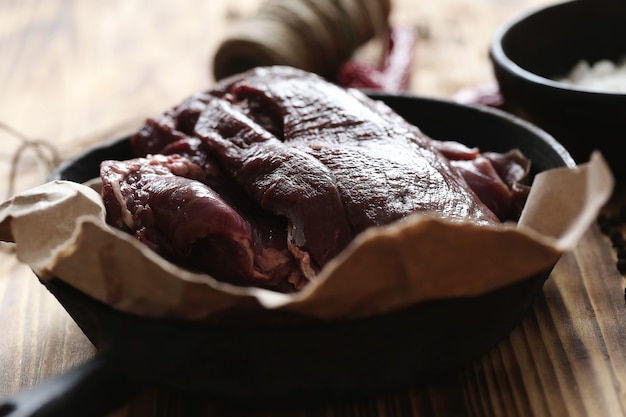
The first step in this delicious journey is picking your prime rib. It's crucial to get a good cut, and that means looking for the right bone. You want a "standing rib roast" – this means the ribs are still attached, which makes for a more flavorful and visually stunning piece of meat. Think of it as a crown jewel of the meat world. You're aiming for a roast with at least three ribs, and a 10-pounder will usually have seven, making for a substantial and impressive centerpiece on your table.
The Grade Matters: Prime vs. Select
Now, don't be shy about asking the butcher for advice. They're the real experts, and they'll help you choose the perfect piece of meat for your needs. When it comes to grade, prime is the gold standard. It's the highest quality, boasting the most marbling, which translates to a juicier, more flavorful roast. However, if you're on a budget, select grade is a great alternative. It might not be as luxurious, but it still delivers a delicious result.
(Part 2) Prep Work: Getting Ready for the Big Roast
Once you've got your chosen prime rib, it's time to give it a little TLC before it goes into the oven. The first step is to trim any excess fat. I like to trim it down a bit, but leave a good layer for flavor and to keep the meat moist. Think of it like a protective blanket for your roast. You can use a sharp knife to trim, or a pair of kitchen shears. Just make sure you're working with a clean surface and sharp tools – safety first, always!
Seasoning: A Simple but Essential Step
Next, it's time to give your prime rib a flavor boost. This is where you get to unleash your creativity. I always start with a simple but essential mix of salt and pepper. It’s the foundation of any great prime rib. But don't be afraid to experiment! You can add other spices like garlic powder, onion powder, or even a sprinkle of paprika for a hint of warmth. Some folks like to go all out with a dry rub – there are tons of amazing recipes online, or you can whip up your own blend. Whatever your style, make sure the seasoning is rubbed all over the roast, ensuring every part gets a taste of deliciousness.
(Part 3) cooking time: Low and Slow is the Way to Go
Now for the fun part – cooking! Prime rib is best cooked low and slow, and an oven is the ultimate tool for achieving that perfect, evenly cooked roast. Set your oven to 325°F (160°C). This is the sweet spot for achieving that melt-in-your-mouth tenderness and juicy perfection that will have everyone raving.
The Roast Needs to Rest: A Crucial Step for Juiciness
A 10-pound prime rib will take around 3-4 hours to cook. Don't worry, I'll break down the timing and temperatures in detail later. For now, just remember, the key to a perfect prime rib is patience. Let the oven do its magic! I like to check the temperature with a meat thermometer. For medium-rare, you're aiming for an internal temperature of 135°F (57°C). But remember, once you take the roast out of the oven, it'll continue to cook. So, it's best to remove it when it’s about 5 degrees below your desired internal temperature. Let the roast rest for at least 15 minutes before carving. This is an essential step – it allows the juices to redistribute throughout the meat, ensuring juicy and delicious slices.
(Part 4) Bringing the Flavour: roasting techniques
Here's a little secret I've learned over the years: roasting with a little water in the bottom of the pan helps create a lovely, moist atmosphere and prevents the meat from drying out. I add a cup or two of water to my roasting pan. It also makes cleanup a breeze!
The Importance of Basting: A Simple Trick for Added Flavor
To keep the roast moist and flavourful, I like to baste it every 30 minutes or so. Use a basting brush or a spoon to pour the juices collected in the pan over the top of the meat. You can also add a little bit of butter or wine to your basting liquid for extra richness. Think of it as a little love tap for your roast – it’s a simple trick that makes a big difference.
(Part 5) Temperature Control: The Key to a perfect roast
Here's the deal: you need to keep a close eye on the temperature of the meat. That's where a good meat thermometer comes in handy. It's your best friend in the kitchen! Insert the thermometer into the thickest part of the roast, making sure it doesn't touch the bone. And remember, you want to take the roast out of the oven when it’s about 5 degrees below your desired internal temperature. It's all about getting that perfect doneness.
Using a Thermometer: A Guide to Doneness
Here's a handy table of temperatures to help you get that perfect roast:
| Level of Doneness | Internal Temperature (°F) | Internal Temperature (°C) |
|---|---|---|
| Rare | 125-130 | 52-54 |
| Medium-rare | 130-135 | 54-57 |
| Medium | 135-140 | 57-60 |
| Medium-well | 140-145 | 60-63 |
| Well-done | 145-150 | 63-66 |
(Part 6) Resting Time: A Crucial Step
After the roast is done cooking, let it rest for 15-20 minutes before carving. This is a crucial step for the ultimate juicy result! It allows the juices to redistribute, resulting in a more tender and juicy roast. Cover it loosely with foil to keep it warm while it rests.
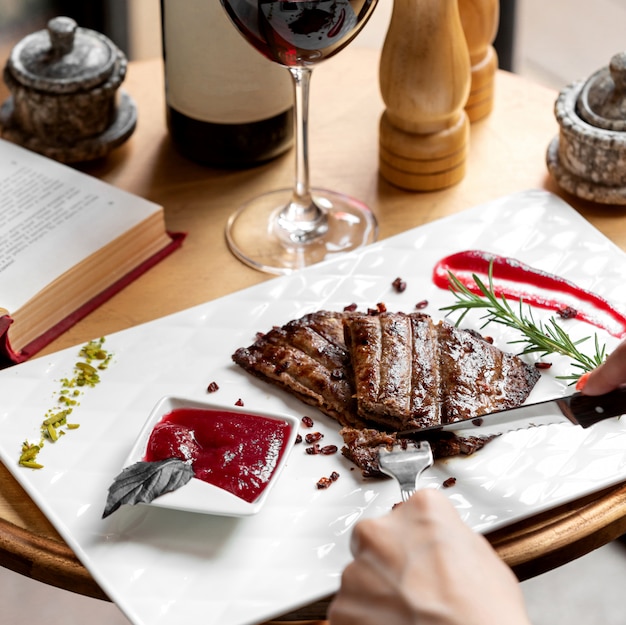
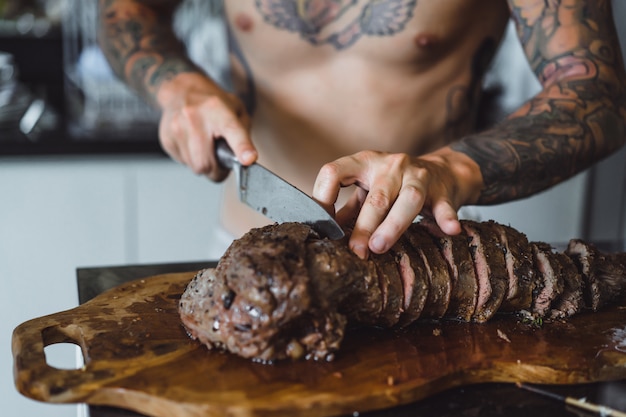
(Part 7) The Art of Carving: Cutting with Confidence
Now, the moment of truth: carving the prime rib. It's a bit of a performance, so feel free to show off! Use a sharp carving knife – it makes all the difference. Imagine you're slicing through butter, smooth and effortless. Slice the meat against the grain, which means cutting perpendicular to the muscle fibres. This results in more tender and palatable slices. Think of it like unravelling a delicious puzzle!
A Step-by-Step Guide to Carving
- Start by slicing off the fat cap. You can save this for later to render down for cooking or to add to sauces. It's like a secret ingredient for even more flavour.
- Use the knife to cut between the bones, removing the ribs. You can save these for a delicious bone broth. Imagine the flavour explosion!
- Cut the roast into slices, about ?? inch thick, slicing against the grain. Remember, perpendicular is the way to go!
- Serve the slices on a platter, with any desired sauce or gravy. The finishing touch for a perfect prime rib experience.
(Part 8) The Ultimate Prime Rib Feast: Accompaniments and Sides
Prime rib is the star of the show, but you need some supporting players. Think of sides that complement the rich flavour of the meat, like roasted vegetables, mashed potatoes, and gravy.
side dish Ideas
- Roasted vegetables: Think asparagus, Brussels sprouts, carrots, or parsnips. These will all caramelise in the oven and pair beautifully with the prime rib. It's a symphony of flavour!
- Mashed potatoes: A classic comfort food that's always a hit with prime rib. You can add a touch of garlic or herbs for extra flavour. Think creamy, comforting goodness.
- Gravy: A must-have accompaniment for prime rib. You can make it from the pan drippings, or use a store-bought version. Don't forget the gravy boat!
- Yorkshire pudding: This fluffy, savory bread pudding is a traditional side dish for prime rib. A touch of British charm for your feast.
(Part 9) prime rib leftovers: Don't Waste a Bite
Don't worry, there will likely be leftovers. The good news is they're even better the next day! You can slice the remaining prime rib and use it in sandwiches, salads, or even tacos. Let's get creative with those leftovers!
(Part 10) FAQs: Your Prime Rib Questions Answered
1. What's the Best Way to Keep Prime Rib Moist?
Low and slow cooking is key. Use a meat thermometer to ensure it doesn't overcook. Basting regularly is also important to keep the roast moist. And finally, let it rest for 15-20 minutes before carving. It's all about patience and a little TLC.
2. How Can I Make My Prime Rib Even More Flavourful?
Use a dry rub. Experiment with different herbs and spices like garlic powder, onion powder, rosemary, thyme, or paprika. You can also try marinating the roast in advance for extra flavour. Think bold flavours and a taste explosion!
3. How Do I Know When My Prime Rib is Done?
Use a meat thermometer to check the internal temperature. It should be about 5 degrees below your desired internal temperature when you remove it from the oven. For medium-rare, you're aiming for 130-135°F (54-57°C).
4. What Should I Serve with Prime Rib?
Roasted vegetables, mashed potatoes, gravy, Yorkshire pudding, or even a simple salad. Choose sides that complement the rich flavour of the meat. Think balance and deliciousness!
5. Can I Freeze Prime Rib?
You can, but it's best to freeze it before it's cooked. Wrap the roast tightly in plastic wrap and then foil. It can be frozen for up to 3 months. Thaw it in the refrigerator for 2-3 days before cooking. Planning ahead for a future prime rib feast!
Right, that’s it for my prime rib masterclass. Go forth and conquer the art of roasting this magnificent cut of meat! Remember, it’s all about low and slow cooking, keeping an eye on the temperature, and letting it rest before carving. With these tips, you’ll be serving up a prime rib worthy of the most discerning guests. And if you have any questions, feel free to drop me a line. Happy roasting!
Everyone is watching

How to Cook Frozen Lobster Tails Perfectly: A Step-by-Step Guide
RecipesLobster. Just the word conjures up images of lavish meals, special occasions, and a taste of luxury. But let's...

Pigs in a Blanket Cooking Time: How Long to Bake for Perfect Results
RecipesAh, pigs in a blanket. Just the name conjures up images of those delightful little parcels of crispy pastry en...

Pork Fillet Cooking Time: How Long to Cook It Perfectly
RecipesPork fillet, or tenderloin as it's sometimes called, is a real favourite in our house. It's so versatile, and...

The Ultimate Guide to Tender, Juicy Pulled Pork
RecipesRight, let's talk pulled pork. It's one of those dishes that just screams "comfort food," doesn't it? I mean...

The Ultimate Guide to Cooking Delicious Frankfurters
RecipesLet's face it, we all love a good frankfurter. It's a classic, simple, and always satisfying. But let's be rea...