As a lifelong sushi aficionado, I've always been captivated by the artistry of sushi making. The delicate balance of flavors, the precision of the knife work, and the sheer beauty of a perfectly constructed piece of sushi, all mesmerize me. But over the years, I've learned that the true heart of any sushi masterpiece lies in the rice. Without perfectly cooked, seasoned, and shaped sushi rice, your culinary creations will simply lack that crucial element that elevates them from good to extraordinary.
This guide is a testament to my years of dedication, a culmination of countless hours spent experimenting with different rice varieties, cooking techniques, and seasoning methods. I've poured my heart and soul into this guide, eager to share my secrets and help you achieve that elusive level of sushi rice perfection. So, grab your ingredients, put on your favourite Japanese music, and let's embark on this culinary adventure together!
(Part 1) The Rice Matters: Choosing the Right Grain
The journey towards perfect sushi rice begins with selecting the right grain. Not all rice is created equal, and using the wrong type can make a world of difference. For sushi, we're looking for a specific type of rice called "short-grain japonica rice," also known as "sushi rice." This rice has a unique characteristic—it's incredibly starchy. This starchiness is what allows the rice to become wonderfully sticky and cohesive when cooked, making it perfect for forming those iconic sushi balls. It's like a magical glue that holds everything together, ensuring your creations maintain their shape.
Choosing Your Rice: A Quest for Quality
There's a vast array of sushi rice brands available, but my personal favourite is "Koshihikari," a highly prized Japanese variety. Its reputation precedes it, and rightly so—it's known for its exceptional flavour, delicate aroma, and remarkable texture. You'll find it at most Asian grocery stores.
But Koshihikari isn't the only option. There are other excellent sushi rice varieties out there, each with its own unique qualities. For example, "Calrose rice," a popular American variety, is also a short-grain rice. However, it's less sticky than Koshihikari and is better suited for other dishes. When it comes to sushi rice, stick with the true short-grain japonica varieties.
Here's a checklist for selecting your perfect sushi rice:
- Short-grain japonica rice: It should be labeled as "short-grain" and specifically state "japonica rice" on the packaging.
- "Sushi Rice": Many brands will explicitly label their rice as "Sushi Rice," which is a surefire way to ensure you're choosing the right type.
- Avoid "Calrose Rice": Calrose rice, while a short-grain variety, isn't ideal for sushi as it tends to be less sticky. It's better suited for other dishes.
(Part 2) Preparing the Rice: Washing Away Impurities
Now that you've got your rice, let's get ready to cook! Before we start cooking, it's crucial to prepare the rice properly. This step might seem insignificant, but it plays a crucial role in the final outcome. Think of it like prepping your ingredients for any dish – you wouldn't just throw raw vegetables into a pan, would you? We want to make sure our rice is ready to shine!
Washing the Rice: A Ritual of Purity
The first step is to wash the rice. This might seem odd, but it's essential to remove any excess starch and impurities. Imagine trying to eat rice that still has all that starchy residue clinging to it—not exactly appetizing, is it? Washing the rice ensures it's clean and ready to absorb the flavours we'll add later.
Here's my time-tested washing method, one I've perfected over the years:
- Measure the Rice: Start by measuring your rice. I usually use about 2 cups of rice for a small batch of sushi, but you can adjust this based on your needs.
- Rinse in a Bowl: Put the rice in a large bowl and fill it with cool water. Gently swish the rice around with your hands to release any excess starch. You'll notice the water turning cloudy as the starch is released.
- Drain and Repeat: Pour out the cloudy water and refill the bowl with fresh water. Repeat this process about 3-4 times, or until the water runs mostly clear. This repeated rinsing ensures that all the excess starch is washed away, leaving you with clean, pristine rice.
- Let it Drain: Once the water is clear, drain the rice thoroughly in a strainer. Allow the rice to drain for about 10 minutes, or until it's not dripping anymore. This resting period allows any remaining moisture to escape.
(Part 3) The Art of Cooking: Unlocking the Rice's Potential
Finally, it's time to cook the rice! This is where the magic happens, where the humble grains transform into something truly special. I've tried various methods over the years, from using a rice cooker to cooking it on the stovetop. But after years of experimentation, I've found that the stovetop method offers the most control and consistently yields the best results. It's like being in charge of the whole process, and it's quite satisfying to see the rice transform from dry grains to fluffy goodness.
Cooking on the Stovetop: A Culinary Symphony
Here's my detailed guide to stovetop cooking, a method I've honed to perfection:
- The Right Pot: Choose a pot with a tight-fitting lid. I prefer a heavy-bottomed pot that distributes heat evenly. This ensures the rice cooks evenly, preventing hot spots that can lead to uneven texture.
- Water Ratio: Use a 1:1.2 ratio of rice to water. So, for 2 cups of rice, you'll need 2.4 cups of water. This precise ratio is crucial for ensuring the rice cooks perfectly. Too much water can lead to mushy rice, while too little can result in dry rice.
- Bring to a Boil: Add the drained rice and water to the pot. Bring it to a boil over high heat, keeping a close eye on it. The water should be bubbling vigorously, indicating that the heat is sufficient to start the cooking process.
- Simmer Time: Once the water starts boiling, immediately reduce the heat to a simmer. Cover the pot tightly with the lid and let it simmer for about 15 minutes. This is where the real magic happens. The rice slowly absorbs the water, becoming tender and releasing its starches.
- Resting Time: After 15 minutes, turn off the heat and let the rice sit covered for another 10 minutes. This resting period allows the rice to absorb the remaining moisture and become beautifully fluffy. It also allows the starches to develop, creating that coveted stickiness.
- Fluff It Up: After the resting time, gently fluff the rice with a rice paddle or fork. This helps to separate the rice grains, preventing them from sticking together and ensuring a light, airy texture.
(Part 4) The Seasoning Secret: sushi rice vinegar
The final touch that elevates your sushi rice from ordinary to extraordinary is sushi rice vinegar. This special vinegar is a blend of rice vinegar, sugar, and salt, and it’s what gives sushi rice its distinct flavour and texture. It's not just a seasoning; it's a key ingredient that brings everything together. It's like the secret ingredient that transforms simple rice into something truly special.
The Perfect Seasoning: A Symphony of Flavors
To make the perfect seasoning, you can create your own sushi rice vinegar mixture, or you can buy it pre-made from the store. If you’re feeling adventurous, I encourage you to try making your own—it’s really easy and lets you customize the flavour to your liking.
Here’s how to make your own sushi rice vinegar, a recipe I've used for years, a tried-and-true method:
- Combine the Ingredients: Combine 1/2 cup rice vinegar, 2 tablespoons sugar, and 1 teaspoon salt in a small saucepan. The proportions are crucial, ensuring the right balance of tanginess, sweetness, and saltiness.
- Gently Heat: Place the saucepan over medium heat and stir until the sugar and salt dissolve. Do not let it boil! We just want to warm it up and dissolve the ingredients. Boiling can make the mixture too concentrated and change the flavor profile.
- Cool and Use: Remove the saucepan from the heat and let the mixture cool completely before using. This allows the flavours to meld together, creating a harmonious balance.
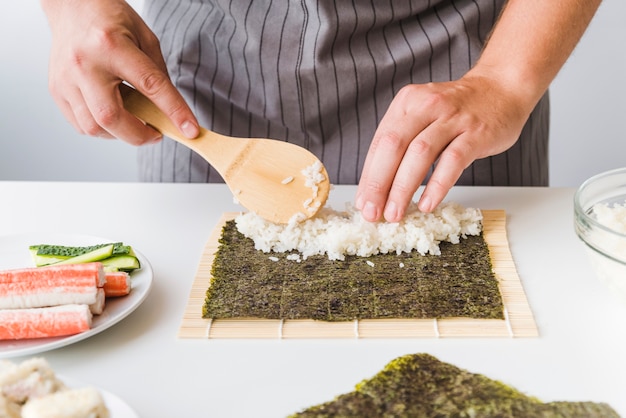
(Part 5) Seasoning the Rice: A Delicate Balance
Now comes the fun part: seasoning the rice! This is where you get to add your own personal touch and truly make the rice your own. The trick is to not over-season it. It should be subtly flavoured, not overly tangy or salty. It's a delicate balance that takes practice and patience.
The Seasoning Technique: A Gentle Touch
Here’s my method for seasoning, a technique I've refined over time, ensuring the perfect balance of flavours:
- Transfer to a Large Bowl: Transfer the cooked rice to a large bowl.
- Drizzle the Vinegar: Drizzle the sushi rice vinegar over the rice. I usually start with about 1/4 cup for 2 cups of rice, but you can adjust this to your preference. Remember, you can always add more, but you can't take it away!
- gentle folding: Use a rice paddle or a large wooden spoon to gently fold the rice vinegar into the rice. Don't stir vigorously—just gently fold it in until it’s evenly distributed. This ensures that the vinegar is incorporated without breaking up the rice grains.
- Taste and Adjust: Taste the rice and add more vinegar if needed. Remember, it’s better to start with less and add more as you go. The ideal flavour is a subtle balance of tanginess and sweetness.
- Let it Rest: Let the rice sit for at least 10 minutes to allow the flavours to meld together. This resting period allows the vinegar to permeate the rice, creating a truly harmonious blend of flavors.
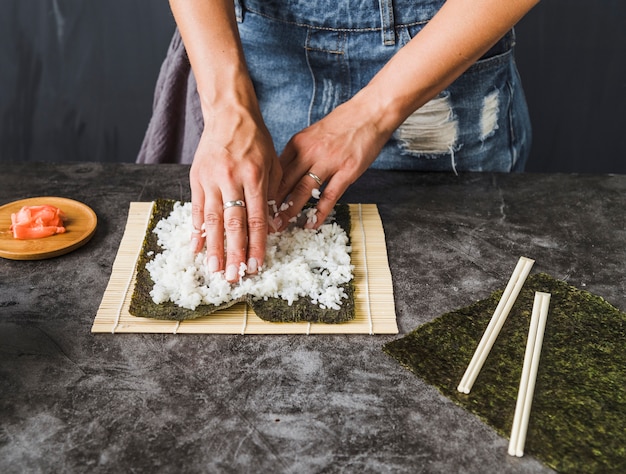
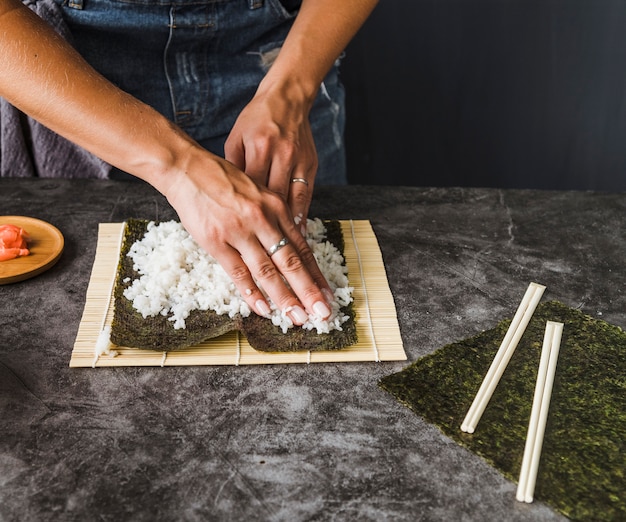
(Part 6) The Art of Shaping: A Culinary Sculptor
Now that the rice is perfectly cooked and seasoned, it’s time to get creative and start shaping it! This is the fun part, where you can experiment with different shapes and sizes for your sushi. It's also important to make sure your hands are clean and slightly wet with water or vinegar, as this helps prevent the rice from sticking to your hands.
Shaping Techniques: Mastery of the Form
Here are some tips for shaping your sushi rice, a skill that takes practice and finesse:
- Press, Don't Squeeze: When forming the rice, don't squeeze it too tightly. Gently press the rice into the shape you want. Over-squeezing can compress the rice, making it too dense and affecting the texture.
- Use a Rice Paddle: A rice paddle is a traditional sushi tool that's really helpful for shaping the rice, especially for nigiri. It's like a little spatula, and it allows you to press and shape the rice without smushing it.
- Practice Makes Perfect: The best way to get the hang of shaping is to practice. Don't be afraid to experiment and play around with different shapes and sizes. The more you practice, the more confident and skilled you'll become.
(Part 7) Storing and Serving: Preserving Perfection
Once you’ve seasoned and shaped your rice, you’re ready to enjoy it! But if you’re making sushi in advance, it’s important to store it properly. The key is to keep the rice moist and prevent it from drying out.
Storage Tips: Keeping the Rice Moist and Fresh
- Keep it Moist: Store the rice in an airtight container and wrap it with plastic wrap to keep it moist. I like to place a damp paper towel on top of the rice for extra moisture. This prevents the rice from drying out and keeps it pliable for shaping.
- Refrigerate Properly: Refrigerate the rice for up to 3 days. However, I recommend using it within 1-2 days for the best flavour and texture. The longer the rice sits, the more it can dry out, affecting its texture and flavor.
- Warm it Up: Before serving, gently warm up the rice in a microwave for a few seconds. This helps to revitalize it and make it more pliable for shaping. If the rice is too cold, it can be difficult to work with.
(Part 8) Mastering the Techniques: A Journey of Culinary Discovery
I know it might seem like a lot of steps, but I promise, once you get the hang of it, making sushi rice will become second nature. Think of it like learning to ride a bike. At first, it can be challenging, but once you get the hang of it, it becomes a breeze. The more you practice, the more confident and skilled you'll become.
Tips for Success: Unlocking the Secrets of Sushi Rice
Here are a few tips to help you master the art of cooking sushi rice, ensuring consistent success:
- Consistency is Key: Use the same brand and type of rice every time. This ensures consistent results. Switching brands can lead to variations in texture and flavor, so sticking with one brand is a good practice.
- Fresh is Best: Use fresh ingredients, especially the sushi rice vinegar. Fresh ingredients always yield better results, so make sure to use fresh vinegar, which will have a brighter, more vibrant flavor.
- Don't Over-Season: Start with a little vinegar and add more as needed. Remember, you can always add more, but you can't take it away! Over-seasoning can make the rice too tangy and salty, overpowering the other flavors.
- Practice, Practice, Practice: The best way to improve your sushi rice skills is to practice regularly. The more you practice, the more confident and skilled you'll become. It's like any other skill—the more you do it, the better you get at it.
(Part 9) FAQs: Your Sushi Rice Questions Answered
I know you might have a few questions about cooking sushi rice. Here are some common questions and their answers, addressing those burning questions you might have:
1. Can I use a rice cooker to cook sushi rice?
Yes, you can absolutely use a rice cooker to cook sushi rice! It's a convenient option, especially if you're short on time. Just make sure to use the "sushi rice" setting or the "manual" setting and adjust the water accordingly. However, I personally prefer the stovetop method as I find it gives me more control over the cooking process.
2. How long can I keep sushi rice in the fridge?
Sushi rice can be stored in the fridge for up to 3 days, but it's best to use it within 1-2 days for optimal flavour and texture.
3. What can I do with leftover sushi rice?
Leftover sushi rice is a versatile ingredient! You can use it to make rice balls (onigiri), rice bowls (donburi), or even add it to soups or stir-fries.
4. What happens if I over-season the rice?
Over-seasoning your sushi rice can make it overly tangy and salty, which can overpower the other flavours in your sushi. If you do over-season it, you can try adding more unseasoned rice to dilute the flavor.
5. Can I use white rice instead of sushi rice?
While white rice can be used in a pinch, it's not ideal for sushi as it lacks the necessary stickiness. If you don't have sushi rice, you can try adding a little bit of cooked sticky rice to your white rice to increase the stickiness. However, it won’t be quite the same as using real sushi rice.
Conclusion: Embark on Your Sushi Rice Journey
I hope this guide has equipped you with all the knowledge you need to create the most perfect sushi rice. Remember, it’s all about choosing the right ingredients, understanding the techniques, and experimenting to find your own perfect recipe. So, gather your ingredients, put on your favourite sushi playlist, and get ready to create some delicious sushi masterpieces! I can't wait to see what you create!
Everyone is watching

How to Cook Frozen Lobster Tails Perfectly: A Step-by-Step Guide
RecipesLobster. Just the word conjures up images of lavish meals, special occasions, and a taste of luxury. But let's...

Pigs in a Blanket Cooking Time: How Long to Bake for Perfect Results
RecipesAh, pigs in a blanket. Just the name conjures up images of those delightful little parcels of crispy pastry en...

Pork Fillet Cooking Time: How Long to Cook It Perfectly
RecipesPork fillet, or tenderloin as it's sometimes called, is a real favourite in our house. It's so versatile, and...

The Ultimate Guide to Cooking Delicious Frankfurters
RecipesLet's face it, we all love a good frankfurter. It's a classic, simple, and always satisfying. But let's be rea...

Wolf Meat Recipes: A Guide to Cooking Wild Game
RecipesLet's be honest, you don't see wolf meat at your local butcher shop every day. It's a bit of a wild card, but ...