(Part 1) Choosing the Right Pumpkin
The first step, of course, is picking the right pumpkin. Now, you might be tempted to grab the biggest, most orange pumpkin you can find, thinking "bigger is better," but trust me, that's not always the best approach. You want a pumpkin that's specifically bred for eating, not just for decoration.The Perfect Pie Pumpkin

Forget the giant pumpkins you see at the local fair, the ones that look like they could house a family of squirrels. Those are bred for size, not flavour. You want a smaller pumpkin, usually around 5-8 pounds, with a deep orange hue. It should feel substantial in your hand, not flimsy or lightweight. And here's a little secret - don't shy away from pumpkins with a little bit of green on them. That green bit doesn't affect the flavour at all. It's simply a sign that the pumpkin was harvested before all the green had completely turned orange.
How to Tell if a Pumpkin is Good
Here's how to tell if a pumpkin is ripe and ready for cooking:
- Give it a gentle tap. It should sound a bit hollow, like a ripe melon. If it sounds dull or thudding, it might not be ripe enough.
- Check the stem. It should be dry and firmly attached. A loose stem might indicate the pumpkin wasn't harvested at its peak. This could mean it's been sitting around for a while and might not be as flavorful.
- Feel the weight. A good pumpkin will feel heavy for its size. This indicates it's packed with moisture and flavor.
Pumpkin Varieties for Pie

While any pie pumpkin will do, some varieties stand out for their flavour and texture. These are a few of my personal favourites:
- Sugar Pie Pumpkin: This is a classic choice, known for its sweet flavour and smooth texture. It's also a good option if you're looking for a pumpkin with a vibrant orange colour that will look stunning in your pie.
- Pie Pumpkin: Another reliable choice, this pumpkin is often smaller than the sugar pie variety. However, it's still packed with flavour and holds its shape well in baking, ensuring you get those beautiful, thick slices of pie.
- butternut squash: Now, this isn't technically a pumpkin, but it's often used in pie recipes and delivers a rich, nutty flavour that pairs wonderfully with spices. It also boasts a vibrant orange color that will make your pie visually appealing.
(Part 2) Prepping the Pumpkin
Once you've got your perfect pumpkin home, it's time to get it ready for cooking. This might seem like a daunting task, but it's actually quite simple. Just follow these steps and you'll be well on your way to pumpkin pie heaven:Cutting the Pumpkin

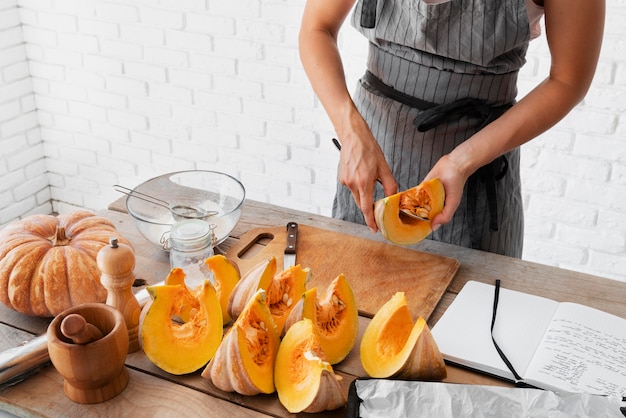
First, you'll need to cut the top off the pumpkin. You can use a chef's knife, but I prefer to use a serrated knife. It cuts through the tough skin with less effort and prevents any slipping or accidents. Make sure to cut around the stem, leaving a little bit of space for a good lid. Remember, you'll be using this lid to cover the pumpkin during roasting, so don't cut too close.
Scooping Out the Seeds and Pulp
Now, the fun part - scooping out the seeds and pulp. Use a sturdy spoon and get those seeds out. You can save those for roasting later for a tasty snack, or you can even plant them in the spring to grow your own pumpkins. I like to use a small handheld scoop to get all the stringy pulp out. This really helps ensure a smooth pumpkin puree. You can also use your fingers to get those last bits of stringy pulp out.
Roasting the Pumpkin
Alright, your pumpkin is ready to go! Preheat your oven to 350 degrees fahrenheit (175 degrees Celsius).
Getting Ready to Roast
Place your pumpkin cut-side down in a baking dish. Add a small amount of water to the dish. This will help to keep the pumpkin moist and prevent it from burning. You can also add a few tablespoons of butter or oil for even more flavor. This will also help to keep the pumpkin from sticking to the baking dish.
roasting time
Now, roast your pumpkin for about an hour, or until it's tender enough to easily pierce with a fork. If you have a larger pumpkin, it might take a little longer. The pumpkin should be soft and slightly mushy when it's done.
(Part 3) Creating Pumpkin Puree
After you've roasted your pumpkin, it's time to turn it into a smooth and delicious puree. This is the magic step where the pumpkin transforms into a key ingredient for your pie.Removing the Skin
Once your pumpkin is out of the oven, let it cool slightly. Then, carefully peel off the skin. The skin should come off easily once it's cooked, but be careful not to burn yourself. You can use your fingers or a small knife to help remove the skin if it's stubborn.
Making the Puree
Now, here's where you can use a few different methods:
Using a Food Processor
My go-to method is a food processor. Simply scoop the flesh into the food processor and pulse it until it's smooth. You can add a splash of water if needed to help the puree blend smoothly. I find that a few pulses is all it takes for a perfectly smooth texture.
Using a Blender
A blender also works well. Just be careful not to overfill it, as the pumpkin can get quite thick. Pulse it until smooth. You can also add a little bit of water or milk to help it blend more easily.
Using a Potato Masher
If you don't have a food processor or a blender, you can use a potato masher to mash the pumpkin into a puree. This method takes a bit more effort, but it still delivers a good result. You might find it helpful to warm the pumpkin flesh slightly before mashing, as this will make it easier to break down.
(Part 4) Storing Your Pumpkin Puree
You've got your pumpkin puree - now what? You can use it immediately in your pie recipe, or you can store it for later use.
Storing in the Fridge
For short-term storage, you can store your pumpkin puree in the fridge. Transfer it to an airtight container and it should keep for about 3-5 days. I like to use glass containers, as they don't retain any odors or flavors.
Freezing for Later Use
For longer storage, you can freeze your pumpkin puree. Again, use an airtight container. This will allow you to have pumpkin puree ready for use whenever you need it. You can freeze it for up to 3 months. Just be sure to label the container with the date, so you know how long it's been in the freezer.
(Part 5) Tips and Tricks for Cooking Pumpkin
Here are a few extra tips and tricks I've learned over the years, to help you achieve pumpkin pie perfection:
- Don't overcook the pumpkin. Overcooked pumpkin can become watery and lose its flavor. If you're unsure about the doneness, simply poke it with a fork. It should be tender but not mushy. You don't want it to fall apart when you scoop it out.
- Add a little bit of sugar. This will help to enhance the natural sweetness of the pumpkin. But don't go overboard. You want to taste the pumpkin, not just the sugar. I usually add a couple of tablespoons of sugar to my pumpkin puree, but you can adjust to your taste.
- Spice it up. Pumpkin pie is known for its warm spices, like cinnamon, nutmeg, and ginger. Don't be afraid to experiment with different spices to find your perfect blend. You can also add a touch of allspice, cardamom, or even a pinch of cloves for a deeper flavor.
- Use a pie crust you love. A good pie crust is essential for a delicious pumpkin pie. If you're not a big fan of making homemade crust, there are plenty of great store-bought options available. Just be sure to choose a crust that's sturdy enough to hold the pumpkin filling.
(Part 6) Pumpkin Pie Variations
Don't feel limited to the traditional pumpkin pie recipe. You can experiment with different flavours and textures to create unique and delicious variations:
Pumpkin Cheesecake
Combine the creaminess of cheesecake with the flavour of pumpkin. This is a rich and decadent dessert that's perfect for special occasions. It's also a great way to use up any leftover pumpkin puree.
pumpkin bread
Pumpkin bread is a classic autumnal treat. It's moist and flavorful and can be enjoyed for breakfast, brunch, or snacking. The addition of pumpkin adds a subtle sweetness and a beautiful, warm color to the bread.
Pumpkin Muffins
For a quick and easy pumpkin treat, try making pumpkin muffins. They're perfect for on-the-go snacking or a delicious breakfast. You can add nuts, chocolate chips, or even a streusel topping for extra flavor and texture.
(Part 7) Pumpkin Pie Recipes
Here's a simple and delicious pumpkin pie recipe that I love to make.
Classic Pumpkin Pie
Ingredients:
- 1 (15-ounce) can pumpkin puree (or 2 cups homemade puree)
- 1 (14-ounce) can sweetened condensed milk
- 2 large eggs
- 1 teaspoon ground cinnamon
- 1/2 teaspoon ground nutmeg
- 1/4 teaspoon ground ginger
- 1/4 teaspoon ground cloves
- 1 (9-inch) pie crust
Instructions:
- Preheat oven to 350 degrees Fahrenheit (175 degrees Celsius).
- In a large bowl, whisk together pumpkin puree, sweetened condensed milk, eggs, cinnamon, nutmeg, ginger, and cloves until smooth. You want to make sure all the ingredients are well combined for a uniform flavor and texture.
- Pour filling into the pie crust and bake for 50-60 minutes, or until the filling is set. You can test the doneness by gently shaking the pie. If the center is still jiggly, it needs more time in the oven.
- Let cool completely before serving. This allows the filling to set properly and prevents the pie from collapsing.
(Part 8) FAQs
Here are some frequently asked questions about cooking pumpkin for pie.
Q1: Can I use canned pumpkin instead of fresh?
Absolutely! Canned pumpkin puree is a convenient and readily available option. Just make sure you're using a canned pumpkin that's specifically labeled "pumpkin puree" and not "pumpkin pie filling". The pie filling already contains added sugar and spices, which may alter the taste of your pie.
Q2: How long does it take to cook a pumpkin?
The roasting time for a pumpkin depends on its size. A smaller pumpkin (around 5-8 pounds) will usually take about an hour to cook. Larger pumpkins might take a little longer. You can check the doneness by piercing the pumpkin with a fork. It should be tender and easily pierced.
Q3: What can I do with leftover pumpkin puree?
Pumpkin puree is a versatile ingredient that can be used in a variety of recipes. Besides pie, you can use it to make pumpkin bread, muffins, cookies, and even soups. It can also be added to smoothies or yogurt for a boost of flavor and nutrients.
Q4: What are the best spices to use in pumpkin pie?
Traditional spices for pumpkin pie include cinnamon, nutmeg, ginger, and cloves. You can also add other spices, like allspice, cardamom, or even a touch of cayenne pepper for a spicy kick. Experimenting with different spice combinations can create unique and delicious flavor profiles.
Q5: How do I know if my pumpkin pie is done?
The filling should be set and no longer jiggly when you gently shake the pie. The edges of the pie should also be lightly browned. If the center is still jiggly, it needs more time in the oven.
Now that you've got all this information, you're ready to create the most amazing pumpkin pie this autumn! So go forth and cook, and enjoy the delicious rewards of your pumpkin-baking journey.
Everyone is watching

How to Cook Frozen Lobster Tails Perfectly: A Step-by-Step Guide
RecipesLobster. Just the word conjures up images of lavish meals, special occasions, and a taste of luxury. But let's...

Pigs in a Blanket Cooking Time: How Long to Bake for Perfect Results
RecipesAh, pigs in a blanket. Just the name conjures up images of those delightful little parcels of crispy pastry en...

Pork Fillet Cooking Time: How Long to Cook It Perfectly
RecipesPork fillet, or tenderloin as it's sometimes called, is a real favourite in our house. It's so versatile, and...

The Ultimate Guide to Cooking Delicious Frankfurters
RecipesLet's face it, we all love a good frankfurter. It's a classic, simple, and always satisfying. But let's be rea...

Wolf Meat Recipes: A Guide to Cooking Wild Game
RecipesLet's be honest, you don't see wolf meat at your local butcher shop every day. It's a bit of a wild card, but ...
