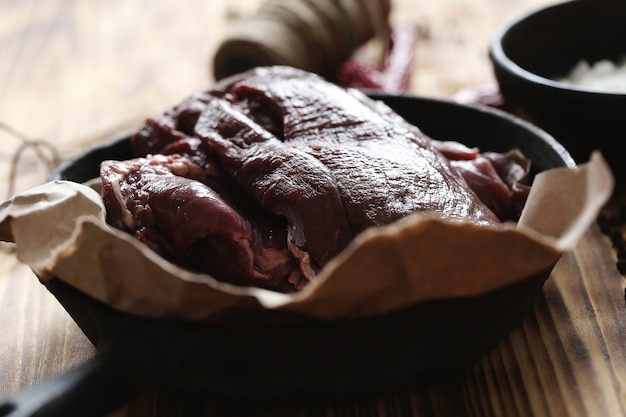
(Part 1) Choosing the Right Brisket: Your Foundation for Flavor
1. The Flat: Lean and Mean
This is the leaner cut, often the go-to for brisket beginners. It's a bit less forgiving than the point, as it can be prone to drying out if you're not careful. Think of it as a lean athlete – it's got muscle, but it needs some TLC to stay hydrated.2. The Point: Rich and Juicy
This cut has more marbling, which makes it super juicy and flavorful. It's also got a lovely layer of fat on top, which renders down during cooking and adds even more richness. The downside? It can be a bit chewy. Think of it as a well-seasoned athlete – it's got the stamina and flavor, but may need a bit more time to get tender.For my first brisket, I went for a flat. I thought it would be easier to manage. But you know what? Now I'm a bit of a point fan. It's just so much more flavorful!
(Part 2) Trimming the Brisket: A Little Prep Goes a Long Way
1. The Fat Cap: A Matter of Balance
The fat cap is the layer of fat on top of the brisket. You want to trim it down to about 1/4 inch. This layer will render down and keep the brisket juicy, but too much fat can make it greasy. Think of it like a good sauce – you want enough to add flavor, but not so much that it drowns everything out.2. The Silver Skin: A Tough Customer
The silver skin is a tough, white membrane on the underside of the brisket. You need to remove it, or it'll make your brisket tough and chewy. The easiest way to do this is to use a sharp knife to score the skin, then peel it off. It's like peeling away a stubborn protective layer to reveal the tender meat underneath.You can use the trimmed fat for other things, like making delicious beef tallow for frying. Or, chuck it in a pan with some onions and carrots for a tasty base for a gravy. Don't waste it!
(Part 3) Seasoning the Brisket: A Symphony of Flavor
1. The dry rub: A Classic Approach
This is the most common way to season a brisket. Simply mix your spices together and rub them all over the brisket. Be sure to get them right into the nooks and crannies. Think of it like giving the brisket a nice massage with flavor.2. The Wet Rub: Adding Moisture and Intensity
A wet rub is made with a combination of spices and liquids, like oil or vinegar. This gives the brisket a more intense flavor and can help it retain moisture. It's like giving the brisket a soothing spa treatment with a touch of extra flavor.3. The Injecting Technique: A Deep Dive into Flavor
This is a bit more advanced, but it's definitely worth a try if you're looking for maximum flavor. You use a syringe to inject a marinade directly into the brisket. This can help to tenderize the meat and make it extra juicy. Think of it like giving the brisket a little IV drip of deliciousness.Personally, I find a good dry rub does the trick. I don't like to overcomplicate things. But hey, if you're feeling adventurous, go for the injection!
(Part 4) Smoking the Brisket: The Slow and Steady Transformation
Okay, this is where the real magic happens. Smoking a brisket is a slow and steady process, and it takes a bit of patience. But trust me, it's worth it. It's like a slow-cooked masterpiece, where the flavors meld and deepen over time.1. Setting Up Your Smoker: The Foundation of Flavor
First things first, you need to get your smoker set up. I use a charcoal smoker, but you can also use a gas smoker or an electric smoker. Whichever you choose, make sure it's clean and preheated to the right temperature. Think of it as setting the stage for a culinary performance.2. The Smoking Process: A Dance with Smoke and Time
Once your smoker is ready, place the brisket on the grate and close the lid. You're going to want to smoke the brisket at a low temperature, around 225-250 degrees Fahrenheit. The exact cook time will depend on the size of your brisket, but you're looking at around 10-12 hours. It's a slow dance between smoke, heat, and time.3. The Stall: A Natural Pause in the Process
Don't be surprised if you hit a plateau in the cooking process. This is called the stall, and it's perfectly normal. The brisket will stop rising in temperature because it's releasing moisture. Don't panic! Just let it do its thing, and eventually, it'll start cooking again. Think of it as a natural pause for the brisket to take a breath and gather its strength.Keep an eye on the smoker and add more wood chips as needed. You want to maintain a steady temperature throughout the cooking process.
(Part 5) Wrapping the Brisket: The Secret to Tenderness
After a few hours of smoking, your brisket will be looking pretty good. But it's not done yet! The final step is to wrap the brisket in foil or butcher paper. This helps to trap the moisture and tenderize the meat. Think of it as giving the brisket a warm embrace to help it reach its full potential.1. Foil vs. Butcher Paper: Two Approaches, Two Results
Both foil and butcher paper work well, but they have different effects on the brisket. Foil will create a steamy environment, which can make the brisket more tender. Butcher paper will allow some moisture to escape, which can give the brisket a more bark-like texture. It's like choosing between a steamy sauna and a more open, airy environment.2. The Wrap: Creating a Cozy Atmosphere for Flavor
Once you've chosen your wrapping method, wrap the brisket tightly and put it back in the smoker. Continue cooking until the brisket reaches an internal temperature of 200-205 degrees Fahrenheit. This is a crucial step. It's what transforms a good brisket into an amazing one. Think of it like the final act in a play, where all the elements come together to create a truly satisfying ending.(Part 6) Resting the Brisket: Allowing the Flavors to Settle
Okay, your brisket is cooked! But hold on, don't slice into it just yet. Let it rest for at least 30 minutes, wrapped in foil. This allows the juices to redistribute throughout the meat, making it super juicy and tender. Think of it like letting the actors take a bow after the curtain call – a moment for the flavors to settle and shine.While you're waiting, get your sides ready. I like to serve my brisket with coleslaw, mac and cheese, and cornbread. It's a classic combination for a reason!
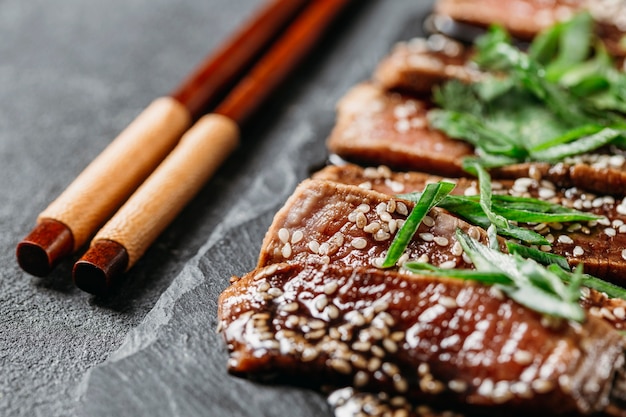
(Part 7) Slicing the Brisket: Unlocking the Tenderness
After the resting period, it's time to slice the brisket. You want to slice it against the grain, which means cutting across the muscle fibers. This will help to make the meat more tender and easier to chew. Think of it like carefully slicing through a beautifully woven tapestry – you want to respect the structure while revealing the beauty within.Start by slicing the brisket into about 1/4 inch thick slices. You can also pull the brisket apart if you prefer. It's a personal preference!
(Part 8) Serving the Brisket: A Feast for the Senses
The moment of truth is here! Serve the brisket with your favourite sides, and enjoy the fruits of your labour. It's a real crowd-pleaser, and it's sure to impress your guests.I like to serve my brisket on a platter with a side of gravy. And don't forget the napkins! It's gonna get messy!
(Part 9) Troubleshooting: Addressing Common Brisket Challenges
Okay, so you've followed all the steps, but your brisket isn't quite turning out like you hoped. Don't despair! Even the best pitmasters have had their fair share of brisket disasters. Here are a few common problems and how to fix them:1. Dry Brisket: A Matter of Hydration
If your brisket is dry, it means it's lost too much moisture during the cooking process. This can be caused by overcooking or by not wrapping the brisket properly.To avoid this, make sure you cook the brisket slowly and wrap it tightly in foil or butcher paper.
2. Tough Brisket: A Question of Time and Temperature
A tough brisket is usually a sign that it wasn't cooked long enough or at a low enough temperature.To fix this, you can try cooking the brisket for a longer time at a lower temperature. You can also use a meat thermometer to make sure the brisket reaches an internal temperature of 200-205 degrees Fahrenheit.
3. Uneven Cooking: Ensuring Consistent Heat
If your brisket is unevenly cooked, it means that some parts are overcooked and others are undercooked. This can be caused by a smoker that's not holding a steady temperature or by a brisket that's not evenly thick.To avoid this, make sure your smoker is calibrated and that you place the brisket on the grate so that it's evenly distributed.
(Part 10) FAQs: Your Brisket Questions Answered
Here are some common questions about brisket cook times:1. How long does it take to smoke a brisket?
The cook time for a brisket varies depending on the size of the brisket and the temperature of the smoker. But generally, you can expect to smoke a brisket for 10-12 hours.2. What temperature should I smoke a brisket at?
The ideal smoking temperature for a brisket is between 225-250 degrees Fahrenheit.3. How do I know when my brisket is done?
You can tell if your brisket is done by using a meat thermometer to check the internal temperature. The brisket should reach an internal temperature of 200-205 degrees Fahrenheit.4. What happens if I overcook my brisket?
If you overcook your brisket, it will become dry and tough.5. What happens if I undercook my brisket?
If you undercook your brisket, it will be raw and unsafe to eat.So, there you have it! My guide to the perfect brisket cook time. I hope this has been helpful. Now, go forth and conquer the world of brisket!
(Part 11) A Final Word: Embrace the Journey
Remember, cooking a brisket is a journey, not a race. Don't be afraid to experiment and find what works best for you. And don't be discouraged if your first attempt isn't perfect. With practice, you'll be a brisket master in no time! Good luck!Now, if you'll excuse me, I'm off to make myself a delicious sandwich with all the leftovers. I can't resist a good brisket sandwich!
Everyone is watching

How to Cook Frozen Lobster Tails Perfectly: A Step-by-Step Guide
RecipesLobster. Just the word conjures up images of lavish meals, special occasions, and a taste of luxury. But let's...

Pigs in a Blanket Cooking Time: How Long to Bake for Perfect Results
RecipesAh, pigs in a blanket. Just the name conjures up images of those delightful little parcels of crispy pastry en...

Pork Fillet Cooking Time: How Long to Cook It Perfectly
RecipesPork fillet, or tenderloin as it's sometimes called, is a real favourite in our house. It's so versatile, and...

The Ultimate Guide to Cooking Delicious Frankfurters
RecipesLet's face it, we all love a good frankfurter. It's a classic, simple, and always satisfying. But let's be rea...

The Ultimate Guide to Tender, Juicy Pulled Pork
RecipesRight, let's talk pulled pork. It's one of those dishes that just screams "comfort food," doesn't it? I mean...