(Part 1) The burger patty: It's All About the Meat
First things first, we need to talk about the heart and soul of any good burger – the patty. Now, I'm a firm believer in using good quality beef for the best flavour. Go for a mix of 80% lean and 20% fat for a juicy and flavourful burger.
Choosing Your Beef: The Foundation of Flavor
When choosing your beef, it's important to look for a good blend of lean and fat. Too much fat can make the patty greasy, while too little can result in a dry and tough burger. I prefer a blend of 80% lean and 20% fat. This gives you a juicy and flavourful burger with a good balance of fat marbling.
Think about it like this: fat is flavour. It adds richness and juiciness to the burger. But, you don't want it to be too fatty, or it will just be greasy and not very enjoyable.
For a pan-fried burger, I tend to use ground chuck, which is a good all-purpose beef. You can also use ground sirloin or a blend of different cuts, but I find chuck to be the most reliable for a juicy and flavorful patty.
The Patty Shape: Finding the Right Thickness
Now, the shape is important too. A nice, thick patty is always a winner. You want to go for a patty that's about ?? to 1 inch thick. This allows for a good sear on the outside and a juicy centre.
Think of it like this: a thicker patty gives you more surface area to get a nice sear, and it also helps to keep the burger juicy because the heat can penetrate more evenly.
Don't be afraid to go with a thicker patty, it’s all about preference. But remember, too thin and your burger will be dry and overcooked in a flash.
Seasoning Your Patty: Keep it Simple
Don't overcomplicate things when it comes to seasoning. Keep it simple. Salt and pepper are your best friends. Season the patties generously with salt and pepper before cooking. You can add other spices, but start with salt and pepper and build from there.
Adding a pinch of garlic powder or onion powder can also add a nice depth of flavor. But again, don't overdo it. The main thing is to let the flavor of the beef shine through.
Don't Press the Patty: Let the Juices Flow
This is a cardinal sin, my friend. Resist the urge to press down on the patty during cooking. This will only squeeze out the juices and leave you with a dry burger.
I know it can be tempting to press down on the patty to help it cook faster, but trust me, it's not worth it. Just let the burger cook undisturbed, and it will come out perfectly juicy and delicious.
(Part 2) Prepping the Patty: The Art of Shaping
Getting Your Hands Dirty:
You’re going to have to get your hands dirty for this part, so roll up your sleeves and get ready. Now, the trick is to handle the meat as little as possible, because you don't want to overwork it. Instead of squashing the meat down with your palm, you want to gently coax it into a patty using your fingertips.
The Perfect Form:
Start by forming a ball of meat in your hand. You want a ball that's about the size of a tennis ball. Now, gently flatten the ball into a patty, ensuring it's about ?? to 1 inch thick. You don’t want it too thin.
A Little Dip:
Once you've shaped your patty, you want to create a slight well or indentation in the centre. This will help the patty cook evenly and prevent it from puffing up too much.
Creating a Well:
A simple way to create this well is by using your thumb, gently pushing into the centre of the patty. This will help to distribute the heat evenly and prevent the centre from becoming too raw.
Rest Time:
Remember, you're going to want to let your patties chill out in the fridge for at least 30 minutes before cooking. This will help them to stay in shape and prevent them from shrinking too much during cooking. You’re going to thank me later.
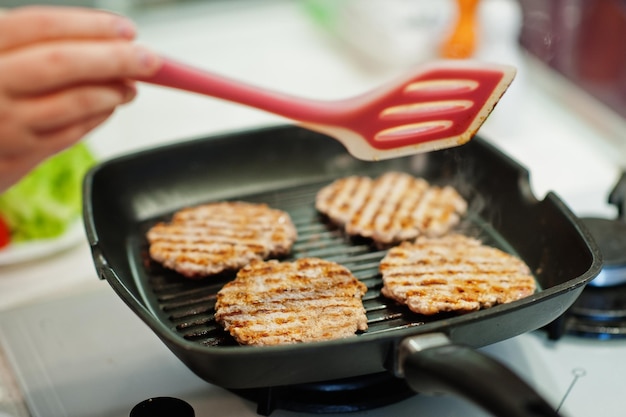
(Part 3) The Cooking Process: Pan-Fried Perfection
Heat It Up!
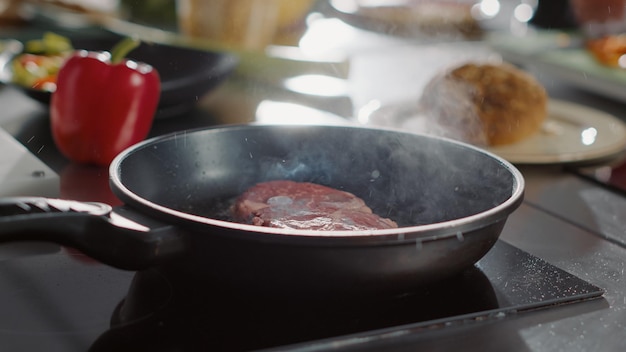
You're going to want to start with a hot pan. Heat a heavy-bottomed skillet or cast iron pan over medium-high heat. I always use a cast iron pan because it distributes heat really well.
Oil, Oil, Oil!
You don't want to skimp on the oil. Add about a tablespoon or two of oil to the pan. You want enough oil to coat the bottom of the pan and prevent the patties from sticking.
The Magic Touch:
Now, here's where things get a bit tricky. You’re going to want to make sure your pan is hot enough before you add the patties. You’ll know it’s ready when a drop of water sizzles and evaporates almost instantly.
You want the pan to be hot enough to create a nice sear on the outside of the patty without overcooking the inside.
The Sear:
Once the pan is hot, carefully place the patties in the pan. Let them cook for about 3-4 minutes per side, or until nicely browned and seared. Don’t touch them! This is where you get that beautiful golden brown crust.
The sear is what gives the burger its flavor and texture. You want to make sure that the patty is nice and crispy on the outside, but still juicy on the inside.
The Flip:
Once the patties have cooked on one side, flip them over and cook for another 3-4 minutes, or until they're cooked through to your desired doneness. I like to use a meat thermometer to ensure that the patties have reached an internal temperature of 160°F (71°C). You can use a thermometer or simply press down gently on the centre of the patty.
Rest Time:
You’re going to want to take those patties out of the pan and let them rest for a few minutes. This will allow the juices to redistribute and create a more tender and juicy burger.
(Part 4) The Doneness: Finding Your Perfect Level
The Raw Side:
Let's be honest, we all know that raw beef isn't exactly recommended. So, you’re going to want to cook your burger patty to a safe internal temperature.
Medium Rare:
If you like your burger on the rarer side, it will have a bright pink centre and will be firm to the touch.
Medium:
A medium burger will have a pink centre with a little brown around the edges. It will be slightly springy to the touch.
Medium Well:
A medium-well burger will have a little pink in the centre and will be firm to the touch.
Well Done:
Now, a well-done burger will be completely brown throughout and will be firm to the touch. This is the safest option, but it's also the least juicy.
How To Tell:
If you're unsure how to tell if your burger is cooked to your desired doneness, you can use a meat thermometer. You can also gently press down on the centre of the patty.
If it feels firm and springy, it’s medium. If it feels firm and squishy, it’s well-done.
(Part 5) The Toppings: A Symphony of Flavours
Ok, we're getting to the good part - the toppings! This is where you can really let your creativity shine.
Classic Combinations:
A classic burger is all about simplicity and balance. You can't go wrong with a few slices of crisp lettuce, juicy tomato, thinly sliced red onion, a few pickles, and a dollop of mayonnaise. This combination is a winner for a reason.
It's fresh, tangy, and a little bit crunchy, all the perfect compliments to a juicy burger.
Cheese Delight:
A good burger is never complete without a slice of cheese. There are so many options out there. I’m a sucker for cheddar or a classic American cheese. But you can try brie, mozzarella, or even blue cheese if you like things a little adventurous.
Cheese adds a creamy and salty flavour to the burger. It also helps to hold the burger together and prevent it from falling apart.
Going Gourmet:
If you want to take your burger to the next level, try adding some gourmet toppings. Bacon, sautéed mushrooms, caramelised onions, roasted peppers, avocado, and a fried egg can elevate your burger to new heights.
These toppings add a bit more complexity and flavour to the burger. They can also add texture and visual appeal.
The Sauce Factor:
Don’t forget the sauce. Ketchup, mustard, and mayonnaise are the basics, but you can get creative with hot sauce, bbq sauce, or even a creamy garlic sauce.
Sauce adds another layer of flavor and moisture to the burger. It can also help to balance out the other flavors of the toppings.
The Bun:
You can’t forget about the bun! I like a sesame seed bun, but you can go for a brioche bun, a pretzel bun, or even a whole-wheat bun.
The bun should be soft and fluffy, but firm enough to hold the burger together. You want a bun that will absorb some of the juices from the patty, but won’t become soggy.
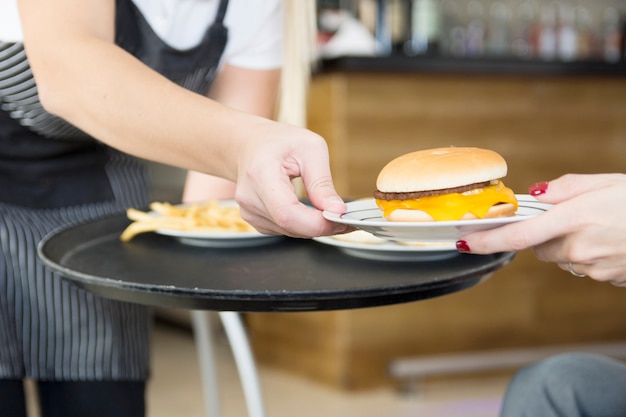
(Part 6) Burger Assembly: Building Your Masterpiece
Now that we've got our patties cooked and our toppings ready, it’s time to assemble our masterpiece.
The Bun:
Start by toasting your bun. You’re going to want to get it nice and crispy. You can toast it in a pan, under the grill, or in the oven.
Toasting the bun adds a nice bit of crunch and flavour. It also helps to prevent the bun from becoming soggy from the juices of the burger.
The Base:
Now, place your patty on the bottom bun. You can add your cheese now, if you like.
If you're adding cheese, now is the time to do it. The heat from the patty will melt the cheese and create a delicious and gooey topping.
The Layers:
It's time for the toppings! Start with your lettuce, followed by your tomato, onion, pickles, and anything else you like.
The order of your toppings is really up to you. But I find that starting with the lettuce helps to absorb some of the juices from the patty, and the tomato and onion add a nice bit of freshness and tang.
The Finale:
Top it all off with a generous dollop of your favourite sauce, and don’t forget the top bun.
A Bite of Perfection:
Now, you’re ready to take a bite. It should be juicy, flavourful, and satisfying.
(Part 7) The side dishes: Complimenting Your Creation
A good burger is never complete without the right side dishes. You want to choose dishes that will complement the burger without overpowering it.
Classic Choices:
You can't go wrong with classic side dishes like french fries, onion rings, or potato salad. They're simple, delicious, and they go perfectly with a juicy burger.
These classic side dishes offer a nice balance of salty, crunchy, and creamy textures.
Healthy Alternatives:
If you're looking for something a little healthier, you can try a side salad, grilled vegetables, or a baked potato.
These healthy alternatives are a great way to add some extra nutrients and fibre to your meal.
Something Sweet:
And, don’t forget to round it all off with a little something sweet. Try a slice of fruit, a scoop of ice cream, or a piece of cake.
A little bit of sweetness is a nice way to finish off your burger meal. It helps to cleanse the palate and prevent you from feeling overly full.
(Part 8) FAQs: Frequently Asked Questions
Here are some common questions people ask about pan-fried hamburgers:
1. What if my patty sticks to the pan?
If your patty sticks to the pan, don't panic! It happens to the best of us. It just means that your pan wasn’t hot enough. You’re going to want to try letting the pan heat up for a couple more minutes before you add the patty.
Make sure your pan is nice and hot before you add the patties. This will help to prevent them from sticking. You can also try using a little bit more oil.
2. How can I tell if my patty is cooked through?
The best way to tell if your patty is cooked through is to use a meat thermometer. You're going to want to stick it into the thickest part of the patty and make sure it reaches an internal temperature of 160°F (71°C). You can also use your finger to press on the centre of the patty.
If it feels firm and springy, it’s medium. If it feels firm and squishy, it’s well-done.
3. What should I do with the leftover burgers?
If you have leftover burgers, don't throw them away! You can make delicious burger sliders, or even use them to make a burger salad.
Leftover burgers are great for lunch or dinner the next day. You can also freeze them for later.
4. What are the best ways to store cooked burgers?
Store leftover cooked burgers in the fridge for up to 3 days. You can also freeze cooked burgers for up to 3 months.
To freeze cooked burgers, wrap them tightly in plastic wrap and then place them in a freezer-safe bag.
5. What is the best way to reheat a burger?
The best way to reheat a burger is in a skillet over medium heat. You can also reheat it in the oven or the microwave.
When reheating a burger, make sure to heat it through until it is steaming hot.
(Part 9) The Final Word: A Burger for Every Occasion
Let me tell you, there is nothing more satisfying than a perfectly cooked, juicy burger. It’s a meal that can be enjoyed by everyone, from kids to adults.
So go out there and get your grill on!
Whether you're having a casual family dinner or entertaining friends, a burger is always a crowd-pleaser. With the right ingredients, techniques, and toppings, you can make a burger that’s truly unforgettable. I hope you enjoy it.
(Part 10) A Visual Guide to burger doneness
Here is a table that shows you what to look for when determining burger doneness:
| Doneness | Internal Temperature (°F) | Internal Temperature (°C) | Description |
|---|---|---|---|
| Rare | 125-130 | 52-54 | Very red centre, soft and cool to the touch. |
| Medium Rare | 130-135 | 54-57 | Bright pink centre, firm to the touch. |
| Medium | 135-140 | 57-60 | Pink centre with a little brown around the edges, slightly springy to the touch. |
| Medium Well | 140-150 | 60-65 | A little pink in the centre, firm to the touch. |
| Well Done | 150-160 | 65-71 | Completely brown throughout, firm to the touch. |
Everyone is watching

How to Cook Frozen Lobster Tails Perfectly: A Step-by-Step Guide
RecipesLobster. Just the word conjures up images of lavish meals, special occasions, and a taste of luxury. But let's...

Pigs in a Blanket Cooking Time: How Long to Bake for Perfect Results
RecipesAh, pigs in a blanket. Just the name conjures up images of those delightful little parcels of crispy pastry en...

Pork Fillet Cooking Time: How Long to Cook It Perfectly
RecipesPork fillet, or tenderloin as it's sometimes called, is a real favourite in our house. It's so versatile, and...

The Ultimate Guide to Cooking Delicious Frankfurters
RecipesLet's face it, we all love a good frankfurter. It's a classic, simple, and always satisfying. But let's be rea...

Wolf Meat Recipes: A Guide to Cooking Wild Game
RecipesLet's be honest, you don't see wolf meat at your local butcher shop every day. It's a bit of a wild card, but ...