As a seasoned grill master, I've spent countless hours perfecting my grilling techniques. But there's one thing that always gets me excited: grilling a strip steak. That beautiful, marbled cut of meat, sizzling on the grill, fills the air with the most incredible aroma. It's a true culinary experience that never fails to impress. But getting it just right – that perfect balance of sear and tenderness – is a skill that takes practice.
So, today, I want to share my secrets to achieving perfect grill time for strip steak. This comprehensive guide will take you through every step, from selecting the right cut to achieving that coveted medium-rare finish. It's more than just grilling – it's an exploration of flavour, technique, and the satisfaction of crafting a truly delicious meal.
(Part 1) The Perfect Cut: Choosing Your Strip Steak
Let's face it, you can't expect to grill a perfect steak if you haven't started with a good one. A good steak is like a good foundation for a house – if you don’t have it, the whole thing can crumble. So, how do you pick the right cut for your grilling adventure?
What Makes a Great Strip Steak?
A great strip steak, or new york strip, as it's often called, boasts several key characteristics:
- Marbling: That beautiful, white flecking of fat running through the meat. This is what gives the steak its incredible flavour and tenderness. Look for good marbling, a sign that the steak is well-fed and ready for a delicious grilling session. The more marbling, the more flavorful and juicy your steak will be. Think of it like a delicious marbled cake - the more marbling, the richer the taste.
- Thickness: You want a steak that’s at least 1 inch thick. This allows you to achieve that perfect sear on the outside while keeping the inside juicy and tender. Imagine it like a thick, juicy burger – the more meat, the better the experience! A thicker steak will also cook more evenly, ensuring that you don't end up with a dry, overcooked exterior and a raw center.
- Colour: Ideally, you want a steak that’s a vibrant red colour. This suggests the meat is fresh and hasn't been sitting around for too long. A bright red hue indicates that the steak is fresh and ready to be cooked. Of course, you should always check for a "sell-by" date just to be sure.
Where to Buy
You can find great strip steaks at your local butcher shop, where you’ll often find a better selection and can ask for advice on the best cut for your needs. A good butcher will be able to guide you towards the perfect cut for your taste and the specific occasion. If you prefer the convenience of a supermarket, look for a reputable brand with a good track record for quality. And remember, don’t be afraid to ask questions. The butcher or supermarket staff are there to help you find the perfect steak.
(Part 2) Preparation: Getting Your Steak Ready for the Grill
Now that you have your perfect strip steak, it’s time to get it ready for its starring role on the grill. This step might seem simple, but it can make a huge difference in the final outcome. Just like a good actor needs time to prepare for their role, so does your steak.
Bring It to Room Temperature
One of the biggest mistakes people make is putting a cold steak straight onto the grill. This can lead to uneven cooking and a tough, chewy texture. Imagine trying to cook a frozen pizza – it wouldn't be a pleasant experience! Instead, take your steak out of the fridge 30-45 minutes before grilling. This allows the steak to come to room temperature, which helps it cook more evenly. It's like letting the steak relax and get comfortable before its big grilling debut.
Seasoning is Key
It’s time to give your steak the love it deserves! Salt and pepper are the staples of a good steak seasoning, but feel free to get creative. I love using a blend of garlic powder, onion powder, paprika, and a pinch of cayenne for a kick.
Here’s a tip: season your steak generously on both sides, but do it right before you put it on the grill. Salting too early can draw out moisture, making your steak drier. It's like adding spices to a cake batter – you want to add them right before you bake it to ensure that the flavors are fully infused.
Don’t Forget the Oil
For the best sear, lightly brush your steak with olive oil or a neutral oil like grapeseed oil. This helps to prevent sticking and ensures a beautiful, golden-brown crust. Imagine a beautiful, crisp pizza crust – that's what you're aiming for with your steak! A little oil goes a long way – you just want to create a thin layer to help the seasoning stick.
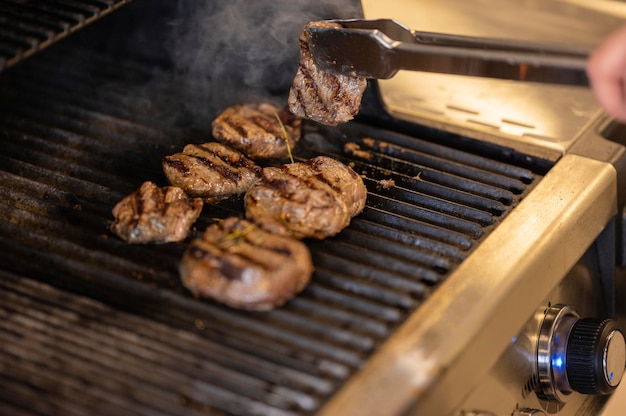
(Part 3) Grilling Techniques: Mastering the Art of Heat

Now comes the exciting part – grilling your steak! This is where you have to make some decisions about heat and cooking time. Just like a good chef knows how to control the flames, so do you.
High Heat: For that Perfect Sear
For the most delicious sear, you want your grill nice and hot. Aim for around 450-500°F. This is where you get that beautiful char on the outside while keeping the inside juicy and tender. You’ll be able to tell your grill is hot enough when you hold your hand a few inches above the grates – if you can only hold it for a second or two, you're ready to grill!
Direct vs. Indirect Heat: Choosing Your Method
There are two main approaches you can take: direct heat and indirect heat. Both have their benefits:
Direct Heat
This involves grilling your steak directly over the hottest part of the grill, leading to a quicker cooking time. It’s perfect for achieving that beautiful sear and char. Imagine a hot pan, ready to cook your steak quickly and evenly. It's like a flash of intense heat, perfect for a steak that wants to be cooked quickly and evenly.
Indirect Heat
This method involves grilling your steak over a cooler part of the grill, usually with the lid closed. This allows for a slower, more even cooking. It's great for thicker steaks or if you want to achieve a more consistent doneness throughout. It's like a gentle, warm embrace for your steak, allowing it to cook slowly and evenly.
(Part 4) Cooking Time: The Magic Number for Doneness
Now comes the crucial part – figuring out how long to cook your steak. This is where things get a little tricky. Every grill is different, and every steak has its own personality. It's like figuring out the perfect recipe for a cake – you need to adjust the ingredients based on the oven and the specific type of cake you’re making.
Using a meat thermometer
The most accurate way to determine doneness is with a meat thermometer. It’s a little like having a secret ingredient – it takes the guesswork out of cooking.
Insert the thermometer into the thickest part of the steak, making sure it doesn’t touch bone. The ideal internal temperatures for different levels of doneness are:
| Doneness | Internal Temperature (°F) |
|---|---|
| Rare | 125-130°F |
| Medium-Rare | 130-135°F |
| Medium | 140-145°F |
| Medium-Well | 150-155°F |
| Well-Done | 160°F and above |
Timing is Everything
If you don’t have a meat thermometer, you can estimate the cooking time based on the thickness of your steak. But this is just a guideline, and it’s always best to check the steak with a thermometer if you want to be sure. It's like having a recipe – it provides a good starting point, but you always need to adjust it based on your ingredients and equipment.
Here are some general guidelines:
- 1-inch thick steak: 3-4 minutes per side for medium-rare
- 1.5-inch thick steak: 4-5 minutes per side for medium-rare
- 2-inch thick steak: 5-6 minutes per side for medium-rare
Remember, these are just general guidelines, and the actual cooking time will vary depending on the heat of your grill and the thickness of your steak. It's a bit like baking a cake – you need to keep an eye on it to make sure it doesn't burn.
(Part 5) Resting: Letting Your Steak Relax and Recover
After taking your steak off the grill, it’s time to give it a moment to breathe – a rest, if you will. It’s like giving an athlete a cool-down after a vigorous workout.
Why Resting is Important
Resting allows the juices to redistribute throughout the steak, resulting in a more tender and juicy piece of meat. It's like a little spa treatment for your steak, giving it time to recover from the intense heat of the grill. The juices that have been pushed to the surface during cooking have a chance to settle back into the meat, ensuring a moist and flavorful steak.
How Long to Rest
You should rest your steak for at least 5-10 minutes before slicing and serving. You can cover it loosely with foil to keep it warm while it rests. It's like letting a hot dish cool down before serving – it gives the flavors time to settle and ensures a more enjoyable eating experience.
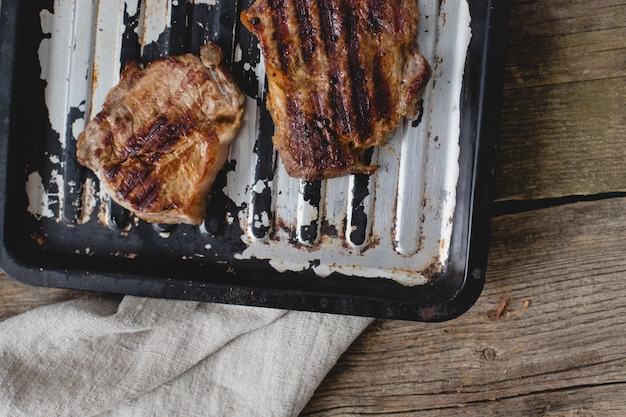
(Part 6) Slicing and Serving: The Grand Finale
Your steak is now ready for its final act. It’s time to slice and serve this masterpiece!
Slicing Techniques
The best way to slice a steak is to cut it against the grain. This means cutting across the muscle fibers, which results in a more tender and easier-to-chew steak. Imagine cutting a piece of fabric – you want to cut across the threads to make it more manageable.
You can use a sharp chef’s knife or a carving knife for this. If you’re using a chef’s knife, hold it at a 45-degree angle and slice with smooth, even strokes.
Serving Suggestions
Serve your perfectly grilled strip steak with your favourite sides. I love it with creamy mashed potatoes, roasted asparagus, or a simple salad with a tangy vinaigrette. And don't forget a dollop of butter or a drizzle of your favourite sauce! You can even add a touch of your favourite herbs or spices to enhance the flavor profile of your steak. It's like creating a symphony of flavors – each element plays a crucial role in creating a harmonious and satisfying experience.
(Part 7) Beyond the Basics: Enhancing Your Grill Game
Now that you’ve mastered the fundamentals of grilling a strip steak, let’s explore some techniques that can elevate your grilling game even further.
reverse searing: A Gentle Approach
For a more evenly cooked steak, try reverse searing. This involves cooking the steak at a low temperature for a longer period, followed by a quick sear over high heat. It's like starting a fire with small twigs and then adding larger logs – a gradual approach that ensures even cooking. The steak is cooked slowly and gently, ensuring that the internal temperature is consistent throughout, while the final sear provides a beautiful crust.
Grill Marks: Adding Visual Appeal
Those beautiful grill marks are more than just aesthetics; they’re a sign of a well-cooked steak. To get those crisp, distinct marks, use a grill that has wide, even grates. And be sure to rotate your steak 90 degrees halfway through cooking to create a cross-hatch pattern. It's like creating a masterpiece on your grill – a testament to your skills and artistry.
Smoking: Adding a Smoky Flavor
For a deeper, more complex flavour, try smoking your steak. You can use wood chips or a smoker box to infuse the steak with your favourite smoky flavour. It's like adding a little mystery and depth to your culinary masterpiece. The smoke adds a unique dimension of flavor, creating a truly memorable experience.
(Part 8) FAQs: Your Grill Master Questions Answered
Here are some of the most frequently asked questions about grilling strip steak:
1. How do I know when my steak is done?
The best way to determine doneness is with a meat thermometer. Insert it into the thickest part of the steak, making sure it doesn’t touch bone. The ideal internal temperatures for different levels of doneness are listed in the table above. It's like having a guidebook for your steak – it tells you exactly when it's reached the desired level of doneness.
2. What if my steak is too thick?
If your steak is thicker than 2 inches, you may want to consider using indirect heat or reverse searing to ensure even cooking. You can also try cutting the steak in half, which will reduce the cooking time and help to ensure even doneness. It's like splitting a thick log to get it to burn evenly – a smart approach to ensure that the entire steak cooks evenly.
3. What do I do if my steak is sticking to the grill?
This can happen if your grill isn’t hot enough or if you haven't oiled the grill grates. If this happens, try using a spatula to gently loosen the steak. You can also try using a grill brush to clean the grates before cooking. It's like ensuring that your baking pan is well-greased to prevent the cake from sticking – a simple precaution that can save you from frustration.
4. Can I grill steak on a gas grill?
Absolutely! Gas grills can be just as effective as charcoal grills for grilling steak. Just make sure you adjust the cooking time and temperature accordingly. It's like choosing your preferred cooking method – whether you use a gas stove or an electric stove, the results can be equally delicious.
5. What’s the best way to store leftover steak?
Store leftover steak in the refrigerator in an airtight container for up to 3 days. You can also freeze leftover steak for up to 3 months. To reheat, you can pan-fry it, grill it, or bake it. It's like giving your steak a second chance to shine – a versatile ingredient that can be enjoyed in multiple ways.
Final Thoughts: A Journey of Flavor
Grilling a strip steak is more than just cooking; it's a journey of flavour. It’s about the aroma that fills your kitchen, the anticipation as it sizzles on the grill, and the satisfaction of creating a delicious meal from scratch. So next time you’re craving a juicy, flavorful steak, try these techniques and experience the joy of grilling perfection. Happy grilling!
Everyone is watching

How to Cook Frozen Lobster Tails Perfectly: A Step-by-Step Guide
RecipesLobster. Just the word conjures up images of lavish meals, special occasions, and a taste of luxury. But let's...

Pigs in a Blanket Cooking Time: How Long to Bake for Perfect Results
RecipesAh, pigs in a blanket. Just the name conjures up images of those delightful little parcels of crispy pastry en...

Pork Fillet Cooking Time: How Long to Cook It Perfectly
RecipesPork fillet, or tenderloin as it's sometimes called, is a real favourite in our house. It's so versatile, and...

The Ultimate Guide to Tender, Juicy Pulled Pork
RecipesRight, let's talk pulled pork. It's one of those dishes that just screams "comfort food," doesn't it? I mean...

The Ultimate Guide to Cooking Sweet Potatoes: From Roasting to Mashing
RecipesSweet potatoes. Just the name conjures up images of warm, comforting dishes, bursts of vibrant color, and a to...