Let’s get real, folks. There’s something primal about grilling a strip steak – the smell of smoke, the hiss of fat hitting the hot grates, the anticipation of that first juicy bite. It’s an experience that elevates a simple meal to an event, and I’ve spent countless hours perfecting my own approach. It’s not just about throwing a steak on the grill and hoping for the best; it’s about understanding the science, the art, and the crucial role of time. So, grab your tongs, get ready to fire up the barbie, and let’s delve into the secrets of grilling a perfect strip steak.
(Part 1) Prepping for Success: Setting the Stage for Steak-tastic Results
The first step is crucial. It’s not about rushing, but rather about preparing your ingredients and your grill with care. Think of it as a chef meticulously arranging their ingredients – a concept known as "mise en place" in the culinary world. By getting everything ready beforehand, you create the perfect environment for a flawlessly grilled steak.
Choosing Your Weapon: The Prime Cut
First, you need a prime weapon, a good-looking, thick-cut, bone-in strip steak. This is the champion of the grilling world, holding its shape beautifully and boasting that luscious marbling that gives it its rich flavour. Aim for a steak that’s at least 1.5 inches thick, ideally around 2 inches. And remember, don’t shy away from asking your butcher for a steak with plenty of marbling – it’s the key to juicy, flavourful results.
Patting it Dry: The Crucial First Step
Once you have your chosen steak, pat it dry with paper towels. This is a non-negotiable step, as a dry surface allows the steak to develop a stunningly crispy crust while grilling. Think of it as prepping the canvas for a masterpiece – you want a crisp, browned exterior that's a testament to the heat and skill.
Seasoning with Finesse: Elevating the Flavour
Now, this is where things get fun – seasoning! While a classic salt and pepper rub will never fail, don't be afraid to unleash your creativity. Adding a touch of garlic powder, onion powder, paprika, or even a pinch of chili flakes can add layers of complexity to your steak. The key is to season generously but not overdo it. You want the spices to enhance the steak's natural flavour, not drown it out.
Remember, season your steak right before grilling – it helps prevent the salt from drawing out moisture and making your steak tough. This little trick goes a long way in ensuring a tender, juicy steak.
Letting it Rest: A Crucial Pre-Grill Ritual
Lastly, before the main event, let your steak rest at room temperature for about 30 minutes. This allows the steak to come up to room temperature, which ensures even cooking. It's like giving your steak a pre-grill warm-up, preparing it for the intense heat it's about to experience. The result? A steak that cooks evenly, resulting in tender, juicy perfection.
(Part 2) The Grill: Your Tool for Transforming Steak
Now, onto the real star of the show – the grill. It’s your tool for transforming a simple slab of meat into a culinary masterpiece.
Hot and Fierce: Mastering the Art of High Heat
For a perfect strip steak, you need a searing hot grill, a grill that crackles with heat and makes you think twice about touching those grates. Aim for a temperature of at least 500°F (260°C). This intense heat is what creates that iconic char and the delicious, crispy crust that elevates a grilled steak to another level.
Gas or Charcoal: Choosing Your Weapon
The eternal debate – gas vs. charcoal. I’ve used both for years, and they both have their strengths. Gas grills offer convenience and precise temperature control, while charcoal grills lend that irresistible smoky flavour that’s simply unmatched. Ultimately, it’s about personal preference and the kind of taste experience you're looking for.
Preheating and Cleaning: Setting the Stage
Before your steak even thinks about touching the grill, make sure it’s preheated to that blistering hot temperature. It should be hot enough to make you reconsider your decision to grill. And remember, a clean grill is a happy grill. Always clean those grates before grilling – you don’t want any unwanted flavours or burnt bits tainting your masterpiece.
(Part 3) The Timetable: Grilling to Perfection

Now, the moment you've been waiting for – the grilling process itself. This is where things get exciting, where timing becomes your ally, and every minute matters.
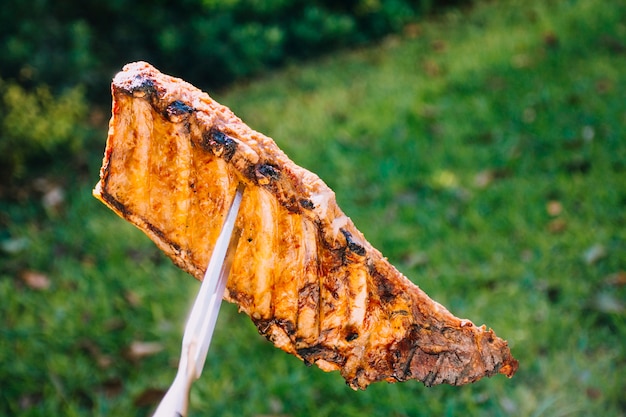
The Initial Sear: A Crisp, Delicious Start
The key to a perfect strip steak is a scorching hot sear. It’s where you get that beautiful, caramelized crust that adds depth and flavour. For a steak that’s 1.5 inches thick, I recommend grilling for 3-4 minutes per side over direct, high heat. Listen to that sizzle, watch the steak change colour before your eyes – it's a culinary transformation.
The Flip and the Finish: A Dance of Heat
After the initial sear, it's time to move your steak to indirect heat. On a gas grill, simply turn off the burner under the steak. On a charcoal grill, move the steak to a section where it’s not directly over the coals. Let it cook for another 3-4 minutes per side, or until it reaches your desired level of doneness.
internal temperature: Your Guide to Steak Success
To ensure you don’t overcook your masterpiece, use a meat thermometer. The USDA recommends cooking strip steak to an internal temperature of 145°F (63°C) for medium-rare. Here's a quick guide to internal temperatures for various levels of doneness:
| Level of Doneness | Internal Temperature (°F) | Internal Temperature (°C) |
|---|---|---|
| Rare | 125°F | 52°C |
| Medium-Rare | 135°F | 57°C |
| Medium | 145°F | 63°C |
| Medium-Well | 155°F | 68°C |
| Well-Done | 160°F | 71°C |
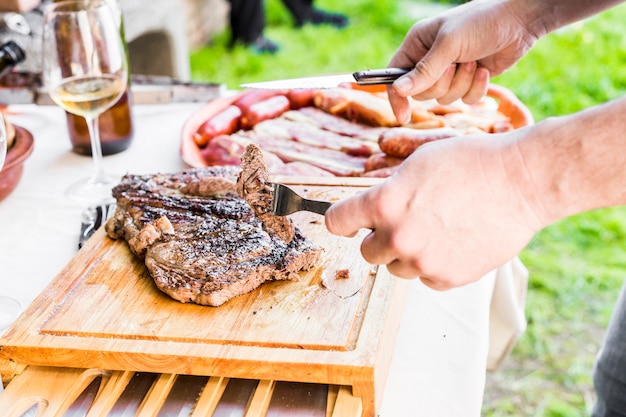
Rest and Enjoy: A Final Act of Patience
Once your steak is cooked to your liking, remove it from the grill and let it rest for at least 5-10 minutes before slicing and serving. This allows the juices to redistribute throughout the steak, resulting in a tender, juicy, and flavourful experience. While you're waiting, put on your best grilling apron and set the table – you've earned it!
(Part 4) Mastering Doneness: The Art of Perfect Timing
Achieving your desired level of doneness is a challenge, a culinary dance that requires practice and precision. But with a bit of patience and the right techniques, you can master the art of grilling a steak that’s cooked just the way you like it.
The Colour Test: A Visual Guide to Doneness
For a quick visual assessment, use this guide to steak colour at different levels of doneness:
- Rare: The centre of the steak will be red, with a thin brown ring around the edge.
- Medium-Rare: The centre of the steak will be pink, with a wider brown ring around the edge.
- Medium: The centre of the steak will be light pink, with a brown ring around the edge.
- Medium-Well: The centre of the steak will be mostly brown, with a very small amount of pink remaining.
- Well-Done: The steak will be completely brown throughout.
The Touch Test: Feeling for Perfection
Another technique is the touch test, feeling the steak to gauge its doneness. Here’s how:
- Rare: The steak will feel very soft and spongy to the touch.
- Medium-Rare: The steak will feel a little firmer than rare, but still fairly soft.
- Medium: The steak will feel firm to the touch.
- Medium-Well: The steak will feel very firm and almost springy to the touch.
- Well-Done: The steak will feel very hard and almost like rubber to the touch.
The Time Test: A Guide for Beginners
For those just starting their grilling journey, the time test can be a helpful guide, although cooking times can vary depending on the steak's thickness, the heat of your grill, and other factors.
(Part 5) Beyond the Basics: Adding Flavour and Flair
So, you've mastered the fundamentals. But what if you want to elevate your grilling game to a new level? Here are a few ideas for adding those extra touches of flavour and flair.
Herbs and Spices: A Symphony of Taste
Get creative with your seasonings! Experiment with different herbs and spices to create a symphony of taste. Some of my personal favourites include:
- Rosemary: A classic choice, rosemary adds a delicious, earthy flavour that complements the steak beautifully.
- Thyme: With its subtle lemony notes and a touch of earthiness, thyme adds a sophisticated layer of flavour.
- Garlic Powder: A staple for many, garlic powder adds a rich, garlicky flavour that's a perfect match for steak.
- Onion Powder: Onion powder brings a sweet, savoury flavour that enhances the steak's natural taste.
- Paprika: A touch of paprika introduces a slightly smoky and sweet flavour profile.
- Chili Flakes: For those who like a little heat, chili flakes add a touch of spice and excitement to the steak.
Marinades: Adding Depth and Moisture
Marinades are an excellent way to add depth of flavour and moisture to your steak. There are endless possibilities, but here are a few of my go-to marinades:
- Soy Sauce and Ginger Marinade: A classic combination, this marinade adds a salty, umami flavour that's simply irresistible.
- Lemon-Herb Marinade: A refreshing choice, this marinade adds a tangy, herbaceous flavour that complements the steak's richness.
- Red Wine Marinade: A luxurious option, a red wine marinade adds a complex, rich flavour that's perfect for special occasions.
Remember, when marinating your steak, ensure it's fully submerged in the marinade. And always pat your steak dry before grilling to prevent the marinade from steaming on the grill, which can cause flare-ups.
Glazes: The Final Touch of Brilliance
A glaze is a sweet or savoury sauce that you apply during the last few minutes of grilling, adding a beautiful sheen and a burst of flavour. Some popular glaze options include:
- Honey-Soy Glaze: A sweet and salty glaze that adds a beautiful caramelized finish to the steak.
- Garlic-Herb Glaze: A savoury glaze that enhances the steak's natural flavour, taking it to the next level.
- Bourbon Glaze: A sophisticated choice, a bourbon glaze adds a sweet and smoky flavour that elevates the steak to a new level.
Apply your glaze about 5 minutes before the steak is done grilling. This gives it time to caramelize and create that beautiful, glossy finish.
(Part 6) The Sidekicks: Perfecting the Pairing
No steak stands alone – it needs a supporting cast of side dishes to complete the culinary experience. Here are a few ideas for side dishes that pair perfectly with a grilled strip steak.
Potatoes: A Classic Companion
Potatoes are a timeless companion for steak, offering a comforting and familiar flavour. Roast them, mash them, or even make crispy potato wedges. Just be sure to season them generously to add depth and flavour. A simple salt and pepper seasoning is always a good choice, or you can get creative with herbs and spices.
Vegetables: A Burst of Freshness
grilled vegetables are a brilliant way to add a burst of freshness and vibrant colour to your steak dinner. Asparagus, bell peppers, zucchini, and onions are all excellent choices. You can grill them alongside your steak or prepare them separately. If you’re feeling adventurous, try grilling corn on the cob or even a whole head of broccoli!
Salads: A Refreshing Counterpoint
A light and refreshing salad is the perfect counterpoint to a rich and hearty steak. Choose a simple salad with leafy greens and a vinaigrette dressing, or get creative with ingredients like grilled chicken, roasted vegetables, or quinoa. Just remember to keep the dressing light and simple so it doesn’t overpower the flavour of the steak.
(Part 7) Storage and Leftovers: Keeping the Flavour Alive
Let’s be honest – sometimes, you might have leftovers. But don’t despair! Here's how to store and reheat your grilled strip steak to ensure it stays delicious.
Storing the Steak
To keep your leftover steak fresh and flavorful, refrigerate it in an airtight container for up to 3-4 days. Always let it cool completely before storing it.
Reheating the Steak
When you’re ready to enjoy those leftovers, you have a few reheating options:
- Pan-frying: Heat a skillet over medium heat and add a little oil. Cook the steak for 2-3 minutes per side, or until it’s heated through. This method will give your steak a nice crispy crust.
- Oven-baking: Preheat your oven to 350°F (175°C). Place the steak on a baking sheet and bake for 10-15 minutes, or until it’s heated through. This is a good option if you want to reheat the steak without drying it out.
- Microwave: Place the steak on a microwave-safe plate and microwave for 30-60 seconds, or until it’s heated through. This is the fastest method, but it can make the steak a bit rubbery.
No matter how you choose to reheat your leftover steak, be sure to let it rest for a few minutes before slicing and serving.
(Part 8) FAQs: Your Grilling Questions Answered
Let’s face it – grilling a strip steak can be daunting, especially for beginners. Here are answers to some of the most frequently asked questions.
1. What if my steak is too thin?
If your steak is too thin, it’s best to cook it in a skillet or pan-fry it instead of grilling it. The intense heat of the grill will cook the steak too quickly and make it dry.
2. What if my steak is too thick?
If your steak is too thick, you can always grill it in two separate pieces. Just make sure to divide the steak evenly and grill each piece for the same amount of time.
3. How do I know when my steak is done?
The best way to know when your steak is cooked to your liking is to use a meat thermometer. Insert the thermometer into the thickest part of the steak, making sure it doesn’t touch any bone.
4. What if my steak is overcooked?
If you’ve overcooked your steak, don’t despair. You can still slice it and serve it. It might not be as tender as a perfectly cooked steak, but it will still be edible.
5. What if my steak is undercooked?
If your steak is undercooked, simply return it to the grill and cook it for a few more minutes. Be sure to check the internal temperature with a meat thermometer to make sure it reaches your desired level of doneness.
And there you have it, my comprehensive guide to grilling a strip steak to perfection. Now, go forth, fire up your grill, and get grilling! You’ll be amazed at how easy it is to create restaurant-quality steak at home. Remember, practice makes perfect, and you'll soon be grilling like a pro!
Everyone is watching

How to Cook Frozen Lobster Tails Perfectly: A Step-by-Step Guide
RecipesLobster. Just the word conjures up images of lavish meals, special occasions, and a taste of luxury. But let's...

Pigs in a Blanket Cooking Time: How Long to Bake for Perfect Results
RecipesAh, pigs in a blanket. Just the name conjures up images of those delightful little parcels of crispy pastry en...

Pork Fillet Cooking Time: How Long to Cook It Perfectly
RecipesPork fillet, or tenderloin as it's sometimes called, is a real favourite in our house. It's so versatile, and...

The Ultimate Guide to Tender, Juicy Pulled Pork
RecipesRight, let's talk pulled pork. It's one of those dishes that just screams "comfort food," doesn't it? I mean...

The Ultimate Guide to Cooking Sweet Potatoes: From Roasting to Mashing
RecipesSweet potatoes. Just the name conjures up images of warm, comforting dishes, bursts of vibrant color, and a to...