You know that irresistible aroma of roasted chicken, right? That golden-brown skin, the succulent meat… It’s a classic for a reason, but achieving that level of perfection takes more than just throwing a bird in the oven and crossing your fingers. There’s a whole art to it, a symphony of techniques and knowledge that elevates this humble dish to culinary heights. Let me, a seasoned chef who’s spent years mastering the art of oven-roasted chicken, be your guide.
This isn’t just a dry recipe, my friend. It’s a journey we’ll take together, full of tips, tricks, and even a few funny stories of my own kitchen mishaps. We’ll delve into choosing the perfect chicken, the importance of proper seasoning, and the secrets to achieving that signature crispy skin. And of course, we’ll explore some delicious variations to keep your taste buds excited.
So, grab a comfy chair, a cuppa, and let’s get started on this delicious adventure!
(Part 1) Choosing Your Chicken: The Foundation of Flavor
Let’s face it, the chicken is the star of the show. Without a good one, it’s like trying to build a castle on shaky ground. So, how do you choose the perfect bird? Here’s a breakdown:
Size Matters (But Not Too Much)
For a standard oven, aim for a chicken weighing around 2.5kg (5.5 lbs). This size is big enough to feed a family without taking forever to cook. If you’re cooking for a smaller group, a 1.5kg (3.3 lbs) bird will do nicely. And if you’re feeling ambitious, a larger bird (around 3-4kg) will impress your guests. Just remember, cooking times will adjust depending on size.
Whole Bird or Pieces?
A whole chicken is the classic choice for a roast, giving you a beautiful centerpiece on the table. But sometimes, you need more control or want a quicker cook time. That’s where individual pieces come in. chicken breasts, thighs, and drumsticks all roast beautifully. Just remember to adjust cooking times accordingly. For example, chicken breasts typically take around 30-45 minutes at 190°C (375°F), while thighs and drumsticks need closer to an hour.
Free-Range vs. Organic: A Matter of Choice
This is a personal preference, a matter of both flavor and ethical considerations. Free-range chickens, allowed to roam freely and peck at natural foods, often have a slightly richer, more robust flavor. organic chickens, raised without antibiotics and artificial hormones, might appeal to those seeking a healthier option.
The "Look and Sniff" Test: A Fresh Chicken Check
Don't be afraid to get hands-on! Give the chicken a good look. The skin should be smooth, taut, and free from bruises or tears, which indicate a fresher, healthier bird. Next, give it a sniff. It should have a clean, slightly sweet smell. If it smells sour or off, put it back. Your nose knows!
(Part 2) Getting Ready to Roast: The Art of Seasoning
Alright, you’ve got your chicken. Now it’s time to transform it into a flavor-bomb. This is where the fun really begins!
The Salt and Pepper Foundation: A Must-Have
Salt and pepper are the backbone of any good roast. Don’t hold back! Season generously, both inside and out. Patting the chicken dry with paper towels before seasoning helps the skin get extra crispy. Use your hands – get that seasoning into every nook and cranny, giving the chicken a good massage. It’s a crucial step for bringing out the natural flavors and creating a beautifully browned, flavorful crust.
Beyond the Basics: Herbs and Spices
This is where your culinary creativity shines! Herbs and spices add layers of complexity and depth. Here are some classics to get you started:
- Rosemary and thyme: A classic combination, these herbs add a comforting and savory touch.
- Garlic powder and paprika: These create a warm and slightly smoky flavor profile.
- Onion powder: Enhances the savory notes and adds a touch of sweetness.
- Oregano and basil: For a Mediterranean twist, these herbs bring a bright and fragrant aroma.
- Red pepper flakes: A touch of heat can add a kick to your roast.
Remember, less is more with spices. You don’t want to overpower the natural flavor of the chicken. Start with a small amount and taste as you go.
Citrus: A Bright and Tangy Touch
A splash of citrus adds a beautiful tanginess that complements the richness of the chicken. Try these options:
- Squeeze of lemon or orange juice: A simple yet effective way to brighten the flavor.
- Lemon or orange slices: Place slices inside the chicken cavity or on top of the bird for a burst of citrusy flavor.
- Citrus zest: Adding zest to your seasoning mix creates a fragrant and vibrant flavor.
Butter: A Moistening Agent or a Crispy Skin Booster
Here’s where opinions diverge. Some people swear by a generous slathering of butter, believing it keeps the chicken moist and adds a rich flavor. Others prefer a more minimal approach, arguing that it can hinder the skin’s crispiness.
Ultimately, it’s up to you. If you’re going the butter route, rub it all over the skin, ensuring you get into the gaps between the skin and the meat. This helps the chicken stay moist and achieve that irresistible crispy skin.
(Part 3) The Oven and the Chicken: Setting the Stage
With your chicken prepped and ready, it’s time to set the stage for a perfect roast. We’re talking about the oven, the roasting rack, and the pan. Each plays a crucial role.
Preheat, Preheat, Preheat: The Key to Even Cooking
You know the drill: preheat your oven to 190°C (375°F). This ensures even cooking and prevents a dry bird. Don’t be tempted to skip this step. It’s a crucial foundation for a perfect roast.
Roasting Rack: The Secret to Crispy Skin and Even Cooking
A roasting rack is a must-have for any serious roaster. It elevates the chicken, allowing air to circulate all around, ensuring even cooking and promoting that beautiful crispy skin. If you don't have a rack, don't fret! You can place the chicken on a bed of vegetables or use a trivet for similar results.
roasting pan: Capturing the Flavors
A roasting pan is essential for catching those delicious drippings, which you can later use to make a heavenly gravy. A standard roasting pan is ideal, but a baking sheet will do in a pinch.
(Part 4) The Roasting Journey: Time, Temperature, and Patience
Finally, it’s time to embark on the roasting journey. It’s a bit of a waiting game, but trust me, the results are worth it. Let’s break down the process:
Time and Temperature: A Crucial Duo
The cooking time depends on the size of your chicken. As a general rule of thumb, allow 45 minutes to 1 hour per kilogram (2.2 lbs) of chicken. So, a 2.5kg (5.5 lbs) chicken will take roughly 2-2.5 hours. But always rely on your trusty meat thermometer for confirmation! The internal temperature should reach 74°C (165°F) in the thickest part of the thigh, indicating it’s cooked through.
The First Half Hour: The Foundation for Crispy Skin
Pop that chicken in the preheated oven and leave it undisturbed for the first 30 minutes. This initial period allows the skin to get a head start on getting crispy. Resist the urge to peek – just let it be!
The Second Half Hour and Beyond: Basting for Moisture and Flavor
After the first 30 minutes, you can start to check on your chicken. Basting is optional, but I highly recommend it. Use the drippings in the pan to baste the chicken, ensuring it stays juicy and the skin achieves that beautiful golden-brown color. Keep an eye on the chicken throughout the cooking process, checking for any signs of over-browning. You can reduce the oven temperature if needed.
Rest is Key: Letting the Juices Redistribute
Once your chicken is cooked through, resist the urge to carve immediately. Instead, take it out of the oven and let it rest for 10-15 minutes. This allows the juices to redistribute throughout the meat, resulting in a more tender and flavorful chicken. While it’s resting, you can start making your gravy. Use those delicious pan drippings, adding some flour, broth, and seasonings. It’s a simple way to add a flavor-bomb to your meal.
(Part 5) Variations on a Theme: Beyond the Basics
You’ve mastered the fundamentals. Now it’s time to get creative and explore some variations that will take your roasted chicken game to the next level.
Stuff It Up: Adding Flavor from the Inside Out
Stuffing your chicken adds another layer of flavor and texture. The classic approach is a bread-based stuffing, but why stop there? Get creative with wild rice, quinoa, or a mixture of chopped vegetables and herbs. Just remember to pack the stuffing loosely, allowing space for it to cook evenly.
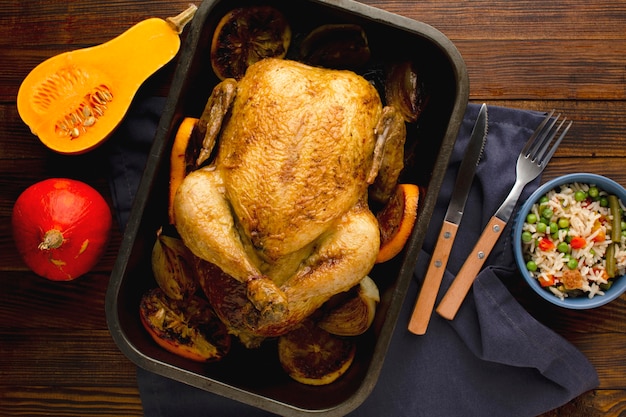
Roasting Vegetables: A Delicious Sidekick
Roast your chicken with vegetables for a complete meal that bursts with flavor. Carrots, potatoes, onions, and garlic are all great companions. Chop them into bite-sized pieces, toss with olive oil, salt, and pepper, and place them in the roasting pan around the chicken. As they cook, they’ll absorb the chicken’s flavors and create a delicious symphony of tastes.
Herbs and Spices: Endless Possibilities
Don’t be afraid to experiment with different combinations. Here are a few ideas to get you started:
- Lemon and rosemary: A classic pairing that creates a fresh and bright flavor.
- Garlic and thyme: A savory and comforting blend.
- Chili powder and cumin: A touch of spice and earthiness for a bolder flavor profile.
Remember, taste as you go and adjust the seasonings to your liking. This is your culinary canvas, so get creative!
A Touch of Sweetness: Balancing Flavor
A little sweetness can really complement the savory flavors of roasted chicken. Try adding a drizzle of honey or maple syrup to the chicken during the last 30 minutes of cooking. It creates a beautiful glaze and adds a touch of sweetness that’s simply irresistible.
(Part 6) Carving and Serving: Presenting Your Masterpiece
The moment you’ve been waiting for – carving the chicken. It might seem intimidating, but with a few tips, it’s a breeze.
Tools of the Trade: Sharpening Your Skills
You’ll need a sharp carving knife and a fork. If you’re not a seasoned carver, poultry shears can be a lifesaver. They’re great for cutting through bone and make the process much easier.
Carving Technique: A Step-by-Step Guide
Here’s a breakdown of the carving process:
- Remove the legs: Cut through the joint where the leg meets the thigh, then slice through the skin and meat to separate the leg from the bird.
- Remove the wings: Cut through the joint where the wing meets the breast, then cut along the bone to separate it from the bird.
- Carve the breasts: Use your knife to slice the breast into thin, even pieces.
Serving Style: A Culinary Showcase
Now, it’s time to present your culinary masterpiece. Serve the chicken on a platter, surrounded by the roasted vegetables if you included them. Add a side of mashed potatoes, rice, or a simple salad for a well-rounded meal.
(Part 7) Leftover Love: Making the Most of Your Roast
Let’s face it, there’s usually leftover roasted chicken. And good news – it’s just as delicious the next day (maybe even better)! Here are some ways to put those leftovers to good use:
chicken salad: A Classic with a Twist
This is a classic way to use leftover roasted chicken. Chop the meat and combine it with mayonnaise, celery, onion, and your favorite herbs and spices. Enjoy it on sandwiches, wraps, or crackers. Add a touch of dried cranberries or chopped walnuts for a little extra flavor.
Chicken Soup: Comforting and Flavorful
Leftover roasted chicken is the perfect base for a hearty and flavorful soup. Use the chicken bones to make a stock, then add the meat, vegetables, and your favorite herbs and spices. A sprinkle of fresh parsley adds a vibrant touch.
Chicken Quesadillas: A Quick and Easy Treat
Warm up some tortillas, fill them with shredded chicken, cheese, and your favorite toppings (think salsa, sour cream, or guacamole), and grill them until the cheese melts.
Chicken Stir-Fry: A Flavor-Packed Meal
Dice the leftover chicken, add it to your favorite stir-fry vegetables and sauce, and enjoy a quick and easy meal. Add a splash of soy sauce or oyster sauce for extra umami flavor.
(Part 8) FAQs: Addressing Your Roasting Questions
Let’s tackle a few of the most common questions about oven-roasted chicken.
What if my chicken is frozen?
If you’re using a frozen chicken, it needs to thaw completely before roasting. The safest method is to thaw it in the refrigerator for 24 hours. You can also thaw it in a cold water bath, but change the water every 30 minutes to ensure it stays cold and prevents bacterial growth.
How do I know if my chicken is cooked through?
The best way to ensure your chicken is cooked through is to use a meat thermometer. It should register 74°C (165°F) in the thickest part of the thigh. This guarantees the chicken is safe to eat and ensures that it’s not overcooked and dry.
What if my chicken is overcooked?
If your chicken is overcooked, it will be dry and tough. Unfortunately, there’s no way to reverse this. But you can try to salvage it by shredding the meat and using it in a dish like chicken salad or soup.
How long can I store leftover roasted chicken?
Leftover roasted chicken can be stored in the refrigerator for up to 4 days. Make sure to store it in an airtight container to prevent it from drying out and absorbing other flavors in the fridge.
What can I do with the drippings?
Those pan drippings are full of flavor! Use them to make a delicious gravy, adding flour, broth, and seasonings for a rich and savory sauce. You can also use them to baste the chicken during the cooking process, adding an extra layer of flavor and moisture.
There you have it – the ultimate guide to oven-roasted chicken! I hope you’ve learned a thing or two and are ready to tackle your next roast. Remember, practice makes perfect, and don’t be afraid to experiment and find what works best for you. Happy roasting!
Everyone is watching

How to Cook Frozen Lobster Tails Perfectly: A Step-by-Step Guide
RecipesLobster. Just the word conjures up images of lavish meals, special occasions, and a taste of luxury. But let's...

Pigs in a Blanket Cooking Time: How Long to Bake for Perfect Results
RecipesAh, pigs in a blanket. Just the name conjures up images of those delightful little parcels of crispy pastry en...

Pork Fillet Cooking Time: How Long to Cook It Perfectly
RecipesPork fillet, or tenderloin as it's sometimes called, is a real favourite in our house. It's so versatile, and...

The Ultimate Guide to Tender, Juicy Pulled Pork
RecipesRight, let's talk pulled pork. It's one of those dishes that just screams "comfort food," doesn't it? I mean...

The Ultimate Guide to Cooking Sweet Potatoes: From Roasting to Mashing
RecipesSweet potatoes. Just the name conjures up images of warm, comforting dishes, bursts of vibrant color, and a to...