Right, you lot, listen up! Today, we're diving headfirst into the delicious world of oven-baked oysters. Now, I know what you're thinking: "Oysters? Ugh, those slimy things?" Trust me, I used to think the same. But then I had my first taste of a perfectly baked oyster, and let me tell you, it was a revelation. The creamy, briny richness, the delicate texture, the way the flavour just explodes in your mouth… It's an experience, I tell you.
So, are you ready to give these little treasures a go? Fantastic! I'm going to walk you through everything you need to know, from choosing the perfect oyster to baking them to absolute perfection. By the time you're done, you'll be an oyster-baking pro, I promise.
(Part 1) The Oyster Odyssey: Choosing Your Treasure

First things first, let's talk oysters. We're not just grabbing any old oyster here, folks. We're on a quest for the good stuff, the kind that'll make your taste buds sing.
The Oyster Lowdown: A Guide to Varieties
You've got a whole world of oyster varieties out there, each with its own unique flavour profile. Don't worry, you don't need to be an oyster expert to pick a good one. Here's the lowdown on some popular choices:
- Belons: These French beauties are known for their delicate, sweet flavour and creamy texture. They're perfect for those new to the oyster game. Think of them as the "gateway oyster."
- Kumamotos: Sweet and buttery, these Japanese oysters are a true treat. They're a bit smaller than others, making them perfect for a quick bite. They're like little bites of pure oyster heaven.
- Blue Points: The classic American oyster, these guys have a briny, metallic flavour that's bold and satisfying. They're the quintessential oyster, a bit more intense than the Belons.
- Olympia: These tiny, delicate oysters are native to the Pacific Northwest and boast a sweet, clean flavour. They're like little gems, packed with a clean, fresh taste.
This is just a tiny glimpse into the vast world of oysters. The best way to discover your favourite? Just try 'em all! You can often find oyster tastings at seafood markets or restaurants. Go on, get adventurous, explore the oyster world!
Fresh is Best: How to Pick the Perfect Oyster
Once you've decided on your variety, it’s time to pick your oysters. Here are a few things to keep in mind:
- Look for tightly closed shells: If the shell is open or loose, it means the oyster is dead and not good to eat.
- Smell for the ocean: A fresh oyster should have a clean, briny smell. If it smells fishy or ammonia-like, it’s gone bad.
- Choose firm oysters: A fresh oyster should feel firm and heavy when you pick it up.
It’s always best to buy your oysters from a reputable source that you trust. They'll be able to tell you about the oyster's origins, how fresh they are, and answer any questions you might have.
Alright, now that you’ve got your oysters, let’s get them ready for baking!
(Part 2) Shucking Like a Pro: Opening Your Oysters
Ok, shucking oysters can seem daunting at first, but trust me, it's not as scary as it looks. With a little practice, you'll be shucking like a pro in no time.
Gather Your Gear: Essential Tools for Shucking
Before you dive in, make sure you have the right tools. You'll need:
- An oyster knife: This special knife has a blunt, rounded tip and a strong blade. It's specifically designed for opening oysters. It's a bit of a specialized tool, so you'll likely need to buy it from a kitchen store or online.
- A shucking glove: This isn't strictly necessary, but it'll protect your hand from sharp oyster shells. You can find these at most kitchen supply stores or online.
- A towel: To clean up any spills or messes. This is one you likely already have in your kitchen!
The Shucking Process: Step by Step
Now, let’s get shucking!
- Find the hinge: Look for the narrowest part of the oyster shell, which is the hinge. This is where the two shells meet.
- Position the oyster: Place the oyster on a sturdy surface, hinge side up. Make sure you're working on a surface that can handle the force of shucking.
- Insert the knife: Carefully insert the oyster knife’s blade between the shell and hinge, twisting slightly to create a gap. Be gentle and patient here, you don't want to break the shell.
- Work your way around: Continue working the knife around the hinge, gently prying open the shell. This takes a bit of practice, so don't be discouraged if it takes a few tries.
- Separate the shells: Once you've worked your way around the hinge, you should be able to separate the shells. You'll hear a satisfying "pop" when the shell releases.
- Remove the top shell: You'll be left with the oyster on the bottom shell. This is the shell you'll use for baking.
- Cut the muscle: There's a small muscle that holds the oyster to the shell. Use your knife to cut this muscle, freeing the oyster. This is the final step, and you'll have a beautiful, shucked oyster ready to be baked.
And there you have it! A perfectly shucked oyster. Just remember to be patient and careful, and don't be afraid to ask for help if you need it. There are plenty of resources online with tips and tricks for shucking, so don't hesitate to check them out.
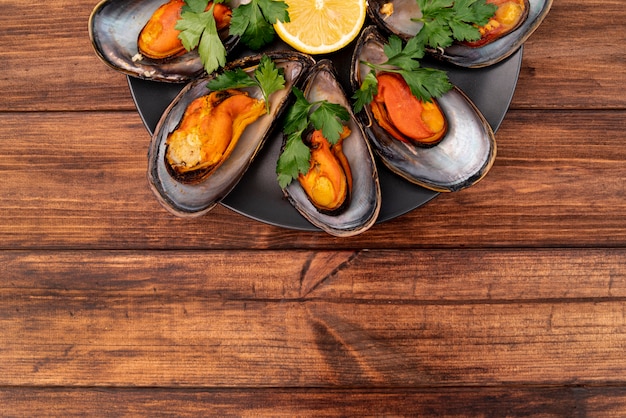
(Part 3) Baking Basics: The Key to Delicious Oven-Baked Oysters
Right, now that you’ve got your oysters prepped and ready to go, it's time to talk about the baking process. This is where the magic happens, folks. Get ready to unlock those flavour bombs!
The Essential Ingredients: A Simple But Delicious Recipe
You don’t need a million ingredients to bake delicious oysters. In fact, less is more. Here's what you’ll need:
- Fresh Oysters: Obviously, this is the star of the show! Make sure they're the freshest you can find.
- Butter: A good quality butter will add richness and flavour. Use unsalted butter so you can control the saltiness.
- Garlic: A touch of garlic adds a nice bite. Use fresh, minced garlic for the best flavour.
- Lemon: Fresh lemon juice adds a bright, tangy flavour that balances the richness of the oyster. Use a good quality lemon for the best flavour.
- Salt and Pepper: Seasoning is essential to bring out the oyster's flavour. Use freshly ground black pepper for a more vibrant flavour.
- Optional additions: Get creative! You can add other herbs like thyme or parsley, or even a bit of red pepper flakes for a touch of heat.
The Art of Baking: Creating a Flavorful Feast
Now, for the baking part. Here's what you need to know:
- Preheat your oven to 400°F (200°C): You want a nice hot oven to ensure the oysters cook quickly and evenly. This will help them cook through without drying out.
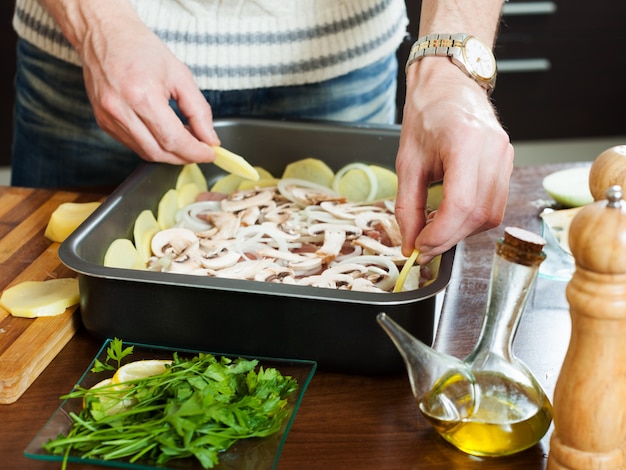
- Prepare your baking dish: Use a shallow baking dish that will hold your oysters in a single layer. You can line it with parchment paper or foil for easy cleanup. This will prevent sticking and make cleanup a breeze.
- Arrange your oysters: Place your shucked oysters, still in their bottom shells, in the baking dish. Make sure the oysters are evenly spaced in the dish.
- Add your toppings: Now it’s time to get creative! Top each oyster with a small knob of butter, a sprinkle of garlic, a squeeze of lemon juice, and a pinch of salt and pepper. Add any additional herbs or spices you’d like. Go wild with your creativity!
- Bake for 10-12 minutes: Keep a close eye on the oysters. They should be cooked through but still juicy. You’ll know they’re ready when the edges of the oysters start to curl and the liquid inside is bubbly. You don't want to overcook them, or they'll become tough and rubbery.
- Serve immediately: Oven-baked oysters are best enjoyed hot and fresh. They'll lose their flavour and texture if they sit for too long.
Easy, right? That’s the beauty of this recipe. It’s simple, but the result is oh so delicious. You'll be amazed at how simple ingredients can create such a delicious dish.
(Part 4) Tasting Notes: The Delights of Oven-Baked Oysters
Alright, you’ve followed the recipe, baked your oysters to perfection, and now it’s time for the moment of truth: the taste test!
The First Bite: A Symphony of Flavours
That first bite of a perfectly cooked oyster is truly something special. The initial burst of brininess is followed by a creamy, buttery richness. The garlic and lemon add a wonderful complexity, while the salt and pepper enhance the natural flavour of the oyster. It’s a symphony of taste, folks.
The Importance of Texture: The Delicate Dance of Crisp and Creamy
But it’s not just about flavour; texture plays a crucial role, too. A well-baked oyster should have a delicate balance of crisp and creamy. The edges should be slightly crisp, while the centre remains beautifully tender and juicy. This contrast of textures is what elevates the oyster experience.
A culinary adventure: Exploring the Versatility of Oven-Baked Oysters
Now, you might be thinking, “Okay, great, I've had my first oven-baked oyster. What next?” Well, the beauty of this dish is its versatility. You can experiment with different toppings and ingredients to create your own unique flavour combinations. Let your creativity run wild!
For example, you could try adding a bit of smoked paprika for a smoky flavour, or some fresh herbs like dill or chives for a more delicate touch. You could even top your oysters with a dollop of crème fra??che or a sprinkle of grated Parmesan cheese for a luxurious twist. The possibilities are endless!
(Part 5) Beyond the Basics: Exploring Oyster Recipes
Ready to take your oyster game to the next level? Let’s dive into some more advanced recipes.
Oysters Rockefeller: A Classic with a Rich History
This iconic dish is a must-try for any oyster lover. It features a topping of spinach, butter, breadcrumbs, and often, some Pernod or absinthe. It’s a rich, decadent, and truly unforgettable dish. It's a bit more involved than the basic recipe, but the flavour is worth the effort.
Oysters Casino: A Gambling-Themed Delight
This recipe gets its name from the fact that it was a popular dish in casinos. It features a topping of bacon, breadcrumbs, and often, some Worcestershire sauce. It’s a savory and satisfying dish that’s perfect for a special occasion. It's a fun and flavorful twist on the classic oven-baked oyster.
Oysters Mornay: A Creamy and Elegant Choice
This recipe features a creamy, cheesy sauce made with béchamel, Parmesan cheese, and often, some nutmeg. It’s a luxurious and elegant dish that’s sure to impress. It's a sophisticated and indulgent option for a special dinner.
Oysters Gratinée: A French Classic with a Simple Elegance
This classic French dish features a topping of breadcrumbs, garlic, and often, some Gruyère cheese. It’s a simple but delicious dish that’s perfect for a casual dinner. It's a light and flavorful option that's perfect for a weeknight meal.
(Part 6) The Oyster Experience: Where to Find the Best Oysters
Alright, you’re ready to dive into the world of oysters. But where do you find these delicious delicacies?
Seafood Markets: The Source for Fresh Oysters
Seafood markets are the best place to find fresh, high-quality oysters. They often have a wide selection of varieties and can offer advice on choosing the right oyster for your needs. They're the experts, so don't hesitate to ask for recommendations.
Restaurants: The Oyster Bar Experience
Many restaurants, especially those with a focus on seafood, have oyster bars. This is a great place to try different varieties and experience the oyster bar culture. It's a fun and social way to enjoy oysters.
Oyster Farms: A Taste of the Source
If you’re looking for a truly unique experience, visit an oyster farm. You can see how oysters are grown and harvested, and even try some fresh oysters straight from the source. It's a fascinating and delicious way to learn about oysters.
(Part 7) Oyster Etiquette: Navigating the World of Oysters
Now, you’ve got your oysters, you’ve baked them to perfection, and you’re ready to enjoy them. But before you dig in, there are a few things to keep in mind.
Shucking Etiquette: A Gentleman's Guide to Oysters
If you’re shucking your own oysters, it’s always polite to offer to shuck for others at the table. And remember, shucking is a skill that takes practice. Don’t be afraid to ask for help if you need it. Shucking is a skill that takes practice, but it's a great way to impress your friends and family.
Eating Etiquette: The Proper Way to Enjoy Your Oyster
When it comes to eating oysters, there are a few things to keep in mind:
- Use a fork: You can eat an oyster with your hands, but it’s more elegant to use a fork. It's a bit more civilized and allows you to fully appreciate the oyster.
- Squeeze the lemon: Adding a squeeze of lemon juice is a classic way to enhance the flavour of the oyster. It brightens up the flavour and balances the brininess.
- Enjoy the experience: Oysters are best enjoyed slowly and savoured. Pay attention to the different flavours and textures. It's an experience to be savoured, not rushed.
A Toast to Oysters: Celebrating the Culinary Delight
Oysters are a true culinary delight. They’re a delicious and nutritious food that can be enjoyed in many different ways. So, the next time you’re looking for something special, give oven-baked oysters a try. You won’t be disappointed!
(Part 8) FAQs: Your Oyster Questions Answered
Let's tackle those burning oyster questions you might have.
1. Are Oysters Safe to Eat Raw?
Yes, oysters can be eaten raw. But it’s essential to buy them from a reputable source that you trust, and to make sure they're fresh and stored properly. Raw oysters can carry bacteria, so it's important to eat them as soon as possible. If you're unsure, it's always best to err on the side of caution and cook them.
2. How Long Can I Store Oysters?
Oysters should be stored in the refrigerator on a bed of ice or in a container filled with cold water. They can be stored for up to a week. But it's best to eat them within 2-3 days for optimal freshness. The fresher the oyster, the better the flavour and texture.
3. What Happens if I Overcook Oysters?
Overcooked oysters will be tough and rubbery. You want to cook them just until the edges curl and the liquid inside is bubbly. If you're unsure, it's always better to err on the side of undercooked. It's better to have a slightly undercooked oyster than an overcooked one.
4. What Happens If I Eat a Bad Oyster?
Eating a bad oyster can cause food poisoning, which can lead to symptoms like nausea, vomiting, diarrhoea, and abdominal cramps. If you suspect you’ve eaten a bad oyster, it’s important to see a doctor. It's rare, but it's always best to be cautious.
5. What Should I Pair with Oysters?
Oysters pair well with a variety of drinks, including:
- Champagne: The bubbles in champagne cleanse the palate and enhance the brininess of the oyster. It's a classic pairing for a reason.
- White Wine: Dry white wines like Sauvignon Blanc and Chardonnay pair well with oysters. They complement the oyster's flavour and add a touch of acidity.
- Beer: A crisp, light lager or a dry cider can also complement the flavour of oysters. They offer a refreshing contrast to the oyster's richness.
And there you have it, folks! A comprehensive guide to the wonderful world of oven-baked oysters. So, what are you waiting for? Grab some fresh oysters, gather your friends, and get ready for a culinary adventure. You’re in for a real treat!
Everyone is watching

How to Cook Frozen Lobster Tails Perfectly: A Step-by-Step Guide
RecipesLobster. Just the word conjures up images of lavish meals, special occasions, and a taste of luxury. But let's...

Pigs in a Blanket Cooking Time: How Long to Bake for Perfect Results
RecipesAh, pigs in a blanket. Just the name conjures up images of those delightful little parcels of crispy pastry en...

Pork Fillet Cooking Time: How Long to Cook It Perfectly
RecipesPork fillet, or tenderloin as it's sometimes called, is a real favourite in our house. It's so versatile, and...

The Ultimate Guide to Cooking Delicious Frankfurters
RecipesLet's face it, we all love a good frankfurter. It's a classic, simple, and always satisfying. But let's be rea...

Wolf Meat Recipes: A Guide to Cooking Wild Game
RecipesLet's be honest, you don't see wolf meat at your local butcher shop every day. It's a bit of a wild card, but ...