You’ve got a beautiful new york strip in your hands, that gorgeous marbling, the perfect thickness – it’s practically begging to be cooked. But before you get all excited and start wielding that spatula, hold your horses! I’ve been on this cooking journey for years, and trust me, there’s a lot more to nailing a New York steak than just throwing it on the grill. This is your comprehensive guide to getting that juicy, perfectly seared, flavour-bomb steak you’ve always dreamed of. We’re going to cover everything from choosing the right cut to mastering the art of resting, and by the time you’re done reading this, you’ll be a New York steak grilling guru.
Part 1: Selecting Your Weapon of Choice
First things first, you need to choose your steak. Now, I’m talking about a New York strip here – that lovely, thick, well-marbled cut. But even within the New York strip family, there’s a whole world of options, and it’s worth knowing the differences.
1.1. The Cut
A New York strip is essentially a boneless ribeye, but it’s cut from a different part of the cow. It’s generally leaner than ribeye and has a more pronounced grain. Now, you’ve got to choose the right grade for your needs. We’re talking about prime, choice, or select. Let me tell you, prime is the king of all steaks. It’s got the most marbling, which means it’s gonna be the most tender and juicy. It’s worth the extra pennies, believe me. Choice is a great option if you’re looking for something a bit more budget-friendly. It’s still got a good amount of marbling, but it won’t be as intensely flavorful as prime. Select is the leanest option, and while it’s perfectly good for cooking, it won’t be as tender as prime or choice.
Here’s a little breakdown to help you choose:
| Grade | Marbling | Tenderness | Flavor | Price |
|---|---|---|---|---|
| Prime | Most marbling | Most tender | Most flavorful | Most expensive |
| Choice | Moderate marbling | Tender | Flavorful | Moderate price |
| Select | Least marbling | Leanest | Mild flavor | Least expensive |
1.2. Thickness
Now, here’s the deal: thicker cuts take longer to cook, but they also retain more moisture. A 1-inch steak is great for a quick cook, while a 1.5-inch steak will give you a more even cook and a more tender result. It’s all about personal preference, really. But trust me, don’t go any thinner than 1-inch. It’s just not worth it.
1.3. Bone-in or Boneless?
The bone-in New York strip is the classic choice. It’s got a great flavour, and the bone helps to distribute heat more evenly. It’s also more visually appealing. A boneless New York strip is a great option if you want something a little more convenient. It’s easier to grill and slice. Go with what you feel like cooking, but in my opinion, bone-in is the way to go for a real gourmet experience.
Part 2: Pre-Game Preparations
Okay, so you’ve got your perfect steak. Now, it’s time to get your prep on.
2.1. Pat It Dry
This is super important. A wet steak will steam instead of sear. Pat that steak dry with paper towels until it’s completely dry. Then, season it liberally with salt and pepper. Don’t be shy here, you can never have too much salt and pepper! You’ll want the seasoning to really stick to the steak. I like to use a coarse ground pepper for that extra kick.
2.2. Bring It To Room Temp
I know this might sound strange, but taking your steak out of the fridge 30-60 minutes before cooking will make a big difference. A cold steak is going to take longer to cook, and the outside will be overcooked before the inside is done. By bringing it to room temp, you’ll ensure a more even cook. The steak will cook more evenly and prevent it from getting that undesirable “gray band” around the outside.
2.3. The Oil is the Key
Now, a good quality oil is going to be your best friend. Choose an oil with a high smoke point, like grapeseed, avocado, or peanut oil. These oils can handle high heat without burning, which is important for getting a nice sear on your steak. Make sure the oil is nice and hot before you put your steak on the grill.
I’ve found that using a combination of oil and butter gives the steak a beautiful crust and adds a delicious, rich flavor. Just make sure you let the butter melt before you put the steak in, or it will burn and stick.
Part 3: The Masterclass of Grilling
We’ve reached the moment of truth. It’s time to fire up the grill and grill that steak to perfection. Now, there are two main types of grills: gas and charcoal. Both have their pros and cons, so it really comes down to personal preference.
3.1. Heat It Up
Get that grill nice and hot. We’re talking about high heat here, around 500°F. If you’re using a gas grill, preheat with all burners on high. If you’re using a charcoal grill, get those coals nice and white-hot. A hot grill is key to getting that beautiful sear and those tasty grill marks.
3.2. The Big Sizzle
Now, gently place that steak on the grill. Don’t overcrowd the grill, give it some space. You want to hear that lovely sizzling sound. Now, here’s the crucial part: Don’t touch it! Let that steak cook undisturbed for about 3-4 minutes on each side. This is what gives you that perfect sear.
You might be tempted to peek at it, but resist the urge. If you constantly lift the steak, it will lose heat and take longer to cook. Trust the process, it will be worth it.
3.3. Flip It Like It’s Hot
After those initial 3-4 minutes, flip that steak. You should be able to get some nice, dark grill marks. Now, continue cooking, flipping every 2-3 minutes, until the steak reaches your desired level of doneness. I always use a meat thermometer to make sure it’s cooked to perfection. A good rule of thumb for doneness is:
| Doneness | internal temperature (°F) |
|---|---|
| Rare | 125-130 |
| Medium-Rare | 130-135 |
| Medium | 140-145 |
| Medium-Well | 150-155 |
| Well-Done | 160 |
Keep in mind that these are just general guidelines. Everyone has their own preference for doneness, and the thickness of your steak can also affect the cooking time.
3.4. The Resting Game
Now, here’s the secret to juicy steak: Resting. Once your steak reaches your desired doneness, take it off the grill and let it rest for 10-15 minutes. This allows the juices to redistribute throughout the steak, resulting in a tender and juicy masterpiece.
If you’re impatient and start slicing immediately, you’ll end up with a steak that’s dry and disappointing. So, be patient and let those juices settle.
Part 4: Beyond the Grill: Other Cooking Methods
Now, I know some of you might not have a grill, or you just prefer other cooking methods. Don’t worry, you can still get a perfect New York steak without a grill.
4.1. Pan-Seared to Perfection
This method is perfect for smaller steaks or if you want a more controlled cook. Heat a heavy-bottomed pan over high heat and add your oil. Once the oil is shimmering, add your steak and cook for 3-4 minutes per side. You’ll get a beautiful sear and a juicy steak. If you want to finish it in the oven, transfer the steak to a preheated 350°F oven for a few more minutes to get it to your desired doneness.
To get that restaurant-quality sear, you can try the “reverse sear” method. This involves cooking the steak in a low oven until it’s almost fully cooked, then searing it in a hot pan for a few minutes to get a crispy crust.
4.2. The Oven’s Got Your Back
If you prefer a more hands-off approach, you can cook your steak in the oven. Preheat your oven to 400°F. Season your steak and place it on a baking sheet. Cook for 10-12 minutes for medium-rare. You can use an oven thermometer to check the internal temperature for your desired doneness.
To add some extra flavor, you can try roasting the steak on a bed of vegetables like onions, peppers, or potatoes. This will add some extra depth to your meal.
Part 5: A Symphony of Flavors: Sauces and Sides
Now, the steak itself is a masterpiece, but let’s talk about taking it to the next level with sauces and sides. I love pairing my New York steak with a rich and flavorful sauce.
5.1. The Classic Béarnaise
A true French classic, Béarnaise sauce is a decadent blend of butter, egg yolks, and herbs. It adds a rich, buttery flavor that complements the steak perfectly. I love making my own Béarnaise sauce, but if you’re short on time, you can always buy a pre-made sauce.
Béarnaise sauce is a little more complex to make, but it’s definitely worth the effort. You’ll need a whisk and a double boiler, and it’s important to keep a watchful eye on the sauce as it cooks.
5.2. The Tangy Chimichurri
This Argentinian sauce is bursting with flavor. It’s made with fresh herbs, olive oil, garlic, and vinegar. It adds a vibrant, tangy touch to the steak, and it’s perfect for a summery meal.
The best part about chimichurri sauce is that it’s super easy to make. Just chop up some fresh herbs, like parsley, oregano, and cilantro, and mix them with olive oil, garlic, and vinegar. It’s ready to go in minutes!
5.3. The Creamy Blue Cheese
If you’re a fan of blue cheese, this sauce is for you. It’s a creamy blend of blue cheese, cream, and garlic. It adds a salty, pungent flavor that complements the rich steak perfectly.
This sauce is perfect for those who enjoy a bolder flavor. You can adjust the amount of blue cheese depending on your preference, but I recommend starting with a small amount and adding more to taste.
5.4. The Perfect Pairing
Now, when it comes to sides, I’m a big fan of keeping it simple and letting the steak shine. A classic potato salad, some roasted asparagus, or a simple green salad is all you really need. However, if you want to get a bit more creative, you could try a grilled corn salad or a creamy mushroom risotto. It’s all about finding what you like best.
Here are a few more side dish ideas that pair well with New York steak:
- Mac and cheese
- mashed potatoes
- Roasted root vegetables
- Creamed spinach
- Grilled onions and peppers
Part 6: The Art of Presentation
Right, so you’ve cooked your perfect steak, you’ve got your sauce, you’ve got your sides. Now, it’s time to make it look amazing. You want to create a presentation that’s as beautiful as the taste.
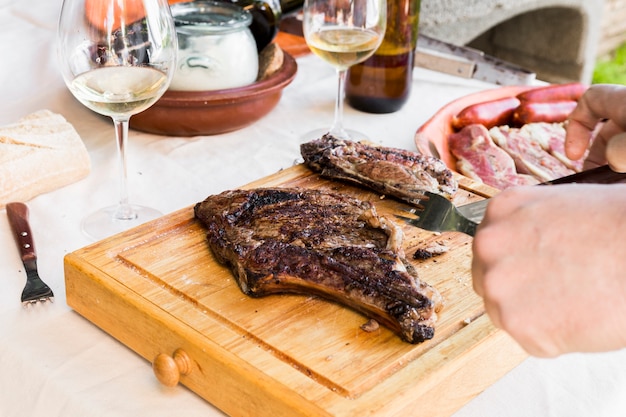
6.1. Slice It Up
Cut that steak against the grain. This helps to break down the muscle fibers and makes the steak more tender. Slice it into thin strips, about 1/2-inch thick. You want to be able to see the beautiful marbling and the juicy center.
If you’re using a bone-in steak, make sure to remove the bone before slicing. This will make it easier to cut and serve the steak.
6.2. Plate It Like a Pro
Use a nice plate, something that will make your steak look even more appealing. Arrange your steak slices on the plate, and then add your sauce and sides. Don’t overcrowd the plate, give everything its own space to shine.
You can use a small spoon to drizzle the sauce over the steak or create a small pool of sauce on the plate. This will add a touch of elegance to your presentation.
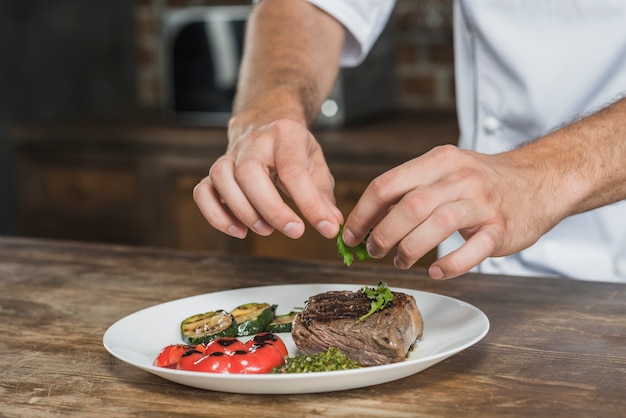
6.3. The Finishing Touches
Add some final touches to your presentation. You can sprinkle some fresh herbs on top, like parsley or chives. Or, add a drizzle of olive oil to make the steak glisten. A sprig of rosemary or a slice of lemon can also add a touch of elegance.
You can also add a small garnish, like a cherry tomato or a few peppercorns, to add a pop of color and texture to the plate.
Part 7: FAQs: Your New York Steak Questions Answered
Let’s tackle some of the most common questions I get asked about cooking New York steak.
- How long should I cook a New York steak? The cooking time will vary depending on the thickness of your steak and your desired doneness. Use a meat thermometer to check the internal temperature for accuracy. Remember, it’s always better to undercook than overcook. You can always cook it a little longer if needed.
- What’s the best way to know if a steak is done? A meat thermometer is the most reliable way to check for doneness. Insert the thermometer into the thickest part of the steak, making sure it doesn’t touch the bone. Different levels of doneness have different temperatures, so make sure you’re cooking to your preference.
- What should I do if my steak is overcooked? Sadly, if your steak is overcooked, there’s not much you can do to fix it. It’s best to avoid overcooking in the first place.
- Can I cook a New York steak in a skillet? Yes, absolutely! You can get a fantastic sear on a New York steak in a skillet. Just make sure you use a heavy-bottomed skillet that can handle high heat. You’ll get a beautifully seared steak, just like you would on the grill.
- What are some good alternative sides for New York steak? You can go beyond the classics and get creative with your sides. Some great options include grilled corn salad, roasted sweet potatoes, sauteed mushrooms, or a creamy risotto.
- Should I use salt before or after cooking? Salt the steak before cooking. This will help to draw out moisture and create a more flavorful crust.
- What can I do if my steak is too tough? If your steak is too tough, it’s likely because it was overcooked. However, you can try using a meat mallet to tenderize the steak. Just make sure not to pound it too much, or you’ll damage the steak.
- What are some good wines to pair with New York steak? A full-bodied red wine, like Cabernet Sauvignon or Merlot, pairs well with New York steak. You can also try a Syrah or Zinfandel.
Part 8: Enjoy Your Masterpiece!
That’s it, my friends! You’ve done it. You’ve cooked the perfect New York steak. Now, sit back, relax, and enjoy your masterpiece. I guarantee you, this steak is gonna be the star of the show.
Remember, cooking is all about experimentation and having fun. Don’t be afraid to try new things and find what works best for you.
Happy grilling!
Everyone is watching

How to Cook Frozen Lobster Tails Perfectly: A Step-by-Step Guide
RecipesLobster. Just the word conjures up images of lavish meals, special occasions, and a taste of luxury. But let's...

Pigs in a Blanket Cooking Time: How Long to Bake for Perfect Results
RecipesAh, pigs in a blanket. Just the name conjures up images of those delightful little parcels of crispy pastry en...

Pork Fillet Cooking Time: How Long to Cook It Perfectly
RecipesPork fillet, or tenderloin as it's sometimes called, is a real favourite in our house. It's so versatile, and...

The Ultimate Guide to Cooking Delicious Frankfurters
RecipesLet's face it, we all love a good frankfurter. It's a classic, simple, and always satisfying. But let's be rea...

Wolf Meat Recipes: A Guide to Cooking Wild Game
RecipesLet's be honest, you don't see wolf meat at your local butcher shop every day. It's a bit of a wild card, but ...