(Part 1) Choosing the Right Peas: The Foundation of Flavour

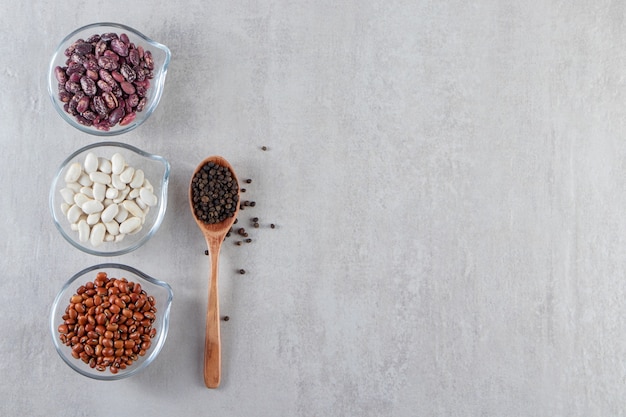
The first step to perfect black-eyed peas is choosing the right ones. It's like building a house - you need a solid foundation. Here's what you need to know:
Fresh vs. Dried: A Matter of Choice
You've got two main options: fresh or dried. fresh black-eyed peas, often found in markets during the summer, are a bit more of a luxury, and they cook up faster. I love them for their vibrant colour and slightly sweet flavour. They often have a delicate skin that melts away during cooking, yielding a smoother texture. However, dried black-eyed peas are the workhorse of the pantry, available all year round. They're also more affordable.
The flavour of fresh black-eyed peas is undeniably vibrant, especially when cooked simply. The sweetness is more pronounced, and their texture is wonderfully tender. But, they are more perishable. If you're looking for a pantry staple, dried black-eyed peas are your best bet. The flavour is slightly less sweet, but they offer a wonderful nutty depth when cooked correctly. Plus, they have a fantastic shelf life, lasting for months if stored properly.
Dried Black-Eyed Peas: A Deeper Dive
If you're going the dried route, pay attention to the following:
- Colour: Look for bright, creamy-white peas with no discolouration. This indicates they're fresh and haven't been stored for too long. Avoid any that are dull or yellowed, as they might be older and have a less desirable flavour.
- Size: Smaller peas tend to cook faster and are easier to digest. Larger peas can be a bit tougher, requiring a longer cooking time. But, both sizes can yield wonderful results, depending on your preference.
- Smell: Fresh, dried peas should have a mild, earthy aroma. If they smell musty or stale, it's best to pass. This usually indicates they have been stored improperly, and the flavour might be compromised.
Sorting and Washing: A Necessary Ritual
Before you even think about cooking, it's essential to sort and wash your dried black-eyed peas. You'd be surprised at how much debris can sneak in. Give them a good rinse in cold water, and remove any pebbles, small twigs, or bits of shriveled peas. This step might seem tedious, but it makes a world of difference in the final dish. You'll end up with cleaner peas and a more enjoyable culinary experience.
(Part 2) The Art of Soaking: Setting the Stage
Soaking dried black-eyed peas is a crucial step. It not only shortens the cooking time but also helps them absorb water, making them plumper and more flavourful. It's a bit of a secret weapon for tender, delicious peas.
The Importance of Soaking
Here's why soaking is a game-changer:
- Faster Cooking: Soaking softens the peas, allowing them to cook more quickly. This saves you time and energy in the kitchen. It also ensures more even cooking, which is essential for achieving that perfect texture.
- Improved Texture: Soaked peas cook up more evenly and less likely to be mushy. You'll get that perfect bite, not a soggy mess. The outer skin becomes more pliable, allowing the pea to absorb the cooking liquid more effectively.
- Reduced Cooking Time: Soaking can significantly cut down on the time it takes to cook the peas, which is great if you're pressed for time. Plus, it also helps reduce the amount of energy used for cooking, making it a more sustainable option.
- Enhanced Flavour: The soaking process allows the peas to absorb more water, leading to a more concentrated and flavorful end result. This is especially important when cooking them in broth or other flavorful liquids.
Soaking Methods: Pick Your Preference
There are a couple of ways to soak your black-eyed peas:
- Cold Water Soak: This is the traditional method, and it's what I always do. Simply cover the peas with cold water, making sure there's about an inch of water above them. Let them sit in the fridge for at least 8 hours, or even overnight. This gives the peas plenty of time to soften and absorb water.
- Quick Soak: If you're in a hurry, you can soak the peas in hot water for about 30 minutes. This is a faster option, but the peas may not be as tender as those soaked in cold water overnight. The hot water method is best for when you need a quick solution, but it's not ideal for maximizing flavour and tenderness.
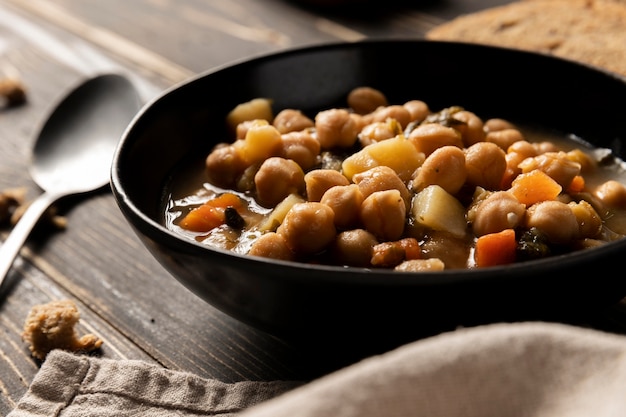
(Part 3) cooking techniques: A Symphony of Flavours
Now, onto the fun part: cooking those black-eyed peas. There are a few ways to do it, and each method brings its own unique flavour profile. It's like choosing the perfect instrument for your culinary symphony.
The Classic Method: Boiling
Boiling is the most straightforward and common method for cooking black-eyed peas. It's simple, reliable, and it allows you to experiment with different flavour combinations. The basic method can be adapted to your preferences, adding aromatics, spices, and herbs for a more complex flavour profile.
How to Boil Black-Eyed Peas: A Step-by-Step Guide
- Step 1: Drain and rinse the soaked peas thoroughly. Make sure to remove any debris or loose skins.
- Step 2: Add the peas to a large pot and cover them with fresh water, leaving about an inch of space at the top. You'll need enough water to ensure the peas cook evenly and don't stick to the bottom of the pot.
- Step 3: Bring the water to a boil, then reduce heat to a gentle simmer. The boiling process helps to soften the peas quickly, while the simmering allows them to cook evenly and absorb more of the flavour from the liquid.
- Step 4: Simmer for about 1-1.5 hours, or until the peas are tender. The cooking time can vary depending on the size and age of the peas. You can test for doneness by piercing a pea with a fork. It should be soft and easily pierced.
- Step 5: Season the peas with salt, pepper, or your preferred spices during the last 15 minutes of cooking. This helps infuse the flavours into the peas.
pressure cooker Magic: Speed and Simplicity
A pressure cooker can be a real time-saver when it comes to cooking black-eyed peas. It's a bit like having a magic wand in the kitchen. It creates pressure, which helps the peas cook quickly and evenly. It's a fantastic option for busy weeknights or when you need a meal ready fast.
Using a Pressure Cooker: Quick and Easy
- Step 1: Drain and rinse the soaked peas thoroughly.
- Step 2: Add the peas to the pressure cooker with enough water to cover them, leaving some space for the steam to build. You can also add aromatics and spices at this stage for added flavour.
- Step 3: Secure the lid and cook according to the manufacturer's instructions. Usually, this takes about 15-20 minutes. The cooking time may vary depending on the pressure cooker model and the amount of peas.
- Step 4: Once the cooking time is up, allow the pressure to release naturally for 10 minutes before releasing any remaining pressure. This helps to prevent the peas from becoming too mushy.
slow cooker Delights: Set It and Forget It
If you're all about hands-off cooking, the slow cooker is your new best friend. It's perfect for those days when you want to come home to a comforting, flavourful pot of black-eyed peas. The slow cooker method allows the flavours to meld and develop over time, creating a rich and satisfying dish.
Slow Cooker: The Ultimate Hands-Off Method
- Step 1: Drain and rinse the soaked peas thoroughly.
- Step 2: Add the peas to the slow cooker with enough water or broth to cover them, leaving a bit of space at the top. You can add aromatics, spices, herbs, or even diced vegetables at this stage.
- Step 3: Cook on low for 6-8 hours, or on high for 3-4 hours, until the peas are tender. The cooking time may vary depending on the size of the peas and the slow cooker model.
- Step 4: Stir in any additional ingredients, such as chopped greens or a squeeze of lemon juice, during the last 30 minutes of cooking. This helps incorporate the fresh flavours into the dish.
(Part 4) Flavour Boosters: Turning Up the Volume
Now that you've cooked your black-eyed peas to perfection, it's time to amp up the flavour. Think of this as adding the perfect seasoning to your culinary masterpiece. Black-eyed peas are incredibly versatile, and they pair well with a wide range of flavours.
Classic Flavour Combinations: Tried and True
Here are some of my favourite flavour combinations that are always a hit:
- Smoky and Savoury: Add smoked paprika, garlic powder, onion powder, and a bay leaf for a rich, smoky flavour. The smoky notes from the paprika and the earthy warmth from the garlic and onion powder create a wonderful combination. The bay leaf adds a subtle, aromatic depth to the dish.
- Spicy Kick: Combine cayenne pepper, cumin, and a touch of smoked paprika for a fiery punch. This combination is perfect for those who enjoy a bit of heat. The cumin adds a warm, earthy note, while the cayenne pepper provides a kick of heat. The smoked paprika adds a subtle smokiness that balances the spice.
- Fresh and Bright: Add chopped cilantro, lime juice, and a pinch of salt for a zesty and refreshing flavour. This is a great option for lighter dishes or when you want a more vibrant flavour profile. The cilantro adds a fresh, herbaceous note, while the lime juice provides a citrusy tang. The salt enhances the flavours of the other ingredients.
- Comforting and Creamy: Stir in a spoonful of coconut milk or cream for a luxurious and comforting flavour. This combination is perfect for those who enjoy a richer and more decadent flavour. The coconut milk or cream adds a silky texture and a subtle sweetness to the dish.
Fresh Herbs: A Burst of Green
Don't underestimate the power of fresh herbs. They can add a whole new dimension of flavour to your black-eyed peas. Here are a few ideas:
- Thyme: Adds a subtle, earthy note. Thyme complements the earthy flavours of the peas and adds a subtle complexity to the dish. It's especially good when paired with smoky or savoury flavours.
- Parsley: Offers a fresh, bright flavour. Parsley adds a clean, herbaceous note that brightens up the dish. It's a great addition to lighter, more refreshing dishes.
- Oregano: Provides a slightly spicy and aromatic flavour. Oregano adds a warm, slightly spicy note that complements the earthy flavour of the peas. It works particularly well with tomato-based dishes.
- Rosemary: Gives a slightly piney and savory flavour. Rosemary adds a unique, woodsy flavour that pairs well with hearty dishes or those with a more rustic feel. It's also a great addition to dishes with a Mediterranean flair.
(Part 5) Serving Suggestions: A culinary adventure
So, you've got your perfectly cooked and seasoned black-eyed peas. Now what? It's time to get creative and explore a world of serving possibilities. Black-eyed peas are incredibly versatile, and they can be incorporated into a wide range of dishes.
Classic comfort food: Hoppin' John
For a Southern classic, you can't go wrong with Hoppin' John. It's a simple dish of black-eyed peas and rice, traditionally served on New Year's Day for good luck. This dish is a comforting and satisfying staple in Southern cuisine, and it's a wonderful way to enjoy black-eyed peas.
How to Make Hoppin' John: A simple recipe
- Step 1: Cook your black-eyed peas according to your preferred method. Make sure they are cooked until tender and have absorbed the desired amount of flavour.
- Step 2: cook rice according to package instructions. Choose a long-grain rice for a fluffy texture that complements the peas.
- Step 3: Combine cooked peas and rice in a large bowl. The ratio of peas to rice is a matter of personal preference, but a good starting point is 1:1.
- Step 4: Add chopped onion, bacon, or ham for extra flavour. The onion adds sweetness and depth, while the bacon or ham provides a salty, smoky flavour. You can also add chopped green peppers for a bit of crunch.
- Step 5: Serve warm and enjoy! Hoppin' John is best enjoyed fresh, but it can also be reheated.
Salad Inspiration: A Lighter Touch
Black-eyed peas are fantastic in salads, adding protein and a satisfying texture. They're a great alternative to beans or lentils, and they add a delightful, earthy note to the salad.
black-eyed pea salad: A Refreshing Twist
- Step 1: Combine cooked black-eyed peas with chopped vegetables, such as bell peppers, tomatoes, and onions. Use a variety of colours for a visually appealing and flavourful salad.
- Step 2: Add a light vinaigrette, such as lemon juice, olive oil, and herbs. The vinaigrette should be light and refreshing, complementing the earthy flavour of the peas. You can also use a balsamic vinaigrette for a more complex flavour.
- Step 3: Top with crumbled feta cheese or toasted nuts for extra flavour and texture. The feta cheese adds a salty, tangy note, while the toasted nuts provide a crunchy texture.
Soup and Stew Sensations: Warm and Nourishing
Black-eyed peas are a staple ingredient in many soups and stews. They add body, protein, and a hearty flavour. The peas absorb the flavours of the other ingredients, creating a rich and satisfying soup or stew.
black-eyed pea soup: A Hearty Comfort
- Step 1: Sauté onions and garlic in olive oil. The onions and garlic provide a base of flavour for the soup, and the olive oil adds richness and depth.
- Step 2: Add cooked black-eyed peas, vegetable broth, and spices, such as cumin and paprika. The vegetable broth adds a light flavour, while the cumin and paprika add warmth and depth. You can also add other spices, such as chili powder, oregano, or thyme, to suit your taste.
- Step 3: Simmer until the flavours meld. This allows the flavours of the ingredients to develop and blend together.
- Step 4: Serve with a dollop of sour cream or yogurt for added richness. The sour cream or yogurt adds a creamy texture and a tangy flavour that complements the earthy flavour of the peas.
(Part 6) Leftovers: Making the Most of Your Bounty
Let's be honest, sometimes you end up with a bit of leftover black-eyed peas. But don't despair! There are so many ways to use them up. Leftover black-eyed peas are a treasure trove of flavour and can be used to create a variety of delicious dishes.
Turn Leftovers into Delicious Meals
Here are a few ideas for using up your black-eyed pea leftovers:
- Black-Eyed Pea Burgers: Combine cooked peas with breadcrumbs, chopped onions, and spices to make flavourful and hearty burgers. These burgers are a great way to use up leftover peas and are packed with protein and fibre. You can add other ingredients, such as chopped herbs, grated carrots, or diced bell peppers, for added flavour and texture.
- black-eyed pea chili: Add cooked peas to a pot of chili for extra protein and texture. The peas absorb the flavours of the chili and add a hearty, earthy note. You can also use leftover chili as a base for a delicious black-eyed pea soup.
- Black-Eyed Pea Dip: Blend cooked peas with avocado, lime juice, and cilantro to create a delicious and healthy dip. This dip is perfect for parties or snacking and is packed with flavour and nutrients. You can also add other ingredients, such as diced tomatoes, red onion, or jalapeno peppers, for a more complex flavour profile.
- Black-Eyed Pea Salad Sandwiches: Pile cooked peas onto sandwiches with lettuce, tomato, and a drizzle of mayonnaise. This is a quick and easy lunch or dinner option that is both satisfying and nutritious. You can also use other toppings, such as sprouts, cucumbers, or avocado, for a more creative and flavourful sandwich.
Freezing for Later: A Pantry Staple
If you've got more black-eyed peas than you can use right away, don't fret! You can freeze them for later use. Freezing is a great way to preserve cooked black-eyed peas and ensure you always have a supply on hand for quick meals. Here's how:
- Step 1: Let the cooked peas cool completely. Make sure they are completely cool before freezing to prevent freezer burn.
- Step 2: Transfer the peas to freezer-safe containers or bags. Use airtight containers or freezer bags to ensure the peas stay fresh and prevent freezer burn.
- Step 3: Label and date the containers. This will help you keep track of how long the peas have been frozen.
- Step 4: Freeze for up to 3 months. Frozen black-eyed peas can be stored for up to 3 months for optimal quality.
(Part 7) nutritional powerhouse: Fuel for Your Body
Black-eyed peas aren't just delicious, they're packed with nutrients. They're a great source of protein, fibre, and various vitamins and minerals. They're also a good source of iron and folate, which are essential for healthy red blood cell production. They are a fantastic choice for those looking for a healthy and filling meal.
A Breakdown of Nutritional Benefits
Here's a table summarizing the nutritional value of cooked black-eyed peas per 100 grams:
| Nutrient | Amount |
|---|---|
| Calories | 110 |
| Protein | 8 grams |
| Carbohydrates | 20 grams |
| Fiber | 8 grams |
| Iron | 2 mg |
| Folate | 80 mcg |
The high protein content makes black-eyed peas a great choice for vegetarians and vegans. The fibre content helps to keep you feeling full and satisfied, making them a great option for weight management. The iron and folate content are essential for healthy blood production and overall well-being.
(Part 8) FAQs: The Most Common Questions Answered
You've got questions, I've got answers! Here are some of the most common questions about black-eyed peas.
1. What does a black-eyed pea taste like?
Black-eyed peas have a mild, earthy flavour that's not overly strong. They have a slightly sweet flavour, with a hint of nuttiness, that reminds me of fresh corn. The texture is firm but tender, and they hold their shape well when cooked.
2. Are black-eyed peas good for you?
Absolutely! They're a great source of protein, fibre, iron, and folate, making them a nutritious addition to your diet. They're also low in fat and calories, making them a healthy choice for those watching their weight. They're a versatile and affordable ingredient that can be enjoyed in a variety of dishes.
3. How long can I keep cooked black-eyed peas in the fridge?
You can store cooked black-eyed peas in an airtight container in the fridge for up to 3-4 days. Just be sure to use them within that time frame for the best flavour and texture. Refrigerated black-eyed peas can be used in salads, soups, or even as a side dish.
4. Can I use canned black-eyed peas?
You can definitely use canned black-eyed peas, especially if you're in a hurry. Just be sure to rinse them thoroughly to remove excess salt and sodium. Canned black-eyed peas are a convenient option, but they can be saltier than their dried counterparts. If you're looking for a more flavourful and less salty option, it's best to cook dried black-eyed peas from scratch.
5. Why are black-eyed peas considered lucky?
In Southern folklore, black-eyed peas are believed to bring good luck, especially when served on New Year's Day. It's thought that their round shape symbolizes coins, and their green color represents prosperity. So, eat up and wish for a lucky year! This superstition is a fun and charming tradition that adds to the enjoyment of black-eyed peas.
There you have it, folks! Everything you need to know about black-eyed peas from choosing the right ones to serving them up in style. Remember, cooking is about experimentation and having fun in the kitchen. So, grab those peas, get creative, and enjoy the delicious results!
Everyone is watching

How to Cook Frozen Lobster Tails Perfectly: A Step-by-Step Guide
RecipesLobster. Just the word conjures up images of lavish meals, special occasions, and a taste of luxury. But let's...

Pigs in a Blanket Cooking Time: How Long to Bake for Perfect Results
RecipesAh, pigs in a blanket. Just the name conjures up images of those delightful little parcels of crispy pastry en...

Pork Fillet Cooking Time: How Long to Cook It Perfectly
RecipesPork fillet, or tenderloin as it's sometimes called, is a real favourite in our house. It's so versatile, and...

The Ultimate Guide to Cooking Delicious Frankfurters
RecipesLet's face it, we all love a good frankfurter. It's a classic, simple, and always satisfying. But let's be rea...

Wolf Meat Recipes: A Guide to Cooking Wild Game
RecipesLet's be honest, you don't see wolf meat at your local butcher shop every day. It's a bit of a wild card, but ...