chicken breast. The humble, versatile, and often misunderstood star of countless kitchens. We all know the struggle: one minute it's juicy and succulent, the next it's dry as the Sahara. I've been there, and trust me, it's a culinary crime. But fret no more, my fellow food enthusiasts! I'm about to share my hard-earned wisdom, gleaned from years of trial and error, to ensure you never again fall victim to the dreaded dry chicken breast.
This isn't just a recipe guide; it's a culinary expedition, your ultimate resource for mastering the art of chicken breast perfection. We'll cover everything from choosing the right cut to understanding the nuances of different cooking methods, mastering the art of seasoning, and even tackling those pesky dryness issues head-on. So, grab your aprons, sharpen your knives, and get ready to embark on a journey to chicken breast nirvana!
(Part 1) Selecting the Right Chicken Breast: It All Starts Here
The foundation of any great dish lies in the quality of its ingredients, and this couldn't be truer for chicken breasts. So, before you even think about preheating your oven or firing up the skillet, let's take a trip to the butcher or the supermarket. Here's what to look for:
Choosing Your Chicken: The Key to Success
- Fresh is Best: Always opt for fresh chicken breasts over frozen ones. They have a superior texture and flavour. I've found that the difference is noticeable – the fresh ones just taste more vibrant.
- Size Matters: Aim for chicken breasts that are roughly the same size. This ensures even cooking. Too big, and you'll end up with undercooked parts. Too small, and they'll dry out in a flash. A good rule of thumb is to look for breasts between 6-8 ounces.
- Trust Your Nose: A fresh chicken breast should have a mild, almost sweet smell. If it smells strong or sour, it's best to steer clear. This is a key indicator of freshness.
- Packaging Check: Ensure the packaging is intact and free of any tears or leaks. And, of course, always check the "use by" date. There's nothing worse than ending up with a chicken breast that's gone bad.
Now, I know what you're thinking: "But what if I can't find perfect chicken breasts?" Don't fret! A good butcher will happily trim them to a more even size for you. And remember, even if the breasts aren't perfectly uniform, you can always adjust your cooking time accordingly. It's all about being adaptable in the kitchen!
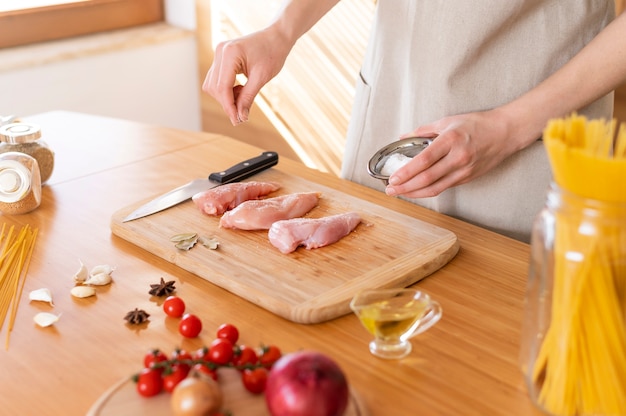
(Part 2) Prepping Your Chicken: A Few Simple Steps
Okay, you've got your chicken breasts, and now it's time to get them ready for their starring role. These simple steps are crucial for achieving a juicy, flavourful result.
Preparing for Perfection
- Pat it Dry: Thoroughly pat the chicken breasts dry with paper towels. This helps prevent steaming, which can make the chicken soggy and less appealing.
- Salt it Up: Salt your chicken breasts about 30 minutes before cooking. This process, known as "salting," helps to draw out moisture and then reabsorb it, resulting in a more flavourful and juicy chicken. It's a simple trick, but it makes a big difference.
- Don't Overcrowd: When cooking chicken breasts, give them space. Overcrowding the pan or baking sheet can lead to uneven cooking and steaming, which can result in a dry, tough texture. Remember, we want happy, well-spaced chicken breasts.
Yes, these steps might seem like extra effort, but they really pay off in the end. Consider it an investment in your chicken's (and your taste buds') future.
(Part 3) The Art of cooking chicken breasts: A Deep Dive
Now for the fun part! We're going to dive into the world of cooking chicken breasts, exploring a variety of methods to suit every taste and lifestyle. From the classic pan-sear to the hands-off magic of baking and the speed of air frying, you'll find your perfect match.
The Pan-Seared Classic: A Kitchen Staple
Pan-searing is a kitchen staple for a reason. It's quick, easy, and delivers a delicious, crispy exterior. Here's how I get those beautiful sear marks:
- Heat It Up: Heat a cast-iron skillet or a heavy-bottomed pan over medium-high heat. Make sure the pan is scorching hot before you add the chicken. This is essential for achieving that perfect sear.
- Oil Up: Add a tablespoon or two of oil, like olive oil or vegetable oil. Let the oil shimmer before adding the chicken. This ensures even browning.
- Sear It: Place the chicken breasts in the hot pan and let them cook undisturbed for about 4-5 minutes per side, or until they develop a nice golden brown crust. Don't touch them! We want them to develop those gorgeous sear marks.
- Reduce the Heat: Once seared, reduce the heat to medium-low and continue cooking for another 5-7 minutes, or until the internal temperature reaches 165°F (74°C). This ensures the chicken is cooked through without drying out.
- Rest is Key: Let the chicken rest for 5-10 minutes before slicing and serving. This allows the juices to redistribute, resulting in a more tender and juicy breast. Remember, patience is a virtue in the kitchen.
Pan-searing is a great way to cook chicken breasts for a quick and satisfying meal. It's a versatile method that can be used for a variety of dishes, from simple chicken with roasted vegetables to more elaborate stir-fries.
The Baking Method: A Hands-Off Approach
Sometimes, you just want to throw some chicken in the oven and forget about it for a while. Baking is a great option for those busy days. Here's what you need to know:
- Preheat Your Oven: Preheat your oven to 400°F (200°C). This is essential for ensuring even cooking.
- Line a Baking Sheet: Line a baking sheet with parchment paper or foil for easy cleanup. This prevents the chicken from sticking to the baking sheet and makes cleanup a breeze.
- Season and Bake: Season the chicken breasts with your favorite spices and herbs. Place them on the prepared baking sheet and bake for 20-25 minutes, or until the internal temperature reaches 165°F (74°C).
- Rest and Enjoy: Let the chicken rest for 5-10 minutes before slicing and serving. This allows the juices to redistribute, resulting in a more tender and juicy breast.
Baking is a great way to cook chicken breasts for a crowd. It's also a good option if you're looking for a healthier cooking method, as it doesn't require any added oil.
The Air Fryer Magic: Quick and Crispy
The air fryer is a modern-day culinary marvel, and for good reason. It can cook chicken breasts to crispy perfection in a fraction of the time. Here's the air fryer method:
- Preheat Your Air Fryer: Preheat your air fryer to 400°F (200°C). This ensures the chicken cooks evenly and crisps up beautifully.
- Season and Cook: Season the chicken breasts with your favorite spices and herbs. Place them in the air fryer basket and cook for 10-12 minutes, or until the internal temperature reaches 165°F (74°C).
- Flip It Over: Flip the chicken breasts halfway through cooking for even browning. This ensures they cook evenly on both sides.
- Rest and Serve: Let the chicken rest for 5-10 minutes before slicing and serving. This allows the juices to redistribute, making the chicken even more tender and juicy.
The air fryer is a fantastic option for busy weeknights. It's quick, convenient, and delivers crispy, flavorful chicken breasts without the added oil of pan-frying. It's also a great option for cooking chicken breasts in smaller batches.
(Part 4) Temperature is Key: Mastering the Internal Thermometer
Now, let's talk about something crucial: temperature. I know, it might seem a bit technical, but it's absolutely essential to ensure your chicken is cooked through and safe to eat.
The Importance of the Internal Thermometer
I can't emphasize this enough: always use a meat thermometer to check the internal temperature of your chicken breasts. It's the only way to be certain that they've reached a safe temperature.
The USDA recommends that chicken breasts be cooked to an internal temperature of 165°F (74°C). Don't rely on visual cues like color changes, as these can be misleading. A thermometer is your reliable guide to perfect, safe chicken.
Using a Meat Thermometer: A Quick Guide
- Insert it Properly: Insert the thermometer into the thickest part of the chicken breast, making sure it's not touching bone or fat. This ensures an accurate reading.
- Wait for the Reading: Leave the thermometer in place for about 10-15 seconds to get an accurate reading. This gives the thermometer enough time to register the internal temperature of the chicken.
- Don't Undercook: If the temperature is below 165°F (74°C), continue cooking until it reaches the recommended temperature. Safety comes first, always!
Investing in a meat thermometer is a wise move. It's a small investment that can save you from food poisoning and ensure you enjoy delicious, safe chicken every time. It's a kitchen essential, truly.
(Part 5) Seasoning Secrets: From Simple to Savory
Alright, let's spice things up! Seasoning your chicken breasts can make all the difference. Think of it as adding the finishing touches to your culinary masterpiece. There's a whole world of flavours out there, and the possibilities are endless.
Classic Chicken Seasoning: A Simple Starting Point
Sometimes, a simple approach is all you need. Here's a basic seasoning blend that works wonders:
- Salt: Salt is crucial for enhancing flavour and helping to retain moisture. It's the foundation of any good seasoning blend.
- Black Pepper: Black pepper adds a touch of spice and complexity. It's a classic pairing with chicken for a reason.
- Paprika: Paprika adds a subtle sweetness and warmth. It provides a lovely depth of flavour to the chicken.
- Garlic Powder: Garlic powder adds a savory, pungent flavour. It's a versatile seasoning that works well with chicken.
- Onion Powder: Onion powder provides a savory depth to the seasoning blend. It adds a lovely aromatic touch to the chicken.
You can adjust the amounts to your liking, but a good starting point is about 1/2 teaspoon of each spice per chicken breast. Mix the spices together before rubbing them onto the chicken.
Spice It Up: Exploring Flavorful Blends
Now, for those of you who like to experiment with bolder flavours, let's dive into some exciting seasoning blends:
- Mediterranean Twist: Combine dried oregano, thyme, rosemary, garlic powder, onion powder, and a pinch of red pepper flakes. This blend is perfect for those who love the taste of the Mediterranean.
- Spicy Southwestern: Mix cumin, chili powder, paprika, garlic powder, onion powder, and a pinch of cayenne pepper. This blend will add a kick of heat and a smoky flavour to your chicken.
- Asian Inspired: Combine ginger powder, garlic powder, sesame oil, soy sauce, and a touch of brown sugar. This blend will add a touch of sweet and savory Asian flavour to your chicken.
These are just a few ideas to get your creative juices flowing. Experiment with different spice combinations, explore global cuisines, and discover your own signature seasoning blends. The world is your oyster, or should I say, your spice rack!
(Part 6) Dealing with Dry Chicken Breasts: A Troubleshooting Guide
We've all been there. We've all cooked a chicken breast that turned out dry and rubbery. It's a common problem, but one that can be avoided with a little knowledge and a few adjustments.
Common Causes of Dry Chicken Breasts
- Overcooking: This is the most common reason for dry chicken breasts. Cook them for too long, and they lose their moisture. It's like wringing out a sponge, but not in a good way.
- High Heat: Cooking chicken breasts over high heat can cause the outside to cook too quickly before the inside has a chance to cook through. The outside gets burnt before the inside is even close to being done.
- Thin Chicken Breasts: Thin chicken breasts can dry out quickly because they have less surface area to retain moisture. It's like a thin piece of paper, it can't hold much moisture.
- Not Resting: Letting the chicken rest after cooking allows the juices to redistribute, resulting in a more tender and juicy breast. The key here is to allow the chicken to relax and recover after cooking.
Tips for juicy chicken breasts: Preventing the Dryness
- Use a Thermometer: Don't rely on visual cues to judge doneness. Use a meat thermometer to ensure the chicken is cooked to the correct internal temperature. This is the most reliable way to avoid overcooking.
- Lower the Heat: Cook chicken breasts over medium or medium-low heat to prevent overcooking. This ensures even cooking without burning the exterior.
- Pound Them Flat: If you have thick chicken breasts, pound them flat with a meat mallet to ensure even cooking. This helps to ensure the thickest part of the chicken cooks through at the same rate as the thinner parts.
- Brine Them: brining chicken breasts in a saltwater solution can help to retain moisture and enhance flavor. The salt helps the chicken retain its moisture during cooking.
- Use a Marinade: A marinade can help to add flavor and keep the chicken moist. Marinades add flavour to the chicken and also help to tenderize the meat.
- Rest and Serve: Always let the chicken rest for 5-10 minutes after cooking to allow the juices to redistribute. This is a crucial step in ensuring a juicy and flavorful chicken breast.
Remember, preventing dry chicken breasts is all about understanding the causes and taking the necessary steps to avoid them. With a little effort, you can enjoy juicy and flavorful chicken breasts every time.
(Part 7) chicken breast recipes: Beyond the Basics
Now that you've mastered the basics of cooking chicken breasts, let's explore some delicious and creative recipes. These recipes showcase different cooking methods, flavour combinations, and techniques to inspire your culinary adventures.
pan-seared chicken with Lemon and Herbs
This recipe is simple, elegant, and bursting with fresh flavour.
- Ingredients:
- 2 boneless, skinless chicken breasts
- 1 tablespoon olive oil
- 1 lemon, zested and juiced
- 2 cloves garlic, minced
- 1/4 cup chopped fresh parsley
- Salt and pepper to taste
- Instructions:
- Season the chicken breasts with salt and pepper.
- Heat the olive oil in a large skillet over medium-high heat.
- Add the chicken breasts to the hot skillet and cook for 4-5 minutes per side, or until golden brown.
- Reduce the heat to medium-low, add the lemon zest, lemon juice, garlic, and parsley.
- Cook for another 2-3 minutes, or until the chicken is cooked through.
- Serve immediately with your favorite side dish.
Baked Chicken with Honey Garlic Glaze
This recipe is sweet, savory, and incredibly easy to make.
- Ingredients:
- 2 boneless, skinless chicken breasts
- 1 tablespoon honey
- 1 tablespoon soy sauce
- 1 clove garlic, minced
- 1/2 teaspoon ground ginger
- Salt and pepper to taste
- Instructions:
- Preheat your oven to 400°F (200°C).
- In a small bowl, whisk together the honey, soy sauce, garlic, ginger, salt, and pepper.
- Place the chicken breasts in a baking dish and pour the glaze over them.
- Bake for 20-25 minutes, or until the chicken is cooked through.
- Serve immediately with your favorite side dish.
air fryer chicken with Chipotle Lime Rub
This recipe is quick, flavorful, and perfect for a busy weeknight.
- Ingredients:
- 2 boneless, skinless chicken breasts
- 1 tablespoon smoked paprika
- 1 tablespoon chili powder
- 1 teaspoon cumin
- 1 teaspoon garlic powder
- 1/2 teaspoon onion powder
- 1/4 teaspoon chipotle powder
- 1/4 teaspoon lime zest
- Salt and pepper to taste
- Instructions:
- In a small bowl, combine the smoked paprika, chili powder, cumin, garlic powder, onion powder, chipotle powder, lime zest, salt, and pepper.
- Rub the spice mixture onto the chicken breasts.
- Preheat your air fryer to 400°F (200°C).
- Place the chicken breasts in the air fryer basket and cook for 10-12 minutes, or until the internal temperature reaches 165°F (74°C).
- Serve immediately with your favorite side dish.
(Part 8) Storage and Leftovers: Maximizing Your Chicken
Let's talk about what to do with your leftover chicken breasts. We've all got that one leftover chicken breast staring back at us from the fridge. But don't worry, there are tons of ways to use it up!
Storing Your Chicken: A Quick Guide
- Refrigerate: Cooked chicken breasts should be stored in the refrigerator within 2 hours of cooking. This helps to prevent bacteria growth.
- Proper Storage: Place the chicken in an airtight container or wrap it tightly with plastic wrap. This ensures the chicken stays fresh and prevents any freezer burn.
- Shelf Life: Cooked chicken breasts can be stored in the refrigerator for 3-4 days. After that, it's best to freeze them or discard them.
- Freeze It: You can also freeze cooked chicken breasts. Place them in a freezer-safe bag or container and freeze for up to 3 months. This allows you to store leftover chicken for later use.
Leftover Chicken Inspiration: Tasty Ideas
- chicken salad: Combine shredded chicken with mayonnaise, celery, onion, and your favorite seasonings. This is a classic way to use up leftover chicken and makes for a delicious lunch.
- Chicken Soup: Add shredded chicken to your favorite soup recipe. It adds a hearty and flavorful protein to your soup.
- Chicken Stir-Fry: Cut leftover chicken into bite-sized pieces and add them to a stir-fry. This is a quick and easy way to use up leftover chicken.
- Chicken Quesadillas: Warm up tortillas and fill them with shredded chicken, cheese, and your favorite toppings. This is a fun and easy way to use up leftover chicken.
- Chicken Pizza: Top your favorite pizza crust with shredded chicken, cheese, and your favorite toppings. This is a delicious and creative way to use up leftover chicken.
Remember, using leftover chicken is a great way to reduce food waste and create delicious new meals. Don't let those chicken breasts go to waste!
FAQs
What's the best way to avoid dry chicken breasts?
The most important thing is to avoid overcooking. Use a meat thermometer to ensure the chicken is cooked to the correct internal temperature of 165°F (74°C). You can also help prevent dryness by using a lower cooking temperature, brining the chicken, or marinating it. These methods help to lock in moisture and prevent the chicken from drying out during cooking.
Can I cook chicken breasts from frozen?
You can cook chicken breasts from frozen, but it will take longer and the results might not be as good. It's best to thaw them in the refrigerator overnight before cooking. This ensures the chicken cooks evenly and prevents it from becoming tough.
What are some good side dishes for chicken breasts?
Chicken breasts are incredibly versatile, so you can pair them with a wide variety of side dishes. Some classic choices include roasted vegetables, mashed potatoes, rice, pasta, salads, and couscous. You can also get creative with your side dishes and try something new, like quinoa, sweet potato fries, or a fruit salad.
How long does it take to cook a chicken breast?
The cooking time for a chicken breast will vary depending on the cooking method and the size of the breast. Generally, a chicken breast will take about 15-25 minutes to cook. It's always best to use a meat thermometer to ensure the chicken is cooked to the correct internal temperature.
What are some tips for making flavorful chicken breasts?
The key to flavorful chicken breasts is seasoning. Use a combination of salt, pepper, and herbs and spices to create your own unique flavor profile. You can also try marinating the chicken breasts in a flavorful liquid, like buttermilk, soy sauce, or citrus juice. These methods add depth of flavour to the chicken and make it more appealing.
Now, go forth, my culinary comrades, and conquer the chicken breast. You've got this!
Everyone is watching

Corn on the Cob: The Ultimate Guide to Perfectly Cooked Ears
Healthy MealsAh, corn on the cob. Just the name evokes images of sunny days, barbecues, and that sweet, juicy flavour that ...

Perfect Pork Roast Oven Cooking Time: A Guide to Delicious Results
Healthy MealsThere's something truly satisfying about a perfectly roasted pork. The aroma alone is enough to make your mout...

Ham Cooking Time: How Long to Bake, Smoke, or Boil a Delicious Ham
Healthy MealsAh, ham. It's a classic, isn't it? A real crowd-pleaser, especially around holidays. And when done right, it'...

Scallops: The Ultimate Guide to Perfect Cooking
Healthy MealsAh, scallops. Those delicate, sweet, and utterly delicious morsels of the sea. They hold a special place in my...

Spaghetti Squash: The Ultimate Guide to Cooking and Serving
Healthy MealsRemember that time you saw spaghetti squash at the supermarket, looking all bumpy and strange, and thought, "W...