Ah, tenderloin. Just the name evokes images of succulent, juicy meat, perfectly cooked and ready to melt in your mouth. And believe me, it’s a culinary experience worth striving for. It’s a cut that deserves respect, a little know-how, and perhaps a dash of confidence. That's why I'm here – to guide you through the journey of mastering the tenderloin roast.
We’ll dive deep into choosing the right cut, prepping it for perfection, exploring various cooking techniques, and even navigating the tricky world of doneness. We'll unlock the secrets to sides and sauces, and explore flavour combinations to ignite your culinary creativity. Buckle up, this guide is your ticket to tenderloin triumph.
(Part 1) Choosing the Perfect Cut: The Foundation of Your Feast
Let's face it, you can’t expect a masterpiece from a mediocre canvas. The same goes for tenderloin. A good cut is the foundation of a perfect roast, and it's worth taking your time to select one.
What Makes a Tenderloin Truly Tender?
Look for these key characteristics when you're at the butcher counter:
- Marbling: Think of marbling as nature's built-in flavour enhancer. Those little streaks of fat throughout the meat will melt during cooking, adding juiciness and flavour. Look for even marbling, not just a few scattered spots.
- Colour: A healthy tenderloin should have a vibrant, deep red colour. Avoid anything too pale or too dark. It's a sign of freshness and quality.
- Thickness: For a satisfying roast, go for a piece that's at least 2 inches thick. This gives you enough room for the heat to penetrate evenly and prevents the meat from cooking too quickly.
The Butcher is Your Friend: Don't be Afraid to Ask
Remember, butchers are the experts! They've seen it all, and they're there to help you find the perfect piece of meat. Ask them about the origin of the tenderloin (grass-fed, free-range), how it was raised, and even their recommendations on the best cooking methods. They'll be thrilled to share their knowledge.
(Part 2) Prepping Your Tenderloin for Success: Setting the Stage

You've got your chosen cut, now it’s time to prep it for its star turn. This is where you'll unlock its potential for flavour and tenderness.
Trimming: A Little TLC for Your Meat
Don’t skip trimming! It’s not about getting rid of all the fat, it’s about shaping the tenderloin and removing any excess that might hinder browning and even cooking. A few strategic cuts will help the roast cook evenly and give you a more attractive final presentation.
Tying the Knot: Keeping It Together
Tying is a crucial step for an even cook. Think of it as a culinary hug that prevents the tenderloin from curling and helps maintain its shape. Use butcher’s twine or even dental floss (yes, really!). A little bit of patience here will pay off in a beautifully browned roast.
Seasoning: Adding the Finishing Touch
Now comes the fun part, where you can infuse your personality into your roast! Seasoning is where you create a symphony of flavours. It’s all about balance and creating a flavour profile that excites your palate.
I’m a fan of keeping it simple with salt, pepper, garlic powder, and a touch of smoked paprika. But feel free to experiment! Try herbs like rosemary, thyme, or oregano, or go bolder with a pinch of chili powder or cumin. Remember, there’s no right or wrong way to season, just what tastes best to you.
Resting Time: Letting the Flavours Settle
Before you start cooking, give your seasoned tenderloin some time to relax. Let it chill out in the fridge for about 30 minutes. This allows the flavours to permeate the meat, and gives it a chance to relax and become more tender.
(Part 3) Cooking Techniques: Your Choices Unveiled
Now, let’s dive into the heart of the matter – the cooking methods. There are a few popular ways to roast a tenderloin, each offering its own unique benefits.
The Classic Oven Roast: A Time-Tested Favourite
This is the tried-and-true method, perfect for weeknight dinners or casual gatherings. It's all about simplicity and delivers a fantastic result. Preheat your oven to a high temperature (around 425°F or 220°C), sear the roast on the stovetop to create a crispy exterior, and then transfer it to the oven. This method delivers a perfect combination of crispy exterior and juicy interior.
reverse searing: Patience for a Perfectly Tender Result
For those who appreciate a slow and steady approach, reverse searing is your method. It’s a testament to the power of low and slow cooking. You’ll start by cooking the tenderloin in a low oven (around 275°F or 135°C) until it's almost fully cooked, then sear it on the stovetop at the end to create that beautiful crust. The result is a consistently tender, juicy roast.
Sous Vide: Precision Cooking for the Ultimate in Tenderness
For the ultimate in precision and control, consider sous vide. This method involves sealing the tenderloin in a vacuum bag and immersing it in a water bath at a precisely controlled temperature. It's an amazing way to ensure even cooking and tender results. You can even cook it a day ahead and reheat it, making it ideal for entertaining.
(Part 4) Achieving the Perfect Doneness: Mastering the Art of Judgement
Now, we're getting into the nitty-gritty – how to know when your tenderloin is perfectly cooked. It’s a delicate dance between raw and overcooked, and it’s all about finding that sweet spot that delivers maximum tenderness and flavour.
The meat thermometer: Your Reliable Guide
If you're serious about getting it right, invest in a meat thermometer. It's your ultimate guide to achieving the perfect level of doneness. Aim for an internal temperature of 135°F (57°C) for medium-rare, 145°F (63°C) for medium, and 160°F (71°C) for well-done. Remember, these are just guidelines, adjust to your preference.
The Finger Test: For the Adventurous (but Not Recommended)
There’s the “finger test” for those who prefer a more hands-on approach. Press the centre of the roast. If it feels firm, it's well-done. If it feels slightly firm, it’s medium. And if it feels very soft, it’s rare. But honestly, I’d stick with the thermometer. It's much more accurate and eliminates the guesswork.
Resting: Letting the Juices Redistribute
Once your tenderloin is cooked, let it rest for 10-15 minutes before carving. This allows the juices to redistribute throughout the meat, leading to a more tender and succulent final product. This is a crucial step that shouldn't be skipped.
(Part 5) Delicious Sides: Partnering Your Tenderloin for a Harmonious Meal
Let's face it, a roast is nothing without its supporting cast of side dishes. They're the unsung heroes that complement the richness of the tenderloin and create a harmonious meal.
Classic Companions: A Symphony of Familiar Flavours
You can't go wrong with classic pairings like creamy mashed potatoes, roasted vegetables, or a simple green salad. They provide a comforting touch that complements the tenderloin's luxurious texture and rich flavour.
Fancy Flair: Elevate Your Meal with Sophisticated Sides
For a touch of elegance, consider a gratin dauphinois (creamy potato gratin) or roasted asparagus with hollandaise sauce. These options add a touch of sophistication and create an impressive meal.
Global Inspiration: Embrace the World of Flavour
Don't be afraid to step outside the box and explore different cuisines for side dish inspiration. A Moroccan-inspired couscous or a vibrant Asian slaw can add exciting bursts of flavour and texture, creating a truly unique dining experience.
(Part 6) Sauces: The Finishing Touch that Elevates Your Creation
Now, let's talk about the finishing touch that can transform a delicious tenderloin into a truly unforgettable culinary masterpiece – sauce. A good sauce can bring everything together, adding another layer of depth and complexity to your meal.
Pan Sauce: Simplicity at its Finest
The most delicious sauces are often the simplest. Pan sauces made from the pan drippings are a perfect example. Deglaze the pan with wine or broth, reduce it down, and whisk in some butter for a rich, flavorful sauce that's practically irresistible.
Mushroom Sauce: A Rich and Earthy Embrace
Mushroom sauce is a classic pairing for tenderloin. It's rich, earthy, and simply divine. You can make it from scratch or use a jarred version, but be sure to adjust the seasoning to your taste.
Creamy Herb Sauce: Light and Refreshing
For a lighter touch, try a creamy herb sauce. Combine cream, fresh herbs like parsley, chives, or tarragon, and a bit of lemon juice for a refreshing and vibrant sauce that complements the tenderloin beautifully.
(Part 7) Creative Flavour Combinations: Unleashing Your Culinary Creativity
Alright, let’s break free from the norm and get adventurous. There’s a whole world of flavour waiting to be explored! Here are a few ideas to get your culinary creativity flowing.
Citrusy Delight: A Bright and Refreshing Twist
Season your tenderloin with a blend of orange zest, rosemary, and garlic. The citrusy notes add a bright and refreshing touch to the rich flavour of the meat, creating a delightful contrast.
Spicy Kick: A Bold and Intriguing Adventure
For those who appreciate a little heat, try a rub of smoked paprika, cumin, and chili powder. It’s a great way to add some depth and intrigue to your roast, and it pairs wonderfully with smoky sides like grilled vegetables or sweet potatoes.
Mediterranean Inspiration: A Trip to the Shores of Flavor
Combine dried oregano, thyme, and garlic for a flavourful Mediterranean twist. Serve with roasted vegetables like peppers, zucchini, and onions for a complete meal that's bursting with flavour and transports you to sunny shores.
(Part 8) Serving and Enjoying Your Masterpiece: A Celebration of Culinary Success
The moment has arrived! Your tenderloin is cooked to perfection, your sides are ready, and your sauce is bubbling away. It’s time to enjoy your masterpiece!
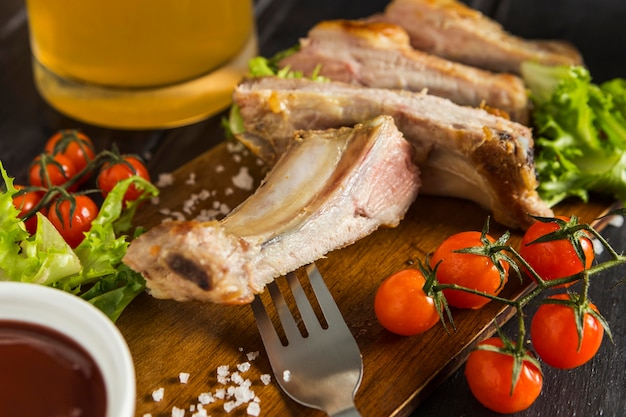
Carving Tips: Slicing with Precision
Carve your tenderloin against the grain. This ensures that each slice is nice and tender, melting in your mouth. Use a sharp chef's knife or a carving knife for the best results. And remember, don't slice it too thin! You want each slice to be substantial and satisfying.
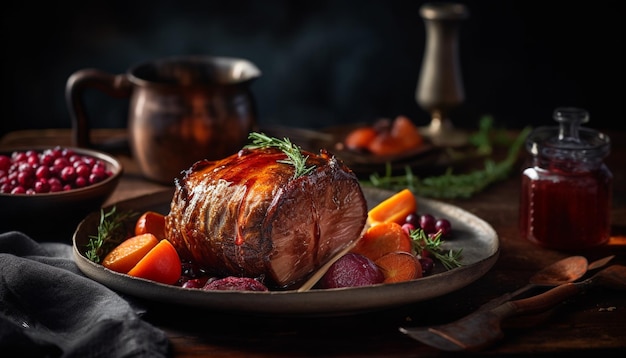
Presentation Matters: Making Your Roast a Culinary Work of Art
Presentation can make all the difference. Arrange your tenderloin slices beautifully on a platter, perhaps on a bed of fresh greens or alongside a swirl of your chosen sauce. Add some fresh herbs, a drizzle of sauce, and a sprinkling of sea salt for a final touch of artistry.
Sharing the Love: Celebrating with Friends and Family
Now, it’s time to share your culinary creation with friends and family. Savour every delicious bite, revel in the compliments, and enjoy the moment. You've earned it!
(Part 9) FAQs: Your Tenderloin Questions Answered
Let's address those lingering questions. I'm here to provide you with the answers you need to feel confident in your tenderloin cooking journey.
1. What if my tenderloin is too thick?
Don't worry, you can always butterfly it! This involves making a horizontal cut almost all the way through the tenderloin, then opening it up like a book. It helps the roast to cook more evenly and makes it easier to serve. Just be sure to tie it up securely to keep the two halves together.
2. What temperature should I cook my tenderloin at?
It depends on your chosen cooking method. For a classic oven roast, aim for 425°F (220°C). For reverse searing, you'll cook it at a lower temperature, around 275°F (135°C). And for sous vide, the temperature will depend on your desired level of doneness. Consult your sous vide instructions for specific temperatures.
3. How long does it take to cook a tenderloin?
The cooking time varies depending on the size and thickness of your roast and your chosen cooking method. A general rule of thumb is to allow 15-20 minutes per pound for a medium-rare roast. However, it's always best to check the internal temperature with a meat thermometer to ensure it's cooked to your liking.
4. How do I know if my tenderloin is done?
The trusty meat thermometer is your best friend here. Aim for 135°F (57°C) for medium-rare, 145°F (63°C) for medium, and 160°F (71°C) for well-done. Remember, doneness is a matter of preference, so adjust the temperature according to your liking.
5. What can I do with leftover tenderloin?
Leftover tenderloin is a culinary treasure! Slice it up and use it in sandwiches, salads, or even pasta dishes. It's also great for making a quick and easy stir-fry. You can also freeze leftover tenderloin for later use. Just be sure to wrap it tightly in plastic wrap and aluminum foil before storing it in the freezer.
There you have it! Your guide to tenderloin triumph. Now, go forth, conquer your kitchen, and impress everyone with your culinary skills. Remember, a tenderloin roast is a testament to your culinary passion, and it’s a dish that will leave everyone wanting more.
Everyone is watching

Corn on the Cob: The Ultimate Guide to Perfectly Cooked Ears
Healthy MealsAh, corn on the cob. Just the name evokes images of sunny days, barbecues, and that sweet, juicy flavour that ...

Perfect Pork Roast Oven Cooking Time: A Guide to Delicious Results
Healthy MealsThere's something truly satisfying about a perfectly roasted pork. The aroma alone is enough to make your mout...

Scallops: The Ultimate Guide to Perfect Cooking
Healthy MealsAh, scallops. Those delicate, sweet, and utterly delicious morsels of the sea. They hold a special place in my...

Ham Cooking Time: How Long to Bake, Smoke, or Boil a Delicious Ham
Healthy MealsAh, ham. It's a classic, isn't it? A real crowd-pleaser, especially around holidays. And when done right, it'...

Spaghetti Squash: The Ultimate Guide to Cooking and Serving
Healthy MealsRemember that time you saw spaghetti squash at the supermarket, looking all bumpy and strange, and thought, "W...