prime rib. Just the name evokes images of a glorious centerpiece, a majestic roast radiating warmth and a tantalizing aroma, promising a meal that’s both a feast for the eyes and a symphony for the palate. It’s the culinary crown jewel, the king of roasts, and a dish that deserves all the attention and care you can give it.
My journey with prime rib has been a delicious adventure, filled with triumphs and, let’s be honest, a few mishaps along the way. There were the times I overcooked it, resulting in a dry, disappointing roast, or the occasions when the sear wasn’t quite right, leaving me with a less-than-perfect crust. But through those experiences, I learned. I discovered the subtle nuances that make the difference between a good prime rib and an exceptional one. And now, I’m ready to share my knowledge with you, guiding you through the steps to crafting your own prime rib masterpiece.
Part 1: Selecting Your Prime Rib – A Cut Above the Rest
The first step to prime rib perfection is choosing the right cut. It’s a decision that shouldn’t be taken lightly. We’re talking about the star of the show, the foundation upon which your culinary masterpiece will be built. And in the world of prime rib, it all boils down to the bones, my friends. Bone-in cuts are the way to go.
The Power of the Bone
Why bone-in? Well, the bones act like little heat conductors, ensuring that the meat cooks evenly and stays incredibly moist. Imagine them as natural convection ovens within your roast, radiating heat and locking in those delicious juices. It’s a culinary magic trick that makes all the difference.
Understanding the Cuts – Standing Tall or Taking a Rib
Now, let’s delve into the different cuts. You’ll mainly encounter two options:
- standing rib roast: This is the classic, the granddaddy of prime ribs. It’s a whole section of ribs, usually 3 to 4 ribs long, weighing in at a hefty 6-8 pounds. This is the cut for serious carnivores, perfect for feeding a hungry crowd. Picture this: a stunning centerpiece, proudly standing tall, ready to be carved with theatrical flair.
- Rib Roast: This is a more manageable size, typically 2 to 3 ribs long, weighing around 4-6 pounds. It’s ideal for smaller gatherings or if you prefer a roast that’s a bit easier to carve and manage. Think of this as a more intimate experience, perfect for a cozy dinner party with close friends or family.
The Grade Factor – Prime vs. Choice
Next, we have the grade. Most prime ribs you’ll find are USDA Choice or Prime. Prime is the highest grade, indicating a cut with the most marbling – those beautiful streaks of fat that contribute to the rich flavor and unbelievable juiciness. It's the luxurious choice, a decadent experience for those who crave the absolute best. Choice, however, is still a fantastic option, offering a superb taste and tenderness at a more affordable price.
Making the Choice:
So, how do you make your decision? It depends on your needs and preferences. A large family gathering calls for a Standing Rib Roast. For a smaller dinner party, the Rib Roast will be just right. And if you're going all out, Prime grade will take your roast to a whole new level of deliciousness. But remember, even Choice grade can be absolutely phenomenal.
Part 2: Setting the Stage – Prepping for Prime Time

You’ve chosen your cut, and now it’s time to unleash your culinary creativity. This is the pre-show preparation, the essential steps that will set the stage for your prime rib’s grand entrance.
Seasoning with Soul – The Spice of Life
Let’s talk seasoning. This is where your own personal touch comes in, a chance to add your own flavour signature to your masterpiece. A classic salt and pepper rub is always a winning combination, a timeless pairing that lets the natural flavour of the beef shine through. But don't be afraid to go beyond the basics. My personal favorites include adding a touch of garlic powder, onion powder, smoked paprika, or even a whisper of rosemary.
The key is to keep it simple and enhance, not overwhelm. Think of seasoning as a gentle nudge, a subtle way to bring out the meat’s inherent deliciousness. A light, even coat is all you need. It’s a delicate balance between flavour and restraint, a dance between bold seasoning and allowing the natural essence of the prime rib to take centre stage.
Room Temperature – Let It Rest
Before you pop your prime rib into the oven, let it rest at room temperature for at least an hour. This allows the meat to reach a more even temperature throughout, ensuring a more consistent and even cook. Think of it as a pre-show warm-up for your culinary star. This step is crucial for a roast that’s both perfectly cooked and beautifully tender.
The Fat Cap – A Culinary Treasure
Now, let’s talk about the fat cap, that beautiful layer of fat covering the top of your roast. It’s a culinary treasure, the key to unlocking the prime rib’s full potential. Don’t be tempted to trim it all off! Leave a thin layer, about 1/4 inch, to ensure that the roast stays incredibly juicy and tender. This fat will render down during cooking, basting the meat from within, ensuring a mouthwatering result.
Part 3: The Grand Performance – Roasting with Precision
The stage is set, the roast is prepped, and it’s time for the grand performance. Fire up your oven to 450°F (232°C) and prepare to orchestrate a culinary symphony. This is where precision meets passion, where patience and technique come together to create a masterpiece.
High Heat Start – The Sizzle of Success
We'll start with high heat, a roaring inferno that will create a beautiful, caramelized crust. This intense heat sears the surface, locking in all those delicious juices and creating a symphony of aromas. It’s the first act of a culinary drama, a dramatic opening that sets the tone for the entire performance.
The Sear – A Culinary Embrace
Place the roast in a roasting pan, uncovered, and let it cook for 15 minutes at this high temperature. The fat cap will begin to render down, creating a glistening pool of flavour and a tantalizing crust that crackles with deliciousness. And remember those bone-in ribs? They’re adding their magic too, conducting heat and keeping the meat incredibly moist. It’s a symphony of flavors and textures, a culinary embrace that begins the journey towards perfection.
Lowering the Heat – A Slow and Steady Rise
After those initial 15 minutes of intense heat, it's time to turn down the heat and allow the roast to slowly develop its flavour and tenderness. Reduce the oven temperature to 325°F (163°C) and continue roasting, uncovered, until your roast reaches the desired level of doneness. This slow and steady approach is essential for a tender, succulent outcome. The meat will cook evenly, allowing the juices to distribute evenly, resulting in a prime rib that's truly melt-in-your-mouth delicious.
Part 4: Timing is Key – The Dance of Doneness
Now, let’s talk about the crucial element of timing. This is where your trusty meat thermometer becomes your culinary compass, guiding you towards the perfect level of doneness.
Roast Weight and cooking time – A Rough Guide
Here is a general guideline for cooking times, but remember, oven temperatures can vary, so always use a meat thermometer to ensure your roast is cooked to your liking:
| Roast Weight (lbs) | Cooking Time (hours) |
|---|---|
| 4-5 | 1 1/2-2 |
| 6-7 | 2-2 1/2 |
| 8-9 | 2 1/2-3 |
These are just estimations. Always use a meat thermometer to check the internal temperature. You want the roast to reach 135°F for medium-rare, 140°F for medium, and 145°F for medium-well.
The Importance of Rest – Allowing Flavors to Bloom
You've reached the desired doneness, and your roast is looking magnificent. But hold on, my friend. It’s time for a well-deserved rest. Let your prime rib rest for at least 15-20 minutes before carving. This allows the juices to redistribute throughout the meat, resulting in a more tender and flavorful experience. It’s a crucial step in the culinary process, allowing the flavours to bloom and the roast to reach its full potential.
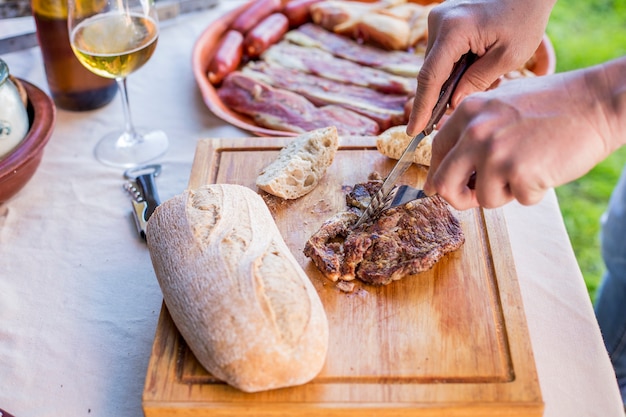
Part 5: The Art of Carving – Unveiling the Masterpiece
The moment of truth has arrived. It's time to unveil your prime rib masterpiece. This is a moment of pure culinary satisfaction, the culmination of all your hard work and precision.
Carving Tips – Precision and Patience
- A Sharp Knife is Your Weapon of Choice: A sharp carving knife is essential. It slices through the meat cleanly and evenly, ensuring each slice is beautifully presented and effortlessly enjoyed.
- Cut Against the Grain: Carve against the grain of the meat. This makes the slices more tender and easier to chew, ensuring a smooth, enjoyable eating experience.
- Remove the Bone: Before carving, remove the bone from the roast. This makes it easier to slice the meat, especially the outer edges, and ensures that you get even portions.
Part 6: The Final Act – Serving with Flair
You’ve cooked it, rested it, and carved it. Now, it’s time for the grand finale, the moment when your prime rib masterpiece takes center stage and delights your guests.
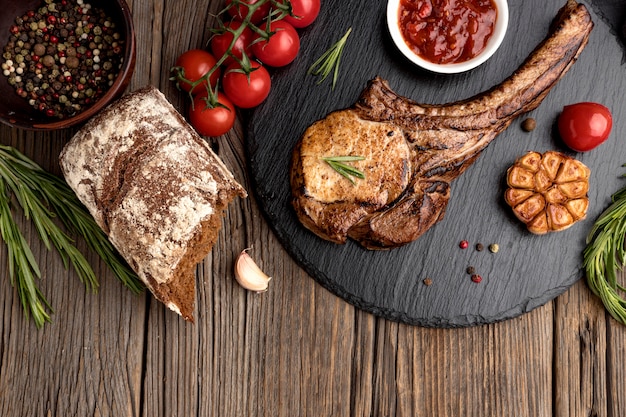
Accompanying Dishes – A Symphony of Flavors
Let’s create a symphony of flavors to accompany your prime rib. Classic roast potatoes or Yorkshire pudding are always a winning choice. A touch of freshness can be achieved with green beans or asparagus. And, of course, a rich, flavorful gravy made from the pan drippings is essential. It's the perfect complement to the richness of the prime rib, a harmonious blend of textures and tastes that elevates every bite.
The Perfect Wine Pairing – A Culinary Duet
Don't forget the wine! A full-bodied red wine is a perfect companion for prime rib. Cabernet Sauvignon, Merlot, or Zinfandel are excellent choices, their bold flavors complementing the richness of the beef. But feel free to experiment! Choose a wine that speaks to your palate and enhances the overall dining experience. It's a culinary duet, where the wine and the prime rib create a harmonious blend of flavors.
Part 7: Leftovers – Culinary Treasure Trove
Your prime rib masterpiece has been devoured, leaving behind a culinary treasure trove – leftovers! And let's face it, those leftovers are just as delicious the next day. But how do you preserve this culinary treasure?
Storing Leftovers – Preserving the Magic
- Refrigerate Quickly: Place the leftover roast in an airtight container and refrigerate within 2 hours of cooking. This is crucial for preventing bacterial growth and ensuring your leftovers stay fresh and flavorful.
- Reheat Properly: When reheating, it's best to do so slowly in the oven at a low temperature. This helps prevent the meat from drying out, allowing it to retain its moisture and tenderness.
FAQs – The Art of Prime Rib Explained
1. What's the best way to tell if my roast is done?
The best way to determine if your prime rib is cooked to your liking is by using a meat thermometer. Insert it into the thickest part of the roast, ensuring it doesn't touch any bone.
- Rare: 125°F (52°C)
- Medium-Rare: 135°F (57°C)
- Medium: 140°F (60°C)
- Medium-Well: 145°F (63°C)
- Well-Done: 155°F (68°C)
2. Can I cook prime rib in a slow cooker?
While you can cook prime rib in a slow cooker, it's not recommended. The slow cooker doesn't provide the high heat needed for that beautiful sear, and it's harder to achieve the perfect level of doneness. For the best results, stick to roasting in the oven.
3. How can I make sure my roast is juicy?
The secret to a juicy prime rib is to keep the fat cap intact. This layer of fat will render down, basting the meat from within and ensuring a moist, flavorful result. Letting the roast rest for 15-20 minutes after cooking is also crucial, allowing the juices to redistribute and create a tender, succulent outcome.
4. What if my roast is too dry?
Don't fret! It happens to the best of us. If your roast is a bit dry, try slicing it thinly and adding some gravy or sauce to help moisten it. You can also try wrapping it in foil for a few minutes to help it steam and rehydrate.
5. Can I freeze prime rib?
Absolutely! Just wrap it tightly in plastic wrap and then again in foil. This will prevent freezer burn and keep your prime rib fresh and flavorful. It's best to freeze it for no more than 3 months. To thaw, place it in the refrigerator for 2-3 days.
There you have it, my friends! Your guide to mastering the art of prime rib cooking. It's a journey of patience, precision, and culinary magic, a quest to create a prime rib masterpiece that will impress even the most discerning palate. Remember, the key is to embrace the process, to trust your instincts, and to have fun along the way. Happy roasting!
Everyone is watching

Corn on the Cob: The Ultimate Guide to Perfectly Cooked Ears
Healthy MealsAh, corn on the cob. Just the name evokes images of sunny days, barbecues, and that sweet, juicy flavour that ...

Perfect Pork Roast Oven Cooking Time: A Guide to Delicious Results
Healthy MealsThere's something truly satisfying about a perfectly roasted pork. The aroma alone is enough to make your mout...

Ham Cooking Time: How Long to Bake, Smoke, or Boil a Delicious Ham
Healthy MealsAh, ham. It's a classic, isn't it? A real crowd-pleaser, especially around holidays. And when done right, it'...

Scallops: The Ultimate Guide to Perfect Cooking
Healthy MealsAh, scallops. Those delicate, sweet, and utterly delicious morsels of the sea. They hold a special place in my...

Spaghetti Squash: The Ultimate Guide to Cooking and Serving
Healthy MealsRemember that time you saw spaghetti squash at the supermarket, looking all bumpy and strange, and thought, "W...