We've all been there, haven't we? Craving a juicy, flavorful steak but the thought of firing up the grill in the middle of winter is just too much to handle. Or maybe you live in a tiny flat with no outdoor space at all. Don't despair, my fellow steak enthusiasts! There's a solution, and it's a lot simpler than you might think. Pan-searing is your new best friend – a foolproof method to achieve restaurant-quality steak in the comfort of your own kitchen, any time of year.
I've always held a deep affection for a good steak. As a kid, I used to spend hours mesmerized, watching my dad grilling up perfect steaks on our patio. There's something undeniably satisfying about the sizzle of meat on the grill and that delicious smoky aroma that fills the air. But I've learned over the years that you don't need a fancy grill or a backyard to enjoy a fantastic steak. Pan-searing is a truly versatile technique, allowing you to control the heat and cook to your exact preference. Plus, it's super easy to clean up afterwards, which is always a bonus!
Let me take you through my tried-and-tested method, sharing some tips and tricks along the way. We'll talk about choosing the right cut of meat, mastering the art of seasoning, and achieving that perfect crust. By the end of this guide, you'll be a confident pan-searing pro, ready to impress your friends and family with your culinary skills. So grab your pan, your favorite steak, and let's get started!
(Part 1) choosing the right ribeye
The first step to a perfect pan-seared ribeye is selecting the right cut of meat. Ribeye is a classic choice for a reason – it's incredibly flavorful and marbled, meaning it's naturally juicy and tender. But not all ribeyes are created equal, so keep these tips in mind when you're at the butcher's or supermarket:
Understanding the Grades
The most common grading system for beef in the UK is the "Beef Quality Assurance" (BQA) scheme. This system takes into account various factors like the animal's age, breed, and overall quality. Look for steaks with a "Grade A" or "Grade E" mark, as these are the highest quality grades. You might also see "Prime" or "Choice" labels, which indicate high-quality meat, although these aren't official British grades.
Now, a quick note: The BQA grading system isn't about the "fatness" of the meat. So even a lean ribeye can have a "Grade A" rating!
Choosing the Right Thickness
For pan-searing, I recommend a ribeye that's at least 1.5 inches (3.8 cm) thick. This gives you enough space for a beautiful sear and helps ensure the steak cooks evenly without drying out.
Checking for Marbling
Take a close look at the meat for white streaks of fat, known as marbling. This fat melts during cooking, adding incredible flavor and juiciness to the steak. You want a ribeye with a good amount of marbling, as it's going to make a huge difference in the end result.
Pro tip: If you're unsure about the marbling, ask the butcher for advice. They'll be able to guide you towards a great cut for pan-searing.
(Part 2) Prepping Your Steak
Once you've chosen the perfect ribeye, it's time to get ready for the cooking process. This step might seem simple, but it's crucial for achieving a delicious steak.
Bringing Your Steak to Room Temperature
One of the most important things you can do for your steak is to let it come to room temperature before cooking. This allows the steak to cook more evenly, ensuring a juicy and tender result. It also helps to prevent the centre from being cold while the outside is already cooked. Take the steak out of the fridge about 30 minutes before you plan to start cooking.
Imagine this: You've got your beautiful ribeye ready to go, but you're rushing to get dinner on the table. You grab the steak straight from the fridge and throw it into a hot pan. What happens? The outside of the steak cooks quickly, creating a nice sear, but the inside remains cold. When you finally cut into the steak, you're met with a disappointing, unevenly cooked piece of meat. Letting the steak come to room temperature prevents this disaster, allowing the heat to penetrate the meat evenly and create a consistently delicious steak.
Patting Dry
Before you start seasoning your steak, it's important to pat it dry with paper towels. This helps to create a beautiful sear by removing any excess moisture that could prevent the steak from browning properly.
Think of it this way: Water and oil don't mix. If your steak is wet, the oil won't be able to sear the meat properly, resulting in a dull, grey crust instead of the beautiful golden brown crust we're aiming for.
Seasoning Like a Pro
Now it's time to get creative with your seasoning. Personally, I love a simple approach, but feel free to experiment.
- Salt: Salt is absolutely essential. It draws out moisture from the steak, which helps to create a flavorful crust. Season liberally on both sides with coarse sea salt.
- Freshly Ground Black Pepper: A generous amount of freshly ground black pepper adds a wonderful depth of flavor.
- Other Spices: For extra flavour, consider adding other spices like garlic powder, onion powder, paprika, or even a pinch of chili flakes.
Remember: Less is more when it comes to seasoning. You can always add more salt and pepper later if needed, but you can't take it away!
Pro Tip: For a more intense flavor, try using a blend of salts, like Himalayan pink salt or smoked sea salt.
(Part 3) The Art of Pan-Searing
This is where the magic happens. It's all about achieving that perfect sear – a beautiful golden crust that adds a delicious layer of flavor.
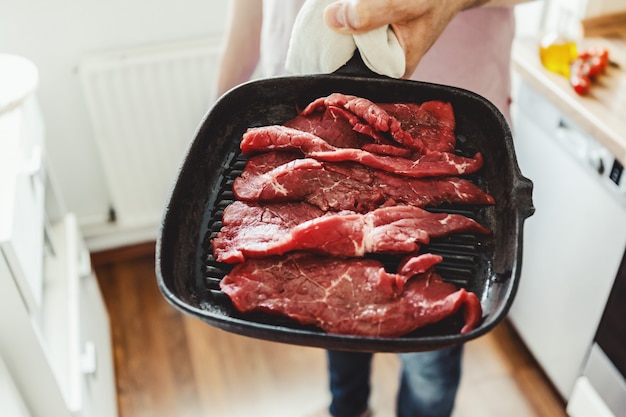
Choosing the Right Pan
You'll need a pan that can handle high heat and distribute it evenly. A cast iron skillet is my go-to choice. It heats up quickly and retains heat well, creating that perfect sear. If you don't have a cast iron skillet, a heavy-bottomed stainless steel pan will work just fine.
cast iron skillets are known for their durability and ability to retain heat. They get incredibly hot, which is crucial for searing a steak. Plus, they develop a natural patina over time, which adds to their flavor and makes them even better at searing.
Heating Up Your Pan
Heat your pan over medium-high heat for about 5 minutes. You want the pan to be piping hot, so it can sear the steak quickly and create that beautiful crust.
Here's a way to test if your pan is hot enough: Add a few drops of water to the pan. If the water sizzles and evaporates immediately, your pan is ready.
Adding Oil
Once your pan is hot, add a generous amount of oil. I prefer to use a neutral oil like vegetable oil or canola oil, as they have a high smoke point and won't affect the flavour of the steak. You want the oil to be shimmering hot, but not smoking.
The high smoke point of these oils means they can withstand high temperatures without burning or giving off an unpleasant smell.
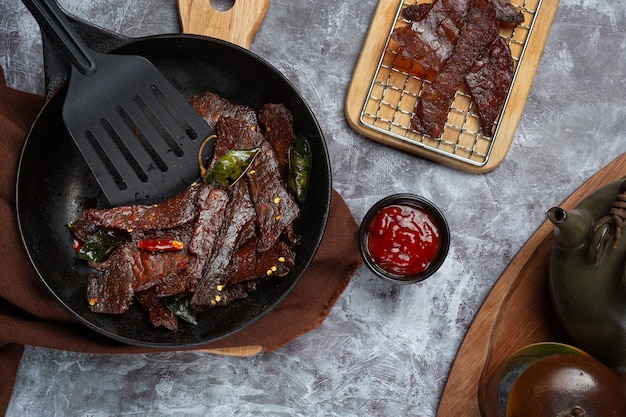
Searing the Steak
Carefully place your steak in the hot pan. You'll hear a satisfying sizzle. Don't move it for at least 2-3 minutes, allowing the steak to develop a nice crust. This is crucial for locking in the juices and creating a beautiful sear.
Resist the urge to move the steak around too much. We want to give the steak time to develop a beautiful crust.
If you want to impress your friends with a special touch, try adding a pat of butter to the pan during the final minute of searing. This will add a lovely golden color and enhance the flavor.
Butter adds a rich, buttery flavor and creates a beautiful golden crust. But remember, butter has a low smoke point, so add it towards the end of the searing process.
Flipping Your Steak
Once the first side is nicely browned, carefully flip the steak over with tongs. Avoid using a fork, as it will pierce the steak and release the juices.
Think of the tongs as gentle hands, carefully lifting and flipping the steak without disturbing its structure.
Sear the second side for another 2-3 minutes, or until it's golden brown.
Finishing Touches
To create a more even cook, you can use a method called "resting" the steak. This involves placing the steak on its side and searing the edges for a minute or two.
This helps to create a beautiful, even crust around the entire steak, ensuring that every bite is flavorful.
(Part 4) Reaching Your Desired Doneness
The real key to a perfect pan-seared ribeye is cooking it to your desired doneness. Everyone has their preferences, but it's important to understand how to achieve the desired level of cook.
Understanding Doneness Levels
Here's a quick guide to different doneness levels:
- Rare: The centre of the steak is cool and red, with a slight warm ring around the outside.
- Medium-Rare: The centre of the steak is pink and warm, with a thicker ring of brown on the outside.
- Medium: The centre of the steak is mostly pink, with a thick brown ring on the outside.
- Medium-Well: The centre of the steak is slightly pink, with a very thick brown ring on the outside.
- Well-Done: The centre of the steak is entirely brown and cooked through.
Experiment with different doneness levels to find your personal preference. Some people prefer their steak rare, while others prefer it well-done. There's no right or wrong answer, it's all about what you enjoy!
Using a Thermometer
The most accurate way to determine doneness is to use a meat thermometer. Insert the thermometer into the thickest part of the steak, making sure it's not touching any bones.
Meat thermometers are inexpensive and readily available. They take the guesswork out of cooking, allowing you to cook your steak to your exact specifications.
Here are some general temperature guidelines:
| Doneness | internal temperature |
|---|---|
| Rare | 125°F (52°C) |
| Medium-Rare | 130°F (54°C) |
| Medium | 140°F (60°C) |
| Medium-Well | 150°F (65°C) |
| Well-Done | 160°F (71°C) |
Remember that these are just guidelines. The ideal temperature for your steak may vary slightly depending on the thickness of the steak and your personal preference.
Testing for Doneness
If you don't have a meat thermometer, you can use the "touch" method to test for doneness. Gently press your finger into the centre of the steak.
- Rare: The steak will feel very soft and jiggly.
- Medium-Rare: The steak will feel slightly firm, but still somewhat springy.
- Medium: The steak will feel firmer, but still slightly springy.
- Medium-Well: The steak will feel very firm and springy.
- Well-Done: The steak will feel very firm and solid.
Keep in mind that this method is less precise than using a thermometer, so it's best to use it as a guide.
Pro Tip: To avoid overcooking, take the steak off the heat a few degrees before it reaches your desired temperature. The steak will continue to cook slightly as it rests.
(Part 5) Resting Your Steak
Once your steak has reached your desired doneness, it's time to let it rest. This is a crucial step that many people forget, but it's essential for a juicy and flavorful steak.
Allow the steak to rest for at least 5 minutes before slicing and serving. This allows the juices to redistribute throughout the steak, preventing them from running out when you cut into it.
Imagine this: You've cooked a beautiful steak to perfection, but you can't wait to dig in. You cut into the steak and immediately all the juices run out, leaving you with a dry, disappointing piece of meat. Letting the steak rest gives the juices time to redistribute evenly, ensuring a juicy and flavorful steak.
Place the steak on a cutting board and cover it loosely with foil. This will keep it warm while it rests. You can also place a few pats of butter on top of the steak to keep it moist.
Butter adds a wonderful richness and flavor, while also keeping the steak moist during resting.
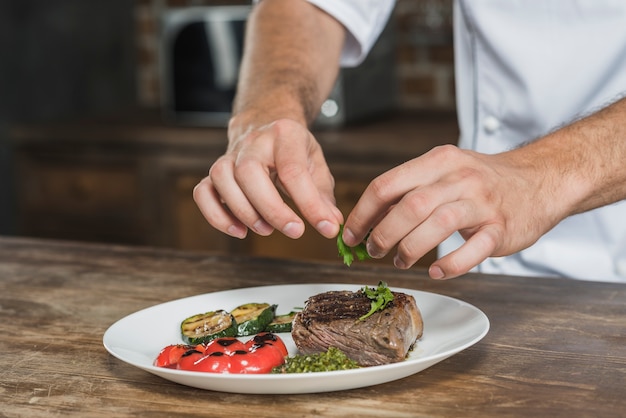
(Part 6) Slicing and Serving
After your steak has rested, it's time to slice and serve. This is your moment to admire your culinary masterpiece and savor the fruits of your labor.
Slicing Your Steak
Slice your steak against the grain. This means slicing the steak perpendicular to the direction of the muscle fibers. This helps to tenderize the steak and make it easier to chew.
Imagine the muscle fibers as tiny threads running through the steak. Slicing with the grain would be like slicing through these threads, making the steak tough and chewy. Slicing against the grain helps to break down these fibers, resulting in a tender and flavorful steak.
Use a sharp knife to slice the steak into thin slices. Avoid using a fork to hold the steak as this will pierce the meat and release the juices.
Serving Your Steak
Serve your pan-seared ribeye on a warm plate, and don't forget to add some delicious sides. mashed potatoes, roasted vegetables, or a simple salad are all great accompaniments.
Enjoy your culinary triumph!
(Part 7) Leftovers
Even with the best planning, there might be some leftover steak. Don't worry, you can definitely enjoy it again!
Storing Your Leftover Steak
Let the steak cool completely before storing it in the refrigerator. Store it in an airtight container to prevent it from drying out.
Using Leftover Steak
Here are a few ideas for using your leftover steak:
- Steak Sandwiches: Slice the leftover steak and use it to create delicious steak sandwiches.
- Steak Salad: Cut the steak into bite-sized pieces and add it to a salad.
- Steak Soup: Dice the steak and use it to make a hearty steak soup.
- Steak Hash: Chop the leftover steak into small pieces and combine it with potatoes, onions, and peppers for a hearty and flavorful hash.
- Steak Quesadillas: Slice the leftover steak and add it to quesadillas with cheese, onions, and peppers for a delicious and satisfying meal.
(Part 8) Mastering the Art of Pan-Searing
So there you have it! My guide to perfect pan-seared ribeye, from selecting the right cut of meat to slicing and serving. Now it's your turn to put this knowledge into practice.
Remember, practice makes perfect. With a little experimentation, you'll be a pan-searing pro in no time, impressing everyone with your culinary skills and enjoying delicious steaks at home.
FAQs
Q: What if my pan isn't big enough for my steak?
A: If your pan is too small, you can cook the steak in two batches. Just make sure to heat the pan thoroughly between batches to ensure that it's hot enough to sear the steak properly.
Q: Can I use a different cut of meat for pan-searing?
A: Absolutely! While ribeye is a classic choice, you can use other cuts of meat for pan-searing, such as:
- new york strip: This cut is known for its rich flavor and tender texture.
- filet mignon: This cut is known for its delicate flavor and tender texture.
- Sirloin: This cut is a more affordable option, but still delivers a great flavour.
- Top Blade: This cut is often overlooked, but it's incredibly flavorful and tender when cooked correctly. It's also a more budget-friendly option.
Experiment with different cuts of meat to find your favorites.
Q: What if my steak is too thick for my pan?
A: If your steak is too thick, you can trim the edges to make it thinner. You can also use a heavy pot or dutch oven to cook the steak, as they have a larger surface area.
Dutch ovens are excellent for cooking steaks because they distribute heat evenly and create a beautiful sear.
Q: What if my steak is undercooked?
A: If you've cooked your steak to a lower level of doneness than you prefer, you can always cook it for a little longer. Just place the steak back in the pan over medium heat and cook for a few more minutes, checking the temperature with a meat thermometer.
Q: What if my steak is overcooked?
A: If you've overcooked your steak, unfortunately, there's not much you can do to fix it. But don't despair! You can always try to salvage the steak by making it into something else, like a steak salad or steak soup.
Remember, even experienced cooks make mistakes sometimes. Don't be afraid to experiment and try new things. The more you practice, the better you'll become at cooking delicious steaks.
Everyone is watching

Corn on the Cob: The Ultimate Guide to Perfectly Cooked Ears
Healthy MealsAh, corn on the cob. Just the name evokes images of sunny days, barbecues, and that sweet, juicy flavour that ...

Perfect Pork Roast Oven Cooking Time: A Guide to Delicious Results
Healthy MealsThere's something truly satisfying about a perfectly roasted pork. The aroma alone is enough to make your mout...

Ham Cooking Time: How Long to Bake, Smoke, or Boil a Delicious Ham
Healthy MealsAh, ham. It's a classic, isn't it? A real crowd-pleaser, especially around holidays. And when done right, it'...

Scallops: The Ultimate Guide to Perfect Cooking
Healthy MealsAh, scallops. Those delicate, sweet, and utterly delicious morsels of the sea. They hold a special place in my...

Spaghetti Squash: The Ultimate Guide to Cooking and Serving
Healthy MealsRemember that time you saw spaghetti squash at the supermarket, looking all bumpy and strange, and thought, "W...