Let's face it, sometimes you just crave a juicy, delicious burger, but the thought of firing up the grill on a chilly evening or dealing with smoke and flare-ups isn't appealing. That's where oven-baked burgers come in. They offer all the flavor and satisfaction of a grilled burger, but with the convenience and comfort of your own kitchen.
This guide will be your go-to resource for mastering the art of the oven-baked burger. We'll break down every step, from choosing the perfect meat to crafting the perfect patty, and from seasoning secrets to the ultimate burger build. Get ready to elevate your burger game, because you're about to unlock a whole new world of deliciousness!
(Part 1) The Foundation: Choosing Your Meat
The star of any burger, of course, is the patty. So, let's start with the heart of the matter: choosing the right meat. While I'm a traditionalist who loves a good beef burger, don't hesitate to experiment! There are so many delicious alternatives, from succulent lamb to juicy turkey patties and even plant-based options.
The Beefy Truth: Embracing Tradition
For a classic, comforting burger, I always recommend a blend of 80/20 beef. This means 80% lean and 20% fat. It's the perfect balance – juicy enough to be satisfying, but lean enough to avoid excessive greasiness.
Groundwork: A Hands-on Approach
You can always grab pre-ground beef from the supermarket or your local butcher, but trust me, there's something special about grinding your own meat. It gives you complete control over the quality and blend, and it's surprisingly easy! I usually opt for a mix of chuck, sirloin, and brisket. This combination creates a beautiful balance of fat and lean, resulting in a patty that's both tender and flavorful.
Expert Tip: Don't Overwork It
Remember, the key to a tender, juicy burger is to be gentle with the meat. Don't overwork it. Just a few gentle folds and you're good to go. Now, here's a little trick I learned the hard way:
Chill It Out: After grinding your meat, let it rest in the refrigerator for about 30 minutes. This helps to firm it up and prevents the patties from spreading too much during cooking.
Choosing Your Meat: A Breakdown
Let's take a closer look at some popular meat options and their characteristics:
| Meat Type | Flavor Profile | Fat Content | Ideal Burger |
|---|---|---|---|
| Beef (80/20) | Classic beefy flavor | 20% | All-around delicious burger |
| Lamb | Gamey and flavorful | 15-20% | Bold, savory burger |
| Turkey | Lean and mild | 5-10% | Healthier option, less flavor |
| Veggie (Beyond Meat, Impossible, etc.) | Varied, depending on brand | Variable | Vegan or vegetarian option |
(Part 2) Shaping Up: Patty Perfection
Okay, your meat is ready, now let's get those patties perfect. This isn't just about flat, round discs. We're aiming for burger royalty!
The Perfect Patty: Size, Shape, and Texture
- Size Matters: A standard burger patty should be about 4-5 inches in diameter and about ?? inch thick. This creates a burger that's satisfyingly large, but not overwhelming.
- The Magic of Indentation: Use your thumb to create a small indentation in the center of each patty. This little trick prevents the patty from puffing up in the middle during cooking, ensuring even cooking and a beautiful, even appearance.
- Chill Out Again: After shaping your patties, place them back in the fridge for at least 30 minutes. This helps them hold their shape and prevents them from shrinking too much during cooking.
(Part 3) Seasoning and Beyond: Elevate Your Burger
Now comes the fun part: flavor! It's time to add some personality to our patties and make them truly sing.
Simple is Best: The Power of Salt and Pepper
I'm a firm believer in keeping things simple, and for me, a good sprinkle of salt and freshly ground black pepper is all I need. But hey, don't be afraid to get creative!
Flavor Explosion: A World of Possibilities
Experiment with different herbs and spices. Garlic powder, onion powder, paprika, chili flakes for a bit of heat – the possibilities are endless! Just remember, a little goes a long way.
Secret Weapon: A Touch of Worcestershire Sauce
Adding a dash of Worcestershire sauce to your seasoned patties adds a depth of flavor that's truly remarkable. It's a secret weapon that takes your burgers to the next level. But again, just a touch is all you need.
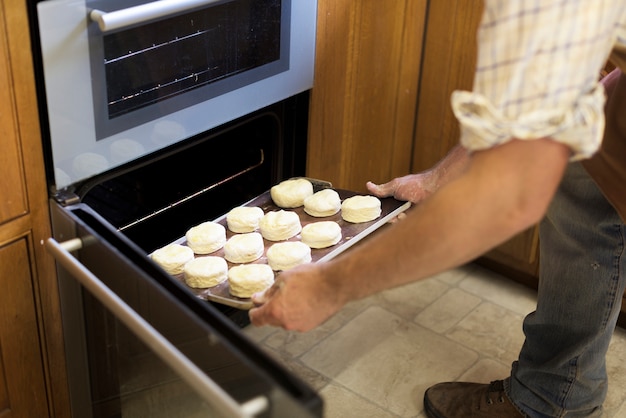
(Part 4) The Oven's Calling: Baking Your Burger
Finally, it's time to get those burgers cooking! Now, you might be thinking, "oven? Really?" But trust me, oven-baked burgers can be just as juicy and delicious as grilled ones, and they're a whole lot easier to manage.
Preheating is Key: Setting the Stage for Success
First things first, preheat your oven to 400°F (200°C). A hot oven ensures that the burgers cook quickly and evenly, resulting in a perfect, crispy exterior and a juicy, flavorful interior.
Baking Tray or Sheet Pan: Your Burger's Home
You can use a baking tray or sheet pan for cooking your burgers. I personally prefer a sheet pan because it gives the patties a bit more space to breathe and allows for better air circulation, resulting in even cooking.
A Little Trick: The Baking Sheet
Line your baking sheet with parchment paper or aluminum foil for easy cleanup. And here's a little tip: lightly grease the parchment paper or foil with a bit of oil to prevent the burgers from sticking.
(Part 5) The Waiting Game: cooking time
Now comes the part where patience is key. The exact cooking time will depend on the thickness of your patties and the desired level of doneness.
Doneness: A Matter of Preference
Remember, everyone has their own preference when it comes to how they like their burgers cooked. A good rule of thumb is to cook the burgers for about 5-7 minutes per side for medium-rare, or 8-10 minutes per side for medium.
A Handy Tip: The meat thermometer
For ultimate accuracy, especially if you're a little nervous about overcooking, use a meat thermometer to check the internal temperature. The ideal temperature for medium-rare is 130°F (54°C), and for medium, it's 145°F (63°C).
(Part 6) The Finishing Touches: Elevating Your Burger
Alright, your burgers are cooked to perfection, but the journey isn't over yet. It's time to add those finishing touches that transform your burger from good to legendary.
Resting is Crucial: Let It Relax
Allow the burgers to rest for 5-10 minutes before serving. This allows the juices to redistribute throughout the patty, resulting in a more flavorful and tender burger.
A Little Bit of Sauce: The Flavor Booster
No burger is complete without a good sauce. Ketchup, mustard, mayonnaise, bbq sauce, sriracha – the options are endless! Experiment and find your perfect pairing.
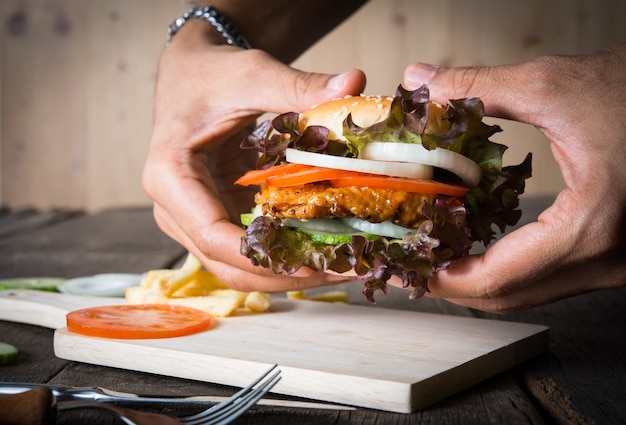
Top It Off: Your Burger's Crown
This is where your creativity really shines! Choose your toppings wisely. Here are a few ideas to get you started:
- The Classics: Lettuce, tomato, onion, pickles, cheese – these are the staples for a reason!
- The Adventurous: Bacon, avocado, caramelized onions, roasted peppers, mushrooms – these add bold, exciting flavors.
- The Gourmet: Truffle aioli, goat cheese, balsamic glaze – these are for the burger connoisseurs who appreciate a touch of sophistication.
(Part 7) The Final Assembly: The Burger Build
Alright, we're finally ready to assemble our masterpiece.
Buns: The Burger's Throne
Choose a good quality bun that's soft and slightly toasted. I like to lightly toast my buns in the oven for a few minutes to give them a bit of crunch and a warm, inviting aroma.
The Burger Build: A Step-by-Step Guide
- Bun Bottom: Place your bottom bun on a plate.
- Sauce: Add a generous layer of your chosen sauce.
- Patty: Place your perfectly cooked burger on top of the sauce.
- Cheese: If you're using cheese, add it now.
- Toppings: Layer on your chosen toppings, building your burger masterpiece.
- Bun Top: Place the top bun on top of the toppings, gently pressing down to create a satisfyingly compact burger.
Expert Tip: Don't Forget the Sides
No burger is complete without a side dish. french fries, onion rings, coleslaw, or a simple salad are all excellent choices.
(Part 8) Burger Masterclass: Tips and Tricks
Here are a few extra tips and tricks to take your oven-baked burgers to the next level.
A Touch of Smoke: Adding Depth
For a smoky flavor that transports you straight to a barbecue, try adding a few drops of liquid smoke to your meat mixture. You can also try grilling the buns for a few minutes for that signature smoky flavor.
The Burger Press: Creating Perfect Patties
If you want to create perfectly uniform patties, you can use a burger press. This will help to ensure that all your patties are the same size and thickness, resulting in even cooking and a beautiful presentation.
The cast iron skillet: For a Crispy Crust
For a crispy crust that adds a touch of indulgence, you can sear your patties in a cast iron skillet before baking them in the oven. Just make sure to heat the skillet over medium heat before adding your patties. The cast iron will impart a lovely sear and enhance the overall flavor.
FAQs: Your Burger Questions Answered
Got questions? I've got answers! Here are some frequently asked questions about oven-baked burgers.
1. Can I Freeze Burger Patties?
Yes, absolutely! You can freeze your shaped patties for later use. Just place them on a baking sheet lined with parchment paper and freeze until solid. Then, transfer them to a freezer-safe bag. To cook from frozen, just thaw the patties in the fridge overnight and cook as instructed.
2. How Do I Prevent My Burgers from Drying Out?
One of the biggest challenges of oven-baking burgers is preventing them from drying out. Here are a few tricks:
- Don't Overcook: Cook the burgers to your desired doneness and no more. Overcooking will result in a dry, tough burger.
- Add Moisture: You can add a little moisture to your burger patties by mixing in a tablespoon or two of water or beef broth.
- Cover the Burgers: Cover the burgers with aluminum foil for the last few minutes of cooking to help them retain moisture.
3. What If My Burgers are Too Thin?
If your patties are too thin, they're more likely to dry out during cooking. You can try shaping them into thicker patties, or you can cook them on a lower temperature for a longer period of time.
4. How Do I Make My Burgers Extra Juicy?
Here are a few tips for extra juicy burgers:
- Use Fattier Meat: Choose a blend of ground beef that's at least 20% fat. The fat will render during cooking, adding moisture and flavor to your burger.
- Don't Overwork the Meat: Be gentle when mixing your ground beef. Overworking the meat will make it tough and dry.
- Indentation Trick: Remember to create an indentation in the center of each patty. This will help to prevent the burger from puffing up during cooking, ensuring even cooking and moisture distribution.
5. Can I Add a Touch of Sweetness?
Absolutely! A touch of sweetness can really elevate your burger. Try adding a spoonful of brown sugar or maple syrup to your meat mixture. You can also caramelize onions for a sweet and savory topping.
And there you have it, my fellow burger enthusiasts! This comprehensive guide will equip you with the knowledge and confidence to create mouthwatering oven-baked burgers that will impress even the most discerning palate. So, gather your ingredients, put on your apron, and get ready to embark on a culinary adventure that will leave you craving for more!
Everyone is watching

Prime Rib Roast Cooking Time Chart: Per Pound Guide
Cooking TipsPrime rib roast. Just the name conjures images of lavish dinners, crackling fires, and hearty laughter. It’s ...

How Long to Bake Potatoes in the Oven (Perfect Every Time)
Cooking TipsBaked potatoes are a staple in my kitchen. They're incredibly versatile, delicious, and surprisingly easy to m...

Perfect Rice Every Time: The Ultimate Guide to Cooking Rice
Cooking TipsAs a self-proclaimed foodie, I've always been a bit obsessed with rice. It's the foundation of countless cuisi...

The Ultimate Guide to Cooking Asparagus: Tips, Techniques, and Recipes
Cooking TipsAsparagus. The mere mention of this spring delicacy conjures up images of vibrant green spears, crisp and burs...

Ultimate Guide to Cooking the Perfect Thanksgiving Turkey
Cooking TipsThanksgiving. Just the word conjures up images of overflowing tables laden with delicious food, the scent of r...