(Part 1) Selecting the Perfect Cut: It All Starts with the Right Choice
The foundation of a stunning roast lies in selecting the perfect cut of meat. It can be overwhelming, with so many choices available. But fear not! I'm here to guide you through the options, ensuring you make the best choice for your needs and taste preferences.
Understanding the Anatomy of a Roast: Prime vs. Less Tender
Think of prime cuts like the rockstars of the meat world – they're the most tender and flavorful, ideal for roasting. We're talking about those beautiful rib roasts, sirloin roasts, and tenderloins. While a bit pricier, they deliver juicy results that will have everyone raving.
Then there are the less tender cuts, like chuck roast or brisket. They're tougher, but don't write them off! They're perfect for slow cooking, which breaks down the connective tissue and transforms them into melt-in-your-mouth masterpieces.
choosing the right cut: Matching Meat to the Occasion
The best cut for you depends on your budget, your preferred cooking style, and the occasion. For a special dinner party, a prime rib roast is a showstopper, a symbol of luxury and indulgence. But for a casual family gathering, a cheaper cut like chuck roast, slow-cooked to perfection, will still be a crowd-pleaser.
Here's a breakdown of some popular options to get your culinary wheels turning:
For a Special Occasion:
- prime rib roast: The quintessential choice for special occasions, this roast is rich, flavorful, and impressive. It's the crown jewel of any roast dinner.
- standing rib roast: A more budget-friendly option than prime rib, still offering fantastic flavor and impressive presentation. It's a great choice for a celebratory dinner without breaking the bank.
- Tenderloin: A boneless cut that's a breeze to carve, known for its incredible tenderness and buttery flavor. It's perfect for those who prefer a more elegant presentation.
For a Family Dinner:
- Chuck Roast: This flavorful and affordable cut benefits from slow cooking, yielding tender, juicy results. It's a fantastic choice for a hearty family meal.
- Brisket: Another tough cut that transforms into a culinary delight after slow cooking. It's perfect for creating a truly satisfying, comforting meal.
- top round roast: This lean and flavorful cut is perfect for roasting whole or slicing into thin portions. It's a versatile choice for a variety of family dinners.
(Part 2) Preparing Your Roast: Laying the Foundation for Flavor
You've chosen your perfect cut of meat. Now it's time to prep it for roasting, ensuring that every flavor note is perfectly harmonized.
The Magic of Salt: Seasoning for Flavor and Tenderness
Salt is the unsung hero of roast cooking. It's not just about adding flavor; it actually helps create a more tender roast. Salt draws moisture out of the meat, breaking down protein strands and enhancing flavor. That's why it's crucial to season your roast generously with salt at least an hour before roasting. Even better, give it an overnight soak in the fridge to maximize flavor penetration.
A Symphony of Spices: Adding Depth and Complexity
Beyond salt, there's a whole world of spices that can elevate your roast to new heights. Pepper, garlic powder, onion powder, rosemary, thyme, and even a blend of your favorite herbs are all welcome additions. Remember, less is more! Allow the natural flavor of the meat to shine through.
Patting Dry for a Crispy Crust: Ensuring a Perfect Finish
Before you pop the roast into the oven, pat it dry with paper towels. This helps to create a crispy, flavorful crust that will make your mouth water. It's a simple step but makes a big difference in the final product.
Adding Fat for Moisture: Keeping it Juicy
If your chosen roast is on the leaner side, consider adding some fat to help it stay moist during cooking. Bacon strips, butter, or even a layer of olive oil will add richness and prevent the roast from drying out.
(Part 3) Roasting Your Roast: The Art of Controlled Heat
The moment you've been waiting for: roasting! This is where the real magic happens, transforming your raw meat into a culinary masterpiece.
Preheat Your Oven: Setting the Stage for Success
Preheat your oven to the desired temperature before introducing your roast. This ensures that the roast cooks evenly from the start, resulting in a more consistently cooked and flavorful final product.
Time and Temperature: Navigating the Roast's Journey
The roasting time and temperature will vary depending on the type and size of your roast. Here are some general guidelines to get you started. Remember, these are starting points, and it's always best to use a meat thermometer to ensure perfect doneness.
| Roast Type | Temperature (°F) | Time Per Pound |
|---|---|---|
| Prime Rib | 450°F (for the first 15 minutes, then reduce to 325°F) | 15-20 minutes |
| Standing Rib Roast | 450°F (for the first 15 minutes, then reduce to 325°F) | 15-20 minutes |
| Tenderloin | 425°F | 15-20 minutes |
| Chuck Roast | 325°F | 20-25 minutes |
| Brisket | 325°F | 30-40 minutes |
| Top Round Roast | 325°F | 20-25 minutes |
The Importance of a Meat Thermometer: Ensuring Perfect Doneness
Don't rely solely on visual cues or guesswork. A meat thermometer is your trusty companion, ensuring your roast is cooked to your exact liking. Here are the recommended internal temperatures for different levels of doneness:
| Doneness | Internal Temperature (°F) |
|---|---|
| Rare | 125-130°F |
| Medium-Rare | 130-135°F |
| Medium | 140-145°F |
| Medium-Well | 150-155°F |
| Well Done | 160°F and above |
The Resting Ritual: Unlocking Tenderness and Flavor
After your roast reaches its desired temperature, remove it from the oven and let it rest for at least 15 minutes before carving. This is a crucial step that many cooks overlook. During resting, the juices redistribute throughout the meat, resulting in a more tender and flavorful roast. It's a simple step but yields remarkable results.
(Part 4) Mastering the Art of Carving: From Roast to Plate with Precision
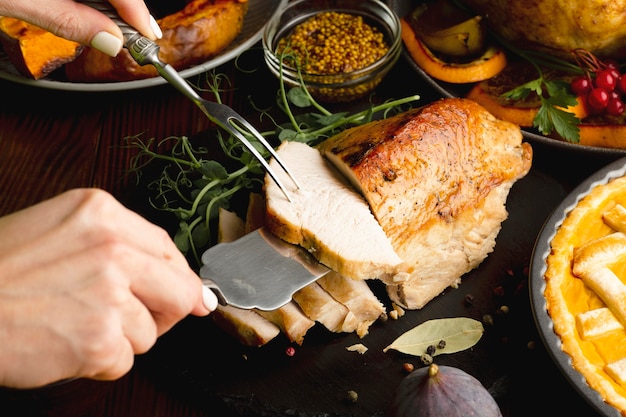
The moment of truth: carving your masterpiece! Don't worry, it's not as daunting as it seems. Here's how to carve a roast like a pro, ensuring even and satisfying slices for everyone.
Sharpening Your Tools: A Sharp Knife is Essential
A sharp knife is paramount for clean, precise cuts. A carving knife is ideal, but a good chef's knife will also do the trick. Invest in a quality knife that's sharp and comfortable to use, and you'll be rewarded with effortless carving and stunning presentation.
Carving Techniques: A Guide to Different Cuts
Each cut of meat has its own carving techniques to maximize tenderness and presentation. Here's a breakdown to help you conquer any roast:
Rib Roasts:
- Slice against the bone: This method creates thin, even slices, showcasing the beautiful marbling and providing an elegant presentation.
- Carve rib bones: You can remove the rib bones before carving for easier slicing and a more streamlined presentation.
Tenderloin:
- Slice across the grain: This ensures maximum tenderness, allowing the fibers to separate easily for a melt-in-your-mouth experience.
- Cut into medallions: For an extra touch of elegance, you can cut the tenderloin into medallions, creating a visually appealing and individual portioning.
Other Roasts:
- Slice against the grain: This technique, common across most roasts, results in more tender slices that melt in your mouth.
- Cut into even slices: Strive for consistency! Even thickness ensures that everyone gets an equal amount of meat and fat, leading to a satisfying and balanced meal.
Serving with Style: Presentation is Key
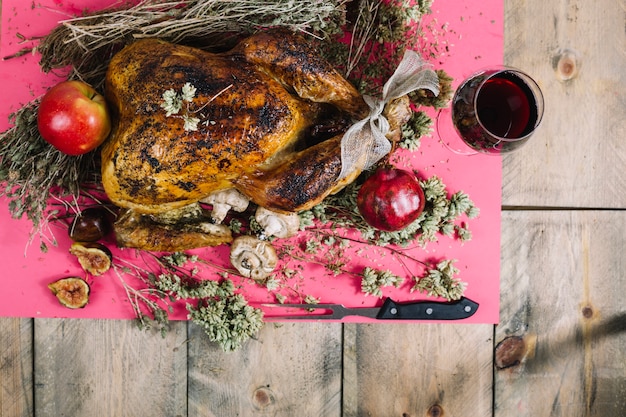
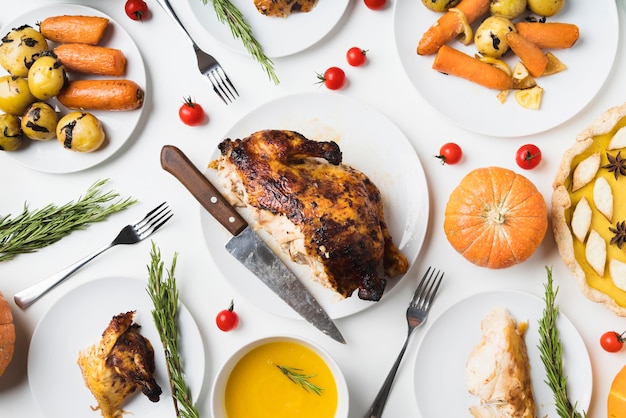
Arrange the carved roast on a beautiful serving platter, and don't be afraid to add a touch of culinary flair. Garnish with fresh herbs, roasted vegetables, or a drizzle of flavorful pan juices. A visually appealing presentation elevates the entire dining experience.
(Part 5) Accompanying Dishes: Completing the Symphony of Flavor
A prime roast deserves a supporting cast of delectable sides, each contributing its unique flavor and texture to the symphony of taste. Here are some classics that pair perfectly with your roasted masterpiece:
Roasted Vegetables: A Burst of Color and Flavor
Roasted vegetables are the perfect accompaniment to a roast, adding a vibrant pop of color and a delightful medley of flavors. Some popular choices include:
- Roasted Potatoes: A timeless classic that complements any roast. They can be roasted with herbs, garlic, or even a sprinkle of parmesan cheese for extra flavor.
- roasted carrots: Their sweet and earthy notes beautifully complement the richness of the roast.
- roasted asparagus: Asparagus adds a delicate, springy flavor that brightens up the plate.
- roasted brussels sprouts: These often overlooked vegetables are transformed into a nutty and slightly sweet delight through roasting.
Yorkshire Pudding: A Fluffy and Flavorful Tradition
Yorkshire pudding is a quintessential English accompaniment to roast dinners. This light and fluffy batter, baked in the oven, rises dramatically, creating a delicious and visually impressive dish. It's a must-try for any roast dinner enthusiast.
Gravy: The Finishing Touch that Ties it All Together
Gravy is the quintessential finishing touch to a roast dinner, adding extra flavor and moisture to every bite. You can make it from the pan juices, capturing the rich essence of the roast, or use a homemade gravy recipe. The choice is yours!
(Part 6) Tips and Tricks: Elevating Your Roast Game
Here are some extra tips and tricks to help you achieve those perfect roast results every time, ensuring your culinary creations become the envy of all your friends and family.
Browning for Depth of Flavor: A Culinary Touch of Magic
Before roasting, browning your roast in a skillet over high heat can elevate the flavor to a new level. This creates a beautiful, crispy crust and adds a depth of flavor that's simply irresistible.
dutch oven Magic: Trapping Heat and Moisture
Roasting in a Dutch oven is a fantastic method for achieving a more tender and juicy roast. The Dutch oven traps moisture and heat, ensuring even cooking and preventing the meat from drying out.
A Splash of Water for Steam: Keeping it Moist
Adding a small amount of water to the bottom of your roasting pan creates steam, which helps keep the roast moist and prevents it from drying out. This simple trick ensures a tender and succulent result.
Meat Thermometer: Your Trusty Guide
As we've discussed, a meat thermometer is your best friend for ensuring perfect doneness. Don't rely on guesswork – use your meat thermometer to consistently achieve the level of doneness you prefer.
Resting is Key: Releasing the Flavor
The importance of resting cannot be overstated. It allows the juices to redistribute throughout the meat, resulting in a significantly more tender and flavorful roast. Patience is key to a truly delicious outcome.
Pan Juices: A Culinary Treasure
Don't throw away the pan juices! They're full of flavor and the perfect base for a delicious gravy. Use the pan juices to create a rich, flavorful gravy that elevates your roast dinner to new heights.
(Part 7) Troubleshooting: Navigating Common Challenges
Even the most experienced cooks encounter bumps in the road. But don't worry! Here are some common problems and their solutions, ensuring that you can overcome any culinary hurdle.
Overcooked Roast: Dry and Tough
An overcooked roast will be dry and tough, a sad outcome after all your efforts. The culprit? Not using a meat thermometer! Use a meat thermometer to ensure you cook it to the desired level of doneness and avoid overcooking.
Undercooked Roast: Pink and Raw
An undercooked roast, while a safety concern, is easily rectified. If your roast is pink and raw, simply return it to the oven to cook for a bit longer, checking the internal temperature with a meat thermometer every few minutes.
Roast Not Browning: Missing that Golden Crust
If your roast isn't browning properly, try increasing the oven temperature or searing the roast in a skillet before roasting. This will help achieve that beautiful, crispy crust.
Roast Not Cooking Evenly: Uneven Doneness
To ensure even cooking, rotate the roast halfway through the cooking time. You can also use a roasting rack to allow air circulation around the roast, promoting even heat distribution.
(Part 8) FAQs: Answering Your Prime Roast Questions
Let's address some common questions about prime roast cooking, providing clarity and confidence in your culinary journey.
1. What is the best way to store a prime roast?
The best way to store a prime roast is in the refrigerator. Place it on a plate or in a container, cover it with plastic wrap, and refrigerate it for up to 3-5 days. You can also freeze it for up to 6 months, but the quality will be best if you use it within 3 months.
2. How can I tell if my roast is cooked to the right temperature?
The only reliable way to tell if your roast is cooked to the right temperature is to use a meat thermometer. Insert the thermometer into the thickest part of the roast, making sure not to touch the bone. The internal temperature should reach the desired level of doneness.
3. Can I cook a prime roast in a slow cooker?
You can cook a prime roast in a slow cooker, but it's not the best method for achieving a crispy crust. If you're using a slow cooker, you'll need to sear the roast in a skillet before adding it to the slow cooker. This will help create a flavorful crust.
4. What is the best way to reheat a prime roast?
The best way to reheat a prime roast is in the oven. Preheat the oven to 325°F, place the roast on a baking sheet, and reheat it for about 15-20 minutes. You can also reheat it in the microwave, but it may lose some of its juiciness.
5. What are some alternative ways to cook a prime roast?
You can also cook a prime roast in a smoker, on the grill, or even in a Dutch oven on the stovetop. Each method will yield slightly different results, but all of them can produce a delicious roast.
(Part 9) A Final Word: Embracing the Journey
There you have it, a complete masterclass in prime roast cooking! Armed with this knowledge, you're ready to create the most delicious and impressive roast dinners for your loved ones. Embrace the journey, experiment with different cuts and seasonings, and have fun in the kitchen!
Happy cooking, and remember, a perfect roast is within your reach!
Everyone is watching

Prime Rib Roast Cooking Time Chart: Per Pound Guide
Cooking TipsPrime rib roast. Just the name conjures images of lavish dinners, crackling fires, and hearty laughter. It’s ...

How Long to Bake Potatoes in the Oven (Perfect Every Time)
Cooking TipsBaked potatoes are a staple in my kitchen. They're incredibly versatile, delicious, and surprisingly easy to m...

Perfect Rice Every Time: The Ultimate Guide to Cooking Rice
Cooking TipsAs a self-proclaimed foodie, I've always been a bit obsessed with rice. It's the foundation of countless cuisi...

The Ultimate Guide to Cooking Asparagus: Tips, Techniques, and Recipes
Cooking TipsAsparagus. The mere mention of this spring delicacy conjures up images of vibrant green spears, crisp and burs...

Ultimate Guide to Cooking the Perfect Thanksgiving Turkey
Cooking TipsThanksgiving. Just the word conjures up images of overflowing tables laden with delicious food, the scent of r...