Let's be honest, there's something about a perfectly roasted turkey breast that just screams "comfort food." But let's also be real – getting that juicy, tender, and oh-so-delicious result isn't always a walk in the park. I've been there, folks, battling dry turkey and wondering where I went wrong. But fear not! After years of experimenting and learning (and maybe a few culinary mishaps along the way), I've got the ultimate guide to mastering this classic dish. From picking the perfect turkey to achieving that irresistible crispy skin, we'll cover everything you need to know. So, grab your apron, sharpen your knives, and get ready to transform your turkey dreams into a reality.
(Part 1) Choosing the Right Turkey Breast: The Foundation of Success

Just like any good recipe, a delicious roasted turkey breast starts with the right ingredients. In this case, it means finding the perfect turkey breast to work with. Here's what you need to consider:
Fresh vs. Frozen: A Matter of Taste and Convenience
Personally, I'm a big fan of fresh turkey breast. It just tastes better, in my opinion, with that vibrant, fresh flavour. But let's face it, sometimes you're working with a tight schedule, and frozen turkey breast is a convenient option. If you go the frozen route, just make sure to thaw it completely before roasting. The package will give you thawing instructions, but a general rule of thumb is to pop it in the fridge for a day or two.
Boneless vs. Bone-in: A Choice of Ease or Rich Flavour
This is a matter of preference, really. Boneless turkey breast is a good choice for beginners. It’s easier to carve and cooks more evenly. Plus, you can find them in smaller sizes, which is perfect if you're cooking for a smaller crowd. However, bone-in turkey breast, while requiring a bit more finesse, delivers a richer, more intense flavour thanks to the bone. It's also a little more likely to give you that crispy skin you crave. Think of it as a little extra flavour payoff for the extra work.
Size Matters: Feeding Your Flock
Choosing the right size turkey breast is key to making sure everyone gets enough to eat. A good rule of thumb is to allow about 1/2 pound of turkey breast per person. Of course, you can adjust this based on your guests' appetites. If you've got a bunch of big eaters coming over, go for a larger turkey breast. If it's just a few of you, a smaller turkey breast or even two smaller ones might be the way to go.
(Part 2) The Art of Brining: Transforming Your Turkey from Dry to Delicious

Now, here's where things get really interesting. Brining is a simple technique that can make a huge difference in the juiciness and flavour of your turkey breast. It involves soaking the turkey in a salt-water solution, which helps retain moisture and enhances the natural flavours. I've learned the hard way: a dry turkey breast is a culinary crime!
The Science Behind Brining: A Moisture Miracle
Think of brining as giving your turkey a spa day. The salt in the brine pulls moisture out of the turkey, and then, through a process called osmosis, pushes that moisture back in, along with some of the salt and any flavourings you've added. This not only makes the turkey more tender but also prevents it from drying out during cooking. It's a win-win situation for anyone who loves a juicy, flavourful turkey!
A Simple Brine Recipe: Get Creative with Flavours
You don't need to be a culinary wizard to whip up a delicious brine. A simple brine can be made with just water, salt, and sugar. For a more complex flavour profile, add herbs, spices, citrus zest, or even a splash of your favourite liquor (think whiskey or brandy for a touch of decadence). Here's a basic brine recipe to get you started:
- 1 cup kosher salt
- 1 cup granulated sugar
- 1 gallon cold water
Just dissolve the salt and sugar in the water, then submerge the turkey breast in the brine for at least 4 hours or overnight. Make sure the turkey is completely submerged and keep it in the fridge while it's brining.
Dry Brining: An Alternative for Time-Crunched Cooks
If you don't have time for a wet brine, don't despair! Dry brining is a great alternative. It involves rubbing the turkey breast with a mixture of salt, herbs, and spices, then leaving it uncovered in the fridge for 12-24 hours. The salt does its magic, drawing moisture out and then back into the meat, resulting in a tender and flavourful turkey. The key here is to pat the turkey breast dry before roasting. This helps achieve that beautiful crispy skin.
(Part 3) Prepping for the Roast: Getting Ready for the Big Event

Now that your turkey breast is brined (or dry brined), it's time to get ready for the main event. This includes prepping the bird, selecting the right roasting pan, and making sure your oven is ready to go.
Pat it Dry: A Simple Step for Crispy Skin
After brining, remove the turkey from the brine and pat it thoroughly dry with paper towels. This helps achieve that beautiful, golden-brown, crispy skin. Trust me, it's a small detail that makes a big difference in the final product.
Seasoning with Savour: A Symphony of Flavours
This is your chance to get creative and add your own signature touch. I love a simple rub of salt, pepper, and paprika, but feel free to experiment. Herbs like thyme, rosemary, sage, or even garlic powder can add incredible depth of flavour. You can also rub seasoning under the skin for extra flavour. Just remember, a little goes a long way!
Stuffing or No Stuffing: A Matter of Preference and Technique
Stuffing is a classic turkey companion, but it can also lead to uneven cooking. If you're aiming for perfectly cooked turkey, I recommend stuffing the turkey breast separately in a casserole dish. This allows the stuffing to cook evenly and prevents the turkey from being overstuffed. If you're determined to stuff the turkey breast, make sure it's loose and not packed too tightly, allowing heat to circulate properly.
The Right Roasting Pan: Choosing a Culinary Champion
Select a roasting pan that's large enough to comfortably accommodate the turkey breast without overcrowding. A shallow pan is ideal for even cooking, and I like to use a pan with a rack. This allows air to circulate underneath the turkey, helping the skin get crispy and preventing the breast from sitting in its own juices.
(Part 4) Mastering the Roasting Process: Bringing Your Turkey to Perfection
Now comes the moment of truth: the roasting process. This is where all your preparation and attention to detail come together.
Preheating Perfection: A Crucial First Step
Preheat your oven to 325°F (160°C). This allows the oven to reach a stable temperature, ensuring even cooking. Don't skip this step! It's the foundation for a successful roast.
cooking times: A Guide to Golden Goodness
The roasting time will vary depending on the size of your turkey breast. A general rule of thumb is to cook the breast for about 15-20 minutes per pound, or until the internal temperature reaches 165°F (74°C) for safe consumption. Remember, it's always best to use a meat thermometer to make sure the turkey is cooked through. Don't rely on the timing alone.
Don’t Overcook It: Preventing Dry Turkey Tragedy
Overcooked turkey is a culinary crime I'm determined to help you avoid! While you want the turkey to be cooked through, overcooking can lead to dry, stringy meat. Remember, the turkey will continue to cook a little after you remove it from the oven, so it's best to err on the side of undercooking. I often recommend taking the turkey out of the oven when the internal temperature is around 160°F (71°C) and letting it rest for 10-15 minutes before carving. This allows the juices to redistribute throughout the meat, resulting in a succulent and tender final product.
Basting for Added Moisture: A Splash of Goodness
Basting is a classic technique for adding moisture to your turkey. It involves spooning the pan drippings over the breast every 30 minutes or so. This keeps the skin moist and helps it brown beautifully. I've found that basting with a mixture of butter and herbs adds even more flavour to the final dish. It's a little extra work, but trust me, it's worth it!
(Part 5) The Rest is Key: Letting the Turkey Recoup its Juices
Once the turkey is cooked through, don't rush to carve it! Let it rest for at least 15 minutes, covered loosely with foil. This allows the juices to redistribute throughout the meat, resulting in a more succulent and tender turkey. A well-rested turkey will also be much easier to carve, with less chance of tearing the meat. Remember, patience is key here.
Carving with Confidence: A Skill to Master
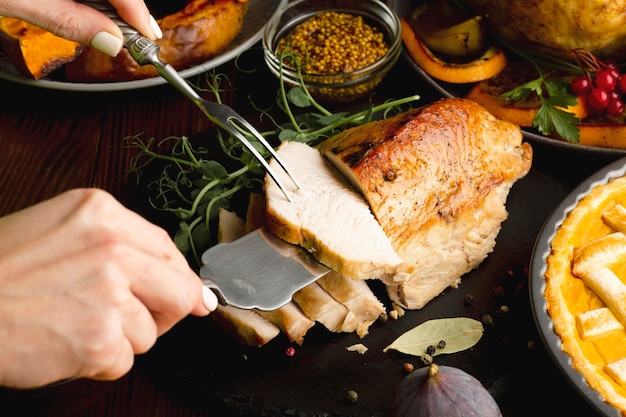
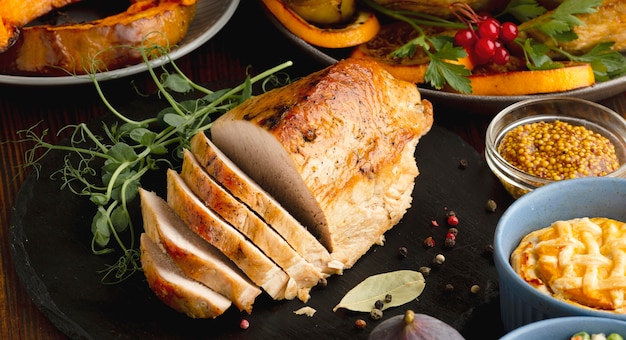
After the resting period, you're ready to carve. Use a sharp carving knife and a cutting board. Cut along the bone, then slice the meat into thin slices. If you're carving a boneless turkey breast, simply slice the meat across the grain into thin slices. Remember, carving against the grain helps prevent the meat from becoming tough.
(Part 6) Serving with Style: Presenting Your Culinary Creation
Now that your turkey breast is beautifully roasted and carved, it's time to serve it with flair! A little presentation can go a long way.
Garnish with Glamour: Adding a Touch of Finesse
A simple garnish can elevate your turkey breast from ordinary to extraordinary. I like to sprinkle fresh herbs like parsley or thyme over the slices, or add a squeeze of lemon for a touch of brightness.
Accompany with Delight: The Perfect side dishes
Pair your turkey breast with classic side dishes like mashed potatoes, stuffing, gravy, cranberry sauce, or roasted vegetables. These classics complement the turkey perfectly and create a well-rounded meal.
Presentation is Everything: A Visual Feast
Arrange the carved turkey breast on a platter, alongside your favourite side dishes. Add a decorative touch with a sprig of rosemary or a slice of lemon. A visually appealing presentation enhances the enjoyment of the meal.
(Part 7) Leftover Love: Transforming Turkey into Delicious Dishes
Leftover turkey? Don't be sad! It's a chance to get creative and whip up some delicious meals.
turkey salad for the Win: A Classic Comfort Food
Chop up leftover turkey and toss it with mayonnaise, celery, and your favorite herbs for a classic turkey salad. You can serve it on bread, crackers, or even as a filling for wraps. It's a quick and easy lunch or dinner option.
turkey soup for Comfort: A Hearty and Satisfying Meal
Leftover turkey makes a hearty and comforting soup. Combine it with vegetables, broth, and noodles for a satisfying meal. You can even use the bones to make a richer stock.
turkey sandwiches for Lunch: A Simple and Delicious Option
Combine leftover turkey with cheese, lettuce, and tomato for a simple and satisfying sandwich. You can also use it for turkey wraps or quesadillas.
Turkey Pizza for a Fun Twist: A Creative culinary adventure
Top your favorite pizza dough with leftover turkey, mozzarella cheese, and your favorite toppings for a delicious and creative dinner. It's a great way to use up leftovers in a fun and unexpected way.
(Part 8) FAQs: Solving Your Turkey Dilemmas
Here are some frequently asked questions about roasting turkey breast:
| Question | Answer |
|---|---|
| Can I cook a turkey breast in a slow cooker? | Yes, you can! Simply place the turkey breast in the slow cooker, season it, and add some liquid, such as broth or water. Cook on low for 6-8 hours or on high for 3-4 hours. It's a great option for a hands-off approach. |
| Can I use a turkey breast that's been previously frozen? | Yes, as long as it’s completely thawed before roasting. Just be sure to thaw it in the fridge for a day or two to ensure thorough thawing. |
| What should I do if the skin isn’t browning enough? | If the skin isn’t browning as much as you’d like, you can try raising the oven temperature to 350°F (175°C) for the last 30 minutes of cooking. You can also use a broiler to crisp up the skin. |
| How do I know if the turkey breast is cooked through? | The best way to know if the turkey breast is cooked through is to use a meat thermometer. Insert it into the thickest part of the breast, making sure not to touch the bone. The internal temperature should reach 165°F (74°C). |
| What can I do with the turkey drippings? | Turkey drippings are a flavour bomb! Use them to make gravy, or save them in the freezer for future use. You can also add them to soups or stews for extra flavour. |
I hope this guide helps you create a delicious and impressive oven-roasted turkey breast. Remember, practice makes perfect, and don't be afraid to experiment with different techniques and flavours. Enjoy the process and savour the results. Happy cooking!
Everyone is watching

Perfect Rice Every Time: The Ultimate Guide to Cooking Rice
Cooking TipsAs a self-proclaimed foodie, I've always been a bit obsessed with rice. It's the foundation of countless cuisi...

Ultimate Guide to Cooking the Perfect Thanksgiving Turkey
Cooking TipsThanksgiving. Just the word conjures up images of overflowing tables laden with delicious food, the scent of r...

The Ultimate Guide to Cooking Asparagus: Tips, Techniques, and Recipes
Cooking TipsAsparagus. The mere mention of this spring delicacy conjures up images of vibrant green spears, crisp and burs...

Can You Cook Spaghetti with Gasoline? (The Shocking Truth)
Cooking TipsWe've all seen those crazy internet trends. You know, the ones that make you wonder, "Did someone actually try...

Chorizo and Eggs Recipe: The Ultimate Guide
Cooking TipsRight, let’s talk about chorizo and eggs. You know, that classic Spanish dish that's always a winner. It's th...
