Ah, the T-bone steak. Just the name conjures up images of smoky grills, juicy meat, and a hearty meal that satisfies on a whole other level. But let's be honest, cooking a T-bone to perfection can feel like a bit of a culinary tightrope walk. You want that beautiful sear, that perfectly cooked interior, and that melt-in-your-mouth texture. So, let's ditch the intimidation and get down to business, shall we? This guide will help you conquer the T-bone and become a grill master in your own right.
Part 1: Choosing the perfect steak
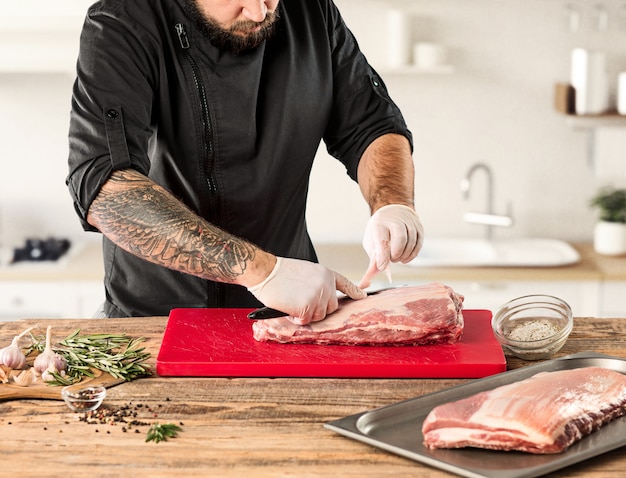
The first step in this delicious journey is picking the right T-bone. You wouldn't build a house on a shaky foundation, would you? So, let's make sure we're working with the best possible foundation: a T-bone that's destined for greatness.
The Cut
Now, this is where your personal preference comes in. Are you craving a quick, satisfying meal for one, or are you hosting a feast for friends and family? If you're looking for a weeknight dinner, a smaller, 1-inch thick T-bone will do the trick. But if you're going for a more substantial meal, you'll want to go for a thicker cut, maybe 1.5 to 2 inches. I personally prefer the larger cuts, they're just so darn impressive on the plate. They look like they mean business, you know?
The Marbling
Marbling is the secret weapon of a juicy, flavourful steak. Those little streaks of fat are like culinary gold, melting during cooking and releasing a wave of richness and flavour that elevates the entire experience. Think of it this way, the more marbling you have, the more delicious the steak will be. Look for a steak with marbling throughout, not just a few scattered spots. It's a good sign that you're about to enjoy a truly special steak.
The Colour
A good T-bone should have a vibrant, deep red colour. Think of it like this: a bright, healthy red colour tells you the steak is ready for its starring role. If it looks pale or has any discolouration, it might mean it hasn't been stored properly. And trust me, you want to avoid that.
The Touch Test
Here's a little trick I learned from an old butcher: Press the steak gently with your finger. It should feel firm, but not hard. If it feels springy, that's a good sign. This tells you the steak is well-marbled and will be juicy and tender.
Part 2: Setting the Stage: Your Grill
Now that you've got your prize-winning T-bone, let's get the grill roaring. The grill is a T-bone's best friend, giving it that signature smoky flavour and those beautiful grill marks. But before you toss your steak onto the heat, let's make sure the grill is ready to do its job.
The Temperature
A hot grill is crucial for a good sear. You want the grill to be blazing hot, around 500 degrees Fahrenheit (260 degrees Celsius), or even hotter. This high heat will create that crispy crust while keeping the inside of the steak juicy and tender. It's a bit of a dance between heat and time, you know? You can use a grill thermometer to make sure your grill is at the right temperature. Or, hold your hand a few inches above the grill for a few seconds. If it gets too hot to hold comfortably, you know you're ready to go.
Cleaning the Grill
Before you go throwing your T-bone on the grill, make sure it's clean. You don't want any remnants of last night's barbecue interfering with your steak's journey to perfection. A clean grill ensures even heat distribution and prevents your steak from sticking to the grates. I've tried all sorts of cleaning methods over the years, from wire brushes to grill cleaners. But for me, a good ol' fashioned scrape with a metal spatula works best.
Prepping the Steak
Don't just chuck your T-bone straight onto the grill. Let's show it some love first. Take it out of the refrigerator about 30 minutes before you plan to cook it. This lets it come to room temperature, which means it will cook more evenly. Then, pat it dry with a paper towel to remove any excess moisture. This ensures a good sear and helps the grill marks develop nicely.
Part 3: The Art of the Sear: Creating a Culinary Masterpiece
The sear is the moment of truth, the time when you transform your raw T-bone into a culinary masterpiece. It's all about creating that beautiful crust, that golden-brown exterior that signals a juicy and flavourful interior.
The First Impression: Searing
You'll want to sear your T-bone for about 3 minutes per side, or until a nice, crispy crust has formed. This might seem like a short amount of time, but it's crucial for locking in the juices and developing that signature char flavour. I often find myself just staring at the steak as it sizzles, mesmerized by the transformation taking place.
Rotating for Evenness
Once you've seared the steak on both sides, give it a little quarter turn. This helps to create those lovely criss-cross grill marks that make the steak look even more appealing. It's like adding a little bit of artistry to your cooking.
The Importance of Time
A good sear is about more than just looks. It's about that beautiful browning on the surface, which helps to lock in the juices and create a flavourful crust. So, don't rush the process. Let the steak get a proper sear on each side, and don't be afraid to let it rest for a few minutes after each turn.
Part 4: Achieving Your Desired Doneness: A Journey to Perfection
You've created a gorgeous sear, but we're not quite finished yet. Now we need to cook the steak through to your preferred level of doneness. This is where a little bit of knowledge and a touch of precision come in handy.
Understanding Doneness
Let's get the lingo straight. There's rare, medium-rare, medium, medium-well, and well-done. But how do you actually know when your steak is cooked to your liking? This is where a meat thermometer comes in handy. It's the most accurate way to ensure your steak is cooked perfectly.
Using a Meat Thermometer
To use a meat thermometer, simply insert it into the thickest part of the steak, making sure not to touch the bone. Leave it in for a few seconds to get an accurate reading. Here's a quick guide to the temperatures for different levels of doneness:
| Doneness | Temperature (°F) | Temperature (°C) |
|---|---|---|
| Rare | 125-130 | 52-54 |
| Medium-rare | 130-135 | 54-57 |
| Medium | 135-140 | 57-60 |
| Medium-well | 140-150 | 60-65 |
| Well-done | 150-160 | 65-71 |
The No-Thermometer Method
If you're not a fan of using a thermometer, you can always rely on the touch test. Just gently press the centre of the steak with your finger. If it feels firm, it's well-done. If it's springy, it's medium. If it feels soft and gives way easily, it's rare. But be warned, this method is a bit more subjective, so it takes practice.
Part 5: The Resting Period: Rejuvenating the Steak
You've seared it, you've cooked it to perfection, but your T-bone journey isn't over yet. The next step is crucial – resting. It's not just about making the steak look pretty; it's about letting the juices redistribute, resulting in a more tender and flavourful steak. It's like giving the steak a chance to breathe and settle into its new form.
The Science Behind Resting
When you cook a steak, the juices get pushed to the outside. If you cut into it immediately, those juices will run out, leaving you with a dry and disappointing steak. But if you let it rest, the juices have time to redistribute throughout the meat, ensuring a juicy and tender bite. It's like a little bit of magic, really.
How Long to Rest
For a T-bone steak, aim to rest it for 5 to 10 minutes before you slice it. This gives the juices enough time to redistribute and make that delicious steak even more satisfying. Personally, I find that the longer you let it rest, the more tender and flavourful the steak becomes.
The Best Resting Method
There are a few ways to rest your steak. Some people prefer to put it on a cutting board with a loose piece of foil over it. Others like to wrap it in foil completely. Personally, I find that a simple wire rack set over a baking sheet works best. This allows the steam to escape while keeping the steak warm.
Part 6: Finishing Touches: Seasoning and Sauce
Your T-bone is now cooked to perfection and has had its well-deserved rest. But there's still a little bit of magic we can add to elevate it even further: seasoning and sauce. It's like putting the final touches on a masterpiece.
Simple Salt and Pepper
Some people believe that a simple sprinkle of salt and pepper is all you need. And to be honest, sometimes, that's all it takes. The salt brings out the natural flavour of the steak, while the pepper adds a touch of spice. Just be sure to season generously, but not excessively. You want to enhance the flavour, not drown it out.
Herbs and Spices
If you want to get a little more creative, you can add a variety of herbs and spices to your T-bone. Rosemary, thyme, garlic powder, onion powder, paprika, even a bit of chili powder - the possibilities are endless. I find that a blend of rosemary, thyme, and garlic powder is a great starting point.
The Perfect Sauce
Now, a good sauce can really make your T-bone sing. There are endless options, from classic béarnaise to rich red wine sauce. But I'm a big fan of simple, flavourful sauces that let the steak shine. A simple butter sauce with a touch of lemon juice and fresh herbs is a personal favourite. You could also add a splash of red wine or balsamic vinegar for a more complex flavour.
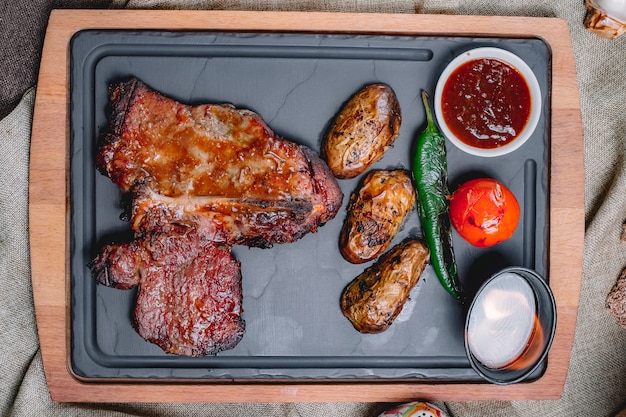
Part 7: Serving and Enjoying Your Masterpiece
Your T-bone is now ready to take centre stage. It's time to present your culinary masterpiece and enjoy the fruits of your labour.
Presentation is Key
Even the best-cooked T-bone deserves a stylish presentation. A simple but elegant platter, maybe with some fresh herbs or a sprig of rosemary for a touch of colour. Make sure the steak is sliced neatly, highlighting the beautiful grill marks and the juicy red interior. I like to slice it against the grain, this makes it easier to chew and adds to the overall enjoyment.
side dishes to Complement
No T-bone steak is complete without a selection of side dishes that complement its rich flavour. roast vegetables, a creamy mashed potato, a fresh salad, or even a simple baked potato. Don't be afraid to get creative with your side dishes.
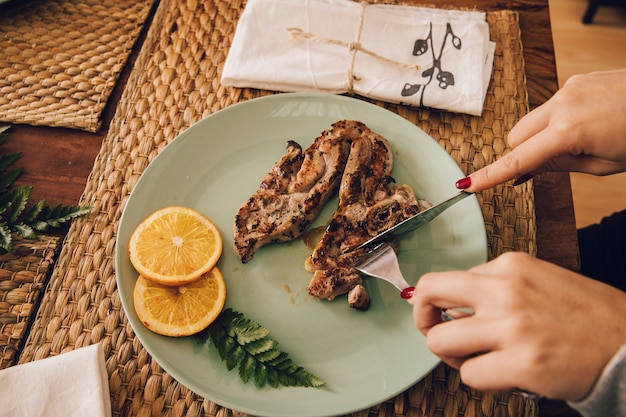
Enjoying Your T-bone
Finally, it's time to enjoy the fruits of your labour. Take a slow, deliberate bite, savouring the juicy, tender texture and the explosion of flavour. A good T-bone steak is an experience, not just a meal.
Part 8: FAQs
You've got your T-bone, you've seared it, you've cooked it to perfection, but you might still have a few questions. So, here are some frequently asked questions about T-bone steak, to make sure you're a true T-bone master.
1. What's the best way to store a T-bone steak?
You'll want to keep your T-bone steak in the coldest part of your refrigerator, ideally on a plate covered with plastic wrap or in a resealable plastic bag. This helps prevent freezer burn and keeps the steak fresh for up to 3-5 days.
2. Can I freeze a T-bone steak?
Yes, you can freeze a T-bone steak, but it's best to freeze it for a shorter period of time, ideally for no more than 1-2 months. For best results, wrap the steak tightly in plastic wrap or freezer paper, then place it in a freezer-safe bag.
3. How do I know if my T-bone steak is bad?
A good T-bone steak should have a fresh, red colour. If it has a greyish or brown colour, it's likely not fresh. Additionally, a bad steak will have a strong, off-putting odour.
4. What kind of wine should I pair with a T-bone steak?
A full-bodied red wine like Cabernet Sauvignon, Merlot, or Shiraz would pair well with a T-bone steak. You could also opt for a Zinfandel or a Malbec. If you prefer a lighter wine, Pinot Noir or a lighter red blend could also work well.
5. What are some other tips for cooking a T-bone steak?
Here are a few more tips for cooking a T-bone steak to perfection:
- Don't overcook the steak! You want it juicy and tender, not dry and tough.
- Use a meat thermometer to ensure that the steak is cooked to your desired doneness.
- Let the steak rest for at least 5 minutes before slicing and serving.
- Experiment with different seasonings and sauces to find your perfect combination.
- Don't be afraid to get creative with your side dishes!
- Enjoy the process and the delicious results!
There you have it, the ultimate guide to cooking the perfect T-bone steak. It might seem like a lot of information, but with a little practice, you'll be grilling up T-bone masterpieces in no time. Remember, it's all about enjoying the process, experimenting with different techniques, and ultimately, creating something delicious that you can be proud of. So go on, give it a go! You won't regret it.
Everyone is watching

Prime Rib Roast Cooking Time Chart: Per Pound Guide
Cooking TipsPrime rib roast. Just the name conjures images of lavish dinners, crackling fires, and hearty laughter. It’s ...

How Long to Bake Potatoes in the Oven (Perfect Every Time)
Cooking TipsBaked potatoes are a staple in my kitchen. They're incredibly versatile, delicious, and surprisingly easy to m...

Perfect Rice Every Time: The Ultimate Guide to Cooking Rice
Cooking TipsAs a self-proclaimed foodie, I've always been a bit obsessed with rice. It's the foundation of countless cuisi...

The Ultimate Guide to Cooking Asparagus: Tips, Techniques, and Recipes
Cooking TipsAsparagus. The mere mention of this spring delicacy conjures up images of vibrant green spears, crisp and burs...

Ultimate Guide to Cooking the Perfect Thanksgiving Turkey
Cooking TipsThanksgiving. Just the word conjures up images of overflowing tables laden with delicious food, the scent of r...