(Part 1) The Foundation of Flavor: Choosing the Right Ingredients
The Flour: The Backbone of Your Dough
Think of flour as the backbone of your dough. It's what gives it structure, elasticity, and ultimately, that satisfying chew. You want a flour that's got enough gluten, but not so much that it becomes tough and chewy. I've experimented with countless flours, but I've found that a good quality all-purpose flour is the most reliable choice for an everyday pizza. It offers a good balance of protein, resulting in a dough that's both strong and pliable.Now, if you're really serious about pizza dough, you might want to consider a blend of flours. For example, using a mix of high-protein flour like bread flour (which has a higher gluten content) and a lower protein flour like cake flour (which has less gluten) can give you a beautifully nuanced crust. The bread flour provides the strength, while the cake flour adds a touch of lightness and tenderness.
The Yeast: The Secret to a Light and Airy Crust
Yeast is the secret ingredient that transforms your dough from a simple mixture into a masterpiece. It's the magic ingredient that makes the crust rise, creating those airy pockets of delight. You can find various types of yeast out there, but my go-to for pizza dough is always active dry yeast. It's readily available, affordable, and consistent. It just needs a little warm water to awaken its magic.Water: The Unsung Hero
Water might seem like a simple ingredient, but it's vital for the texture of your dough. Just like a baker needs the right amount of water to create a moist cake, you need the right amount of water to create a dough that's both supple and manageable. Think of it as the glue that binds the flour and yeast together.The key is to use lukewarm water. Not too hot, which can kill the yeast, and not too cold, which will slow down the activation process. The ideal temperature is around 105°F to 115°F (40°C to 46°C). A little touch test helps – the water should feel comfortably warm, but not scorching.
Salt: The Flavor Enhancer
Salt is often overlooked, but it plays a crucial role in pizza dough. It not only adds flavour but also helps to balance out the sweetness from the sugar in the dough. And a touch of salt actually helps to control the yeast activity, preventing it from becoming too enthusiastic and making the dough rise too quickly.(Part 2) Crafting the Dough: Your Step-by-Step Guide
The Basic Pizza Dough Recipe:
Ingredients:
- 2 1/2 cups (300g) all-purpose flour
- 1 teaspoon (5g) active dry yeast
- 1 teaspoon (5g) salt
- 1 teaspoon (5g) sugar
- 1 cup (240ml) lukewarm water
- Olive oil, for greasing
Instructions:
- In a large bowl, combine the flour, yeast, salt, and sugar. Give it a good stir, ensuring the ingredients are evenly distributed.
- Pour in the lukewarm water and start mixing with a wooden spoon or spatula. You'll begin to see a shaggy dough forming.
- Now it's time to get your hands dirty! Turn the dough out onto a lightly floured surface and start kneading. This is where the magic happens. Knead for about 5-7 minutes, or until the dough becomes smooth and elastic. Don't be afraid to get a little rough with it. The kneading process helps develop the gluten strands, which give the dough its strength and elasticity.
- Grease a large bowl with olive oil. This will prevent the dough from sticking to the sides. Place the dough in the bowl, turning it to coat all sides with the olive oil.
- Cover the bowl with a clean kitchen towel or plastic wrap and let the dough rise in a warm place for 1-2 hours, or until it has doubled in size. A warm oven with the light on is a great spot for this.
- Once the dough has risen, give it a good punch down to release the air bubbles. Divide the dough into portions, depending on how many pizzas you're making.
- Shape each portion into your desired base. You can go for a classic round shape, a rectangular base, or even experiment with fun shapes using cookie cutters.
- Preheat your oven to 450°F (230°C). This high temperature is essential for achieving a crispy crust.
- Bake the pizzas for 10-15 minutes, or until the crust is golden brown and the cheese is bubbly and melty.
Simple, right? But there's more to it than just following a recipe. Understanding the science behind the process and learning how to adapt the recipe to your own preferences is what truly elevates your pizza dough game.
(Part 3) The Art of Kneading: Developing Flavor and Texture
The more you knead, the stronger the gluten network becomes. This strength is vital for holding the weight of your toppings and preventing a soggy bottom. Imagine it like building a strong foundation for your pizza, one that can support the delicious layers on top.
How to Know When Your Dough is Kneaded Enough:
There's a simple test to determine if you've kneaded your dough sufficiently.
- Take a small piece of dough and stretch it between your fingers. If it stretches without tearing and forms a thin membrane, you're good to go.
- If the dough tears easily, it needs more kneading. Keep working it until it becomes elastic and stretchy.
Don't be afraid to get a little rough with the dough. It's okay to be firm but gentle. Think of it as a culinary workout for your dough, building strength and resilience.
(Part 4) The Importance of Rest: Patience is a Virtue
After you've kneaded your dough, it's time to let it rest. This crucial step allows the yeast to work its magic and the gluten to relax, resulting in a lighter, airier crust. It's a time for the dough to unwind and develop its full potential.The First Rise: Building Flavor and Texture
The first rise is all about letting the yeast do its thing. During this time, the yeast feeds on the sugars in the flour, producing carbon dioxide gas. This gas gets trapped within the gluten strands, causing the dough to rise and puff up. It's a fascinating process that transforms your dough into a light and airy masterpiece.The time it takes for the dough to rise depends on the temperature of your environment. A warm room will speed up the process, while a colder room will slow it down. Aim for a warm place, around 70°F to 75°F (21°C to 24°C). You'll know the dough is ready when it has doubled in size.
The Second Rise: Achieving a Crispy Crust
After the first rise, you'll want to punch down the dough, gently releasing the air bubbles. Then, let it rise again. This second rise is shorter than the first, but it's important for creating a crispy crust. The yeast continues to work, but the gluten also strengthens, helping to hold the shape of the dough and preventing it from collapsing during baking.The length of the second rise will depend on the type of pizza you're making. For a thicker crust, you might let the dough rise for longer. If you want a thinner crust, you can shorten the rise time. Experiment and see what works best for you.
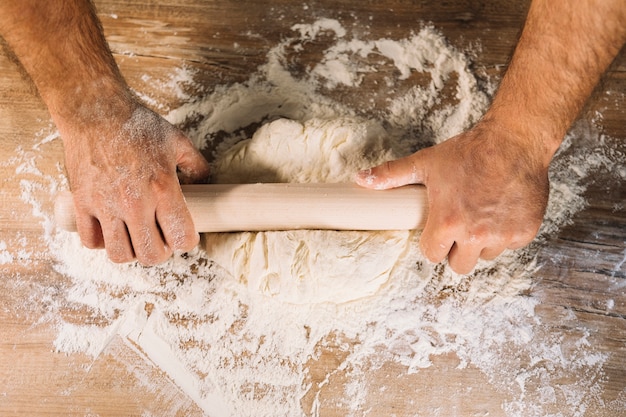
(Part 5) Shaping the Dough: A Culinary Dance
Now comes the fun part: shaping your dough. This is where your creativity comes into play, transforming your dough into the foundation of your pizza masterpiece.The Traditional Round Shape:
This is the classic pizza shape, the one that immediately comes to mind when you think of pizza. To create a round base, gently press the dough into a circle with your fingertips. Then, use your hands to stretch the dough out to your desired size. Be gentle but firm. Don't overwork the dough, as this can make it tough.
The Rectangular Shape:
For a rectangular pizza, flatten the dough into a rectangle with your hands. You can also use a rolling pin for a more even shape. This shape is perfect for pizzas with a variety of toppings, as it allows for a more even distribution of flavors.
Getting Creative with Shapes:
Once you've mastered the basics, you can get creative and experiment with different shapes. Use cookie cutters to shape your dough into fun designs, like stars, hearts, or even animals. You can also try folding your dough into a calzone, creating a delicious pocket of savory goodness.
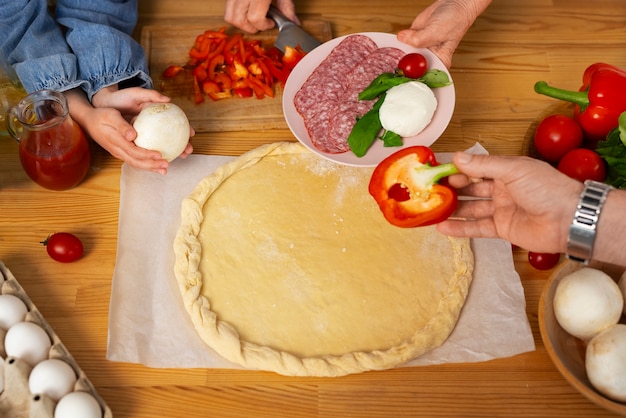
(Part 6) The Power of Toppings: Taking Your Pizza to the Next Level
The crust is the foundation, but the toppings are what take your pizza from good to great. This is where you can really express your culinary personality.The Classic Toppings:
Start with the classics: tomato sauce, mozzarella cheese, pepperoni, mushrooms, olives, and onions. These timeless ingredients work together to create a balanced and satisfying pizza.
Getting Creative with Toppings:
Don't be afraid to break out of the box and experiment with unique combinations. Roasted vegetables, pesto, goat cheese, fresh herbs, and even pineapple can add exciting dimensions to your pizza. The possibilities are endless!
The Art of Toppings:
When it comes to toppings, less is often more. Don't overload your pizza with too many toppings, as this can make the crust soggy and prevent the flavors from shining through.
Pre-Baking the Crust:
For a crispy crust and prevent soggy toppings, you can pre-bake your dough for a few minutes before adding toppings. This helps to set the crust and allows the toppings to cook evenly.
(Part 7) Baking to Perfection: The Final Step
Now it's time to bake your pizza and transform it into a golden-brown masterpiece.Preheat Your Oven:
Preheat your oven to a high temperature, at least 450°F (230°C). This high heat creates a crispy crust and helps the cheese melt beautifully.
The Importance of a Pizza Stone:
If you want to achieve that ultimate pizza crust, invest in a pizza stone. It absorbs heat evenly, creating a consistent temperature for baking and a perfectly crispy crust.
Baking Time:
Bake your pizza for 10-15 minutes, or until the crust is golden brown and the cheese is bubbly and melted. Keep a close eye on your pizza during baking, as ovens can vary in temperature.
(Part 8) The Importance of Practice: Patience and Experimentation
Like anything in life, making pizza takes practice. Don't be discouraged if your first few attempts aren't perfect. It takes time to develop your skills and find your rhythm.Embrace the Mistakes:
Every pizza-making experience is a learning opportunity. I've certainly had my fair share of pizza disasters, from flat and dense pizzas to rock-hard crusts. But each mistake taught me something new and helped me improve my skills.
Experiment with Techniques:
Try different kneading techniques, experiment with different rising times, and explore various topping combinations. You might discover that you prefer a thicker crust or that you love adding a certain type of cheese.
Don't Be Afraid to Break the Rules:
Pizza recipes are guidelines, not rules. Feel free to adjust the ingredients, baking time, and even the shape of your pizza. There's no right or wrong way to make pizza, as long as you enjoy the process and the results.
(Part 9) The Joy of Sharing: A Culinary Experience
One of the best things about pizza is that it's a food that brings people together. It's perfect for sharing with friends and family, creating a warm and inviting atmosphere.I remember making pizza with my kids when they were younger. It was a messy and chaotic affair, but it was also filled with laughter and joy. We'd knead the dough together, sprinkle on the toppings, and then watch with anticipation as it baked in the oven.
Pizza is more than just a meal. It's a shared experience, a culinary adventure that brings people together.
(Part 10) FAQs
Now, I'm sure you have a few questions about making pizza dough. So, here are some frequently asked questions, along with my answers.
What happens if my dough doesn't rise?
There are a few reasons why your dough might not rise. First, make sure you're using active yeast. If the yeast is old or inactive, it won't be able to rise. Second, check the temperature of the water you used to rehydrate the yeast. It should be lukewarm, not too hot or too cold. Finally, ensure your dough is rising in a warm place. A warm oven with the light on is a good option.
What if my dough is too sticky?
If your dough is too sticky, it might need more flour. Start by adding a tablespoon of flour at a time and kneading until the dough is no longer sticky.
Can I use a stand mixer to make pizza dough?
Absolutely! A stand mixer can make kneading a lot easier. Simply add all the ingredients to the bowl of your stand mixer and use the dough hook attachment to knead the dough for 5-7 minutes, or until it's smooth and elastic.
How long can I store pizza dough in the refrigerator?
You can store pizza dough in the refrigerator for up to 3 days. Just wrap it tightly in plastic wrap or store it in an airtight container. When you're ready to use it, let the dough come to room temperature before shaping and baking.
What are some tips for making a crispy crust?
Here are a few tips for achieving a crispy crust:
- Preheat your oven to a high temperature (at least 450°F/230°C).
- Use a pizza stone or baking sheet.
- Bake the pizza for a shorter amount of time, about 10-15 minutes, or until the crust is golden brown and cooked through.
There you have it, the secrets to pizza dough mastery. It's a journey, not a destination. So, get your hands dirty, experiment, and embrace the delicious possibilities of homemade pizza. Happy baking!
Everyone is watching

Prime Rib Roast Cooking Time Chart: Per Pound Guide
Cooking TipsPrime rib roast. Just the name conjures images of lavish dinners, crackling fires, and hearty laughter. It’s ...

How Long to Bake Potatoes in the Oven (Perfect Every Time)
Cooking TipsBaked potatoes are a staple in my kitchen. They're incredibly versatile, delicious, and surprisingly easy to m...

Perfect Rice Every Time: The Ultimate Guide to Cooking Rice
Cooking TipsAs a self-proclaimed foodie, I've always been a bit obsessed with rice. It's the foundation of countless cuisi...

The Ultimate Guide to Cooking Asparagus: Tips, Techniques, and Recipes
Cooking TipsAsparagus. The mere mention of this spring delicacy conjures up images of vibrant green spears, crisp and burs...

Ultimate Guide to Cooking the Perfect Thanksgiving Turkey
Cooking TipsThanksgiving. Just the word conjures up images of overflowing tables laden with delicious food, the scent of r...