Let's face it, there's nothing quite like a perfectly cooked tenderloin steak. The rich, juicy flavor, the melt-in-your-mouth tenderness, the satisfying sizzle on the pan... it's a culinary experience that's hard to beat. But achieving that perfect sear, that beautiful pink center, and that heavenly tenderness can sometimes feel like a culinary tightrope walk. I've been there, trust me. I've had my fair share of steak disasters, from tough, overcooked slabs to raw, undercooked ones that made my stomach churn. But over the years, I've learned a thing or two, and with a few tricks up your sleeve and a bit of practice, you'll be mastering the art of tenderloin in no time.
This guide is a culmination of years of trial and error, reading countless cookbooks, watching hours of cooking shows, and, of course, experimenting in my own kitchen. I'm going to walk you through every step, from choosing the right cut to mastering the perfect sear, sharing my personal tips and experiences along the way. It's going to be a bit of a journey, but I promise, it'll be worth it. So grab your apron, sharpen your knives, and let's get started.
(Part 1) Choosing the Right Tenderloin

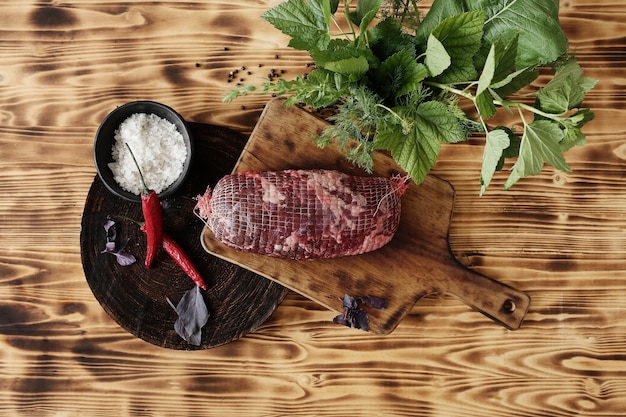
The journey to a perfect steak starts with the right ingredient. Think of it as choosing the right canvas for your culinary masterpiece. A good tenderloin is the key to a truly satisfying steak experience. Here's what to look for when selecting your cut:
1. The Cut: filet mignon, Your Culinary Canvas
When it comes to tenderloin, you're essentially looking for the "filet mignon" cut. This is the most tender part of the beef, and it's typically a long, cylindrical piece of meat. You'll usually find it sold in two parts: the "large end" and the "small end."
The large end, often referred to as the "center cut," is where you'll find the most tender and marbled meat. This makes it ideal for grilling or pan-frying. It's got that beautiful, buttery texture that melts in your mouth. The small end, while still delicious, tends to be a bit tougher and might be better suited for slow cooking methods like braising.
2. The Marbling: The Secret to Juiciness and Flavor
Marbling, or the amount of intramuscular fat running throughout the meat, is crucial for flavor and tenderness. Think of it as the secret sauce to a juicy, flavorful steak. Look for a tenderloin with good marbling – you'll see white streaks of fat running throughout the meat. This fat melts during cooking, making the steak juicy, flavorful, and incredibly tender.
3. The Color: A Sign of Freshness
The color of the beef should be a deep, rich red, not pale or discolored. It should be firm to the touch, like a well-toned muscle. If the meat looks pale or has a grayish tinge, it's probably not as fresh and might not be the best choice. Remember, a good cut of beef should have a vibrant red color that speaks to its freshness.
4. The Weight: A Matter of Scale
The weight of the tenderloin will depend on how many people you're cooking for, but a good rule of thumb is to aim for about 1.5-2 inches thick. This will give you a nice, thick steak that's perfect for grilling or pan-frying. A thicker steak will also be easier to cook evenly, reducing the chances of a dry, overcooked center.
Don't be afraid to ask your butcher for advice! They're the experts in choosing and handling meat. I've learned so much from my local butcher over the years, and it's been invaluable. They can guide you to the best cuts, help you choose the right weight, and even give you some tips on prepping and cooking.
(Part 2) Prepping the Tenderloin: Setting the Stage for Success
Now that you've got your perfect tenderloin, it's time to prep it for cooking. This might seem like a simple step, but it's actually quite important. Proper prepping helps to ensure even cooking and brings out the best flavor in your steak.
1. Seasoning: A Flavorful Symphony
Here's where you can really get creative! For a classic steak seasoning, I love a simple combination of salt and pepper. But feel free to experiment with other herbs and spices – garlic powder, paprika, onion powder, even a pinch of cayenne for a bit of heat. I've even tried a sprinkle of smoked paprika for a smoky, rich flavor.
Remember, a little goes a long way, and you can always add more seasoning later if you feel it needs it. The key is to create a flavorful crust on the outside of the steak, without overwhelming the natural flavors of the meat.
2. Pat It Dry: The Key to a Crisp Crust
This step is crucial. Wet meat creates steam, which prevents a good sear and that beautiful, crispy crust you're aiming for. You want a nice, dry surface for your steak to ensure that perfect browning. Pat it dry with paper towels and give it a good dusting with your chosen seasoning.
3. Let It Rest: A Relaxing Moment for Flavor
Letting your steak rest at room temperature for about 30 minutes before cooking allows it to come up to room temperature, which helps ensure even cooking. It's all about getting that perfect sear, you see.
If you're short on time, you can skip this step, but you might not get the same level of tenderness and browning. It's best to plan ahead and give your steak a little time to relax before it takes center stage on the pan.
(Part 3) The Art of the Sear: A Culinary Dance of Fire and Flavor
Ah, the sear. This is where the magic happens. A good sear creates a beautiful crust, locking in the juices and adding a delicious flavor to your steak. The key is to get the pan really hot and then use a high heat to sear both sides quickly. It's a dance of fire and flavor, a culinary ballet that transforms a simple steak into a masterpiece.
1. The Right Pan: Your Culinary Stage
Cast iron is my absolute favorite for searing. It distributes heat evenly and gets incredibly hot, creating that perfect sear. If you don't have a cast iron pan, a heavy-bottomed stainless steel or carbon steel pan will also work. But remember, a good pan is like a good stage; it sets the stage for a truly impressive performance.
2. Get the Pan Hot: The Fire That Ignites Flavor
Don't be shy! Get the pan blazing hot. It should be so hot that a drop of water sizzles immediately when you drop it in. You want the pan to be screaming hot for that perfect sear. Don't rush this step. It might take a few minutes for the pan to reach the desired temperature. Think of it as preheating your culinary oven, ready to transform your steak.
3. The Oil: A Slick of Culinary Magic
Use a high heat cooking oil like avocado oil or grapeseed oil. These oils have a high smoke point and can withstand the high heat of your pan. They act like a protective layer, preventing the steak from sticking and burning, while adding a subtle flavor. You only need a thin layer, just enough to coat the bottom of the pan. Don't be tempted to add too much oil. It won't help, and it'll make cleaning up harder.
4. The Sear: The Moment of Truth
Place the steak in the pan and leave it undisturbed for 2-3 minutes. Don’t touch it! Resist the temptation to fiddle with it. You want to let the steak develop a nice crust before flipping it. You'll hear that beautiful sizzle as the steak releases its juices. That's the sound of flavor being locked in, a symphony of culinary magic. Once you hear that, it’s a sign the steak is ready to be flipped.
5. Flip It: A Culinary Waltz
Carefully flip the steak over to sear the other side. Let it cook for another 2-3 minutes, again, without moving it around. Resist the urge! A beautiful, even crust will develop. You'll see that lovely browning on the surface of the steak, a testament to the skillful sear. Now, you'll be ready to finish cooking the steak.
(Part 4) Finishing the Steak: A Symphony of Heat and Flavor
You've got that beautiful sear, now it's time to finish cooking the steak to your desired level of doneness. Don't be afraid to experiment and find what you like best. There are various ways to finish cooking a tenderloin: in the oven, on the grill, or even in a skillet. Each method adds a unique touch to the final flavor profile of your steak.
1. Oven: A Gentle Embrace of Heat
Preheat your oven to 350°F. After searing the steak, place it in a preheated oven for 5-7 minutes for medium-rare, 8-10 minutes for medium, and 12-15 minutes for medium-well. Remember, the time will vary depending on the thickness of the steak. It's always a good idea to use a meat thermometer to ensure that the steak is cooked to your liking.
2. Grill: A Smoky Romance
After searing, move the steak to indirect heat on the grill. Close the lid and let it cook for 5-7 minutes for medium-rare, 8-10 minutes for medium, and 12-15 minutes for medium-well. I love the smoky flavor that grilling adds to my steak. Plus, the even heat of the grill ensures that the steak cooks evenly, giving you a perfectly cooked, smoky-flavored masterpiece.
3. Skillet: A Cozy Finish
If you're short on space or don't have an oven or grill, you can finish cooking the steak in the same skillet you used to sear it. Turn the heat down to medium-low and let the steak cook for 5-7 minutes for medium-rare, 8-10 minutes for medium, and 12-15 minutes for medium-well. Remember, you're looking for gentle cooking here, not another sear! You want to retain the beautiful crust you've already created and cook the steak through gently.
(Part 5) Checking for Doneness: The Art of Precision
No one wants a dry, overcooked steak. This is where a meat thermometer is your best friend. It takes the guesswork out of cooking and ensures that your steak is cooked to your desired level of doneness. It's like having a culinary compass, guiding you towards the perfect level of doneness.
1. Medium-Rare: The Sweet Spot of Tenderness
This is my personal favorite. The steak is still juicy and tender, with a slightly pink center. It's a nice balance of flavor and tenderness, a culinary compromise that satisfies both the palate and the texture lover.
2. Medium: A Little Firmness, Still Full of Flavor
The steak is cooked through, but still has a little pink in the center. It's a good choice if you prefer your steak with a bit more firmness, a touch of resistance when you sink your teeth into it.
3. Medium-Well: A Safe and Satisfying Choice
The steak is cooked through with very little pink left in the center. It's the safest option, but it can be a bit dry. If you're looking for a well-cooked steak, this is the way to go.
If you don’t have a meat thermometer, you can use the "touch test" to gauge the doneness of your steak. Press on the center of the steak. If it feels soft and springs back easily, it’s medium-rare. If it feels firmer, it’s medium. And if it feels very firm, it’s medium-well. But remember, this method is not as accurate as using a meat thermometer. It's a good starting point, but a thermometer provides more precise results.
(Part 6) Resting Your Steak: A Moment of Relaxation for Flavor
This is a step that many people overlook, but it's crucial. Resting your steak after cooking is essential. It allows the juices to redistribute throughout the meat, resulting in a more tender, flavorful steak. It's a moment of relaxation for your culinary masterpiece, a chance for those flavorful juices to settle in and create a truly satisfying experience.
1. The Importance of Resting: A Culinary Lesson in Patience
When you cook a steak, the juices are forced to the surface. When you cut into the steak right away, those juices will run out, leaving you with a dry, flavorless steak. By resting the steak, you give the juices time to redistribute evenly, resulting in a much more flavorful and juicy steak.
2. How Long to Rest: A Matter of Timing
The ideal resting time is 10 minutes for a steak that’s about 1 inch thick. For a thicker steak, you might want to rest it for 15-20 minutes. The steak should be covered loosely with foil to keep it warm. This will help to maintain the temperature of the steak while it rests, ensuring a delicious, warm steak when you're ready to savor it.
It’s a good idea to rest the steak on a cutting board or plate with a wire rack underneath to allow for any excess juices to drain. This will keep your cutting board clean and prevent the steak from steaming in its own juices, preserving the integrity of your culinary creation.
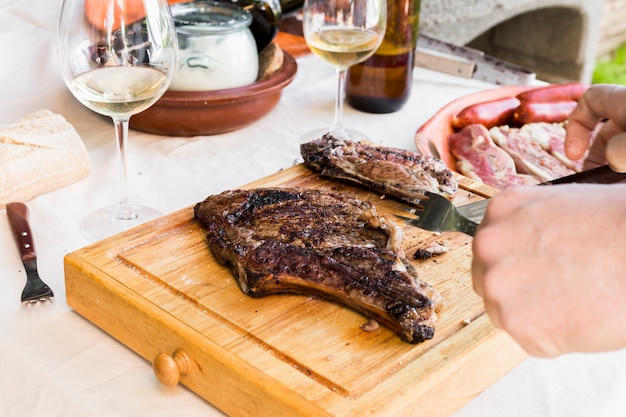
(Part 7) Slicing and Serving: The Grand Finale
The moment of truth! It’s time to slice and serve your perfectly cooked tenderloin. But, remember, there’s an art to slicing too! It’s important to slice the steak against the grain. This means slicing across the muscle fibers, rather than with the grain. Slicing across the grain will make the steak much easier to chew and will also help to create a more tender texture, making it a delightful experience for your taste buds.
1. Slicing Techniques: A Culinary Dance with Precision
First, slice the steak into thin, even slices, about ?? inch thick. Make sure to cut all the way through the steak, but be careful not to cut through the bottom of the cutting board. Use a sharp knife. A dull knife will tear the meat and make it look uneven. I’ve learned this the hard way, and let me tell you, it’s not fun!
2. Serving Suggestions: A Symphony of Flavors
There are countless ways to serve your perfectly cooked tenderloin. You can keep it simple with a side of roasted vegetables, mashed potatoes, or a green salad. Or, you can get creative and try a gourmet sauce like béarnaise or chimichurri. I love a good chimichurri! It adds a vibrant and refreshing flavor to the steak, a burst of tanginess that complements the richness of the meat.
And don't forget about the sides! For a truly impressive meal, consider serving your steak with a side of asparagus, creamed spinach, or sautéed mushrooms. For a heartier meal, you can pair your steak with a baked potato or mashed sweet potatoes. The possibilities are endless. Don’t be afraid to experiment and find what you enjoy most.
(Part 8) Storage and Leftovers: A Culinary Encore
Now, let's talk about leftovers. What to do with that delicious tenderloin after you've had your fill?
1. Storage: Preserving the Flavor
To keep your steak fresh, store it in the refrigerator in an airtight container for up to 3-4 days. You can also freeze your steak for up to 3 months. When freezing, make sure to wrap the steak tightly in plastic wrap and then place it in a freezer-safe bag. This will help to prevent freezer burn and preserve the flavor and texture of your steak.
2. Leftovers: A culinary adventure
Leftover tenderloin is perfect for a quick and easy meal. You can slice it thinly and use it for sandwiches, salads, or tacos. You can also dice it and add it to pasta dishes or stir-fries. Get creative! Don’t let those delicious leftovers go to waste.
Remember, I've learned through years of cooking, trial, and error. It's all about understanding your equipment, your meat, and your own personal preferences. So, relax, have fun, and enjoy the journey of mastering the art of cooking a tenderloin steak.
FAQs
1. What is the best way to thaw a frozen tenderloin?
The best way to thaw a frozen tenderloin is in the refrigerator. This will allow the steak to thaw slowly and evenly, minimizing the risk of bacteria growth. You can also thaw your steak in cold water, but be sure to change the water every 30 minutes to keep the water cold. Avoid thawing your steak at room temperature. This can cause bacteria to grow and can make the steak unsafe to eat.
2. What are some good sides to serve with tenderloin steak?
The great thing about tenderloin is that it pairs well with a wide variety of sides. Some classic pairings include mashed potatoes, asparagus, creamed spinach, roasted vegetables, and a green salad. But, feel free to get creative! You can also serve your steak with pasta dishes, risotto, or even a side of quinoa. The possibilities are endless.
3. How can I tell if my steak is done?
The most accurate way to tell if your steak is done is to use a meat thermometer. Insert the thermometer into the thickest part of the steak and make sure it doesn’t touch any bone.
| Doneness | internal temperature |
|---|---|
| Rare | 125°F - 130°F |
| Medium-Rare | 130°F - 135°F |
| Medium | 140°F - 145°F |
| Medium-Well | 150°F - 155°F |
| Well-Done | 160°F - 165°F |
If you don't have a meat thermometer, you can use the "touch test." Press on the center of the steak. If it feels soft and springs back easily, it's medium-rare. If it feels firmer, it's medium. And if it feels very firm, it's medium-well. But remember, this method is not as accurate as using a meat thermometer. It's a good starting point, but a thermometer provides more precise results.
4. How can I make my tenderloin more flavorful?
There are a few ways to make your tenderloin more flavorful. First, make sure to use a high-quality tenderloin with good marbling. Second, season your steak liberally with salt and pepper. You can also add other herbs and spices, such as garlic powder, onion powder, or paprika. Finally, let your steak rest for 10 minutes after cooking. This will allow the juices to redistribute and will result in a more tender and flavorful steak.
5. What are some good sauces to serve with tenderloin steak?
A good sauce can really elevate your tenderloin steak. Some classic pairings include béarnaise sauce, chimichurri sauce, and red wine sauce. But feel free to get creative! You can also serve your steak with a simple pan sauce made from the drippings in the pan. Just add a splash of red wine or stock and whisk to combine.
Everyone is watching

How to Cook Frozen Lobster Tails Perfectly: A Step-by-Step Guide
RecipesLobster. Just the word conjures up images of lavish meals, special occasions, and a taste of luxury. But let's...

Pigs in a Blanket Cooking Time: How Long to Bake for Perfect Results
RecipesAh, pigs in a blanket. Just the name conjures up images of those delightful little parcels of crispy pastry en...

Pork Fillet Cooking Time: How Long to Cook It Perfectly
RecipesPork fillet, or tenderloin as it's sometimes called, is a real favourite in our house. It's so versatile, and...

The Ultimate Guide to Tender, Juicy Pulled Pork
RecipesRight, let's talk pulled pork. It's one of those dishes that just screams "comfort food," doesn't it? I mean...

The Ultimate Guide to Cooking Sweet Potatoes: From Roasting to Mashing
RecipesSweet potatoes. Just the name conjures up images of warm, comforting dishes, bursts of vibrant color, and a to...