Let's talk ribs, folks. Not just any ribs, mind you, but the kind that make your mouth water just thinking about them, the kind that leave you licking your fingers and craving more. We're talking about tender, fall-off-the-bone spareribs, the holy grail of barbecue. I've spent years chasing the perfect rib recipe, trying countless methods, from dry rubs to wet marinades, from slow smoking to quick grilling. And let me tell you, the journey has been delicious. But along the way, I've learned a thing or two about what makes a truly exceptional rib experience.
This isn't just about a few recipes. It's about the whole shebang, the ins and outs of choosing the right cut, mastering the art of the rub, and finally, achieving that glorious, melt-in-your-mouth texture. We'll also explore different cooking methods and sauces because, let's face it, a good rib needs a good sauce, and the possibilities are endless!
(Part 1) The Rib of Choice: spare ribs, the King of the Barbecue

First things first, you need to pick the right cut. Now, you've got your baby back ribs, which are shorter and more tender, and then you've got your spare ribs, which are longer and have a bit more meat on them. Both have their merits, but for me, spare ribs are the way to go. They've got that lovely fat content that adds richness and flavour, and they tend to be a bit more forgiving in terms of cooking time. Plus, they just look mighty impressive piled up on a plate, don't they?
Selecting the Perfect Rack: Choosing Your Meat Wisely
When you're picking out your rack of spare ribs, there are a few things to look for. You want a rack that's got good marbling, which means it’s got that nice fat running through the meat. You want to feel that bit of give when you press on it. It shouldn’t be too hard, but it shouldn't be flimsy either. And always give the ribs a good sniff. They should smell fresh and clean, not at all gamey.
Speaking of gamey, I once bought a rack of ribs from a dodgy butcher, and oh boy, did I regret it. The ribs were so tough and flavourless, they tasted like I’d been chewing on a piece of leather. Lesson learned: always choose a reputable butcher or a supermarket you trust.
Preparing the Ribs: Removing the Membrane for Tenderness
Okay, so you've got your rack of spare ribs. Now, it's time to prep them. First, give them a good rinse and pat them dry. Then, you need to remove the membrane, that thin, tough skin on the back side of the ribs. Don't worry, it's easier than you think. You can use a butter knife to loosen it up, then peel it off with your fingers. It's a bit of a messy task, but trust me, it's worth it.
Why bother with removing the membrane? Well, it's tough and chewy and will prevent the flavour from penetrating the meat. Removing it ensures that the rub and sauce can penetrate the meat, resulting in a more tender and flavorful rib.
(Part 2) The Art of the Rub: Building the Foundation of Flavor

Now, you’re ready to get your hands dirty. The rub is the foundation of flavour, and it’s a crucial step in this whole rib journey. It’s a mix of spices and seasonings that you’ll apply to the ribs before cooking. There’s no one-size-fits-all rub recipe. It’s all about experimenting and finding what works best for you.
I’ve got a few basic rub recipes that I swear by, and I’ll share those with you later. But before we jump into recipes, let’s talk about the key ingredients that make a good rub.
Essential Rub Ingredients: A Symphony of Spice
Think of your rub as a symphony of flavors. Here are the key players:
- Salt: The backbone of any good rub, salt enhances the natural flavour of the meat. It also helps to draw out moisture, creating a juicy and flavorful rib.
- Pepper: Adds a kick and complexity to your rub. Black pepper is a classic choice, but you can also experiment with other varieties like white pepper or cayenne pepper for a bit more heat.
- Smoked Paprika: Infuses your ribs with a touch of smokiness. Paprika adds a deep red color to your rub and a subtly sweet, smoky flavor that complements the meat beautifully.
- Garlic Powder: Adds depth and flavor to your rub. Garlic powder provides a powerful punch of flavor without the need for fresh garlic.
- Onion Powder: A touch of sweetness and umami, onion powder adds another layer of complexity to your rub.
- Brown Sugar: A bit of sweetness to balance out the savory flavors. Brown sugar also helps to create a caramelized crust on the ribs as they cook.
- Chili Powder: For a touch of heat (optional, of course!). Chili powder brings a warm, earthy flavor with a hint of spiciness.
- Cumin: Adds a warm, earthy flavor. Cumin adds a depth of flavor that complements the smokiness of the ribs.
- Cayenne Pepper: For a more intense heat (optional). Cayenne pepper provides a fiery kick that can be adjusted to your liking.
These are just a few examples. You can use any combination of spices and seasonings you like. Just remember to be bold!
Applying the Rub: A Hands-On Experience
Once you've got your rub mixed up, you're ready to apply it. Get those hands dirty! I like to rub it all over the ribs, making sure to get it into all the nooks and crannies. Then, I place the ribs in the fridge, uncovered, for at least 4 hours or overnight. This allows the spices to penetrate the meat and really develop those delicious flavors.
(Part 3) The Smoking Stage: Unveiling the Magic of Low and Slow
Now, we’re getting to the good stuff: the smoking. For me, this is the most crucial part of the entire rib-cooking process. It’s where the magic happens. It’s where those ribs get that beautiful smoky flavour and tender, fall-off-the-bone texture.
Choosing Your Wood: The Symphony of Smoke
First things first, you've got to pick your wood. Oak is a classic choice for ribs, but you can also use hickory, pecan, mesquite, or even applewood, depending on the flavour profile you’re after. Personally, I’m a big fan of hickory. It gives the ribs a real smoky flavour that I just can’t get enough of. Each wood type imparts a unique flavor:
| Wood | Flavor Profile |
|---|---|
| Oak | Classic, slightly sweet, robust smoke |
| Hickory | Strong, smoky, nutty flavor, often used for pork |
| Pecan | Mild, sweet, slightly nutty flavor, good for poultry |
| Mesquite | Strong, bold, almost earthy flavor, great for beef |
| Applewood | Mild, fruity, slightly sweet flavor, good for poultry and fish |
Setting Up Your Smoker: The Stage is Set
Once you've got your wood, you need to set up your smoker. If you're using a charcoal smoker, you'll want to make sure you’ve got enough coals to maintain a steady temperature. If you're using a gas smoker, you'll need to set the heat to a low and slow temperature.
The Smoking Process: The Art of Low and Slow
Now, you’re ready to smoke those ribs. You want to aim for a temperature between 225°F (110°C) and 250°F (120°C). It’s important to maintain a consistent temperature, so check the smoker frequently and adjust the heat as needed. You'll be using low and slow heat to break down the collagen in the ribs, making them incredibly tender.
Smoking time can vary depending on the size of the ribs and the desired tenderness. But, as a general rule of thumb, plan on smoking those ribs for about 3 to 4 hours, or even longer, until they’re nice and tender.
The Importance of Patience: A Culinary Marathon
You’ve got to be patient with this one. It’s a slow and steady process, and that’s what makes it so rewarding. Resist the temptation to rush things. You can't force that tenderness. It takes time. The longer you smoke them, the more tender and flavorful they become.
The Wrap Method: The Final Push for Tenderness
After a few hours, you can wrap the ribs in aluminum foil. This helps to trap steam and accelerate the tenderizing process. I like to wrap them in foil, with a little bit of butter, apple juice, or even some barbecue sauce. This creates a moist environment that allows the ribs to cook more evenly and become incredibly tender.
The Final Stage: Rest and Relaxation
After wrapping the ribs, you can continue to smoke them for another hour or two, or until they’re really tender. Once they’re ready, remove them from the smoker and let them rest for about 15 minutes. This allows the juices to redistribute and creates a more succulent rib.
(Part 4) The Sauce Situation: The Final Touch of Flavor
Now, you’ve got your beautifully smoked ribs, all tender and juicy. But they need a little something extra: a good sauce! A good barbecue sauce can really make or break a rib. It’s that final touch that brings it all together.
Homemade vs. Store-Bought: Craft Your Own Flavor
You can go with a store-bought sauce, but honestly, there's something special about making your own. You can control the flavour and adjust it to your taste. Plus, it’s a lot more fun!
Key Sauce Ingredients: Building Blocks of Flavor
When it comes to sauce, the possibilities are endless. But there are a few key ingredients that you’ll find in most good barbecue sauces:
- Tomato Paste: Adds sweetness and depth to your sauce. Tomato paste provides a concentrated tomato flavor that adds a rich base to your sauce.
- Vinegar: Provides a tangy bite, balancing out the sweetness of the sauce. Vinegar also helps to cut through the richness of the ribs.
- Brown Sugar: Adds sweetness to balance out the acidity. Brown sugar also helps to create a rich, caramelized flavor in the sauce.
- Worcestershire Sauce: Adds umami and complexity. Worcestershire sauce brings a savory depth to the sauce that enhances the overall flavor.
- Mustard: For a touch of heat and a slight tang. Mustard adds a subtle heat and a pleasant tanginess to the sauce.
- Spices: You can add any spices you like, such as paprika, chili powder, garlic powder, and onion powder. Experiment with different spice combinations to find what you like best.
Once you've got your ingredients ready, you can simmer them together until they thicken and reduce. You can adjust the consistency and flavor to your liking by adding more sugar, vinegar, or spices.
Sauce Application: Adding the Finishing Touches
The best time to apply the sauce is during the final stage of cooking. You can brush the sauce onto the ribs while they’re still in the smoker, or you can baste them with sauce during the last half hour of cooking. Be careful not to add sauce too early, as it can burn and create a bitter flavor.
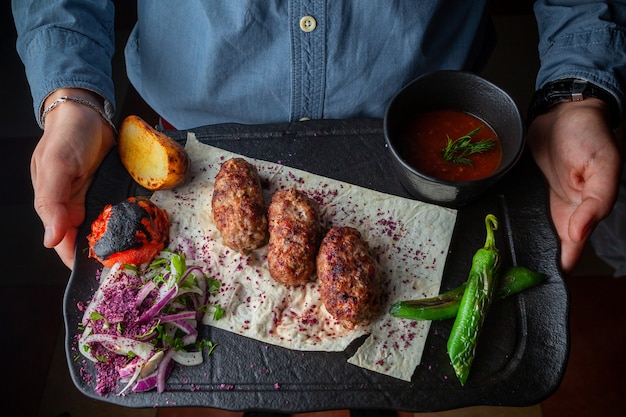
(Part 5) The Glorious Feast: A Celebration of Flavor
Okay, the moment of truth! Your ribs are done, and it’s time to enjoy the fruits of your labour. Take a deep breath, admire your creation, and get ready to indulge.
Serving Up Success: The Perfect Pairing
I like to serve my ribs with a side of creamy coleslaw, baked beans, and a heaping pile of potato salad. But you can choose whatever sides you like. The important thing is to enjoy your masterpiece!
The Final Bite: Pure Rib Satisfaction
You pick up a rib and take a bite. The meat practically melts in your mouth, and you’re hit with a wave of flavour: smokiness, spice, and just a hint of sweetness. Your eyes close, and you sigh with contentment. That’s the feeling, folks. That's the feeling of pure rib satisfaction.
(Part 6) Ribs on the Grill: Achieving Tenderness without a Smoker
So, what if you don’t have a smoker? Don’t worry, you can still make amazing ribs on the grill! It might not give you that deep, smoky flavour, but you can still achieve that melt-in-your-mouth texture.
Grilling Setup: Mastering the Indirect Heat
You’ll want to set up your grill for indirect heat. You can do this by placing the coals or gas burners on one side of the grill and leaving the other side empty. This creates a heat zone for searing and a cooler zone for cooking.
The Grilling Process: Searing and slow cooking
Start by searing the ribs over high heat for a few minutes on each side. This helps to create a nice crust and lock in the juices. Then, move the ribs to the cooler side of the grill and continue cooking them for about 2 to 3 hours, or until they’re tender.
You can also wrap the ribs in foil, as mentioned before, during the grilling process to speed up the tenderizing.
(Part 7) Beyond the Basics: Experimenting with Flavours
So far, we’ve talked about the classic way to make ribs, but why stop there? There’s a whole world of flavour out there, and ribs are the perfect canvas for experimentation.
The Sweet and Spicy Approach: Adding a Kick
If you like things a little spicy, you can add some cayenne pepper or chili powder to your rub or sauce. For a sweet and smoky flavour, try adding a little bit of brown sugar or maple syrup to your rub.
The Asian Twist: A Fusion of Flavor
For something a bit different, try incorporating Asian flavours. You can add ginger, garlic, soy sauce, and sesame oil to your rub or sauce.
The Herb and Spice Medley: A Symphony of Aromas
Don’t be afraid to experiment with different herbs and spices. You can add thyme, rosemary, oregano, or even a touch of coriander. Let your imagination run wild.
The Fruity Infusion: A Touch of Sweetness
For a unique twist, try adding some fruit to your ribs. You can use apple cider, pineapple juice, or even a little bit of citrus zest.
(Part 8) FAQs (Frequently Asked Questions)
So, you’ve got your ribs, you’ve got your rub, and you’re ready to fire up the smoker. But, you might have a few questions. Here are some common questions about making ribs, and my answers based on years of rib experience!
Q1. How do I know if my ribs are done?
You can tell if your ribs are done by checking for tenderness. The meat should be so tender that it practically falls off the bone. You can also check the temperature with a meat thermometer. The internal temperature should reach 190°F (90°C).
Q2. What if my ribs are too tough?
Don’t worry, it happens to the best of us. If your ribs are too tough, you can always try cooking them longer. You can also wrap them in foil with some apple juice or broth to help steam them and tenderize them.
Q3. Can I freeze ribs?
Yes, you can freeze ribs. It’s best to freeze them before cooking, and you can freeze them for up to 3 months. Just make sure to wrap them tightly in plastic wrap and aluminum foil before putting them in the freezer.
Q4. How can I make my ribs more flavorful?
The key to flavorful ribs is using a good rub and a good sauce. Experiment with different spice combinations and sauces to find what you like best. You can also try marinating the ribs in a flavorful liquid before cooking them.
Q5. What’s the best way to reheat ribs?
The best way to reheat ribs is in the oven at a low temperature. You can also reheat them on the grill or in a smoker. Just make sure to wrap them in foil to help keep them moist.
(Part 9) The Rib Journey Continues
Making ribs is a journey, not a destination. There’s always something new to learn, some new flavour combination to try, some new technique to master. So, keep experimenting, keep exploring, and keep enjoying those delicious, melt-in-your-mouth ribs!
And if you ever have any questions or want to share your own rib adventures, feel free to drop me a line. I’m always happy to hear from fellow rib enthusiasts!
Everyone is watching

How to Cook Frozen Lobster Tails Perfectly: A Step-by-Step Guide
RecipesLobster. Just the word conjures up images of lavish meals, special occasions, and a taste of luxury. But let's...

Pigs in a Blanket Cooking Time: How Long to Bake for Perfect Results
RecipesAh, pigs in a blanket. Just the name conjures up images of those delightful little parcels of crispy pastry en...

Pork Fillet Cooking Time: How Long to Cook It Perfectly
RecipesPork fillet, or tenderloin as it's sometimes called, is a real favourite in our house. It's so versatile, and...

The Ultimate Guide to Cooking Delicious Frankfurters
RecipesLet's face it, we all love a good frankfurter. It's a classic, simple, and always satisfying. But let's be rea...

Wolf Meat Recipes: A Guide to Cooking Wild Game
RecipesLet's be honest, you don't see wolf meat at your local butcher shop every day. It's a bit of a wild card, but ...