It's that time of year again - the aroma of roasting turkey filling the air, the familiar clatter of cutlery, and the joyful chatter of loved ones gathered around the table. There's just something magical about a perfectly roasted turkey, isn't there? It's the centerpiece of any festive feast, a symbol of tradition and togetherness. But let's face it, roasting a turkey can be a bit daunting. You want it to be succulent, golden-brown, and bursting with flavor, not dry, pale, and disappointing. Fear not, my fellow food enthusiast! This guide will equip you with the knowledge and techniques to create a show-stopping roasted turkey that will impress even the most discerning palate.
(Part 1) Choosing Your Turkey: The Foundation of Flavor
The first step to achieving a culinary masterpiece is choosing the right ingredients, and for a roast turkey, that means selecting the perfect bird. It's a bit like choosing a vintage wine - you want to make sure it's going to meet your expectations.
Size Matters: Feeding the Crowd
Let's be honest, no one wants to be left wanting more, but no one wants leftovers that last a week either! A good rule of thumb is to allow about 1 pound of turkey per person. So, for a family gathering of eight, a 10-12 pound turkey should be just right. But remember, turkey leftovers are a glorious thing - perfect for sandwiches, salads, or even a hearty soup!
Fresh or Frozen: A Matter of Preference
This is a question that often sparks debate amongst seasoned turkey roasters. I personally prefer fresh turkeys, as the flavour seems more intense, and the skin crisps up beautifully. However, if time is of the essence, a frozen turkey will work just as well. Just ensure to defrost it properly, following the instructions on the packaging.
Free-Range or Organic: Ethical and Flavorful
If you're concerned about animal welfare and environmental sustainability, a free-range or organic turkey might be the way to go. Not only are they raised in more humane conditions, but they often have a richer flavour, due to a diet that includes a variety of natural ingredients.
Checking for Quality: Spotting the Best Bird
Once you've made your choice, it's essential to inspect the turkey for quality. The skin should be smooth and free from any blemishes, a sign of a healthy bird. Look for a plump turkey, with good weight in the breast and legs, indicating a well-fed bird. The packaging date should be recent, and it's worth checking the expiration date as well.
A Sniff Test: Unlocking the Secrets of the Turkey
Here's a little trick I learned from my grandmother: give the turkey a good sniff! It should have a clean, fresh aroma, reminiscent of the farm it came from. If it smells off or has a strange odour, it's best to choose another turkey.
(Part 2) Preparing the Turkey: Unleashing Flavor and Moisture
With the perfect turkey chosen, it's time to prep it for the big roast. This is where you can really elevate the taste and tenderness of your bird.
Brining: The Secret Weapon for juicy turkey
Ah, brining! This is where the real magic happens, transforming a plain turkey into a symphony of flavour. Imagine giving your turkey a spa day! Brining involves soaking the turkey in a salt-water solution, which helps to lock in moisture, making it incredibly juicy and tender. I use a simple brining solution: 1 cup of salt, 1 cup of sugar, and 1 gallon of water. The turkey should soak in the fridge for 12-24 hours, allowing the brine to work its magic.
Stuffing: The Debate Continues
This is a topic that ignites heated discussions amongst chefs and home cooks alike. Traditionally, turkeys are stuffed with a delicious bread-based mixture, but for food safety reasons, it's recommended to stuff the turkey separately and cook it in a baking dish. This ensures the stuffing cooks evenly and reaches a safe temperature. If you opt for a separate stuffing, you can use the time to make a more elaborate stuffing with additional ingredients like vegetables, herbs, and spices.
Patting It Dry: The Key to crispy skin
Once the turkey is out of the brine (or if you've skipped the brining step), pat it dry with kitchen paper. This is essential for achieving that irresistible crispy skin, the hallmark of a truly exceptional roast turkey.
Seasoning: A Symphony of Flavors
Now comes the fun part: seasoning the turkey! I love using a simple blend of salt, pepper, and garlic powder, but don't be afraid to get creative and add your own personal touch. Consider adding herbs like rosemary, thyme, or sage, or spices like paprika, cumin, or chili powder. You can also try rubbing the turkey with butter or olive oil before seasoning for extra moisture and flavor.
(Part 3) Roasting the Turkey: The Culinary Performance
We're finally at the heart of the matter, the moment of truth: roasting the turkey. It's like conducting an orchestra, each step crucial to creating a harmonious symphony of taste and texture.
Preheating the Oven: Setting the Stage
Preheat your oven to 325°F (165°C). This is a vital step, ensuring the turkey cooks evenly and doesn't get burnt. A preheated oven creates the perfect environment for the turkey to cook through evenly, producing a beautifully golden-brown exterior without drying out the interior.
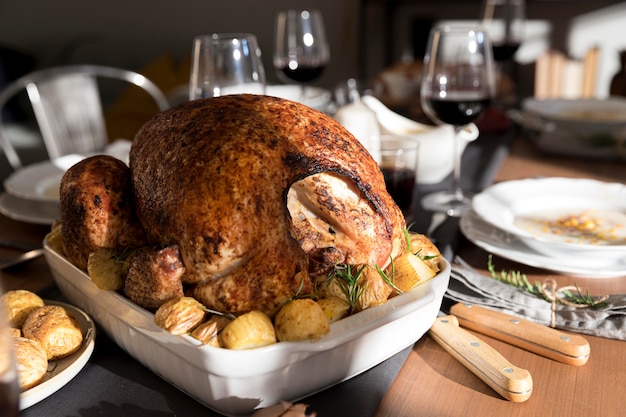
Setting up the Turkey: Creating a Stable Foundation
Place the turkey on a roasting rack, and put it in a roasting pan. Add a cup of water or broth to the bottom of the pan to create steam and keep the turkey moist. The roasting rack allows air to circulate around the turkey, helping to cook it evenly and achieve that crispy skin. The water or broth in the bottom of the pan will prevent the turkey from drying out and create a delicious sauce to make gravy later.
Time to Roast: The Culinary Clock
The roasting time will depend on the size of your turkey. A good rule of thumb is about 15 minutes per pound. For a 12-pound turkey, that's about 3 hours. It's important to note that these are just general guidelines. Always check the internal temperature of the turkey with a meat thermometer to ensure it's cooked through.
Checking for Doneness: The Moment of Truth
You'll know your turkey is done when the internal temperature reaches 165°F (74°C) in the thickest part of the thigh. This is the most reliable way to ensure the turkey is cooked through and safe to eat. The internal temperature should also be at least 165°F in the breast as well.
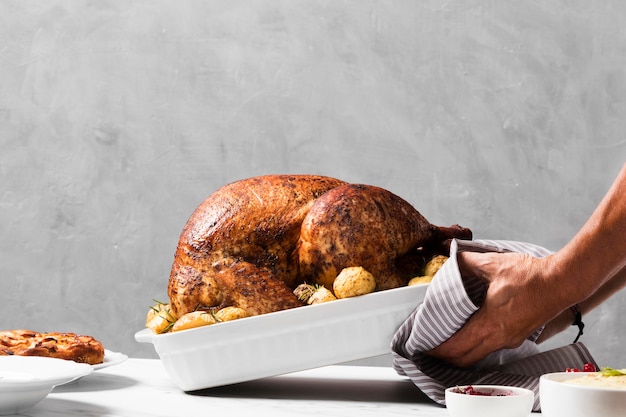
Resting the Turkey: A Time for Relaxation
Once the turkey is cooked, let it rest for at least 30 minutes before carving. This allows the juices to redistribute throughout the meat, resulting in a more tender and juicy turkey.
(Part 4) Carving the Turkey: Unlocking the Deliciousness
The moment we've all been waiting for: carving the turkey!
Tools of the Trade: Essential Equipment
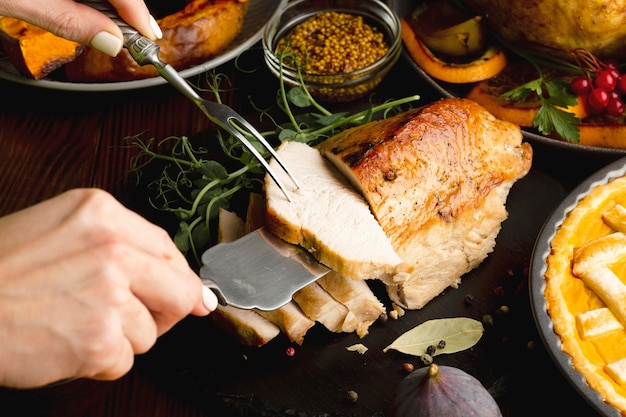
You'll need a sharp carving knife and a carving fork to make this process a breeze. A sharp knife will ensure clean cuts, while the carving fork will help to hold the turkey in place as you carve.
Carving Techniques: A Masterful Approach
Start by carving the breasts, working from the front to the back. Then, carve the legs and thighs. Finally, carve the wings. Try to make smooth, even slices, and avoid shredding the meat.
Presentation is Key: The Art of the Platter
Once the turkey is carved, arrange the pieces on a platter. I like to add some fresh herbs and cranberries for a festive touch. Consider creating a visually appealing arrangement of the carved turkey, with the breast slices in the center and the legs and wings arranged around the edges.
(Part 5) The Finishing Touches: Adding the Final Flourishes
Almost there, folks! Let's add those finishing touches that will elevate your roasted turkey from good to truly exceptional.
Gravy: The Essential Side
No roasted turkey is complete without gravy! You can make gravy from the turkey drippings, or use store-bought gravy. Either way, it's essential to add a touch of flavour to your meal. The rich, savory gravy adds a wonderful layer of flavor and moisture to the turkey.
side dishes: Perfect Pairings
Roasted vegetables, mashed potatoes, and stuffing are classic side dishes for roasted turkey. But feel free to get creative and add your own personal favorites. Consider Brussels sprouts with bacon, cranberry sauce, or a baked sweet potato casserole.
Garnish: Adding a Touch of Elegance
A few sprigs of parsley, some cranberries, or a lemon wedge can add a touch of elegance to your platter.
(Part 6) Leftover Turkey Magic: A Culinary Treasure Trove
Let's be honest, everyone loves leftover turkey! It's a blank canvas for a variety of culinary delights.
turkey sandwiches: The Classic
You can't go wrong with a classic turkey sandwich. Add some mayonnaise, lettuce, and tomato for a delicious lunch or dinner.
turkey soup: A Comforting Treat
Turn your leftover turkey into a hearty and comforting soup. Add vegetables, broth, and spices for a satisfying meal.
Turkey Casserole: A Hearty Dish
Mix leftover turkey with vegetables, cheese, and sauce for a delicious casserole.
turkey salad: A Light Option
Chop up leftover turkey and mix it with mayonnaise, celery, and onion for a light and refreshing salad.
(Part 7) Common Mistakes and How to Avoid Them: Navigating the Culinary Pitfalls
We've all been there, folks! A dry turkey or a burnt skin is a real turkey-roasting nightmare. But fear not, you can avoid these common mistakes with a little knowledge and careful attention.
Overcooking: The Number One Mistake
Overcooking is a common mistake, resulting in dry meat. To avoid this, use a meat thermometer to check the internal temperature and cook the turkey until it reaches 165°F (74°C).
Burnt Skin: The Beauty Faux Pas
Burnt skin is a real shame! To prevent this, reduce the oven temperature to 325°F (165°C) and keep an eye on the turkey. You can also tent the turkey with foil during the last part of the cooking process to prevent the skin from burning.
Uneven Cooking: The Shape Issue
If your turkey isn't cooking evenly, it's likely because the oven isn't set to the correct temperature or the turkey is too large for the roasting pan.
Underseasoned: The Flavour Fiasco
Don't be afraid to season your turkey generously! Add salt, pepper, and other herbs and spices to enhance the flavour.
Not Resting the Turkey: The Juicy Issue
Resting the turkey is essential for allowing the juices to redistribute. This prevents the meat from being dry and ensures it's juicy and tender.
(Part 8) FAQs: Your turkey roasting Questions Answered
You've got questions, I've got answers!
1. Can I brine a frozen turkey?
It's not recommended to brine a frozen turkey. Brining works best on fresh turkeys.
2. How do I know if my turkey is cooked through?
Use a meat thermometer to check the internal temperature. It should reach 165°F (74°C) in the thickest part of the thigh.
3. What if my turkey is overcooked?
If your turkey is overcooked, it's likely to be dry. Try slicing it thin and serving it with gravy or sauce.
4. Can I use a different type of bird for this recipe?
Yes, you can use a chicken or a goose. Adjust the cooking time accordingly.
5. What if my turkey skin is not crispy?
If your turkey skin is not crispy, try increasing the oven temperature for the last 30 minutes of cooking.
(Part 9) Final Thoughts: The culinary journey Continues
Well, there you have it! With this comprehensive guide, you're ready to create the most delicious roasted turkey that will impress your guests and leave them wanting more. Remember, practice makes perfect. So don't be afraid to experiment and find what works best for you. And most importantly, have fun!
Enjoy the turkey and happy holidays!
Everyone is watching

How to Cook Frozen Lobster Tails Perfectly: A Step-by-Step Guide
RecipesLobster. Just the word conjures up images of lavish meals, special occasions, and a taste of luxury. But let's...

Pork Fillet Cooking Time: How Long to Cook It Perfectly
RecipesPork fillet, or tenderloin as it's sometimes called, is a real favourite in our house. It's so versatile, and...

Pigs in a Blanket Cooking Time: How Long to Bake for Perfect Results
RecipesAh, pigs in a blanket. Just the name conjures up images of those delightful little parcels of crispy pastry en...

The Ultimate Guide to Cooking Delicious Frankfurters
RecipesLet's face it, we all love a good frankfurter. It's a classic, simple, and always satisfying. But let's be rea...

Wolf Meat Recipes: A Guide to Cooking Wild Game
RecipesLet's be honest, you don't see wolf meat at your local butcher shop every day. It's a bit of a wild card, but ...