Right, let’s be honest, there’s nothing quite like a perfectly cooked sirloin steak. That beautiful sear, the juicy center, and the satisfying chew – it’s a culinary masterpiece waiting to happen. I’ve been cooking sirloin steak for years, and I’ve learned a thing or two about getting it absolutely spot on. From the perfect cut to the ideal cooking method, I’m going to share all my secrets with you, and by the end of this, you’ll be turning out sirloin steaks that would make even the most discerning steakhouse chef jealous.
(Part 1) choosing the right cut: The Foundation of a Great Steak

The first step to a cracking sirloin steak is choosing the right cut. Now, this isn’t just about going to the butcher and pointing at the biggest piece of meat, it’s about understanding what makes a good sirloin steak. You want something with a good balance of marbling, which gives it flavor and tenderness, and a nice even thickness, so it cooks evenly. We’re looking for a steak that will hold its own, a steak with character.
Understanding the Different Cuts: Navigating the Butcher's Counter
Now, sirloin comes in a few different forms, each with its own characteristics. You’ve got your top sirloin, your bottom sirloin, and even a center cut. They’re all part of the same family, but they’ve got their own personalities, so to speak. Here’s a quick breakdown:
- Top Sirloin: This is the most common cut, often referred to as “strip loin” in the US. It’s a leaner cut, known for its delicate flavor and tender texture. This makes it great for grilling and pan-frying, as it won’t dry out easily.
- Bottom Sirloin: Now, the bottom sirloin is a bit less tender than its top counterpart. It has a more robust flavor, and while it’s still delicious, it’s better suited for slow-cooking methods like braising or roasting. It’s like a steak that needs a little bit more time and love to reach its full potential.
- Center Cut Sirloin: Ah, the center cut. It’s the fancy one, usually thicker and more flavorful than the others. This is where you’ll find the most marbling, giving it a rich, buttery texture. Ideal for thick steaks, perfect for grilling or pan-searing, it’s the showstopper of the sirloin family.
Picking the Perfect Piece: Mastering the Art of Selection
Once you’ve got a cut in mind, here’s what to look for when you’re selecting your sirloin:
- Marbling: You want good marbling, those little streaks of fat that run through the meat. They add flavor and tenderness, and are a sign of a good quality cut. Think of it like the veins of a good cheese – it's what gives it depth and complexity.
- Color: A good sirloin steak should be a bright red color, with a slightly darker, almost purple hue on the outside. Avoid any steaks that are pale, grayish, or have a dull color. This indicates that the meat might not be as fresh as it could be.
- Thickness: Aim for a steak that’s about 1-1.5 inches thick. This allows it to cook evenly and develop a good sear on the outside while keeping the inside juicy. A thin steak will cook too quickly and might dry out, while a steak that's too thick might not cook through properly.
- Freshness: Make sure the steak smells fresh and doesn’t have any off-putting odors. It should be firm to the touch, not soft or squishy. This means it’s been handled properly and is ready to be cooked.
(Part 2) Preparing for the Perfect Cook: Setting the Stage for Success

Alright, you’ve got your steak, now it’s time to get it ready for cooking. This is all about giving it the best chance to shine. We’re prepping it for its big moment, making sure it’s ready to impress.
The Crucial Step: Patting Dry: A Simple Step with Big Impact
Firstly, pat your steak dry with paper towels. This removes excess moisture, which helps it develop a beautiful crust when you sear it. It’s a small step but makes a huge difference. Think of it as giving the steak a little confidence boost before it hits the heat.
Seasoning with Finesse: The Art of Simplicity
Now, the seasoning. I’m a firm believer in simple seasoning, let the steak speak for itself. I go for just salt and pepper, but you can get creative with herbs and spices. Here are my tips:
- Salt: Use kosher salt, it’s flaky and allows you to season generously without making the steak too salty. The flakes will melt into the steak, creating a flavorful crust.
- Pepper: Freshly ground black pepper is always best. A good grinder will give you more flavour. It's all about that fresh, peppery kick.
- Herbs: If you’re going for herbs, rosemary, thyme, or garlic are all classic choices. Just a light sprinkle goes a long way. They add a subtle aroma and complexity to the flavor.
Let it Rest: Giving the Steak Time to Breathe
Finally, let your steak rest at room temperature for 30 minutes before you cook it. This allows it to come up to a more even temperature, ensuring a more consistent cook. Think of it as giving the steak a chance to relax and get ready for its big moment.
(Part 3) Mastering the Art of Searing: The Foundation of a Great Steak
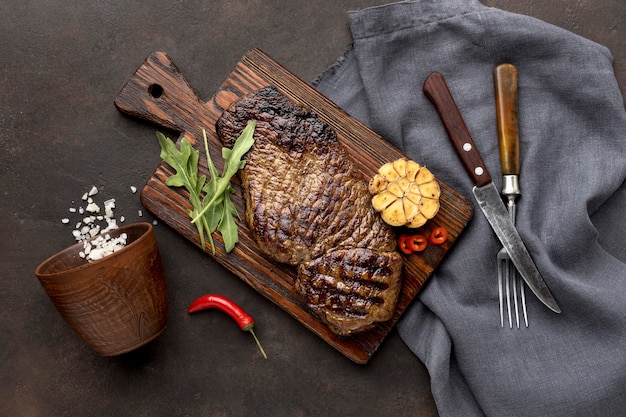
Now we’re getting to the exciting part: searing. This is where we get that beautiful crust and lock in those delicious juices. It’s the first step towards transforming a plain piece of meat into a culinary masterpiece.
The Cast Iron King: A Reliable Tool for perfect searing
My weapon of choice? A cast iron skillet, hands down. It holds heat incredibly well, ensuring a good sear. It’s like a sturdy friend, always reliable and ready to help you create something great. A heavy-bottomed pan will also do the trick, but cast iron is my go-to for that perfect sear.
Heat It Up: Getting the Pan Ready for Action
Get your pan scorching hot over high heat. You’re aiming for a pan that’s so hot it almost smokes. This is essential for a proper sear. Think of it as creating a mini-volcano of heat, ready to transform your steak.
The Searing Dance: A Choreographed Culinary Performance
Once the pan is hot, add a small amount of oil. I prefer grapeseed oil or avocado oil because they have a high smoke point. Now, place your steak in the pan. Don’t overcrowd the pan, give it space to cook evenly. We want each steak to have its own little dance floor.
Don’t Touch!: The Importance of Patience
The key here is patience. Let the steak sit undisturbed for 2-3 minutes per side. This allows the outside to brown beautifully and form a crispy crust. Resist the urge to move it around! We want the heat to do its job without interruption.
The Flip: A Carefully Timed Moment
After 2-3 minutes, flip the steak over and sear the other side. You’ll see a gorgeous crust forming, a sign that you’re on the right track. It's a moment of satisfaction, knowing that you're on your way to a delicious steak.
(Part 4) Bringing It to the Finish Line: The Final Steps to Perfection
Now that you’ve got a great sear, it’s time to finish cooking the steak to your desired doneness. It’s like a race to the finish line, but with a delicious prize at the end.
Cooking to Perfection: Knowing Your Desired Doneness
The key is to know your steak doneness. Here’s a handy table that’ll help you get it right:
| Doneness | internal temperature (°F) | Internal Temperature (°C) | Description |
|---|---|---|---|
| Rare | 125-130 | 52-54 | Red center, cool to the touch. Perfect for those who like their steak with a touch of red. |
| Medium Rare | 130-135 | 54-57 | Red center, warm to the touch. The classic steakhouse choice, with a juicy, flavorful center. |
| Medium | 135-140 | 57-60 | Pink center, warm to the touch. A good balance of tenderness and flavor, with a touch of pink. |
| Medium Well | 140-145 | 60-63 | Slight pink center, hot to the touch. For those who prefer a slightly less pink steak. |
| Well Done | 145 | 63 | No pink, hot to the touch. For those who prefer their steak fully cooked. |
Choosing Your Method: The Finishing Touches
You can finish cooking the steak using several methods. You can finish it in the oven, on the grill, or even back in the pan. It's like choosing the final act of a play, making sure it ends on a high note.
- Oven: Transfer the seared steak to a preheated oven at 350°F (175°C). This is a great way to cook a steak evenly. It's like giving the steak a warm hug, allowing it to cook gently to your desired doneness.
- Grill: Move the steak to a medium-heat grill, closing the lid to trap the heat. This gives you a smoky flavor. It's like adding a touch of drama to your steak, giving it a smoky, outdoorsy aroma.
- Pan: You can also finish cooking the steak in the pan, turning it occasionally to cook evenly. It's the most straightforward method, but it still allows for a delicious and juicy result.
The Rest is Key: Letting the Steak Recover
Once your steak is cooked to your desired doneness, remove it from the heat and let it rest for 5-10 minutes. This allows the juices to redistribute, giving you a juicier and more tender steak. It’s like a little time-out, allowing the steak to recover and regain its composure before being sliced and savored.
(Part 5) Elevate Your Steak Experience: Taking It to the Next Level
We’ve got a perfectly cooked steak, now let’s make it even more amazing. It's like adding a touch of magic, enhancing the experience and making it truly memorable.
Sides that Complement: The Perfect Pairing
I’m a big believer in sides that compliment the steak, not compete with it. Here are some ideas:
- Roasted Vegetables: roasted asparagus, Brussels sprouts, or broccoli are a classic match. They offer a fresh, earthy counterpoint to the richness of the steak.
- Creamy Mash: mashed potatoes, sweet potato mash, or even cauliflower mash are a comforting and delicious choice. They provide a creamy, comforting element that balances the savory steak.
- Fresh Salad: A simple green salad with a light vinaigrette keeps things light and refreshing. It's a breath of fresh air, adding a touch of acidity and lightness to the meal.
Sauces that Add Depth: The Finishing Touch
A good sauce can elevate your steak to a whole new level. Here are some of my favorites:
- Béarnaise Sauce: A rich, emulsified sauce made with egg yolks, butter, and tarragon. It’s classic for a reason, offering a creamy, tangy, and herbaceous element to the steak.
- Red Wine Sauce: A simple sauce made with red wine, shallots, and herbs. Perfect for a hearty steak, providing a rich, savory depth of flavor.
- Mushroom Sauce: A flavorful sauce made with sauteed mushrooms, cream, and herbs. It’s a delicious and earthy option, adding a touch of umami and texture to the steak.
Embrace the Finishing Touches: The Final Flourishes
There’s something about a little sprinkle of fresh parsley, a squeeze of lemon juice, or a drizzle of olive oil that takes your steak from good to phenomenal. Don’t be afraid to experiment! These finishing touches are like the final touches of a masterpiece, adding a touch of artistry and flavor.
(Part 6) Steakhouse Secrets Revealed: Unlocking the Professionals' Secrets
Now, let's talk about those fancy steakhouse steaks. They’re not magic, they’re just a few tricks of the trade. Here are a few secrets I’ve picked up over the years, allowing you to bring a touch of steakhouse magic into your own kitchen.
The Importance of Seasoning: A Masterful Blend
Steakhouse chefs often use a salt and pepper blend that includes other spices like garlic powder, onion powder, or paprika. This adds depth and complexity to the flavor. You can create your own blend or try a pre-made one. Don’t go overboard, a subtle seasoning is all you need. It's about enhancing the natural flavor of the steak, not overwhelming it.
The reverse searing Technique: A Controlled Cook
Many steakhouses use a technique called reverse searing. This involves cooking the steak in the oven at a low temperature until it reaches your desired doneness, then searing it quickly over high heat to create a crispy crust. This method ensures a more evenly cooked steak with a juicy center. It's like a slow and steady approach, allowing the steak to cook evenly before giving it a final burst of heat.
The "Broil" Finish: A Touch of Char
Another trick is to finish the steak under the broiler for a few minutes to create a nice char. This gives it a more intense flavor and a slightly smoky aroma. Be careful not to burn it! It's like adding a touch of smokiness, giving the steak a more complex and nuanced flavor.
(Part 7) Don't Be Afraid to Experiment: Embrace Your Culinary Creativity
Don't be afraid to experiment with different cooking methods, seasonings, and toppings. The possibilities are endless! You can try grilling your steak over charcoal, searing it in a cast iron pan, or even cooking it sous vide. There are so many ways to cook a perfect sirloin steak, and finding what you like best is all part of the fun. It's about embracing your culinary creativity and finding what works best for you.
I love to experiment with different herbs and spices, like smoked paprika, chili flakes, or a blend of dried herbs. I also like to add a little bit of butter and garlic to the pan at the end of cooking for an extra flavor boost. But hey, it's all about finding what you like best. It's like discovering your own signature dish, a personalized experience that you can call your own.
(Part 8) FAQs: Addressing Your Steak-Related Questions
Here are some common questions about cooking sirloin steak, addressing those lingering doubts you might have. Let's get those questions answered!
1. Can I cook sirloin steak from frozen?
It's best to cook sirloin steak from thawed, but if you’re in a pinch, you can cook it from frozen. Just make sure to add a few extra minutes to the cooking time. It might not be ideal, but it'll get the job done in a pinch.
2. What’s the best way to store sirloin steak?
Store sirloin steak in the refrigerator for up to 3 days. Wrap it tightly in plastic wrap or aluminum foil to prevent freezer burn. You can also freeze sirloin steak for up to 3 months. Just be sure to wrap it tightly in freezer paper or plastic wrap. Proper storage ensures that your steak stays fresh and flavorful for as long as possible.
3. Can I reuse the same pan for other things after cooking a steak?
It’s generally best to avoid reusing the same pan for other dishes after cooking a steak. The pan will be coated in fat and could impart a steak flavor to other dishes. Give the pan a good scrub with hot soapy water before using it again. It's all about keeping those flavors separate and ensuring that your other dishes are free from unwanted steakiness.
4. How do I know when my steak is cooked to my liking?
You can use a meat thermometer to check the internal temperature of the steak. Or, you can use the "finger test." Press on the center of the steak and feel for the amount of resistance. A rare steak will feel very soft, a medium-rare steak will feel slightly firm, and a well-done steak will feel very firm. It's like getting to know your steak, feeling its texture and determining its readiness.
5. What should I do if my steak is overcooked?
If your steak is overcooked, there’s not much you can do to fix it. But you can still enjoy it! Slice the steak thinly and serve it with a sauce that will help to mask the dryness. Don't let a slightly overcooked steak ruin your meal. There are ways to salvage it and still enjoy a delicious dinner.
Right, there you have it. A comprehensive guide to making the perfect sirloin steak. Remember, it’s all about having fun and experimenting in the kitchen. And most importantly, don’t be afraid to get your hands dirty! Happy cooking!
Everyone is watching

How to Cook Frozen Lobster Tails Perfectly: A Step-by-Step Guide
RecipesLobster. Just the word conjures up images of lavish meals, special occasions, and a taste of luxury. But let's...

Pigs in a Blanket Cooking Time: How Long to Bake for Perfect Results
RecipesAh, pigs in a blanket. Just the name conjures up images of those delightful little parcels of crispy pastry en...

Pork Fillet Cooking Time: How Long to Cook It Perfectly
RecipesPork fillet, or tenderloin as it's sometimes called, is a real favourite in our house. It's so versatile, and...

The Ultimate Guide to Cooking Delicious Frankfurters
RecipesLet's face it, we all love a good frankfurter. It's a classic, simple, and always satisfying. But let's be rea...

Wolf Meat Recipes: A Guide to Cooking Wild Game
RecipesLet's be honest, you don't see wolf meat at your local butcher shop every day. It's a bit of a wild card, but ...