Right, let's be honest, there's nothing quite like a plate of perfectly cooked chicken wings, is there? They're the ultimate finger food, perfect for a casual get-together, a sports day, or just a lazy Sunday afternoon. But let's face it, not every attempt at making these beauties turns out quite as we hoped. Sometimes they're dry, sometimes they're soggy, and sometimes they just lack that "wow" factor.
Well, fret no more, my fellow wing enthusiasts! I've spent countless hours (and maybe a few too many chicken wings) perfecting my own recipe for the ultimate crispy, juicy chicken wings, and I'm ready to share my secrets with you. Get ready for a deep dive into the world of wing-making, from choosing the perfect cuts to mastering the art of the crispy skin and the juicy interior. We'll even explore some of my favourite sauces, from the classic Buffalo to a sweet and spicy Honey Sriracha. So grab your apron, your favourite beverage, and let's get cooking!
(Part 1) Picking the Perfect Wings

choosing the right cuts: Drumettes, Flats, and Wingettes
The first step to achieving wing nirvana is selecting the right cuts. Now, you've got your drumettes, your flats, and your wingettes, and each has its own unique charm. Personally, I'm a big fan of drumettes – those little nuggets of pure chicken goodness. They're compact, easy to eat, and have that perfect balance of meat to bone. For a fun, interactive experience, drumettes are the way to go.
Flats, on the other hand, are great for dipping. Their larger, flat shape provides a generous surface area for coating with sauce, making them a favourite amongst sauce lovers. And then there are wingettes, which are essentially the tips of the wings. While they don't offer much meat, they're perfect for those who prefer a bit more meat and a bit less bone.
Ultimately, the choice is yours! Experiment with different cuts and see which ones you enjoy most.
The Importance of Freshness: Recognizing Quality
Always, always, always choose fresh wings. You want them to be plump, firm, and with a slight sheen to their skin. The skin should be smooth and unblemished, with no signs of bruising or discoloration. If you're buying frozen, make sure they're not too frosty or ice crystals. They should smell clean and fresh, with no off-putting odours.
The Power of Size: Small is Mighty
While it's tempting to go for those jumbo-sized wings, trust me, they're not always the best choice. Smaller wings cook more evenly and tend to get crispier. Plus, they're easier to handle, which is a bonus when you're trying to navigate a messy plate of wings.
(Part 2) The Art of Brining: A Secret Weapon for Juicy Wings
What is Brining?
Now, we're getting into the nitty-gritty of flavour and texture. Brining is a simple yet incredibly effective technique that involves soaking your wings in a saltwater solution before cooking. This process helps to retain moisture, making your wings incredibly juicy and tender.
The Benefits of Brining: More Than Just Moisture
So, why bother with this extra step? Well, it's all about the science, my friend! By immersing the wings in the salt solution, you're essentially drawing moisture into the meat, helping to create a juicy, flavorful result. And don't worry, the salt won't make the wings taste salty – it just enhances the natural flavor of the chicken.
But brining goes beyond just making your wings juicier. It also helps to tenderize the meat, making it easier to cook evenly.
The Brining Process: A Step-by-Step Guide
1. The Solution: Combine water, salt, and sometimes sugar in a large container. The exact proportions depend on your preference, but a good starting point is 1 cup of salt per gallon of water. Adding a little sugar helps to balance the saltiness and enhance the natural sweetness of the chicken.
2. The Soak: Submerge your wings in the brine for 2-4 hours, or even overnight for extra juicy results. Make sure the wings are fully submerged. If you're brining overnight, it's a good idea to cover the container with plastic wrap and refrigerate it.
3. The Rinse: After brining, rinse the wings thoroughly under cold water to remove excess salt. Pat them dry with paper towels before moving on to the next step.
(Part 3) Pat It Dry, People!: The Importance of a Dry Surface

Why Drying is Crucial: The Foundation of Crispness
You might be thinking, "Why bother drying my wings?" Well, here's the deal: a dry surface is crucial for achieving that beautiful, crispy skin. When moisture remains on the surface of the wings, it hinders the browning process and creates a soggy, unattractive finish.
Think of it this way: the drier the surface, the more readily the breading will adhere and crisp up, giving you that irresistible crunch.
The Drying Technique: Pat, Don't Rub!
1. Pat, Don't Rub: After rinsing the wings, pat them dry with paper towels. Avoid rubbing, as this can damage the skin.
2. Air Drying: For extra crispy skin, let the wings air dry on a wire rack for at least 30 minutes. This helps the skin to firm up and promotes even browning. Place the rack over a baking sheet to catch any drips.
(Part 4) The Battle of the Breading: A Crunch That Satisfies
Flour Power: The Basics of a Crispy Coating
Let's talk breading, the key to a delicious crunch! While you can definitely bake or roast your wings, the classic method involves coating them in a breading mixture. Flour is a fantastic base for a simple, crisp coating. Its fine texture allows for a light, airy breading that won't overwhelm the flavour of the chicken.
Spice It Up: Adding Flavor to Your Breading
But hold on, don't stop at just plain flour! Get creative with your seasonings. I like to use a blend of paprika, garlic powder, onion powder, and a touch of cayenne pepper for a kick. A dash of dried herbs, like thyme or rosemary, adds an extra layer of complexity. You can also experiment with different types of spices, like cumin, coriander, or chili powder. Remember, the possibilities are endless!
Beyond Flour: Other Breading Options
Beyond flour, you can experiment with other breading options. panko breadcrumbs add a delightful crunch, while cornmeal offers a slightly grainy texture. But remember, you want the breading to adhere to the wings, so use a light hand and avoid over-coating.
The Breading Technique: A Step-by-Step Approach
1. The Prep: In a bowl, combine your chosen flour or breading mixture with your spices.
2. The Dip: Dip each wing in the breading mixture, ensuring it's completely coated.
3. The Shake: Gently shake off any excess breading, ensuring a light, even coating.
4. The Rest: Place the breaded wings on a wire rack to allow the coating to set for about 15 minutes. This will help prevent the breading from falling off during cooking.
(Part 5) The Art of Deep Frying: Achieving Perfect Crispness
Heating Up: The Oil Temperature is Key
For ultimate crispiness, deep frying is the way to go. Get your oil nice and hot, but not too hot. A good starting point is 350°F (175°C). You want the oil to be hot enough to cook the wings quickly and evenly, but not so hot that the breading burns before the chicken is cooked.
The Deep Frying Technique: A Step-by-Step Guide
1. The Oil: Fill a deep fryer or a large pot with enough oil to completely submerge the wings. Heat the oil to the desired temperature. Use a deep-frying thermometer to ensure accuracy.
2. The Batch: Don't overcrowd the fryer! Cook the wings in batches to ensure even cooking.
3. The Cook: Carefully lower the wings into the hot oil. Cook for about 8-10 minutes, or until golden brown and cooked through.
4. The Turn: Use tongs to carefully turn the wings halfway through cooking to ensure all sides are cooked properly.
5. The Drain: Once the wings are cooked, carefully remove them from the oil using a slotted spoon or tongs. Place them on a wire rack to drain excess oil.
Checking for Doneness: A Guide to Perfect Wings
You know those wings are ready when they're golden brown and the breading is crisp. Don't be afraid to give them a little poke – they should feel firm to the touch, with no pink flesh remaining.
(Part 6) Baking for a Healthier Crunch: A Simple Alternative to Frying
The Baking Process: A Step-by-Step Guide
For those who prefer a healthier approach, baking is a great alternative to frying. Preheat your oven to 400°F (200°C) and place the breaded wings on a baking sheet lined with parchment paper. Bake for 25-30 minutes, flipping them halfway through, until they're golden brown and cooked through.
Keeping It Crispy: Tips for Achieving that Desired Crunch
To help achieve that crispy skin, you can use a baking rack placed over the baking sheet. This allows for airflow around the wings, promoting even cooking and crispiness.
The Secret Weapon: Broiling for the Final Touch
For an extra crispy finish, you can broil the wings for a few minutes at the end of the baking time. This will help to further crisp up the skin and enhance the browning. Just keep a close eye on them to prevent burning.
(Part 7) Saucy Delights: The Finishing Touches
The Sauce Options: A World of Flavor
Now we're talking! The sauce is what really elevates those chicken wings to the next level. You've got your classic buffalo sauce, of course, but don't limit yourself. Experiment with sweet and spicy options like honey sriracha, tangy bbq sauces, or even creamy ranch dressing.
The Dipping Technique: A Interactive Experience
Once the wings are cooked, you can toss them in the sauce or simply provide dipping containers for a more interactive experience. A light coating of sauce is all you need to enjoy the flavor without overpowering the crispiness.
(Part 8) Let's Get Saucy: Some Favourite Sauce Recipes
Classic Buffalo Sauce: The OG
1 cup hot sauce (your favorite brand)
1/4 cup melted butter
1 tablespoon white vinegar
Combine the ingredients in a saucepan over low heat. Stir until the butter is melted and the sauce is heated through.
Honey Sriracha: A Sweet and Spicy Delight
1/4 cup honey
1/4 cup sriracha sauce
1 tablespoon soy sauce
Combine the ingredients in a small bowl and whisk until smooth. You can adjust the sweetness and spice level by adding more honey or sriracha, depending on your preference.
Sweet and Smoky BBQ: The BBQ Lover's Choice
1/2 cup barbecue sauce
1/4 cup brown sugar
1 tablespoon smoked paprika
1 teaspoon chili powder
Combine the ingredients in a small saucepan over low heat. Stir until the sugar is dissolved and the sauce is heated through.
(Part 9) Serving Up the Wings: Presentation Matters
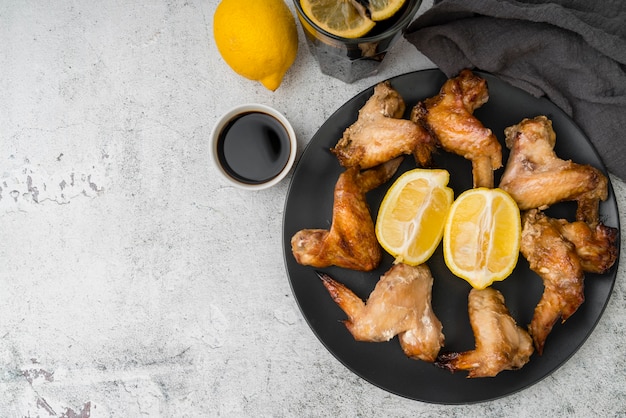
The Plate Matters: A Visual Feast
Don't underestimate the power of a good presentation. Serve those wings on a platter or a rustic wooden board. A simple yet elegant presentation will make your wings even more appealing.
The Garnish: Adding a Touch of Freshness
A sprinkle of fresh parsley or chives adds a touch of freshness and visual appeal. A few wedges of lemon or lime offer a bright contrast in flavor and color.
side dishes: Perfect Pairings
No wing party is complete without the perfect side dishes. Think creamy dips like blue cheese dressing or ranch, fresh celery sticks for cleansing the palate, and crunchy potato wedges for a satisfying combination.
FAQs
1. What is the best way to store leftover chicken wings?
Store leftover wings in an airtight container in the refrigerator for up to 3 days. You can reheat them in the oven or microwave, but they might not be as crispy. To retain some of the crispness, try reheating them in a preheated oven.
2. Can I use different types of chicken for wings?
While chicken wings are the best choice for a classic wing recipe, you can use other cuts of chicken, such as drumsticks or thighs. Just adjust the cooking time accordingly. Remember that drumsticks and thighs tend to be larger and will take longer to cook.
3. What if my wings are too dry?
If your wings turn out a bit dry, try tossing them in a sauce or adding a little bit of moisture before reheating them. You can also try adding a tablespoon or two of chicken broth to the reheating dish.
4. What are some creative ways to use leftover chicken wings?
You can use leftover wings in salads, sandwiches, or even in a hearty soup. Get creative! shredded chicken wings can add a boost of protein and flavour to your favourite dishes.
5. What are some tips for making the most flavorful chicken wings?
To boost flavor, try marinating your wings in a mixture of soy sauce, honey, and spices before cooking. You can also use a dry rub or add a touch of citrus juice to the breading. Experiment with different flavor profiles to find your favourites.
Remember, cooking chicken wings is a journey, not a destination. Experiment with different techniques, flavors, and sauces. Enjoy the process, and most importantly, have fun!
Everyone is watching

How to Cook Frozen Lobster Tails Perfectly: A Step-by-Step Guide
RecipesLobster. Just the word conjures up images of lavish meals, special occasions, and a taste of luxury. But let's...

Pigs in a Blanket Cooking Time: How Long to Bake for Perfect Results
RecipesAh, pigs in a blanket. Just the name conjures up images of those delightful little parcels of crispy pastry en...

Pork Fillet Cooking Time: How Long to Cook It Perfectly
RecipesPork fillet, or tenderloin as it's sometimes called, is a real favourite in our house. It's so versatile, and...

The Ultimate Guide to Cooking Delicious Frankfurters
RecipesLet's face it, we all love a good frankfurter. It's a classic, simple, and always satisfying. But let's be rea...

Wolf Meat Recipes: A Guide to Cooking Wild Game
RecipesLet's be honest, you don't see wolf meat at your local butcher shop every day. It's a bit of a wild card, but ...