Ah, eggs. Those little oval wonders are a breakfast staple, a lunchtime treat, a dinner hero, and a snacking sensation. But getting them just right can be a bit of a culinary conundrum, can't it? One minute they're runny, the next they're rubbery. And let's not even mention the dreaded green ring!
But fear not, egg enthusiasts! I'm here to share my egg-cellent wisdom and guide you through the art of cooking perfect eggs every time. We'll cover everything from the basics to the more advanced techniques, so you can confidently whip up the perfect egg, whether you're after a soft-boiled wonder, a perfectly poached delight, or a fluffy omelette.
So grab your pan, a whisk, and a good dose of enthusiasm, and let's get cracking!
(Part 1) choosing the right eggs
Before we even get to the cooking part, we need to talk about the eggs themselves. Choosing the right eggs is the first step towards egg-cellence.
egg size: A Matter of Proportion
First things first, size matters! I usually go for medium-sized eggs. They're a good all-rounder and work well for most recipes. They're not too small, not too big, just right for a balanced bite. If you're cooking for a crowd or need a more substantial egg, then large eggs are your best bet. But for those delicate dishes where you want a delicate yolk, then small eggs are the way to go.
Egg Colour: More Than Just Aesthetics
The colour of the shell doesn't actually affect the taste of the egg. It's all about the breed of hen! Brown eggs are typically laid by hens that live outdoors and free-range, while white eggs come from hens kept in more controlled environments. Personally, I'm a sucker for a good brown egg. It's all about that rustic feel, don't you think? Plus, the free-range lifestyle often means those hens are getting a more varied diet, which might just translate into a richer flavour (though, that's just a personal opinion).
egg freshness: A Test of Time
You can check the freshness of an egg by placing it in a bowl of cold water. If it sinks to the bottom and lays flat, it's fresh! If it floats, it's past its best. But honestly, I've never been one for checking. I always go by the "sniff test." If it smells a bit off, then it's definitely time to toss it.
(Part 2) Mastering the Basic Techniques
Okay, now that we've chosen our perfect eggs, let's get down to the nitty-gritty of cooking them.
Boiling: Simple and Reliable
boiling eggs is a classic. It's simple, reliable, and can be done in a jiffy. Here's my tried and tested method:
- Fill a saucepan with enough cold water to cover the eggs by at least an inch. This ensures the eggs cook evenly and prevents them from sticking to the bottom of the pan.
- Gently add the eggs to the pan. Make sure they're not piled on top of each other. This will allow the heat to circulate around each egg for even cooking.
- Bring the water to a rolling boil. Once it reaches a boil, reduce the heat to a simmer and set a timer. This gentle simmering prevents the eggs from cracking and helps to create a consistent texture.
- For soft-boiled eggs, cook for 3-4 minutes. The yolk will be runny and the white will be tender.
- For medium-boiled eggs, cook for 6-8 minutes. The yolk will be set, but still slightly soft. The white will be firm.
- For hard-boiled eggs, cook for 10-12 minutes. The yolk and white will be completely set.
- Once cooked, drain the water and immediately plunge the eggs into a bowl of iced water to stop the cooking process. This will make the eggs easier to peel and prevent the yolk from turning green.
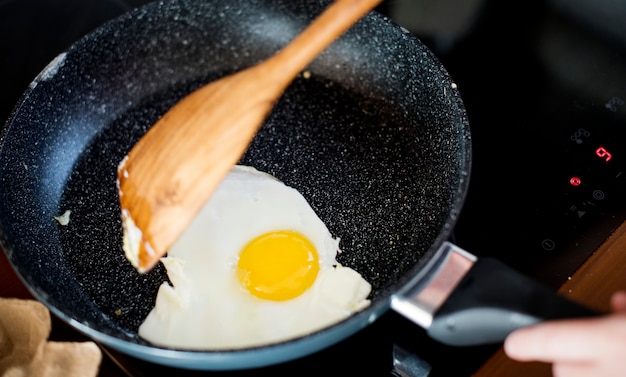
Frying: A Skill Worth Mastering
Frying an egg is a bit more of a skill, but trust me, anyone can do it. Here's how I like to do it:
- Heat a non-stick pan over a medium heat. A good non-stick pan is essential for preventing the egg from sticking.
- Add a little bit of oil or butter to the pan. This creates a lubricating layer that allows the egg to slide easily.
- Crack the egg into a small bowl and gently slide it into the pan. This method ensures the yolk remains intact and the egg cooks evenly.
- Cook for 2-3 minutes on one side, until the white is set and the yolk is still runny. If you prefer a firmer yolk, cook for a little longer. This gives you control over the level of doneness.
- Use a spatula to carefully flip the egg over and cook for another 30 seconds or so. This ensures the egg cooks evenly on both sides without breaking the yolk.
Poaching: A Touch of Culinary Elegance
Poaching is a bit more sophisticated, but with a bit of practice, you'll be a poaching pro in no time.
- Fill a saucepan with water and bring to a simmer. This gentle simmer ensures the egg cooks slowly and evenly without overcooking.
- Add a splash of vinegar to the water. This helps to keep the egg white together. The acid in the vinegar helps the proteins in the egg white to coagulate more quickly, resulting in a neat and compact poached egg.
- Crack the egg into a small bowl. Gently swirl the water in the saucepan to create a whirlpool. This creates a gentle current that helps to keep the egg white in a compact shape.
- Carefully slide the egg into the swirling water. This technique ensures the egg cooks evenly and prevents the white from spreading too much.
- Cook for 3-4 minutes, or until the white is set and the yolk is still runny. Adjust the cooking time based on your preference for the yolk's doneness.
- Use a slotted spoon to carefully lift the egg out of the water and drain it on kitchen paper. This removes excess water and prevents the egg from becoming soggy.
(Part 3) The Art of the Omelette
Now, let's talk about everyone's favourite egg-based dish: the omelette.
Choosing the Right Pan: The Foundation for Success
A good omelette needs a good pan! I love using a non-stick pan for my omelettes. It makes life so much easier. A non-stick pan ensures the omelette doesn't stick to the bottom, making for easy flipping and a perfectly cooked dish.
Whipping the Eggs: Airiness is Key
Now, for the eggs themselves. I like to whisk them with a fork until they are light and frothy. It adds a bit of airiness to the omelette. Whipping the eggs incorporates air, which creates a lighter and fluffier omelette.
Adding the Fillings: A culinary adventure
The fun part! Cheese, mushrooms, ham, spinach... the possibilities are endless. But remember, don't overload the omelette. A few key ingredients are all you need. Adding too many ingredients can make the omelette dense and difficult to fold.
Cooking the Omelette: A Step-by-Step Guide
- Heat a non-stick pan over a medium heat. This ensures the pan is hot enough to cook the omelette quickly and prevent it from becoming soggy.
- Add a little bit of butter or oil to the pan. This helps to lubricate the pan and prevents the omelette from sticking.
- Pour the whisked eggs into the pan and tilt the pan so the eggs spread evenly. This ensures the omelette cooks evenly and prevents it from sticking to the bottom of the pan.
- Cook for a minute or two, until the bottom of the omelette is set. This allows the omelette to solidify without overcooking.
- Add your chosen fillings to one half of the omelette. Adding the fillings at this stage allows them to cook slightly, creating a more flavorful omelette.
- Use a spatula to fold the other half of the omelette over the fillings. This creates the classic omelette shape and encloses the fillings.
- Cook for another minute or two, until the omelette is cooked through. This ensures the egg is cooked through and the fillings are heated.
(Part 4) Solving Common Egg-Cooking Problems
Alright, so we've covered the basics. But what happens when things go wrong?
Green Ring Around the Yolk: A Sign of Overcooking
This happens when the eggs are overcooked. The iron in the yolk reacts with the sulfur in the egg white, causing that unattractive green ring. The best way to avoid this is to cook your eggs for a shorter period of time. This is particularly important for hard-boiled eggs.
Tough and Rubbery egg whites: Overcooking Again
This is another sign of overcooking. Overcooked egg whites become tough and rubbery. To prevent this, make sure you cook your eggs for the correct amount of time. This applies to all types of cooked eggs.
Eggs Sticking to the Pan: A Problem of Adhesion
This is a common problem, especially when frying eggs. The solution? A good non-stick pan is your best friend. And don't be afraid to add a little bit of oil or butter to the pan. This creates a barrier between the egg and the pan, preventing sticking.
Eggs Not Peeling Properly: A Sticky Situation
This can be a real pain, especially with hard-boiled eggs. The trick is to add a teaspoon of salt to the water when boiling the eggs. The salt helps to prevent the eggs from cracking and makes them easier to peel. This is because salt raises the boiling point of water, making the eggs cook more evenly and reducing the chance of cracking.
(Part 5) The Egg-cellent Accessories
Now, let's talk tools!
egg timer: A Precise Measurement of Time
A good egg timer is essential for achieving perfect boiled eggs. There are lots of fancy ones out there, but I prefer a simple, analogue one. An egg timer ensures you don't overcook your eggs, resulting in a perfectly cooked yolk and white.
Egg Slicer: Easy and Even Slices
An egg slicer makes it easy to cut hard-boiled eggs into neat slices. This is particularly handy for salads or sandwiches. An egg slicer produces uniformly sized slices, making your salads and sandwiches look more appealing and professional.
Egg Cup: A Stylish and Practical Serving Vessel
Egg cups are a stylish way to serve soft-boiled or poached eggs. They keep the egg warm and prevent it from spilling all over the plate. An egg cup provides a secure and elegant way to enjoy your soft-boiled or poached eggs.
Whisk: A Tool for Airiness and Smoothness
A whisk is essential for whipping eggs for omelettes and scrambled eggs. It adds air to the eggs, making them lighter and fluffier. A whisk creates a smooth and consistent texture for your omelettes and scrambled eggs.
(Part 6) The Egg-sploration Continues
Don't be afraid to experiment! There's a whole world of egg recipes out there.
Scrambled Eggs: A Quick and Easy Breakfast Option
Scrambled eggs are a quick and easy breakfast option. Just whisk the eggs with a little milk or cream, then cook over a low heat, stirring constantly. Adding milk or cream adds moisture and richness to the scrambled eggs, making them smoother and more flavorful.
Eggs Benedict: A Classic Brunch Dish
Eggs Benedict is a classic brunch dish. It's made with poached eggs, Canadian bacon, and hollandaise sauce, all served on english muffins. This rich and decadent dish is perfect for a special occasion or a leisurely weekend brunch.
deviled eggs: A Popular Party Snack
Deviled eggs are a popular party snack. They're hard-boiled eggs that are mashed with mayonnaise, mustard, and other seasonings. These bite-sized treats are a classic appetizer that can be customized with different spices and flavors.
egg salad: A Delicious Sandwich Filling
Egg salad is a delicious sandwich filling. It's made with hard-boiled eggs that are mashed with mayonnaise, celery, and seasonings. This versatile filling can be used in sandwiches, wraps, or as a topping for salads.
Quiche: A Savoury Tart
Quiche is a savoury tart that's filled with eggs, cheese, and other ingredients. It's a perfect brunch or dinner option. This versatile dish can be made with a variety of fillings, including vegetables, meats, and seafood.
(Part 7) A Few Egg-stra Tips
Here are a few extra tips to help you achieve egg-ceptional results.
Don't Overcook: The Key to Tender Eggs
It's easy to overcook eggs, so always keep a close eye on them. Overcooked eggs become tough and dry.
Use fresh eggs: For Optimal Texture and Taste
Fresh eggs have a better texture and taste. Fresh eggs have a firmer yolk and a less pronounced "eggy" flavor.
Season Well: Enhancing the Flavour Profile
Salt and pepper are essential seasonings for eggs. Don't be afraid to add other herbs and spices to your liking. Experiment with different herbs and spices to create unique and flavorful egg dishes.
Don't Be Afraid to Experiment: Embracing Culinary Creativity
There's no right or wrong way to cook eggs. Feel free to try different techniques and recipes. Experimenting with different methods and ingredients will help you discover your own personal style of cooking eggs.
(Part 8) Egg-cellent FAQs
Now, let's address some of the most common questions about cooking eggs.
1. How do I get rid of the green ring around the yolk?
The green ring is caused by overcooking. To avoid it, cook your eggs for a shorter time. You can also try adding a teaspoon of vinegar to the water when boiling eggs, as this helps to prevent the green ring from forming.
2. How do I peel hard-boiled eggs easily?
Add a teaspoon of salt to the water when boiling the eggs. This helps to prevent the eggs from cracking and makes them easier to peel. You can also try adding a teaspoon of baking soda to the water, which helps to soften the shell and make it easier to peel.
3. How do I know if an egg is fresh?
Place the egg in a bowl of cold water. If it sinks to the bottom and lays flat, it's fresh. If it floats, it's past its best. Another way to test an egg's freshness is to crack it into a bowl. Fresh eggs have a clear and firm white and a round, bright yellow yolk.
4. Can I use old eggs to make scrambled eggs?
Yes, you can use old eggs to make scrambled eggs. However, they might not be as fluffy or have the same texture as fresh eggs. Older eggs tend to have a thinner white and a flatter yolk, which can make them a bit more watery.
5. Can I freeze eggs?
You can freeze egg yolks, but not whole eggs. Separate the yolk from the white and freeze it in a container. Just remember that the texture might change a little when thawed. Freezing whole eggs can cause the whites to become watery and the yolks to become rubbery.
(Part 9) The Egg-ceptional Conclusion
And there you have it, folks! Your ultimate guide to cooking perfect eggs every time. Remember, practice makes perfect. So get out there and start experimenting! You'll be a true egg-pert in no time.
Everyone is watching

How to Cook Frozen Lobster Tails Perfectly: A Step-by-Step Guide
RecipesLobster. Just the word conjures up images of lavish meals, special occasions, and a taste of luxury. But let's...

Pigs in a Blanket Cooking Time: How Long to Bake for Perfect Results
RecipesAh, pigs in a blanket. Just the name conjures up images of those delightful little parcels of crispy pastry en...

Pork Fillet Cooking Time: How Long to Cook It Perfectly
RecipesPork fillet, or tenderloin as it's sometimes called, is a real favourite in our house. It's so versatile, and...

The Ultimate Guide to Cooking Delicious Frankfurters
RecipesLet's face it, we all love a good frankfurter. It's a classic, simple, and always satisfying. But let's be rea...

Wolf Meat Recipes: A Guide to Cooking Wild Game
RecipesLet's be honest, you don't see wolf meat at your local butcher shop every day. It's a bit of a wild card, but ...