Let's be honest, for many of us, Brussels sprouts have been a culinary enigma. They've often been relegated to the back of the fridge, a symbol of childhood memories of overcooked, bitter vegetables. But, my friends, it's time to banish those memories and embrace these versatile little green gems. I'm here to tell you that Brussels sprouts can be absolutely delicious, and with a few simple tips and tricks, you can transform them from a dreaded side dish to a star of your kitchen.
Over the years, I've discovered a world of possibilities when it comes to cooking Brussels sprouts, and I'm excited to share my knowledge with you. This guide isn't just about techniques, it's about a shift in perspective, a celebration of flavour, and a rediscovery of a humble vegetable with a surprising amount of potential.
Part 1: Picking the Perfect Sprouts
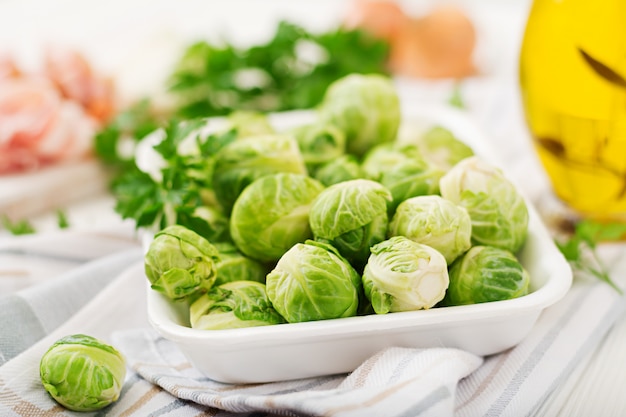
The journey to Brussels sprout bliss begins with selecting the right ingredients. A little attention to detail at the grocery store can make a big difference in the final outcome.
The Sprouts Selection Process
Forget the days of grabbing a bag of whatever's on offer. Take your time, choose carefully, and you'll be rewarded with a delicious result.
What to Look For
Firmness and Compactness: You want sprouts that are firm to the touch, with tightly closed leaves. Think of them like a tiny, green cabbage. Avoid any that feel soft or have loose leaves – those are signs that the sprout is past its prime.
Size Matters: I generally prefer sprouts that are about the size of a 50 pence piece. Smaller sprouts tend to be more tender and cook faster, while larger ones can be a bit more chewy. However, there's no need to be overly fussy here. Use what you have!
Colour is Key: Look for a vibrant green colour. Any yellowing or browning is a sign that the sprout has been sitting around a little too long and might be losing its freshness.
Part 2: The Art of Prepping
Now that you've got your perfect sprouts, it's time to get them ready for cooking. This stage is all about creating a clean canvas for your culinary masterpiece.
The Trimming Routine
Eliminating the Base: Start by trimming off the tough, woody bottom of each sprout. This is the part that will never cook properly and will only add bitterness to your dish. A sharp knife will make this quick and easy.
The Rinse Cycle: Give your sprouts a good rinse under cold water to remove any dirt or debris. You can even soak them for a few minutes if you want to ensure they're clean.
Half or Quarter: For smaller sprouts, you can usually just cut them in half. Larger ones benefit from being quartered, especially if you're aiming for a crispier texture. This allows for faster cooking and ensures that each piece gets evenly cooked.
Part 3: Roasting for Glory
Roasting is arguably the most popular and delicious way to cook Brussels sprouts. It brings out their natural sweetness and adds a delightful smoky flavour.
Roasting 101
Preheat Your Oven: Get your oven cranked up to 200°C/400°F. This ensures that your sprouts cook quickly and evenly, developing that beautiful golden-brown colour.
Greasing and Seasoning: Toss your prepped sprouts with a good drizzle of olive oil. I like to use extra virgin olive oil for its flavour. Add a pinch of salt and pepper at this stage. You can also add a pinch of other spices like garlic powder or smoked paprika to enhance the flavour.
Spread It Out: Spread your oiled sprouts in a single layer on a baking sheet. This prevents steaming and ensures that all sides are exposed to the heat, leading to even cooking.
roasting time: Roast for about 20-25 minutes, flipping them halfway through. You'll know they're ready when they're tender and slightly charred on the edges. The edges should be crispy and the insides should be cooked through.
Flavor-Boosting Tips
Garlic Goodness: A few cloves of roasted garlic can add a wonderful depth of flavour to your sprouts. Just toss them in with the sprouts before roasting. The garlic will soften and become even more flavorful in the oven.
Sweetness and Caramelization: A drizzle of maple syrup or a sprinkle of brown sugar can create a delicious caramelized effect. The sweetness complements the naturally bitter flavour of the sprouts. Be careful not to overdo it, just a touch is enough.
Citrus Burst: A squeeze of lemon juice or orange zest can add a refreshing acidity that complements the sprouts beautifully. The citrus notes help to brighten up the flavour and create a more balanced dish.
Part 4: The Pan-Fried Phenomenon
If you're looking for a quick and easy cooking method, pan-frying is the way to go. It delivers a crispy exterior and a tender interior.
Searing Success
Heat It Up: Get a heavy-bottomed pan nice and hot over medium-high heat. A touch of olive oil is all you need. The high heat ensures that the sprouts develop a beautiful golden-brown crust.
Fry Time: Add your sprouts to the hot pan and let them sear for about 5-7 minutes, flipping them occasionally. They should be golden brown and crispy. Don't overcrowd the pan; cook in batches if needed.
Don't Overdo It: Be careful not to overcook the sprouts. They should be tender but still have a bit of a bite to them. Overcooked sprouts will become mushy.
Flavor Twists
Bacon Bits: A sprinkle of crispy bacon bits adds a salty, smoky flavour that goes amazingly well with Brussels sprouts. The bacon fat also adds a richness to the dish.
Nutty Goodness: Toasted nuts like pecans or walnuts add a wonderful crunch and flavour contrast. The nuts also add a touch of healthy fats and protein to your meal.
Herby Delight: Fresh herbs like thyme, rosemary, or sage are great for adding a fragrant touch. Chop them finely and sprinkle them over the sprouts during the last minute of cooking. The herbs infuse the sprouts with their unique aromas.
Part 5: The Braised Beauty
Braising Brussels sprouts is a fantastic way to achieve a tender, melt-in-your-mouth texture. The slow cooking process also intensifies their flavours and creates a delicious sauce.
Braising Basics
Get Your Pot Ready: Use a heavy-bottomed pot or dutch oven. Heat a little olive oil over medium heat. The pot should be large enough to accommodate the sprouts without overcrowding them.
Sauté and Season: Sauté your prepped sprouts for a few minutes until they start to soften. Add salt, pepper, and any other spices you like. I like to add a pinch of nutmeg to my braised sprouts, but feel free to experiment with your favourite flavours.
Add Some Liquid: Pour in a little broth, wine, or even just water. Bring the mixture to a simmer, then cover the pot and braise for about 15-20 minutes, or until the sprouts are tender. The liquid should be simmering gently, not boiling.
Braising Variations
Apple Cider Bliss: Add some apple cider to the braising liquid for a sweet and tangy twist. The apple cider complements the natural sweetness of the sprouts and creates a more complex flavour profile.
Citrus Zest: A bit of lemon or orange zest can brighten up the flavour profile. The citrus adds a fresh, vibrant note that contrasts beautifully with the earthy flavour of the sprouts.
Smoked Paprika: A pinch of smoked paprika adds a smoky depth that complements the braised sprouts beautifully. The smoked paprika creates a warm, inviting flavour that goes well with the braising liquid.
Part 6: The Grilled Goodness
Grilling is a great way to add a smoky char to your Brussels sprouts. It adds a rustic flavour that is perfect for summer barbecues.
grilling guidelines
Preheat Your Grill: Fire up your grill to medium heat. Make sure the grill is evenly heated to ensure that the sprouts cook properly.
Oil It Up: Toss your prepped sprouts with a little olive oil, salt, and pepper. You can also add other seasonings like garlic powder or onion powder.
Grill Time: Place the sprouts on the grill and cook for about 10-15 minutes, turning them occasionally until they're tender and slightly charred. Watch them carefully to prevent burning.
Grill-tastic Flavour
Citrus Infusion: Grill your sprouts with a squeeze of lemon or lime juice for a tangy touch. The citrus juice adds a bright, refreshing flavour that balances out the smokiness of the grill.
Spice It Up: Try adding a pinch of chili flakes for a little kick. Chili flakes bring a subtle heat that adds a layer of complexity to the flavour.
Herby Goodness: Fresh herbs like rosemary or thyme can be added to the grill while cooking for a fragrant aroma. The herbs release their aromatic oils as they cook, infusing the sprouts with their unique flavours.
Part 7: The Ultimate Side Dish
Now that you've mastered a few different cooking methods, it's time to consider how to incorporate Brussels sprouts into your dishes.
The Sidekick
roast chicken Perfection: Roasting Brussels sprouts alongside your roast chicken is a classic pairing. The smoky flavours complement each other perfectly. The sprouts absorb the juices from the chicken, creating a delicious side dish.
Pork Power: Sprouts make a great side for pork chops, sausages, or even a roast pork belly. The sweetness of the sprouts balances out the savoury flavours of the pork. The combination of pork and sprouts is a classic comfort food.
Fishy Friends: Grilled or roasted sprouts can be a delicious accompaniment to grilled or baked fish. The combination of earthy and salty flavours is divine. The sprouts provide a nice contrast to the delicate flavour of the fish.
The Star of the Show
Sprouts Salad: A refreshing salad with shaved Brussels sprouts, toasted nuts, dried cranberries, and a light vinaigrette is a delightful vegetarian option. The sprouts add a unique crunch and bitterness to the salad.
Sprouts Soup: A creamy Brussels sprouts soup with a hint of nutmeg is both comforting and delicious. The soup is a great way to use up leftover sprouts.
Sprouts Hash: A hearty hash with roasted brussels sprouts, bacon, potatoes, and onions is perfect for a brunch or light lunch. The hash is a flavorful and satisfying meal.
Part 8: Beyond the Basics: Creative Ideas
Let's push the boundaries and explore some more creative ways to use Brussels sprouts. There's a whole world of culinary possibilities waiting to be discovered.
Sprouts Beyond the Side
Sprouts Fritters: Shredded Brussels sprouts can be mixed with flour, spices, and cheese to create delicious fritters. The fritters can be served as an appetizer or as part of a larger meal.
Sprouts Pizza: Roasted Brussels sprouts can be added to a pizza for a unique and tasty topping. The sprouts add a bit of bitterness and a crunchy texture to the pizza.
Sprouts Stir-fry: Brussels sprouts can be stir-fried with other vegetables and protein for a quick and healthy meal. The sprouts add a unique flavour and texture to the stir-fry.
Part 9: Storage and Shelf Life
Storing your sprouts properly ensures they stay fresh and delicious for longer. A little care can go a long way.
Refrigeration Revolution
Keep It Cool: Store your unwashed Brussels sprouts in a plastic bag in the refrigerator. They can last for up to a week this way. This prevents them from drying out and losing their freshness.
Avoid the Freezer: While you can freeze Brussels sprouts, they often lose their texture and flavour after being frozen. It's best to use them fresh whenever possible. If you do need to freeze them, blanch them first for better results.
Part 10: FAQs
Q: What if my Brussels sprouts are too bitter?
A: If you find your sprouts are a bit too bitter, adding a touch of sweetness can help balance out the flavour. A drizzle of honey, maple syrup, or even a pinch of brown sugar can work wonders. The sweetness will mask the bitterness and create a more harmonious flavour.
Q: How can I tell if my Brussels sprouts are cooked?
A: You'll know your sprouts are cooked when they're tender and slightly charred on the edges. They should be fork-tender but still hold their shape. If you can easily pierce them with a fork, they're cooked.
Q: What can I do with leftover Brussels sprouts?
A: Leftover roasted sprouts can be added to salads, soups, or used as a filling for sandwiches or wraps. They can also be chopped up and added to scrambled eggs or omelets.
Q: Are Brussels sprouts good for you?
A: Absolutely! They're packed with vitamins, minerals, and antioxidants, making them a healthy addition to your diet. They're a good source of vitamin C, vitamin K, and fiber.
Q: What are the best Brussels sprouts to buy?
A: Look for firm, compact sprouts with a vibrant green colour. Avoid any that are soft, have loose leaves, or show signs of yellowing or browning. The best sprouts are fresh and free from blemishes.
The Final Word
So there you have it, the ultimate guide to cooking Brussels sprouts like a pro. It's not about mastering a single recipe, it's about understanding the principles of cooking these little green gems and experimenting with different flavours and techniques. Don't be afraid to get creative and try something new! With a little practice, you'll be turning out delicious Brussels sprout dishes that will impress even the pickiest eaters. And who knows, maybe you'll even become a Brussels sprout convert! Remember, it's all about embracing the possibilities and discovering the hidden potential of this versatile vegetable.
Everyone is watching

How to Cook Frozen Lobster Tails Perfectly: A Step-by-Step Guide
RecipesLobster. Just the word conjures up images of lavish meals, special occasions, and a taste of luxury. But let's...

Pigs in a Blanket Cooking Time: How Long to Bake for Perfect Results
RecipesAh, pigs in a blanket. Just the name conjures up images of those delightful little parcels of crispy pastry en...

Pork Fillet Cooking Time: How Long to Cook It Perfectly
RecipesPork fillet, or tenderloin as it's sometimes called, is a real favourite in our house. It's so versatile, and...

The Ultimate Guide to Cooking Delicious Frankfurters
RecipesLet's face it, we all love a good frankfurter. It's a classic, simple, and always satisfying. But let's be rea...

Wolf Meat Recipes: A Guide to Cooking Wild Game
RecipesLet's be honest, you don't see wolf meat at your local butcher shop every day. It's a bit of a wild card, but ...