I’m a big believer that everyone deserves a good rib experience – the kind where the meat falls off the bone, the sauce is sticky and sweet, and the smoky flavour lingers on your taste buds long after the last bite. But achieving that perfect rib is a journey, and it can be a bit of a rollercoaster ride for beginners.
I’ve been there – those early attempts at ribs were a bit of a disaster. Dry and tough, or sauce burnt to a crisp before the meat was even close to done. But I wouldn’t give up. I dove headfirst into the world of rib cookery, experimenting with different methods, reading countless articles, and, most importantly, learning from my mistakes. And guess what? I finally cracked the code!
Now, I’m excited to share my rib-cooking secrets with you. This isn't just a recipe, it's a step-by-step guide that’ll turn you into a rib master. So grab a drink, get comfy, and let’s embark on this delicious journey together!
Part 1: The Rib Game – Choosing Your Player
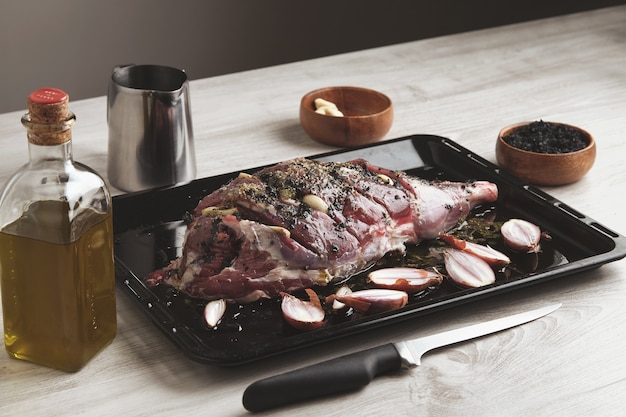
It all starts with the right cut. Choosing the right ribs is like picking the perfect player for your BBQ team – you want a cut that's going to bring its A-game to the table.
1. Baby back ribs vs. spare ribs: It's a Battle of Texture and Size
There are two main contenders: baby back ribs and spare ribs. Baby back ribs are the smaller, more tender duo, usually favoured for their delicate flavour and tenderness. Spare ribs, on the other hand, are the brawny bunch, packing more meat and often boasting a richer, more robust flavour. The choice is yours – do you prefer elegance or a hearty feast?
2. Fresh vs. Frozen: The Case for Fresh
Fresh ribs are always my go-to. The flavour is just that much more vibrant, and the texture is unparalleled. But, if fresh isn’t available, don’t fret! Frozen ribs are a perfectly acceptable substitute. Just make sure you give them plenty of time to thaw in the refrigerator – nobody wants to cook a frozen solid block of meat!
3. The Quality Check: Finding a Rib That's Ready to Shine
When you’re inspecting your ribs, make sure they’re a healthy pink colour, like a rosy sunrise. If you see any dark patches or notice a funky smell, those ribs are best left on the shelf. And if you’re buying from a butcher, ask for a cut that’s not too thin or too thick – you want that sweet spot for even cooking.
Part 2: The Brine Bath – A Secret Weapon for tender ribs
Imagine your ribs getting a luxurious spa treatment. This is the magical moment of brining! It’s like a flavour-infused soak, boosting moisture and enhancing that melt-in-your-mouth texture.
1. Why Brine? It’s All About Moisture and Flavor
Brining is the secret to juicy, tender ribs. The salt in the brine draws out some moisture, but as the ribs soak, they reabsorb that moisture along with a delicious dose of flavour. It's a beautiful cycle of moisture and taste, resulting in ribs that are practically bursting with flavour.
2. The Simple Brine Recipe: Less is More
You'll find countless brine recipes out there, but I'm a firm believer in simplicity. Here's a simple brine that's guaranteed to work wonders:
- 1 gallon of water
- 1 cup kosher salt
- 1 cup brown sugar
Simply dissolve the salt and sugar in the water, and your brine is ready to go. Easy peasy, right?
3. Timing is Everything: How Long to Soaking
The brining time depends on the thickness of your ribs. For baby back ribs, I recommend a 4-6 hour soak. Spare ribs, those larger fellas, might need a bit more time – up to 8 hours to ensure they absorb all the goodness.
Part 3: Low and Slow: The Art of Gentle Cooking
It’s time to unlock the secrets of low and slow cooking. This isn’t just a cooking method, it’s a philosophy – a commitment to tenderizing the meat and letting the flavours really develop.
1. Low and Slow: A Culinary Love Story
low and slow cooking is the secret to melt-in-your-mouth ribs. The magic happens because the low heat allows the collagen in the meat to break down, transforming into gelatin. This gelatin is what gives your ribs that incredible tenderness – it’s like a culinary love story unfolding inside your smoker or oven.
2. Smoker, Grill, or Oven: Choose Your Cooking Weapon
For the ultimate smoky flavour, a smoker is my personal favourite. But if you don’t have one, don’t worry! You can still achieve amazing results with a grill or even an oven.
3. Setting the Temperature: The Sweet Spot
Whether you're using a smoker, grill, or oven, the key is a consistent low temperature. For a smoker, aim for between 225°F and 250°F. If you’re using a grill, turn it to low heat and use a thermometer to keep an eye on the temperature. And for an oven, bake those ribs at 250°F.
4. The cooking time: A Journey of Patience
The cooking time is a bit of a dance with patience. It depends on the size of your ribs and how tender you like them. But as a general rule, you can expect to cook your ribs for 3-4 hours, maybe even longer if you want that extra tender texture.
5. Wrapping Time: The “Stalling” Phase and the Magic of Foil
During the cooking process, you’ll notice the rib temperature plateaus – that’s the “stalling” phase, a natural part of the cooking journey. To help things along and make sure your ribs are ridiculously tender, wrap them in foil. This traps the steam, helping the meat cook more quickly and stay super juicy.
Part 4: Sauce It Up – A Symphony of Flavors
Now comes the fun part – adding flavour to your masterpiece! It’s like composing a culinary symphony – every sauce adds a different dimension to your rib experience.
1. Store-Bought vs. Homemade: The Power of Personalization
Store-bought barbecue sauce is a great shortcut, but homemade sauce is where you can really express yourself. You can adjust the sweetness, spice, and smokiness to your liking.
2. My Go-To Sauce Recipe: A Simple, Flavorful Foundation
This simple sauce recipe is my go-to:
- 1 cup ketchup
- 1/2 cup brown sugar
- 1/4 cup apple cider vinegar
- 2 tablespoons Worcestershire sauce
- 1 tablespoon mustard
- 1 teaspoon smoked paprika
- 1 teaspoon garlic powder
- 1 teaspoon onion powder
- 1/2 teaspoon black pepper
Combine all the ingredients in a saucepan and simmer over low heat until it thickens. This sauce is a delicious foundation – feel free to add your own personal touches, like a dash of chili powder for extra kick or a sprinkle of brown sugar for a touch of sweetness.
3. The Art of Timing: When to Sauce Your Ribs
Timing is crucial when it comes to sauce. You don’t want to sauce too early, as the sauce can burn before the meat is cooked. And you don’t want to wait too long, or the ribs won’t have time to soak up all that flavour. I usually start basting my ribs with sauce about 30-45 minutes before they're done.
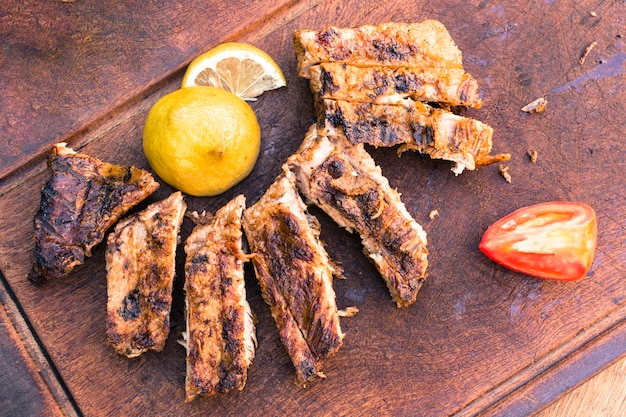
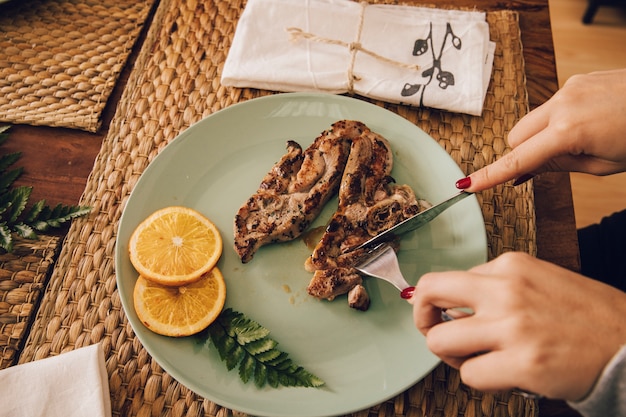
4. The Final Touch: Finishing with a Flourish
Once your ribs are cooked and glazed with sauce, it's time to give them a final flourish. A sprinkle of chopped green onions adds a fresh touch, while a drizzle of extra barbecue sauce intensifies the flavour.
Part 5: Checking for Doneness – A Rib's Tale of Tenderness
How do you know when your ribs are ready for their close-up? Here's how to tell if they're done to perfection:
1. The bone test: A Classic Test of Tenderness
The classic method – if the meat pulls away from the bone with a gentle tug, they’re ready to eat!
2. The meat thermometer: A Precise Measure
For a more precise measure, use a meat thermometer. Your ribs are cooked through when the internal temperature reaches 190°F to 200°F.
Part 6: The Resting Period – A Moment of Culinary Relaxation
After all that hard work, your ribs deserve a well-deserved rest. It’s like a spa treatment for your meat, letting the juices redistribute and make those ribs even more tender and flavorful.
Let your ribs rest for at least 15 minutes before slicing and serving. This extra step ensures those juicy flavours are locked in, ready to burst with every bite.
Part 7: Serving and Savoring: A Feast for the Senses
The moment has arrived! It’s time to celebrate your rib masterpiece!
1. A Feast for the Senses: Classic Sides for Your Rib Feast
Ribs are best enjoyed with classic barbecue sides. Think creamy potato salad, crunchy coleslaw, and hearty baked beans. A cornbread muffin or a fresh salad adds a nice touch of balance.
2. Sauce Variety: Catering to Every Tastebud
Offer a variety of sauces to cater to different preferences. Sweet, spicy, tangy – give everyone the chance to customize their rib experience. And don’t forget the napkins! Ribs are messy, but oh so worth it!
3. Sharing is Caring: A Gathering of Flavors
Ribs are perfect for sharing with loved ones. Gather everyone around the table, let the aromas fill the air, and let the feasting begin!
Part 8: Tips and Tricks: Mastering the Art of Rib-Cooking
Here’s a collection of extra tips and tricks to help you perfect your rib-cooking game.
- Don't be afraid to experiment! Try adding different spices to your brine, or use various types of wood for smoking.
- Keep the fire steady! If you’re using a smoker, maintain a consistent fire to keep the temperature even.
- Don't overcrowd the smoker or grill! Overcrowding can cause the temperature to drop, making it harder to cook the ribs evenly.
- Rotate for even cooking! If you’re using a grill, rotate the ribs halfway through the cooking process to ensure they cook evenly on all sides.
- Keep an eye on those ribs! If they start to look dry, add a bit more sauce or wrap them in foil for a few more minutes.
Part 9: Ribs FAQs: Answers to Your Burning Questions
1. Can I Cook Ribs in the Oven?
Absolutely! oven-baked ribs can be just as delicious as ribs cooked on a smoker or grill. Just follow the low and slow method, and wrap the ribs in foil during the "stalling" phase for that extra moisture.
2. What Kind of Wood Should I Use for smoking ribs?
The wood you choose will affect the flavour of your ribs. Some popular choices for smoking ribs include hickory, oak, pecan, and mesquite. Experiment with different woods to find your favourite flavour combination.
3. How Long Can I Keep Ribs in the Brine?
You can brine ribs for up to 24 hours. However, I recommend no more than 8 hours. Brining for too long can make the meat overly salty.
4. What if My Ribs Are Too Dry?
If your ribs are too dry, there’s not much you can do to fix them. But in the future, make sure you cook them at a lower temperature for a longer period of time.
5. How Can I Make My Ribs More Tender?
The secret to tender ribs is cooking them low and slow. You can also try wrapping them in foil during the "stalling" phase to help them cook faster and retain moisture.
I hope this guide has given you the confidence to tackle rib cooking with gusto! It takes a little practice, but once you master the art of low and slow, you’ll be a rib-cooking champion. Remember, it’s all about the right ingredients, the right techniques, and a little bit of love. So get out there, fire up your grill, and get ready to enjoy some of the most delicious ribs you’ve ever tasted!
Everyone is watching

How to Cook Frozen Lobster Tails Perfectly: A Step-by-Step Guide
RecipesLobster. Just the word conjures up images of lavish meals, special occasions, and a taste of luxury. But let's...

Pigs in a Blanket Cooking Time: How Long to Bake for Perfect Results
RecipesAh, pigs in a blanket. Just the name conjures up images of those delightful little parcels of crispy pastry en...

Pork Fillet Cooking Time: How Long to Cook It Perfectly
RecipesPork fillet, or tenderloin as it's sometimes called, is a real favourite in our house. It's so versatile, and...

The Ultimate Guide to Cooking Delicious Frankfurters
RecipesLet's face it, we all love a good frankfurter. It's a classic, simple, and always satisfying. But let's be rea...

Wolf Meat Recipes: A Guide to Cooking Wild Game
RecipesLet's be honest, you don't see wolf meat at your local butcher shop every day. It's a bit of a wild card, but ...