Ah, sausages. A British culinary icon, a weekend breakfast staple, and a comforting dish that never fails to satisfy. But let’s be real, sometimes we all end up with sausages that are dry, shrivelled, or, worse, undercooked and pale. No one wants that! That’s why I’m here to share my simple, foolproof guide to stovetop sausage perfection. We’ll explore everything from selecting the perfect sausage to achieving that glorious golden-brown crust. Buckle up, sausage lovers, we’re about to embark on a flavourful journey!
Part 1: The Sausage Odyssey
1. Embarking on a Sausage Safari:
First things first, let’s talk sausages. The vast world of sausage is a culinary adventure waiting to be explored! From classic British bangers to spicy chorizo, herby italian sausages, and even vegetarian options, the possibilities are endless. It’s all about choosing a sausage that sings to your taste buds. Personally, I’m a sucker for a good old-fashioned pork sausage with a hint of sage and onion – it’s a classic for a reason. But hey, if you’re feeling adventurous, go wild!
2. Seeking the Butcher’s Wisdom:
If you’re lucky enough to have a local butcher, I urge you to pay them a visit. They are the sausage wizards, the masters of meat, and they can guide you towards the perfect sausage for your needs. They’ll have a fantastic selection of freshly made sausages, and they’re always happy to share their knowledge and recommendations.
I remember this one time, I was looking for something special for a barbecue. The butcher, a true sausage connoisseur, recommended a smoked sausage with a hint of paprika. It was an absolute revelation! And the best part? He gave me a grilling tip – cook them over indirect heat for that extra smoky flavour. A sausage revelation!
3. Navigating the Supermarket Scramble:
But let’s be realistic, not everyone has a local butcher right around the corner. Don’t fret, supermarkets do have some decent sausages on offer these days. Look for sausages with a high meat content and a decent flavour profile, and avoid anything with loads of filler like breadcrumbs or soya. Remember, less is more when it comes to sausage ingredients!
I tend to go for sausages made with British pork. But ultimately, it’s your taste buds that should guide your choice. Go with what you love, and don’t be afraid to experiment!
Part 2: Prepping for the Pan-Sizzle
1. The Great Thaw:
So, you’ve got your sausages, but they’re still chilling in the fridge. Now, before we can get cooking, we need to let those sausages adjust to room temperature. This ensures even cooking. Imagine throwing frozen sausages into a hot pan – it’s a recipe for disaster! They’ll cook unevenly, leaving you with some parts that are raw and others that are dry.
Instead, take them out of the fridge about 30 minutes before you start cooking. Let them hang out on the counter, getting cozy with room temperature.
2. Choosing Your Pan Pal:
Now it’s time to choose your pan. A good, heavy-bottomed pan is key, especially if you’re looking for that beautiful crispy crust. Cast iron is a classic choice – it distributes heat evenly and holds onto it like a champ.
I’ve got this old cast iron pan that’s been in my family for generations. It’s seen a lot of sausage action, believe me! But if you don’t have a cast iron pan, any sturdy, non-stick pan will do. Just make sure it’s big enough to hold all your sausages without them crowding each other.
Part 3: The Great Sizzle: A Step-by-Step Guide to Sausage Success
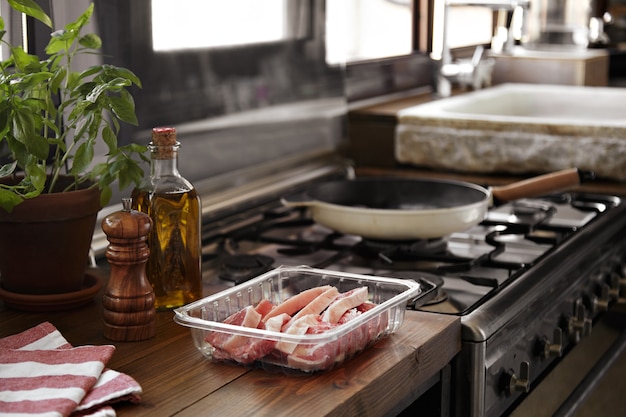
1. The Oil Spill:
Grab your chosen pan and give it a good wipe with some kitchen paper. We want a clean slate for our sausage symphony! Now, add a little oil to the pan. I prefer olive oil for its flavor, but you can use sunflower oil or even vegetable oil. Just enough to create a thin film on the bottom of the pan.
Remember, less is more! We’re not looking for a swimming pool of oil, just enough to help the sausages sizzle.
2. The Heatwave:
Put the pan over a medium heat. You want to get the pan nice and hot, but not smoking hot. If you’re using a gas stove, you’ll know it’s ready when the oil shimmers.
The heat is essential for getting that crispy crust. It’s what transforms a humble sausage into a culinary masterpiece!
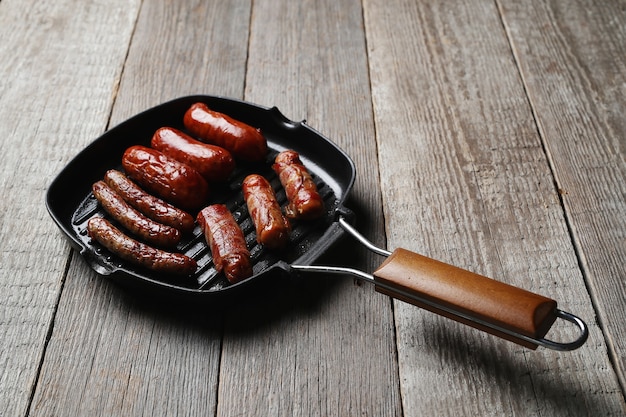
3. The Sausage Drop:
Once the pan is hot, it’s showtime! Gently place the sausages into the pan, making sure they’re not crammed in like sardines. Give them some space to breathe and cook evenly.
I try to arrange them in a single layer, like a sausage symphony. It's all about creating a beautiful, evenly-cooked sausage masterpiece.
4. The Sausage Tango:
Now, it’s time for the tango! Don’t just leave those sausages to stew; you’ve got to get involved! Use a spatula or a pair of tongs to gently move them around in the pan. This ensures they cook evenly and get that gloriously crispy crust on all sides.
I like to rotate them every few minutes, like a sausage waltz. It’s a delicate dance, but it’s worth the effort!
Part 4: The Sausage Symphony: Sounds and Signs of Success
1. The Sound of Success:
As your sausages cook, listen closely! You’ll hear them sizzle and pop, like a miniature orchestra. That sound is music to my ears! It’s the sound of sausage perfection in the making.
The popping means that the fat is rendering out, and the sizzling means that they’re getting nice and crispy. It’s a clear indication that you’re on the right track.
2. The Colourful Cue:
Now, let your eyes be your guide! Those sausages should start to turn a lovely golden-brown. This is a visual signal that they’re cooking beautifully. You’ll see the fat start to render out and the surface will become beautifully caramelised.
If they’re still pale and limp, give them a little more time. But don’t let them burn! You’re aiming for that perfect balance between crispy and juicy.
3. The Internal Check:
This is the crucial part! You need to make sure those sausages are cooked through. You can check this with a meat thermometer.
Stick the thermometer into the thickest part of the sausage. The internal temperature should reach 160°F (71°C). If it hasn’t reached this temperature, give it a bit more time in the pan.
If you don’t have a thermometer, you can try the poke test. Poke the sausage with a knife. If the juices run clear, then it’s cooked. If they’re still pink, give it a bit more time.
Part 5: The Finishing Touch: Rest, Presentation, and Beyond
1. The Rest Stop:
Once your sausages are cooked through, don’t rush to plate them up! Take them off the heat and let them rest for a few minutes. This gives the juices a chance to redistribute, which makes for a more succulent and flavourful sausage.
While they’re resting, you can get on with preparing your other accompaniments, like baked beans, fried bread, or a nice green salad.
2. The Presentation Parade:
Now, it’s time to showcase your culinary masterpiece! Arrange your sausages on a plate, like a little sausage army.
If you’re feeling fancy, you can add a dollop of mustard or ketchup. I like to serve mine with a bit of brown sauce and a sprinkle of fresh parsley.
3. The sausage sides:
Right, the sausages are ready, but what are you going to serve them with? There are so many delicious options, it’s hard to choose!
Let’s explore some classic and creative sausage side dishes:
- The Classic Combo:
For a traditional British breakfast, you can’t go wrong with a classic combo of baked beans, fried bread, grilled tomatoes, mushrooms, and a slice of toast.
- The Spicy Symphony:
If you’re feeling adventurous, you could try something a bit more exotic, like a sausage with a spicy chorizo. Serve this with a side of rice, a green salad, and a dollop of spicy salsa.
- The Italian Rhapsody:
Italian sausages are always a good choice. They have a delicious blend of herbs and spices that are just perfect. Serve them with a side of pasta, a green salad, and a drizzle of olive oil.
Part 6: Sausage Storage Secrets: Keeping Your Sausages Fresh
Right, you’ve cooked up a storm, and you’ve got some sausages left over. What now? Fear not, my friend! I’ve got you covered.
1. The Freezer Frenzy:
Sausages can be frozen for up to 3 months. Just make sure they are cooled completely before putting them into freezer-safe bags or containers. When you’re ready to cook them, simply thaw them in the fridge overnight.
2. The Fridge Fiasco:
If you’re not planning to freeze them, keep them in the fridge for up to 3 days. Make sure they are stored in a sealed container or wrap them tightly in cling film.
Part 7: FAQs: Sausage SOS: Troubleshooting Your sausage cooking
Right, you’ve got your sausages, you’ve cooked them, you’ve eaten them, and now you’re full of questions! Don’t worry, I’ve got your answers.
1. What if my sausages are sticking to the pan?
If your sausages are sticking to the pan, it could be that the pan isn’t hot enough or that there isn’t enough oil. Try increasing the heat and adding a little more oil. You could also try using a spatula to gently lift them up and make sure they’re not stuck to the bottom.
2. What if my sausages are burning?
If your sausages are burning, it means that the pan is too hot. Turn down the heat and give them a few minutes to cook through. You can also try adding a little more oil to the pan.
3. What if my sausages are dry?
If your sausages are dry, it could be that they’ve been overcooked. Try to cook them on a lower heat and for a shorter amount of time. You can also try adding a little water to the pan to help steam them and keep them moist.
4. What if my sausages are undercooked?
If your sausages are undercooked, simply cook them for a little longer. You can check if they’re cooked through using a meat thermometer or by poking them with a knife. If the juices run clear, they’re cooked.
5. Can I cook sausages in the oven?
Yes, you can cook sausages in the oven. Preheat your oven to 375°F (190°C). Place the sausages on a baking sheet and bake for 20-25 minutes, turning them halfway through.
Part 8: Beyond the Basics: Exploring Different Sausage Styles and Techniques
Now that you’ve mastered the basics of stovetop sausage cooking, let’s delve into some fun and exciting techniques to elevate your sausage game!
1. Grilling for that Smoky Flavor:
Grilling sausages adds a delicious smoky flavour. Preheat your grill to medium-high heat. Place the sausages on the grill and cook for 10-12 minutes, turning them halfway through.
2. The Magic of Slow-Cooking:
Slow-cooking sausages in a flavorful broth or sauce creates a tender and flavorful dish. Place the sausages in a slow cooker with your favorite ingredients like onions, garlic, herbs, and spices. Cook on low for 6-8 hours or on high for 3-4 hours.
3. Sausage Skewers for a Party-Ready Treat:
Sausage skewers are perfect for entertaining. Thread the sausages onto skewers with your favorite vegetables like bell peppers, onions, and mushrooms. Grill or bake until cooked through.
There you have it, my friends! A comprehensive guide to stovetop sausage perfection, from beginner basics to adventurous techniques. Remember, the key to sausage success is a combination of good ingredients, the right technique, and a little bit of love. Now go forth and create your own sausage masterpieces!
Everyone is watching

How to Cook Frozen Lobster Tails Perfectly: A Step-by-Step Guide
RecipesLobster. Just the word conjures up images of lavish meals, special occasions, and a taste of luxury. But let's...

Pigs in a Blanket Cooking Time: How Long to Bake for Perfect Results
RecipesAh, pigs in a blanket. Just the name conjures up images of those delightful little parcels of crispy pastry en...

Pork Fillet Cooking Time: How Long to Cook It Perfectly
RecipesPork fillet, or tenderloin as it's sometimes called, is a real favourite in our house. It's so versatile, and...

The Ultimate Guide to Tender, Juicy Pulled Pork
RecipesRight, let's talk pulled pork. It's one of those dishes that just screams "comfort food," doesn't it? I mean...

The Ultimate Guide to Cooking Sweet Potatoes: From Roasting to Mashing
RecipesSweet potatoes. Just the name conjures up images of warm, comforting dishes, bursts of vibrant color, and a to...