Choosing the Cut
What is Prime Rib?
“Prime rib” is a fancy name for a cut of beef from the rib section, specifically ribs 6 to 12. It’s a lean cut of meat, but what really makes it special is the marbling – those lovely streaks of fat that give it incredible flavour and tenderness. But here’s the catch – not all prime rib is created equal.
Prime Rib Cuts Explained
Here’s a quick breakdown of the different cuts and their characteristics:
- Standing rib roast: This is the classic prime rib cut. It’s a whole rack of ribs, typically weighing in at 6-8 pounds. It’s impressive to look at and makes a statement on the table. Think of it as a grand feast for a large gathering.
- Rib Roast: This is a cut from the standing rib roast, usually 3-4 ribs thick. Still a good size for a crowd, but a bit more manageable than the whole rack. Perfect for a smaller gathering, maybe a family dinner or a special occasion with friends.
- english cut: This cut includes the bone and the eye of the rib, and it’s known for its leanness. A great choice if you want a more refined cut, ideal for smaller portions or a more elegant presentation.
Honestly, I’m a big fan of the standing rib roast, it’s like a culinary statement piece. But the choice really depends on the size of your crowd and what you’re looking for in terms of flavour and presentation. Do you envision a grand feast or a more intimate gathering? That will help you choose the right cut.
Tips for Choosing the Right Prime Rib
When you’re at the butcher counter, remember these tips:
- Look for good marbling: The more marbling, the more flavourful and tender the prime rib will be. You'll see those beautiful streaks of fat running through the meat, like little veins of deliciousness.
- Ask about the age of the beef: Older beef tends to be tougher, so opt for a younger animal. A younger animal will have more tender and flavourful meat.
- Choose a cut with good fat coverage: This will help keep the meat moist while it roasts. That layer of fat acts like a natural insulator, keeping the meat juicy and succulent.
Preparing for the Roast
The Night Before:
Let’s get one thing straight – prime rib loves to chill out. You’re not going to rush this, you’re going to pamper it.
- Pat the prime rib dry: Use paper towels to pat the meat dry. This helps the crust to form nicely. You want that beautiful, crisp exterior, and a dry surface helps achieve that.
- Season generously: Now it’s time to flavour your masterpiece. I’m a big fan of a simple salt and pepper rub, but feel free to get creative with your seasonings. Think garlic powder, onion powder, paprika, rosemary, or even a pinch of cayenne pepper. The possibilities are endless!
- Wrap and refrigerate: After you’ve seasoned your prime rib, wrap it tightly in plastic wrap. Then, seal it up in a freezer bag for extra protection. The key is to keep the air out and let those flavours develop. Refrigerate for at least 12 hours, but 24 hours is ideal. This allows the meat to chill out and the flavours to really meld. The longer the flavours infuse, the tastier your prime rib will be.
The Day Of:
The big day has arrived! You’re almost there. Now it’s time to bring the prime rib out of the fridge and let it come to room temperature, about 1 hour. This will help it cook more evenly. You don’t want to shock the meat by going straight from the fridge to the hot oven.
Getting Ready for the Roast
Now, let’s prepare your oven and your tools. You’ll need:
- A roasting pan: Make sure your pan is large enough to fit your prime rib with some space around it. You’ll want the air to circulate so the meat cooks evenly. You don't want the meat crowded in the pan, it needs some breathing room to cook evenly.
- A meat thermometer: This is essential for checking the internal temperature of the prime rib. We’ll talk about that later, but trust me, a meat thermometer is your best friend. A meat thermometer is your trusty guide to ensuring the perfect level of doneness.
Roasting the Prime Rib
Alright, the stage is set, and we’re ready for the big show!Preheating the Oven:
First, preheat your oven to 450°F (232°C). It’s important to have your oven hot to sear the outside and create that beautiful crust. Imagine those lovely brown bits, that's what we’re going for.
Roasting:
Let’s get this party started!
- Place the prime rib in the roasting pan: Make sure the meat is in the middle of the pan with some space around it.
- Roast for 15 minutes: This initial high-heat searing is crucial for creating that amazing crust. Don’t be tempted to open the oven during this time, let the magic happen! You want that beautiful, crispy exterior, and a quick blast of high heat is the way to go.
- Reduce the oven temperature to 325°F (163°C): Now we’re going to slow things down. At this temperature, the prime rib will cook evenly and stay juicy. This is where the patience comes in, letting the prime rib cook slowly and gently to ensure it’s perfectly juicy.
- Roast for about 15 minutes per pound: This is a general guideline, but keep in mind that the exact roasting time will depend on the size of your roast and your desired level of doneness. A larger roast will need more time, and your personal preference for how cooked you like your meat will also impact the time.
- Basting: To keep the prime rib moist and flavourful, you can baste it every 30 minutes or so with pan juices. This adds extra flavour and prevents the surface from drying out. It’s like giving your prime rib a little spa treatment, keeping it hydrated and happy.
- Rest: Once the prime rib reaches the desired internal temperature, take it out of the oven and let it rest for at least 15 minutes before carving. This allows the juices to redistribute, ensuring a juicy, tender cut. This is a crucial step, don’t skip it!
Cooking the Prime Rib to Perfection
Let’s talk about that all-important internal temperature, the key to prime rib perfection. You want it cooked to your liking, but you don’t want to overcook it.
Internal Temperature Guide:
Here’s a handy table to help you determine the ideal internal temperature for your desired level of doneness:
| Doneness | Internal Temperature (°F) | Internal Temperature (°C) |
|---|---|---|
| Rare | 125-130 | 52-54 |
| Medium Rare | 130-135 | 54-57 |
| Medium | 135-140 | 57-60 |
| Medium Well | 140-145 | 60-63 |
| Well Done | 145 | 63 |
Remember, these are just guidelines. You can adjust the temperature slightly based on your preferences. I prefer my prime rib medium-rare, so it’s still juicy and tender, but you might like it a bit more cooked. Just make sure you use a meat thermometer to check the internal temperature, don’t rely on your eyes alone! That meat thermometer is your guide, trust it.
Tips for Perfect Doneness
- Start with a cold prime rib: This helps ensure even cooking. I know, it’s tempting to skip this step, but trust me, it makes a difference. It’s like a marathon, not a sprint. We want the heat to penetrate the entire roast evenly.
- Don’t overcook it: Overcooking is the biggest enemy of a good prime rib. It can make the meat tough and dry, so keep a close eye on the temperature. Overcooked prime rib is a tragedy, let’s avoid that.
- Rest the prime rib: This gives the juices time to redistribute throughout the meat. Remember, the rest is key. It’s like giving the meat a chance to settle down and recover from its journey through the oven.
Serving Your prime rib masterpiece
You’ve done it! Your prime rib is cooked to perfection. Now it’s time to showcase this culinary masterpiece.
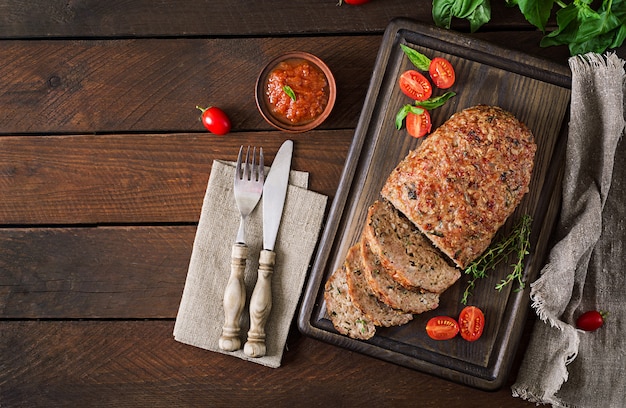
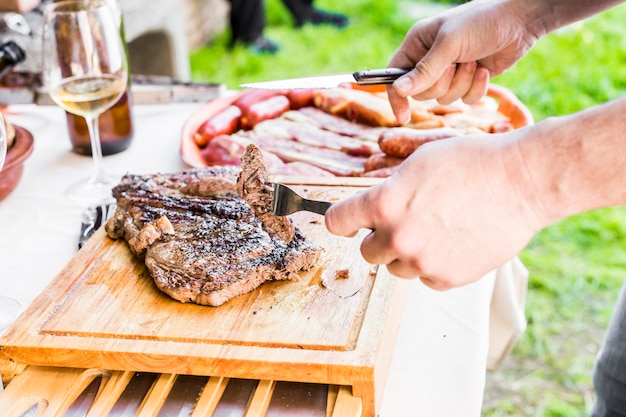
Carving the Prime Rib
The anticipation is building, and you’re ready to slice open that beautiful prime rib. Here are some tips for carving like a pro:
- Use a sharp carving knife: A dull knife will tear the meat, so invest in a good carving knife. Invest in a good knife, it will be your trusty companion for this task.
- Carve against the grain: This will help to create tender, bite-sized pieces. The grain of the meat runs along the bone. Think of the grain as the direction the muscle fibers run, and carving against it makes for a more tender cut.
- Leave the bones in for presentation: The bone adds a nice visual appeal, and the meat tends to be more tender along the bone. The bones add a rustic charm and a touch of drama to your presentation.
- Slice evenly: Aim for slices that are about 1/2 inch thick. This will ensure that every piece is cooked to your desired doneness. Even slices make for a more aesthetically pleasing presentation and ensure everyone gets a piece cooked to their liking.
Sides and Sauces
No prime rib is complete without a delicious selection of sides.
Here are some ideas to complement your prime rib:
- Roasted Vegetables: Think asparagus, Brussels sprouts, carrots, or potatoes. Roasted vegetables add a vibrant burst of colour and flavour, a perfect contrast to the rich prime rib.
- mashed potatoes: Creamy and comforting, mashed potatoes are a classic pairing for prime rib. This is a timeless classic, adding a comforting touch to the meal.
- green bean casserole: A nostalgic side dish that always brings back good memories. A classic for a reason, it adds a comforting and familiar element to the table.
- Yorkshire Pudding: A fluffy, savoury pudding that’s perfect for soaking up the pan juices. It’s like a fluffy cloud of deliciousness that complements the prime rib beautifully.
And don’t forget the sauce! A rich, flavourful sauce can elevate your prime rib to new heights.
Here are some sauce options:
- Au Jus: A simple and classic sauce made with pan juices, it’s a perfect complement to prime rib. It’s like the prime rib’s best friend, enhancing its flavour.
- Horseradish Cream Sauce: A tangy and spicy sauce that adds a kick to your prime rib. It’s like a little burst of heat that wakes up your taste buds.
- Red Wine Sauce: A rich and complex sauce that pairs beautifully with the flavour of prime rib. It adds depth and elegance, like a beautiful symphony of flavours.
- Mushroom Sauce: A hearty and earthy sauce that adds depth to the flavour of the prime rib. It’s like a walk in the forest, bringing earthy goodness to your plate.
prime rib leftovers: Don't Waste Them!
Let’s be honest, sometimes you end up with leftovers – even after a prime rib feast. But don’t worry, those leftovers are full of flavour and potential!
Prime Rib Sandwiches:
A prime rib sandwich is a classic way to use up leftovers.
Here’s what you need:
- Prime rib leftovers
- Sandwich rolls
- Your favourite sandwich toppings (like cheese, lettuce, tomato, onions, etc.)
- Au Jus (optional)
Simply slice your prime rib leftovers, layer them onto your rolls, add your toppings, and drizzle with au jus if you like. It's like a second act for your prime rib, a delicious and satisfying way to enjoy its leftover glory.
Prime Rib Hash:
Another tasty way to use up leftovers is to make a hearty prime rib hash.
Here’s what you need:
- Prime rib leftovers
- Potatoes
- Onions
- Your favourite seasonings
Dice your prime rib leftovers, potatoes, and onions. Then, sauté them in a pan with your seasonings until the potatoes are tender and the prime rib is heated through. It's a comforting and satisfying meal, a delicious way to repurpose those precious leftovers.
Prime Rib Soup:
Leftover prime rib can also be used to make a delicious and comforting soup.
Here’s what you need:
- Prime rib leftovers
- Vegetables (like carrots, celery, onions)
- Broth
- Your favourite seasonings
Sauté your vegetables in a pot with your seasonings. Then, add your prime rib leftovers, broth, and simmer until the vegetables are tender and the flavours have melded. It's a warm and comforting hug in a bowl, a perfect way to use those delicious leftovers.
(Part 7)prime rib tips and Tricks
I’ve learned a few tricks over the years that can make your prime rib even better.
- Don’t overwork the meat: Handle the prime rib gently to prevent it from becoming tough. Gentle handling is key, you don't want to squeeze the life out of that beautiful piece of meat.
- Use a meat thermometer: A meat thermometer is essential for ensuring your prime rib is cooked to perfection. It’s your trusty guide, always there to ensure perfect doneness.
- Rest the meat: Allowing the prime rib to rest before carving helps the juices to redistribute, resulting in a more tender and juicy cut. Let it rest, it deserves it after all that work!
- Use a high-quality carving knife: A sharp knife will make carving easier and prevent the meat from tearing. Invest in a good knife, it will make your carving life so much easier.
- Get creative with your seasonings: Don’t be afraid to experiment with different rubs and marinades. Think outside the box!
FAQs
I get it, you’re probably brimming with questions about prime rib. Here are some answers to common questions.
- Q: How long can I keep prime rib in the fridge before cooking?
A: You can store prime rib in the fridge for up to 5 days before cooking. Just make sure it’s wrapped tightly in plastic wrap and sealed in a freezer bag to keep it fresh. It’s like a little hibernation period for your prime rib, keeping it fresh and ready for its culinary destiny.
- Q: Can I freeze prime rib?
A: Yes, you can freeze prime rib for up to 3 months. Thaw it in the refrigerator for a few days before cooking. Freezing is a great way to extend the lifespan of your prime rib, making it ready for whenever you’re ready to cook it.
- Q: What if I overcook my prime rib?
A: Don’t panic! Even if you overcook your prime rib slightly, it will still be edible. Just be aware that it might be a bit tougher than you’d like. A slightly overcooked prime rib is better than a burnt one!
- Q: How do I make a good au jus?
A: To make au jus, simply deglaze the roasting pan with some red wine or broth. Then, add some pan juices and simmer until it’s reduced to a nice sauce consistency. Au jus is like the essence of the roast, capturing its flavours in a delicious sauce.
- Q: Can I use a different cut of meat for prime rib?
A: While prime rib is typically made from the rib section of beef, you can use other cuts, like chuck roast or a boneless rib-eye roast. Just be aware that the cooking time and internal temperature may vary slightly. Experimentation is key, you might discover your own unique twist on the prime rib.
There you have it, folks. Now you have all the tools, tips, and tricks you need to cook a prime rib that will make you the envy of your friends and family. It may take a bit of effort, but trust me, the reward is worth it. So, go forth and conquer those culinary heights – you’ve got this!
Everyone is watching

How to Cook Frozen Lobster Tails Perfectly: A Step-by-Step Guide
RecipesLobster. Just the word conjures up images of lavish meals, special occasions, and a taste of luxury. But let's...

Pigs in a Blanket Cooking Time: How Long to Bake for Perfect Results
RecipesAh, pigs in a blanket. Just the name conjures up images of those delightful little parcels of crispy pastry en...

Pork Fillet Cooking Time: How Long to Cook It Perfectly
RecipesPork fillet, or tenderloin as it's sometimes called, is a real favourite in our house. It's so versatile, and...

The Ultimate Guide to Cooking Delicious Frankfurters
RecipesLet's face it, we all love a good frankfurter. It's a classic, simple, and always satisfying. But let's be rea...

Wolf Meat Recipes: A Guide to Cooking Wild Game
RecipesLet's be honest, you don't see wolf meat at your local butcher shop every day. It's a bit of a wild card, but ...