Let's face it, life is too short for soggy, overcooked rice. It's a tragedy! But, thankfully, the humble rice cooker has saved countless meals from watery doom. I used to be a complete disaster in the kitchen when it came to rice. Sticky, mushy messes were my calling card. Then I discovered the rice cooker. My world changed. Seriously. It's like magic! You chuck in the rice, add some water, press a button, and poof, perfect rice appears. It’s like having a personal rice chef at your beck and call, ready to create delicious meals without any fuss.
But even with the wonders of a rice cooker, there’s a bit of a learning curve to mastering the perfect rice. Getting the right rice-to-water ratio is key, and there are a few little tricks that can elevate your rice game to Michelin-star level. So, settle in, grab your rice cooker, and get ready to learn the secrets to creating fluffy, perfectly cooked rice every single time.
(Part 1) The Rice: Your Culinary Canvas

The first step to making perfect rice is choosing the right rice. It's the foundation of your dish, the blank canvas upon which you’ll paint your culinary masterpiece. The world of rice is vast and varied, offering a range of textures and flavors. Today, we’ll focus on long-grain rice, the workhorse of the rice world. But don't worry, we'll explore other types of rice later in this guide, expanding your culinary horizons.
1. White Long-Grain Rice: The Everyday Hero
White long-grain rice is the go-to choice for a reason. It’s the classic, the one you find in every supermarket aisle. It has a mild flavor, cooks up fluffy and light, and it’s incredibly versatile. Whether you're making stir-fries, curries, or simply a side dish, white long-grain rice is your trusty companion. It’s affordable, readily available, and just plain easy to work with.
2. brown rice: The Healthier Choice
For those seeking a more nutritious option, brown rice is your champion. It’s a whole grain, meaning it hasn’t been stripped of its bran and germ, giving it a slightly nutty flavor and a chewier texture. Brown rice takes a bit longer to cook than white rice, so be patient. In a rice cooker, you might need to tinker with the settings a bit to achieve the perfect texture, but it's definitely doable.
3. jasmine rice: A Fragrant Adventure
If you want to add a touch of exotic flair to your meals, look no further than Jasmine rice. This fragrant rice, with its delicate floral aroma, will transport you to a Thai market. Its slightly sticky texture makes it perfect for Thai dishes and rice salads. Just be prepared to pay a bit more for this aromatic treat.
4. basmati rice: The Royal Treatment
Basmati rice is the king of rice, known for its long, slender grains, delicate aroma, and fluffy texture. It's the perfect companion for Indian curries, biryanis, and pilafs, its lightness allowing it to soak up all those delicious flavors without overpowering them. While it does take a little longer to cook than white rice, it's worth the extra wait for its exquisite taste and texture.
(Part 2) Understanding Your Rice Cooker: A Partner in Cuisine
Your rice cooker isn't just a simple appliance. It’s your culinary sidekick, your partner in rice-making adventures. It's a key player in the quest for perfect rice, so it's essential to understand its quirks and features.
1. Types of Rice Cookers: From Basic to Deluxe
Rice cookers come in all shapes and sizes, from simple, budget-friendly models to high-tech wonders with bells and whistles galore. I’ve been through both types, and honestly, a basic model works perfectly fine for everyday use. It's about finding the right balance for your needs and budget. If you're looking for something fancy, there are rice cookers that can handle different types of rice, steam vegetables, and even make porridge. But for the purposes of this guide, we'll focus on the basics.
2. The Settings: Choosing the Right Path
Most rice cookers have a few basic settings: “White Rice,” “Brown Rice,” “Quick Cook,” and sometimes a “Porridge” setting. The “White Rice” setting is your standard go-to. The “Brown Rice” setting adjusts the cooking time to accommodate the longer cooking time of brown rice. The “Quick Cook” setting can be handy for a speedy meal, but it might not always give you the perfect texture. Experiment with different settings to see what works best for you and your favorite rice varieties.
3. The “Keep Warm” Function: A Lifesaver for Leftovers
One of the most incredible features of a rice cooker is the "Keep Warm" function. Once the rice is cooked, the cooker automatically switches to keep warm mode, ensuring your rice stays perfectly warm and delicious for hours. This is a lifesaver for meal prepping, allowing you to cook a batch of rice ahead of time and have it ready for a quick and easy meal. It’s also a blessing for those times when you’ve cooked a bit too much, preventing waste and ensuring you have a comforting side for another meal.
(Part 3) The Golden Ratio: Rice to Water
Now, we're getting to the heart of the matter, the secret code to perfect rice: the rice-to-water ratio. This is where things can get a little tricky, but don't worry, I'm here to guide you through it. The perfect ratio will depend on the type of rice you’re using, but a good starting point is a 1:1 ratio. That means for every cup of rice, you'll use one cup of water. It's a simple rule, but it's crucial to success.
1. Measuring Rice: The Right Tool for the Job
Before you even start cooking, make sure you have the right measuring cup. A rice measuring cup, specifically designed for rice, is ideal. It's slightly larger than a regular measuring cup, ensuring you get the right amount of rice for the best results. If you don't have a rice measuring cup, use a regular one, but pack the rice in tightly to get the right volume. It’s all about precision!
2. Measuring Water: The Importance of Precision
Now, for the water. This is where your intuition comes into play. The perfect amount of water varies slightly depending on the rice you’re using and your personal preference. Start with the 1:1 ratio, but don't be afraid to adjust it based on the type of rice. Brown rice usually needs a bit more water than white rice. Remember, rice absorbs water as it cooks, so it’s better to start with a little less water than you think you'll need. You can always add more if necessary. It's easier to add more water than to try to salvage dry rice!
3. The Water Absorption: A Dance of Texture
Water absorption is the key to the texture of your cooked rice. Too little water, and you'll have dry, crumbly rice. Too much water, and you'll end up with a mushy, sticky mess. It's a delicate balance. Think of it as a dance between water and rice, resulting in a perfectly textured dish.
(Part 4) The Washing Ceremony: A Ritual of Purity
Now, we're getting into the realm of culinary rituals. Rinsing rice before cooking is a subject of heated debate. Some swear by it, while others believe it's unnecessary. However, I’m firmly in the camp of the rice-rinser. It's a simple step that can make a big difference in the texture and taste of your rice.
1. The Rinsing Process: Gentle but Thorough
To rinse your rice, place it in a fine-mesh strainer over a bowl. Run cold water over the rice, gently swirling it with your hand. Keep rinsing until the water runs clear. This usually takes about 2-3 rinses. Don't be alarmed if you see some milky water. That's just the excess starch. It’s a normal part of the process. Just make sure the water is crystal clear before you move on.
2. The Importance of Rinsing: Beyond the Taste
Rinsing your rice isn’t just about achieving a fluffier texture. It helps remove any dust, dirt, or impurities clinging to the rice grains. Think of it as a little spa treatment for your rice. It leaves you with a cleaner, brighter rice that’s ready to be transformed into a delicious meal.
3. The Great Debate: To Rinse or Not to Rinse
Ultimately, the decision to rinse or not to rinse is up to you. Some argue that rinsing removes the rice's natural nutrients, but I haven’t found any evidence to support that. In fact, I believe that rinsing helps preserve the nutrients by removing the excess starch. Plus, you get a fluffier, lighter texture. It’s all about personal preference and what works best for you.
(Part 5) The Cooking Process: Let the Transformation Begin
Okay, now we’re getting to the fun part – the actual cooking! This is where the magic happens. It's like watching a culinary metamorphosis unfold right before your eyes. Remember, we're aiming for that perfect fluffy, delicious rice, cooked evenly throughout. Let’s get started.
1. Preparing Your Rice Cooker: A Clean Canvas
Before you start cooking, make sure your rice cooker is clean and ready to go. I usually give it a quick wipe-down with a damp cloth to remove any leftover rice grains or other bits and pieces. It's a good habit to keep your kitchen sparkling clean. And, of course, check to make sure it’s plugged in and ready for action.
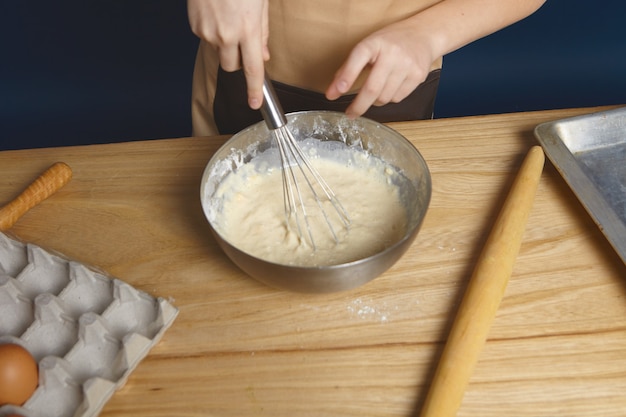
2. Adding the Rice and Water: Precision and Patience
Now, for the moment of truth! Carefully transfer your rinsed rice into the rice cooker pot. I use a small bowl or a measuring cup to avoid any spills. Then, add the measured water to the rice cooker pot. I like to gently swirl the rice and water with my finger to make sure the water is evenly distributed. It's like giving your rice a little stir-fry, getting it ready for its transformation.
3. Closing the Lid: The Countdown Begins
With the rice and water in place, close the lid of your rice cooker tightly. We want to trap the steam inside, helping the rice cook evenly and create that perfect fluffy texture. Now, the moment of truth! Press that “Cook” button. Your rice cooker will automatically start the cooking process, allowing you to relax while the magic unfolds. No more hovering over the stove, stirring and worrying about burnt rice. It’s time to sit back and let the rice cooker work its magic.
4. The “Keep Warm” Function: A Perfect Ending
Once the rice is cooked, your rice cooker will automatically switch to the “Keep Warm” function. It’s a brilliant feature, preventing the rice from drying out or overcooking. It’s also ideal for meal prep, allowing you to cook a batch of rice ahead of time and keep it warm until you're ready to serve. And, of course, it's a lifesaver for leftovers, keeping them perfectly warm and delicious for another meal.
(Part 6) The Art of Fluffing: Achieving Perfect Texture
Here’s where the artistry comes in – fluffing the rice! It's like giving your rice a gentle massage, releasing any trapped moisture and creating a light, airy texture. It’s a vital step in achieving perfectly cooked rice, so don’t skip it!
1. Let the Rice Rest: Patience is a Virtue
After the cooking cycle is complete, let the rice sit in the rice cooker for about 10 minutes. This gives the rice time to absorb any remaining moisture and ensures it’s cooked evenly. Don’t rush to open the lid; let the steam settle and the rice relax. It’s a crucial part of the process.
2. The Fluffing Technique: Gentle but Firm
After 10 minutes, gently open the lid. Using a fork or a rice paddle, gently fluff the rice. Be careful not to break the rice grains, but loosen them up and separate them from each other. I usually fluff for about 30 seconds, until the rice is light and airy. It's like giving your rice a little boost, helping it reach its full potential.
3. The Perfect Texture: A Test of Fluffiness
Now, check the texture. Well-fluffed rice should be light and airy, with individual grains that are separate. If it's still sticky or clumpy, fluff it a little more. But don't overdo it. You want to achieve a light, fluffy texture that’s perfect for serving. It’s the ultimate goal!
(Part 7) Tips and Tricks: Elevate Your Rice Game
Now that you’ve mastered the basics, let’s talk about some tips and tricks to elevate your rice game. These are the little secrets that can take your rice from good to extraordinary.
1. Adding a Pinch of Salt: A Secret Ingredient
Did you know that adding a pinch of salt to your rice can enhance its flavor? It’s true! It brings out the natural sweetness of the rice and adds a touch of complexity. I usually add about a quarter teaspoon of salt to the water when cooking my rice. But if you’re feeling adventurous, try adding other spices, like a bay leaf, star anise, or a pinch of ginger. It’s a wonderful way to create unique flavor profiles.
2. Using a Different Liquid: Experiment with Flavors
Who says you have to use water for cooking rice? Get creative and use chicken broth, vegetable broth, or even coconut milk. This will infuse your rice with a different flavor and create a unique dining experience. Just be sure to adjust the amount of liquid you use depending on the type of liquid you choose. Chicken broth or vegetable broth will give you a richer flavor, while coconut milk will make your rice a bit sweeter and creamier.
3. Cooking Rice with Other Grains: Mix it Up!
Why stop at rice alone? You can also cook other grains like quinoa, barley, or even lentils in your rice cooker. Just be sure to adjust the cooking time and the amount of liquid you use depending on the type of grain you’re using. It’s a fantastic way to add variety to your meals and explore different textures and flavors.
4. Storing Leftover Rice: Keep it Fresh and Delicious
Once you’ve cooked a batch of rice, store any leftovers in an airtight container in the fridge for up to 3 days. To reheat, microwave the rice for a few minutes, or you can also reheat it in a saucepan on the stovetop with a splash of water. If you want to freeze leftover rice, place it in an airtight container and freeze for up to 3 months. Just thaw it completely before reheating. Leftover rice is a wonderful blank canvas for a variety of dishes, from rice bowls to fried rice.
(Part 8) Different Types of Rice: Mastering the Variations
Now, let's dive into the specifics of different types of rice, exploring their unique characteristics and cooking techniques. This will equip you with the knowledge to create the perfect rice dish for any occasion.
1. White Long-Grain Rice: The Classic Guide
White long-grain rice is the most common type, and it's the easiest to cook. Use a 1:1 ratio of rice to water. Add a pinch of salt to the water for extra flavor. Rinse the rice thoroughly before cooking. And remember to fluff the rice after it’s cooked to release any excess moisture. It’s a versatile choice for countless dishes.
2. Brown Rice: A Bit More Patience Required
Brown rice takes a bit longer to cook than white rice. Use a 1.5:1 ratio of water to rice. Add a pinch of salt to the water. Rinse the rice thoroughly before cooking. Make sure to set your rice cooker to the “Brown Rice” setting. You might need to add a bit more water, depending on your cooker. Brown rice is a nutritious and flavorful choice, offering a satisfying chewiness.
3. Jasmine Rice: The Fragrant Delight
Jasmine rice is known for its delicate floral aroma and slightly sticky texture. Use a 1:1 ratio of water to rice. Rinse the rice thoroughly before cooking. Let the rice rest for a few minutes after it’s cooked to allow the steam to dissipate, creating a fluffy texture. Jasmine rice adds a touch of elegance to any meal, especially Asian dishes.
4. Basmati Rice: The Perfect Accompaniment
Basmati rice is a long-grained rice with a delicate aroma and fluffy texture. Use a 1.25:1 ratio of water to rice. Rinse the rice thoroughly before cooking. Let the rice rest for a few minutes after it’s cooked to allow the steam to dissipate and create a fluffy texture. Basmati rice is the star of Indian cuisine, adding a touch of sophistication to any dish.
(Part 9) FAQs: Common Questions About Rice Cookers
Finally, let's address some of the most common questions about rice cookers. We've all been there, trying to figure out the secrets of this magical appliance.
1. What Happens if I Add Too Much Water?
If you add too much water, your rice will be mushy and sticky. It won’t have that perfect fluffy texture. But don’t panic! You can try to salvage it by fluffing the rice more aggressively and letting it sit for a few more minutes to absorb the excess moisture. If it’s still too mushy, add a bit more rice to absorb the extra water. But in the future, strive for precision in your measurements.
2. What Happens if I Add Too Little Water?
If you add too little water, your rice will be dry and crumbly. This happens because the rice doesn’t have enough moisture to cook through. It's a bit tougher to fix dry rice, but you can try adding a little water to the rice cooker and letting it cook for a few more minutes. If it’s still too dry, add a splash of water and microwave it for a few seconds. But, it’s always better to err on the side of caution and ensure you have enough water from the beginning.
3. Can I cook rice in a Rice Cooker if I Don’t Have a Measuring Cup?
Yes, you can cook rice without a measuring cup. But you’ll need to be more careful with your measurements. If you don't have a rice measuring cup, use a regular one, packing the rice tightly. As for the water, use any kind of container to measure it. Just make sure to use the right amount for the type of rice you’re cooking. Start with a little less water than you think you’ll need and add more if necessary.
4. Can I Cook Other Things in My Rice Cooker Besides Rice?
Absolutely! Many rice cookers can handle more than just rice. They can be used to steam vegetables, cook quinoa, barley, and even make porridge. Check the manual for your rice cooker to see what other functions it has. You might be surprised at its versatility.
5. How Long Does it Take to Cook Rice in a Rice Cooker?
The cooking time varies depending on the type of rice you’re using and the model of the rice cooker. White rice typically takes about 20-30 minutes to cook, while brown rice takes longer, typically 40-60 minutes. Most rice cookers have an automatic “Keep Warm” function, keeping the rice warm and ready to serve once it’s finished cooking. So, don't worry about overcooking. Just check the manual for your specific rice cooker to find out the recommended cooking times for different types of rice.
With these tips and techniques, you'll be well on your way to becoming a rice-cooking expert. So, grab your rice cooker, gather your ingredients, and start creating delicious, fluffy, perfect rice for every occasion. Happy cooking!
Everyone is watching

How to Cook Frozen Lobster Tails Perfectly: A Step-by-Step Guide
RecipesLobster. Just the word conjures up images of lavish meals, special occasions, and a taste of luxury. But let's...

Pork Fillet Cooking Time: How Long to Cook It Perfectly
RecipesPork fillet, or tenderloin as it's sometimes called, is a real favourite in our house. It's so versatile, and...

Pigs in a Blanket Cooking Time: How Long to Bake for Perfect Results
RecipesAh, pigs in a blanket. Just the name conjures up images of those delightful little parcels of crispy pastry en...

The Ultimate Guide to Cooking Delicious Frankfurters
RecipesLet's face it, we all love a good frankfurter. It's a classic, simple, and always satisfying. But let's be rea...

Wolf Meat Recipes: A Guide to Cooking Wild Game
RecipesLet's be honest, you don't see wolf meat at your local butcher shop every day. It's a bit of a wild card, but ...