Let's talk steak, shall we? Now, I’ve been in the kitchen for years, and I’ve tried my fair share of steak recipes. But nothing quite beats a good old oven-baked rib eye. It’s just got that perfect combination of tenderness, flavor, and that beautiful, juicy pink center that makes your mouth water. This isn’t just another recipe; it's a journey to steak nirvana, and I’m going to take you along for the ride. So, grab your apron, gather your ingredients, and let’s get cooking!
(Part 1) choosing the right cut

The first step to a perfect oven-baked rib eye is picking the right piece of meat. You want a thick, well-marbled cut with good fat distribution. Now, I’m not talking about a hunk of fat, but rather a nice marbling that will render down and infuse the meat with flavor during cooking. And remember, a little extra fat never hurts! It adds to the richness and tenderness of the steak. Think of it as a flavor enhancer, making your steak taste even more delicious.
Looking for the perfect rib eye
When you’re at the butcher’s, look for a rib eye that’s at least 1.5 inches thick. Anything thinner than that and you risk overcooking it, leading to a dry and tough steak. I always ask for a bone-in cut. It’s just more flavorful and visually appealing. Plus, the bone acts like a little heat sink, ensuring even cooking. As for the marbling, look for a good amount of white streaks throughout the meat, which indicates a good level of fat content. These streaks will render down during cooking, creating a beautiful, juicy steak. You want a good balance between lean meat and fat for the perfect texture and flavor.
(Part 2) Preparing for the Oven
Before we hit the oven, let’s get our steak prepped and ready to go. It’s all about seasoning and creating that delicious crust. And trust me, this is where a lot of people go wrong.
Salt and Pepper – A Classic Pairing
Salt and pepper are your best friends when it comes to steak. I’ve always been a big fan of coarse salt, like kosher salt. It coats the steak beautifully and helps to draw out moisture. Then, there’s black pepper, preferably freshly ground for that extra oomph. The trick is to season generously, but not overdo it. Remember, you can always add more later, but you can’t take it away. It’s about finding that perfect balance.
Don't Be Afraid of a Little Oil
A light coating of oil is essential. It helps create a crispy crust and prevents the steak from sticking to the pan. I prefer olive oil for its flavor, but you can use any neutral oil you like. Just be sure to rub it all over the steak, ensuring even coverage. Don’t overdo it, though. A thin layer will do the trick.
(Part 3) The Magic of the Oven
Now comes the fun part, the oven! Here's where we'll transform our seasoned beauty into a culinary masterpiece.
Preheat to Perfection
Before you even think about putting your steak in the oven, preheat it to 400°F (200°C). A hot oven is crucial for that beautiful sear and a juicy interior. Don’t be tempted to rush the process. A properly preheated oven is the foundation for a perfectly cooked steak. It ensures even cooking and prevents the steak from becoming tough and dry.
Choosing the Right Pan
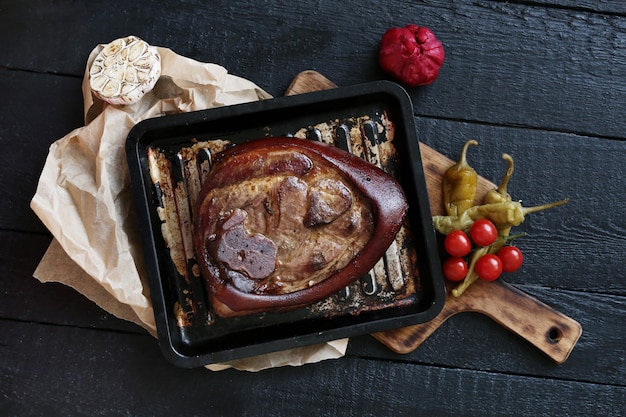
For oven-baked steak, I always use a cast iron skillet. It retains heat beautifully, ensuring even cooking and a crispy crust. If you don’t have a cast iron skillet, a heavy-bottomed oven-safe pan will do the trick. Just make sure it’s big enough for your steak to lay flat. You don’t want to crowd the pan, which can lead to uneven cooking and a soggy steak.
Searing for Flavor
Okay, now for the exciting part. Heat your pan over high heat, then add the steak. Don’t crowd the pan, and don’t move it around too much. Let it sear undisturbed for about 3-4 minutes per side. This creates that irresistible crust that we all crave. This is where you’ll see those beautiful Maillard reaction browning, which brings out so much flavor. It’s a chemical reaction that happens when food is heated at high temperatures, creating those delicious brown crusts and complex flavors.
(Part 4) The Art of Resting
One crucial step that many people forget is resting. After cooking, give your steak a good 10-minute rest before slicing and serving. This allows the juices to redistribute, resulting in a more tender and flavorful steak.
The Importance of Patience
Resting a steak isn’t just about allowing it to cool down, it’s about giving the juices a chance to settle back into the meat. As the steak cooks, the juices are pushed to the surface. When you cut into it too soon, those juices run out, leaving a dry steak. By resting it, you allow those juices to be reabsorbed, resulting in a much more tender and flavorful steak. Think of it like a little spa treatment for your steak! It’s worth the wait.
(Part 5) cooking times and Doneness
Now, every steak lover has a preferred level of doneness. Whether you like it rare, medium-rare, medium, or well-done, this section is all about mastering the art of cooking time.
Understanding internal temperatures
Using a meat thermometer is the best way to ensure your steak is cooked to your liking. Here’s a quick guide to internal temperatures for different levels of doneness:
| Doneness | Internal Temperature (°F) | Internal Temperature (°C) |
|---|---|---|
| Rare | 125-130 | 52-54 |
| Medium-rare | 130-135 | 54-57 |
| Medium | 140-145 | 60-63 |
| Medium-well | 150-155 | 65-68 |
| Well-done | 160 | 71 |
Don't Forget about the Oven Time
The searing process is just the beginning. After searing, transfer your steak to a preheated oven for about 5-8 minutes, depending on your desired doneness. Keep an eye on the steak, checking the internal temperature with a thermometer every few minutes until it reaches your preferred level of doneness. This is where the oven comes in handy, allowing for even and controlled cooking.
Adjusting for Thickness
Remember, cooking time varies depending on the thickness of your steak. A thicker steak will take longer to cook than a thinner one. If you’re unsure, it’s always better to err on the side of undercooking. You can always put it back in the oven for a few more minutes, but you can’t undo overcooking!
(Part 6) The Art of Finishing Touches
Okay, your steak is cooked to perfection, rested, and ready to be devoured. Now it’s time to add those final touches that will elevate your dish to a whole new level.
A Burst of Flavour with Herbs and Spices
Fresh herbs and spices are a great way to enhance the flavor of your steak. My personal favorites include rosemary, thyme, garlic, and paprika. I like to add them during the last few minutes of cooking. This allows the flavors to infuse the steak without becoming overpowering. Adding herbs and spices towards the end also helps to retain their vibrant flavors and aromas.
Butter and Garlic – A Classic Combo
For a truly decadent experience, I love to add a knob of butter and a clove of garlic to the pan after the steak is removed. As the butter melts, it infuses the steak with a rich and savory flavor. The garlic adds a wonderful aroma and depth. This is truly a game changer for your steak! It’s a simple yet effective way to add another layer of flavor and richness to your steak.
Glazing for a Shiny Finish
If you’re feeling fancy, you can glaze your steak with a pan sauce or a simple balsamic reduction. This adds a lovely shine and a burst of acidity to complement the richness of the steak. Just be careful not to overcook the glaze, as you want it to be glossy and not burnt. Glazing can make your steak look even more appealing and elevate the entire dining experience.
(Part 7) Serving with Style
The steak is done, the finishing touches are added, and now it’s time to plate and serve. Let’s make this a memorable meal!
The Perfect side dish
A steak deserves a worthy companion. I love to pair my oven-baked rib eye with classic sides like roasted potatoes, asparagus, or a mixed green salad. But feel free to get creative and try other options like creamy mashed potatoes, sautéed mushrooms, or even a side of grilled corn on the cob. The key is to choose sides that complement the flavors of the steak.
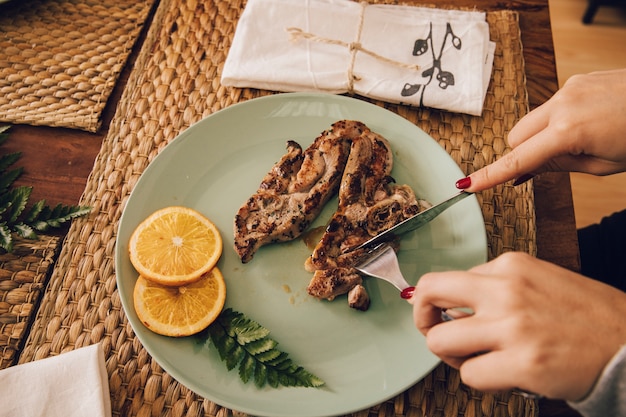
Presentation is Key
Even the simplest meal can be elevated with a little presentation. Place your steak on a beautiful plate, and don’t be afraid to use garnishes like fresh herbs or a sprinkle of sea salt to add a touch of elegance. A simple squeeze of lemon juice over the steak can also add a bright and refreshing flavor. It’s all about creating a visually appealing and inviting dish.
Embrace the Moment
Finally, take a moment to appreciate your culinary masterpiece before you dig in. Enjoy the aroma, the beautiful sear, and the juicy pink center. This is a moment to savor, a testament to your hard work and culinary prowess. Now, enjoy your delicious oven-baked rib eye! Take your time, enjoy the flavors, and appreciate the effort you put into creating this delicious meal.
(Part 8) FAQs: Your Questions Answered
Let's address some common questions about oven-baked rib eye steak.
1. How do I know if my steak is done?
The best way to determine doneness is by using a meat thermometer. Insert the thermometer into the thickest part of the steak, making sure it doesn’t touch any bone. Check the internal temperature against the chart in (Part 5) to ensure it’s cooked to your liking.
2. What if my steak is overcooked?
It happens to the best of us! While overcooked steak is still edible, it won’t be as tender or flavorful. To salvage it, you can try slicing it thinly and using it in a stir-fry or fajitas. Or, you can shred it and use it in a beef sandwich or other dishes. Don’t let a slightly overcooked steak go to waste! Get creative with it and find a way to use it in another dish.
3. Can I use other cuts of beef for this recipe?
Absolutely! This recipe works well with other cuts of beef like strip steak, tenderloin, or even a good sirloin. Just adjust the cooking time accordingly based on the thickness of the cut. Feel free to experiment and find your favorite cuts for oven-baked steak.
4. How can I prevent my steak from drying out?
The key is to cook it at a high temperature for a short amount of time. Avoid overcooking the steak, and be sure to rest it for 10 minutes before slicing. This will allow the juices to redistribute and prevent the steak from becoming dry. It's all about achieving that perfect balance of cooking time and temperature.
5. What are some good toppings for oven-baked rib eye steak?
The possibilities are endless! Here are a few ideas:
- Blue cheese crumbles and a drizzle of balsamic vinegar
- Horseradish sauce and a sprinkle of fresh chives
- caramelized onions and a dollop of sour cream
- Grilled pineapple and a sprinkle of chili flakes
- A fried egg and a drizzle of truffle oil
So, there you have it! A comprehensive guide to achieving oven-baked rib eye steak perfection. It’s all about choosing the right cut, seasoning generously, and using the oven to create that irresistible sear and juicy interior. Now, go forth and conquer the world of steak! And remember, practice makes perfect, so don’t be afraid to experiment and find your own perfect technique. Happy cooking!
Everyone is watching

How to Cook Frozen Lobster Tails Perfectly: A Step-by-Step Guide
RecipesLobster. Just the word conjures up images of lavish meals, special occasions, and a taste of luxury. But let's...
Pigs in a Blanket Cooking Time: How Long to Bake for Perfect Results
RecipesAh, pigs in a blanket. Just the name conjures up images of those delightful little parcels of crispy pastry en...
Pork Fillet Cooking Time: How Long to Cook It Perfectly
RecipesPork fillet, or tenderloin as it's sometimes called, is a real favourite in our house. It's so versatile, and...
The Ultimate Guide to Cooking Delicious Frankfurters
RecipesLet's face it, we all love a good frankfurter. It's a classic, simple, and always satisfying. But let's be rea...
Wolf Meat Recipes: A Guide to Cooking Wild Game
RecipesLet's be honest, you don't see wolf meat at your local butcher shop every day. It's a bit of a wild card, but ...