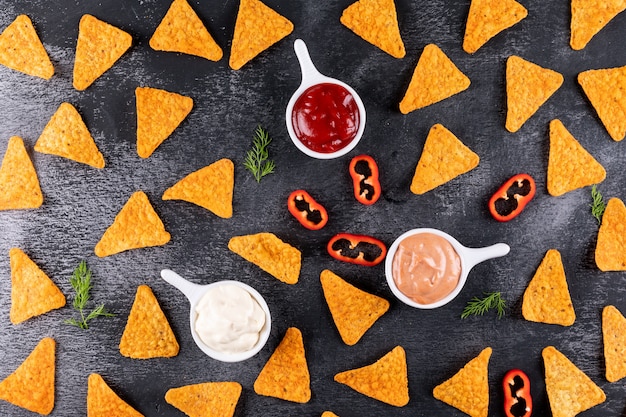
Ah, nachos. The mere mention of the word conjures images of warm, cheesy goodness, a symphony of textures and flavors, a perfect party appetizer or a comforting weeknight snack. But let's be honest, those soggy, limp tortilla chips you often find at the takeaway just don't cut it. You deserve better, my friend! You deserve nachos that are crispy, flavour-packed, and utterly irresistible.
That's why I'm here to share my foolproof guide to oven-baked nachos - a recipe I've been perfecting for years, tweaking it here and there, until it finally reached a level of pure nacho bliss. Buckle up, because we're about to embark on a nacho adventure that'll leave your taste buds singing!
(Part 1) The Foundation: Choosing the Right Chips
The first step on this nacho journey is choosing the right chips - the foundation upon which your culinary masterpiece will be built. This is no time for flimsy, store-bought chips that crumble at the slightest touch. You need something sturdy, with a satisfying texture that can withstand the weight of all those delicious toppings.
My Go-To Chip Choices:
- Tortilla chips: The classic choice for a reason! Look for ones that are thick and slightly rippled, like Tostitos. These chips provide a solid base for all the toppings, holding their shape even under the weight of a generous helping of cheese and other goodies.
- Restaurant-style chips: These are often larger and thicker than standard tortilla chips, offering a more substantial crunch. They might be a bit pricier, but trust me, they're worth it!
- homemade chips: For the ultimate control over your nacho destiny, consider making your own chips. It's surprisingly easy! Simply slice up some corn tortillas, brush them with oil, and bake them until they're golden and crispy. You'll be amazed at how fresh and delicious they taste.
What to Avoid:
Stay far, far away from those thin, flimsy chips that are more like crackers than chips. They'll turn into a soggy mess under the weight of your toppings, leaving you with a pile of disappointment. You deserve better than that!
(Part 2) The Secret Sauce: The Perfect Bake
Now that you've got your chips, it's time to unlock the secret to perfectly crispy, oven-baked nachos. This is where the magic happens. It's all about finding the right temperature and timing to achieve that irresistible crunch.
The Baking Process:
- Preheat your oven: I always set my oven to 180°C (350°F). This ensures even cooking and those beautiful golden-brown chips that just beg to be devoured.
- Spread your chips: I like to use a baking sheet lined with parchment paper for easy cleanup. Don't overcrowd the chips; they need some breathing room to crisp up properly.
- The initial bake: Pop those chips in the oven for about 5-7 minutes. This first bake is all about getting them nice and warm, ready to receive their toppings.
- The toppings go on: Take the chips out, and it's time for the fun part - the toppings! We'll get to that in just a moment.
- Back in the oven: Once your nachos are loaded with all the goodness, pop them back in the oven for another 5-7 minutes, or until the cheese is melted and bubbly.
Tips for the Perfect Bake:
- Don't skip the parchment paper! It prevents the chips from sticking to the baking sheet, and makes cleanup a breeze. Plus, it helps to ensure those chips get nice and crispy.
- Don't overcrowd the baking sheet. Give those chips some space to breathe, otherwise they'll steam instead of crisp up.
- Keep an eye on those nachos! Overbaking can lead to burnt chips, and nobody wants that.
- Use a baking sheet with a lip. This will help to prevent any spills or messes, keeping your kitchen clean and your nacho experience delightful.
(Part 3) The Flavor Explosion: Toppings Galore
The toppings are where you can really let your creativity shine! This is your opportunity to create a culinary masterpiece or simply stick with a classic combo. The possibilities are endless, limited only by your imagination and the contents of your pantry.
My Favourite Toppings:
Cheese:
This is a must-have for any true nacho lover! I prefer a blend of cheddar and Monterey Jack - the sharp, tangy cheddar adds a delicious bite, while the Monterey Jack provides a creamy, melty texture. But feel free to experiment! Use whatever cheese your heart desires.
Beans:
black beans, pinto beans, refried beans, or even kidney beans - the choice is yours! They add a creamy texture, a boost of protein, and a subtle earthy flavor that complements the other toppings beautifully.
Veggies:
I love adding fresh veggies for a burst of color, flavor, and a touch of freshness. Chopped tomatoes, red onions, juicy jalape??os, and a generous sprinkling of cilantro are all fantastic options. And don't forget the salsa! It adds a bright, tangy kick that elevates the whole nacho experience.
Meat:
ground beef, shredded chicken, pulled pork - the sky's the limit! I personally love to go for a hearty ground beef or spicy chorizo. The meat adds a satisfying savory element and a delightful depth of flavor.
Other Goodies:
Sour cream, guacamole, hot sauce, pickled onions, diced avocado...the list goes on! These extras add a touch of decadence, a kick of spice, or a refreshing contrast to the other flavors.
Tips for Perfect Toppings:
- Don't go overboard. You want to be able to taste all the flavors, not just a mush of toppings.
- Layer your toppings. Start with the cheese, then add your beans, veggies, and meat. This ensures that everything is evenly distributed and that each element gets a chance to shine.
- Let the cheese melt. Before you add the rest of your toppings, let the cheese melt for a few minutes. This will help it to stick to the chips and create that delicious, gooey goodness.
- Add some heat. If you like it spicy, don't be afraid to add some hot sauce!
- Get creative! This is your chance to experiment and find your perfect topping combo. Don't be afraid to try new things and see what works best for you.
(Part 4) Beyond the Basics: Getting Fancy
Okay, so you've mastered the basics of oven-baked nachos. But let's talk about taking your nacho game to the next level! These upgrades will make your guests say, "Wow, these are amazing!" and leave you feeling like a culinary rockstar.
Elevated Ingredients:
- Smoked cheese: Add a touch of smoky depth to your nachos with some smoked Gouda or cheddar. It adds a subtle, smoky flavor that elevates the cheese experience.
- Chorizo: Spicy and flavourful, chorizo is a delicious addition to any nacho spread. Its rich, savory flavor and slight heat add another dimension of taste.
- Pico de gallo: This fresh salsa adds a burst of flavour and colour, with its combination of diced tomatoes, onions, jalape??os, and cilantro.
- grilled corn: Slice up some corn on the cob and grill it for a smoky, sweet flavour that adds a delightful textural element.
- Roasted peppers: Red or green peppers roasted until soft and slightly charred add a delicious sweetness and a touch of smoky complexity.
Presentation Matters:
Don't just plop your nachos on a plate and call it a day. Get creative with your presentation! This is where you can really make those nachos stand out.
- Use a cutting board. It's a stylish way to serve your nachos and it's easy to clean. Plus, it adds a touch of rustic charm to your spread.
- Add a garnish. Sprinkle some chopped cilantro, diced red onion, or a few jalape??o slices on top. These little touches add a pop of color and freshness.
- Serve with a side of guacamole. A small bowl of homemade guacamole adds a touch of elegance and a creamy, flavorful contrast to the cheesy nachos.
(Part 5) The Nacho Bar: A DIY Feast
For a truly interactive experience, why not create a nacho bar? This is a fun and festive way to entertain guests, allowing them to customize their own nacho masterpiece.
Setting up your Nacho Bar:
- Choose your chips. Offer a variety of chips, like tortilla chips, corn chips, and even potato chips, to cater to different tastes.
- Set up your toppings. Create different stations for cheese, beans, veggies, meat, and sauces. This keeps things organized and allows guests to easily build their perfect nacho combination.
- Get creative with your presentation. Use bowls, baskets, and trays to display your toppings. Make it visually appealing and inviting for guests to explore the options.
- Don't forget the napkins and utensils. Make sure your guests have everything they need to build their perfect nachos and enjoy them mess-free.
Tips for a Successful Nacho Bar:
- Keep it simple. Focus on a few key toppings that will appeal to most people. You don't need to go overboard with too many options.
- Label your toppings. This will make it easier for guests to know what they're getting. It's especially helpful if you have some less common toppings.
- Have fun! This is a chance to get creative and let your guests build their own perfect nachos.
(Part 6) Beyond Nachos: Creative Variations
Now that you've mastered the art of oven-baked nachos, let's explore some fun variations. You can adapt this recipe to create delicious appetizers and even full meals, all inspired by the nacho goodness.
Nacho-Inspired Appetizers:
- Mini Nachos: Make smaller, individual nachos by using smaller chips or breaking larger chips into pieces. These are perfect for a casual gathering or a snack.
- Nacho Bites: Create bite-sized nachos by combining your favourite toppings and shaping them into small balls. These are perfect for a party or a quick and easy snack.
- Nacho Dip: Combine your favourite toppings with a creamy base, like sour cream or Greek yoghurt, for a delicious dip. Serve it with tortilla chips, veggie sticks, or even crackers.
Nacho-Inspired Meals:
- Nacho Bake: Combine all your favourite toppings in a casserole dish and bake until bubbly and delicious. This is a hearty, satisfying meal that's perfect for a cold night.
- Nacho Pizza: Top a pizza crust with your favourite nacho toppings for a fun and flavorful twist on a classic dish.
- Nacho Soup: Combine a spicy broth with your favourite nacho toppings for a hearty and comforting soup.
(Part 7) The Great Nacho Debate: Oven vs. Microwave
Now, some people will swear by the microwave for their nachos. They say it's quick and easy, and they're not wrong. But trust me, oven-baked nachos are on a whole different level. Here's why:
| Oven | Microwave | |
|---|---|---|
| Crispness | Crisp and crunchy, with a satisfying snap | Soggy and limp, with a sad, soft texture |
| Cheese | Melted and bubbly, with a delicious, gooey consistency | Gooey and stringy, with a texture that's more rubbery than melty |
| Flavor | Deep and complex, allowing each topping to shine | Mild and bland, with less depth of flavor |
| Presentation | Stunning and inviting, with crispy chips and a beautiful array of toppings | Clumpy and messy, with a less appealing presentation |
Why Oven-Baked Wins:
The oven provides a more even heat distribution, resulting in perfectly crispy chips and a deliciously melted cheese. It allows each topping to cook evenly and develop its full flavor potential. Microwave nachos, on the other hand, tend to get soggy and unevenly cooked, with the cheese often ending up rubbery and the chips lacking the delightful crunch.
So, while the microwave might be faster, the oven delivers a superior nacho experience. It's worth the extra time and effort, I promise!
(Part 8) FAQs: Your Nacho Questions Answered
I've put together a list of frequently asked questions about oven-baked nachos to help you on your nacho journey.
Q: How long do I bake nachos for?
A: Bake your chips for about 5-7 minutes before adding your toppings, and then another 5-7 minutes after you add the toppings. Keep an eye on them and don't be afraid to adjust the baking time if needed. You want them golden brown and perfectly crispy!
Q: Can I add toppings before baking?
A: You can, but I recommend waiting until after the initial bake. This will help to prevent your toppings from getting soggy, especially those that release moisture, like salsa or diced tomatoes.
Q: What kind of cheese is best for nachos?
A: I prefer a blend of cheddar and Monterey Jack, but you can use any cheese you like. Other popular choices include Colby Jack, mozzarella, and pepper jack. Just remember to choose cheeses that melt well for that delicious, gooey goodness.
Q: How do I keep my nachos crispy?
A: Don't overcrowd your baking sheet and bake them for the right amount of time. Avoid using too much liquid toppings, such as salsa, which can make the chips soggy. If you do use salsa, add it after the baking process to maintain that perfect crispness.
Q: Can I make nachos in advance?
A: It's not ideal, as the chips will lose their crispness. However, you can assemble the nachos, without adding the toppings, ahead of time and then bake them right before serving. This will allow you to have everything ready and save some time on the day.
(Part 9) The Nacho Legacy: A culinary journey
So there you have it, my friends, the ultimate guide to oven-baked nachos! This isn't just a recipe, it's a journey. A journey of flavour, creativity, and good times.
Remember, the beauty of nachos lies in their versatility. So go ahead, experiment, explore, and most importantly, have fun! Let your nacho dreams run wild!
Everyone is watching

How to Cook Frozen Lobster Tails Perfectly: A Step-by-Step Guide
RecipesLobster. Just the word conjures up images of lavish meals, special occasions, and a taste of luxury. But let's...

Pigs in a Blanket Cooking Time: How Long to Bake for Perfect Results
RecipesAh, pigs in a blanket. Just the name conjures up images of those delightful little parcels of crispy pastry en...

Pork Fillet Cooking Time: How Long to Cook It Perfectly
RecipesPork fillet, or tenderloin as it's sometimes called, is a real favourite in our house. It's so versatile, and...

The Ultimate Guide to Cooking Delicious Frankfurters
RecipesLet's face it, we all love a good frankfurter. It's a classic, simple, and always satisfying. But let's be rea...

Wolf Meat Recipes: A Guide to Cooking Wild Game
RecipesLet's be honest, you don't see wolf meat at your local butcher shop every day. It's a bit of a wild card, but ...