Oh, the bone-in ribeye. Just the name evokes images of juicy, flavorful steak, cooked to perfection and resting on a bed of creamy mashed potatoes. It's the king of steaks, no doubt, a dish that can impress even the most discerning palate. I've cooked my fair share of ribeyes over the years, from simple pan-fried steaks to elaborate grilled masterpieces. And let me tell you, it's a journey of discovery, a dance between heat and time, that ultimately results in a culinary triumph.
This guide isn't just a recipe; it's an invitation to embark on this journey together. We'll delve into the secrets of choosing the perfect ribeye, mastering the art of seasoning, and conquering the challenges of achieving that perfect sear and even cooking. I'll share my own trials and tribulations, the little tricks I've learned along the way, and hopefully, you'll walk away with the confidence to create a bone-in ribeye that's worthy of a standing ovation.
(Part 1) Choosing Your Ribeye: A Meat Connoisseur's Guide
Let's face it, you can't just grab any old steak and expect it to turn into a culinary masterpiece. The journey begins with selecting the right ribeye, one that promises flavor, tenderness, and visual appeal. It's like choosing the perfect canvas for your artistic expression – it sets the stage for a delicious outcome.
The Cut: Where Flavor Begins
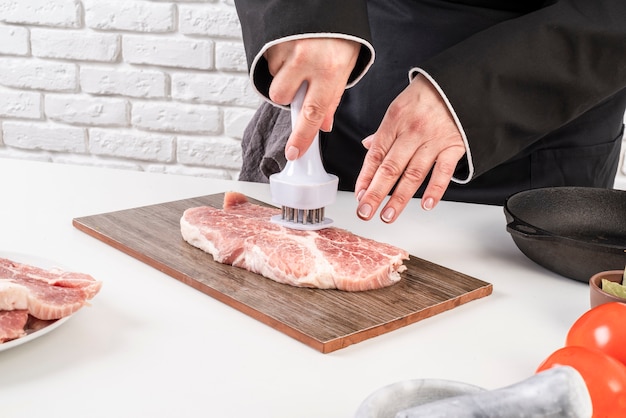
First things first, you want a bone-in cut, no ifs, ands, or buts. The bone adds flavor and character, and it helps the steak cook more evenly. Imagine a symphony of flavors – the bone acts as the conductor, orchestrating the tenderness and juiciness of the meat. Look for a good marbling, those lovely streaks of fat that melt into the meat, infusing it with incredible richness. They're like little jewels scattered across the surface, promising a rich and satisfying taste.
When you hold a ribeye, it should feel firm and springy, not mushy or loose. This indicates that the meat is fresh and of good quality. Think of it as a handshake – a firm grip signifies a good quality steak.
The Size: It's All About Personal Preference
Now, size matters. For a single serving, a 1-inch thick ribeye will do nicely. But if you're feeding a crowd, you can go bigger, even up to 2 inches thick. Personally, I love a thick ribeye; it gives you that delicious, melt-in-your-mouth texture. It's like biting into a cloud of flavor. But if you're short on time, a thinner cut will cook faster.
The Butcher: Your Meat Guru
Don't underestimate the power of a good butcher. They're your allies in the quest for the perfect ribeye. Ask them for a "dry-aged" ribeye, if available. Dry-aging is a process where the meat is hung for several weeks in a controlled environment, allowing the moisture to evaporate, concentrating the flavor and tenderizing the meat. It's like aging a fine wine – it develops a more complex and nuanced taste.
But be warned, dry-aged ribeye can be pricier. It's an investment in flavor and quality, but it's worth it if you're looking for the ultimate steak experience. And don't be afraid to ask your butcher for advice. They're experts in their craft and can help you choose the perfect ribeye for your needs.
(Part 2) Prepping Your Steak: A Symphony of Flavors
You've selected your star ingredient – now it's time to give it the attention it deserves. Proper preparation is crucial for bringing out the best in your ribeye. It's like tuning your instrument before a performance – ensuring that everything is in harmony.
Room Temperature: The Key to Even Cooking
Let's get this straight: never cook a steak straight from the fridge. It's a recipe for uneven cooking and a tough center. Imagine cooking a cold potato – it won't cook evenly and will likely end up dry and hard. The same principle applies to steak. Take your ribeye out of the fridge at least 30 minutes before cooking, allowing it to come to room temperature. This ensures that the meat cooks evenly, both inside and out. It's like letting the meat relax and unwind before it's put through the heat of the grill or skillet.
Seasoning: The Foundation of Flavor
The seasoning is where your creativity can shine. Salt and pepper are the essentials, but don't stop there. A sprinkle of garlic powder, onion powder, paprika, or even a pinch of cayenne pepper can add complexity and depth to your steak. My secret weapon is a blend of smoked paprika and black pepper. Trust me, it elevates the taste to another level.
Think of seasoning as adding different instruments to your culinary symphony. Each spice adds its own unique flavor, creating a harmonious and rich taste profile.
Patting Dry: The Art of Moisture Control
Before cooking, pat the ribeye dry with paper towels. This will help you achieve a beautiful sear, and it also prevents steam from forming during cooking, which can make the steak soggy. Imagine trying to sear a wet pancake – it won't crisp up properly. The same principle applies to steak. Patting it dry ensures that the heat penetrates the meat evenly, resulting in a flavorful and crispy crust.
(Part 3) mastering the sear: The Magic of High Heat
The sear is the moment of truth, the point where the steak transforms from a simple cut of meat into a culinary masterpiece. It's the art of creating a flavorful, crispy crust that seals in the juices and adds a layer of complexity to the taste. It's like striking the first chord in a musical performance – it sets the tone for the entire piece.
The Tools: Cast Iron or Grill, Your Choice
You can sear a ribeye in a cast-iron skillet or on a hot grill. I prefer a cast-iron skillet; it retains heat beautifully and gives you a perfect sear every time. It's like a reliable friend, always delivering consistent results. But a grill is great for those smoky flavors, adding a touch of rustic charm to your steak. Whichever you choose, make sure it's screaming hot before you add the steak.
Think of the skillet and grill as different instruments in your culinary orchestra. Each one produces a unique flavor profile, and the choice is yours to make based on your preferences.
Oil Up: Lubrication for Perfection
Heat a good amount of oil in your skillet or on the grill. I use a combination of olive oil and avocado oil for a delicious, nutty flavor and a high smoke point. Avocado oil has a higher smoke point than olive oil, so it can withstand higher temperatures without breaking down. Make sure the oil is shimmering before you add the steak. It should be hot enough to sizzle as soon as the steak hits the pan or grill. Imagine the oil as the lubricant that helps the steak glide across the surface, creating a beautiful, even sear.
Searing Time: A Crucial Dance
Place the ribeye in the hot oil and let it sizzle. Don't move it for at least 3-4 minutes. You want that beautiful, crisp crust on the outside. It's like allowing the steak to settle into the heat, developing a deep, rich flavor. After those initial minutes, turn the steak over and sear the other side for another 3-4 minutes.
This back-and-forth dance between the steak and the heat is crucial for achieving a perfect sear. It's a delicate balance, but with a little practice, you'll master the art of creating that signature crust.
The Edges: Don't Forget the Sides
Don't neglect the edges of the steak. Sear those too, for a complete flavor explosion. Flip the steak frequently, about every minute, to ensure even browning on all sides. Imagine a painter meticulously working their brushstrokes, ensuring that every part of the canvas is covered in color. This is how you ensure that your steak is cooked evenly and has a delicious crust on all sides.
(Part 4) Achieving the Perfect Doneness: A Matter of Timing
Now comes the crucial part: cooking your ribeye to the perfect doneness. This is where you transform from a novice cook into a master chef. It's a delicate balance of heat and time, a testament to your understanding of the steak's internal chemistry. It's like conducting an orchestra – each instrument needs to play its part in perfect harmony to create a beautiful symphony of flavors.
The Thermometer: Your Trusty Guide
The best way to ensure perfect doneness is to use a meat thermometer. It's like having a conductor's baton – it helps you control the tempo and intensity of the cooking process. For a medium-rare ribeye, aim for an internal temperature of 130°F (54°C). For medium, go for 140°F (60°C), and for medium-well, aim for 150°F (65°C).
Visual Clues: A Helpful Indicator
If you don't have a thermometer, you can rely on visual clues to determine doneness. Imagine a painting – the colors change depending on the amount of light. The same principle applies to steak. A medium-rare steak will have a red center, while a medium steak will have a pink center. A well-done steak will be brown throughout.
But remember, visual clues are subjective and can vary depending on the thickness of the steak and the type of heat you're using. A thermometer provides a more accurate measure of doneness.
Resting Time: Crucial for Tenderness
Once the steak reaches your desired doneness, take it off the heat and let it rest for 10 minutes before slicing. This allows the juices to redistribute throughout the meat, resulting in a more tender and flavorful steak. Cover the steak loosely with aluminum foil to keep it warm. Imagine the steak as a symphony orchestra, each muscle fiber playing its own unique note. Resting the steak allows those notes to blend and harmonize, creating a rich and satisfying taste.
(Part 5) Serving Your Masterpiece: A Celebration of Flavor
You've poured your heart and soul into creating this culinary masterpiece – now it's time to present it with pride. It's the culmination of your journey, a moment of satisfaction and delight. It's like the final act of a play, where all the elements come together to create a powerful and memorable experience.
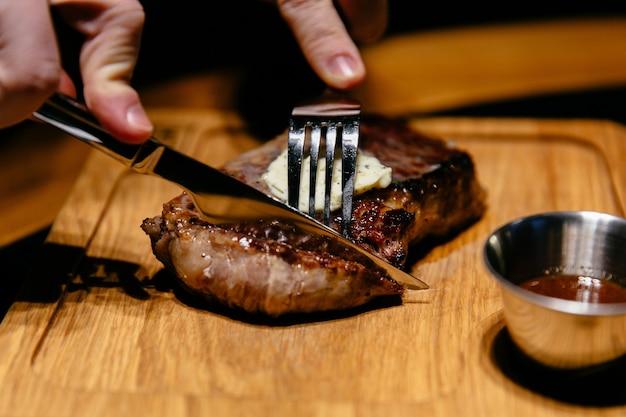
The Cut: A Work of Art
After resting, slice the steak against the grain. This helps tenderize the meat and makes it easier to chew. Imagine a sculptor meticulously carving a piece of marble – the final cut determines the shape and texture of the sculpture. The same principle applies to steak. Slicing against the grain ensures that the meat is tender and easy to eat. Arrange the slices on a platter and garnish with fresh herbs, a drizzle of olive oil, or a sprinkle of sea salt.
The Sides: Complementary Companions
A bone-in ribeye deserves a side dish that complements its richness. Think creamy mashed potatoes, roasted asparagus, sauteed mushrooms, or a simple green salad. Imagine a well-balanced meal as a harmonious composition – each element complements and enhances the others. The side dish acts as a counterpoint to the richness of the steak, creating a balanced and satisfying dining experience.
The Presentation: The Final Touch
Don't forget the presentation. Serve your steak on a beautiful platter with your chosen sides. You can even add a touch of elegance with a sprig of rosemary or a lemon wedge. Imagine the final act of a performance – the lighting, the costumes, and the stage design all contribute to the overall impact of the show. The same principle applies to serving your steak. A well-presented meal creates a visual and sensory delight, adding to the enjoyment of the dining experience.
(Part 6) Cooking a Ribeye in a cast iron skillet: My Favorite Method
Now, let's get down to the nitty-gritty. My personal favorite way to cook a ribeye is in a cast-iron skillet. It's a classic method that never fails to deliver a perfect sear and an even cook. It's like a tried and true recipe, passed down through generations, a testament to its timeless appeal. Here's how I do it:
1. Preheat the Skillet: Building the Foundation
Heat a cast-iron skillet over high heat for at least 5 minutes. You want the skillet to be scorching hot. You can test it by sprinkling a few drops of water on the surface; they should sizzle and evaporate immediately. Imagine a canvas – the hotter the surface, the more vibrant and intense the colors. The same principle applies to the skillet. The hotter the skillet, the more intense and flavorful the sear.
2. Oil Up: The Lubricant for Success
Add a generous amount of oil to the hot skillet. I use a mix of olive oil and avocado oil, but you can use your favorite oil with a high smoke point. Avocado oil has a higher smoke point than olive oil, so it can withstand higher temperatures without breaking down. Imagine the oil as the lubricant that helps the steak glide across the surface, creating a beautiful, even sear.
3. Sear and Flip: The Dance of Heat
Place the ribeye in the hot skillet and sear for 3-4 minutes per side. Don't touch it! Let it develop that beautiful, crispy crust. It's like allowing the steak to settle into the heat, developing a deep, rich flavor. Then flip the steak over and sear the other side for another 3-4 minutes.
This back-and-forth dance between the steak and the heat is crucial for achieving a perfect sear. It's a delicate balance, but with a little practice, you'll master the art of creating that signature crust.
4. The Flip and Finish: The Perfect Ending
Once the steak has a nice sear on all sides, reduce the heat to medium-low and flip the steak one more time. This will allow the internal temperature to rise more evenly without burning the outside. Imagine a sculptor carefully shaping their clay – the final touches are what transform the raw material into a beautiful work of art. This final flip allows the steak to cook evenly without compromising the beautiful sear.
5. The Thermometer Test: The Final Verdict
Insert a meat thermometer into the thickest part of the steak to check the internal temperature. For a medium-rare ribeye, aim for 130°F (54°C). Once it reaches your desired temperature, remove the steak from the skillet and let it rest for 10 minutes.
(Part 7) Grilling a Ribeye: Embrace the Smoky Flavor
If you're a grill enthusiast like me, you'll love the smoky flavor that grilling adds to a ribeye. It's like adding a touch of rustic charm to your culinary masterpiece. But grilling requires a bit more attention to detail to ensure even cooking and a delicious outcome. It's like a dance with fire – you need to be careful and precise to achieve the desired results.
1. Preheat the Grill: Get That Heat Going
Preheat your grill to high heat, preferably over direct heat. You want the grill grates to be scorching hot. You can test it by holding your hand a few inches above the grates; you should feel the heat instantly. Imagine the grill as a stage – the hotter the stage, the more intense and energetic the performance. The same principle applies to grilling. A hot grill ensures a quick and even sear, adding a delicious smoky flavor to your steak.
2. Clean the Grates: A Smooth Surface for Success
Make sure your grill grates are clean. You don't want any stuck-on food to hinder the searing process. Imagine a canvas – a clean surface allows the artist to create their masterpiece without any distractions. The same principle applies to grilling. Clean grill grates ensure that the steak cooks evenly and doesn't stick, resulting in a beautiful sear and delicious flavor.
3. Oil the Grates: Prevent Sticking
Brush the grill grates with oil to prevent the steak from sticking. This will help you get a nice, even sear. Imagine the oil as a lubricant – it helps the steak glide across the surface, ensuring a beautiful and even sear.
4. Sear and Rotate: An Even Cook on the Grill
Place the ribeye on the hot grill and sear for 3-4 minutes per side. Then rotate the steak 90 degrees and sear for another 1-2 minutes. This will create those beautiful grill marks and ensure even cooking. Imagine a painter meticulously working their brushstrokes, ensuring that every part of the canvas is covered in color. This rotation technique ensures that the steak cooks evenly and develops those iconic grill marks.
5. Move to Indirect Heat: The Final Cook
Once the steak has a nice sear on all sides, move it to the indirect heat zone of the grill, if your grill has one. If not, close the lid and reduce the heat to medium-low. Imagine the grill as a stage – the direct heat is the spotlight, and the indirect heat is the background lighting. Moving the steak to indirect heat allows the internal temperature to rise evenly without burning the outside.
6. The Thermometer Test: The Verdict is In
Insert a meat thermometer into the thickest part of the steak to check the internal temperature. For a medium-rare ribeye, aim for 130°F (54°C). Once it reaches your desired temperature, remove the steak from the grill and let it rest for 10 minutes.
(Part 8) Troubleshooting: The Solutions to Common Cooking Challenges
Even the most experienced chefs encounter occasional challenges in the kitchen. It's part of the learning process, a testament to the fact that cooking is an art, not a science. Don't be discouraged if your first attempt doesn't turn out perfect. Use these troubleshooting tips to refine your skills and become a ribeye master.
1. Overcooked Steak: A Sad Reality
If you've overcooked your steak, don't despair! There's still hope. Slice the steak thinly and serve it over a bed of mashed potatoes or pasta to help balance out the dryness. You can also make a pan sauce with the leftover juices from the skillet or grill to add some moisture and flavor. Imagine a painter adding a touch of water to their paint to create a more subtle and nuanced shade. This is how you can salvage an overcooked steak.
2. Raw Center: Not Quite Ready
If your steak has a raw center, return it to the skillet or grill for a few more minutes, checking the internal temperature frequently until it reaches your desired doneness. Don't forget to rest the steak for 10 minutes before slicing. Imagine a sculptor carefully shaping their clay – the final touches are what transform the raw material into a beautiful work of art. This final cooking time ensures that the steak is cooked evenly and safe to eat.
3. Uneven Cooking: A Common Dilemma
If your steak is cooking unevenly, adjust the heat or flip the steak more frequently to ensure all sides cook evenly. You can also use a meat thermometer to check the internal temperature in different areas of the steak. Imagine a conductor meticulously guiding the orchestra – each instrument needs to play its part in perfect harmony. The same principle applies to cooking steak. Adjusting the heat and flipping the steak ensures that it cooks evenly, resulting in a delicious and satisfying meal.
4. Stuck to the Grill: A Sticky Situation
If your steak is sticking to the grill, try loosening it with a spatula. You can also brush the grill grates with oil before cooking to prevent sticking. Imagine a canvas – a smooth surface allows the artist to create their masterpiece without any distractions. The same principle applies to grilling. Oil on the grill grates helps the steak release easily, ensuring a beautiful sear and delicious flavor.
5. Not Enough Sear: A Disappointing Outcome
If your steak doesn't have a nice sear, try cooking it over higher heat for a few more minutes. You can also use a cast-iron skillet or a grill with high heat for a more pronounced sear. Remember, patience is key! Imagine a sculptor carefully shaping their clay – the final touches are what transform the raw material into a beautiful work of art. This extra searing time ensures that the steak has a beautiful, crispy crust, adding depth of flavor and texture.
(Part 9) FAQs: Answers to Your Burning Questions
You've poured over the guide, and you're ready to tackle your first bone-in ribeye. But there are still some lingering questions. Let's address them together. It's like a Q&A session with the maestro – a chance to clear up any confusion and ensure that you're ready to perform your culinary symphony.
1. How long should I sear a ribeye?
You should sear a ribeye for 3-4 minutes per side, or until it develops a beautiful, crispy crust. Don't rush the process! A good sear is essential for a delicious and flavorful steak.
2. What temperature should I cook a ribeye to medium-rare?
A medium-rare ribeye should have an internal temperature of 130°F (54°C). You can use a meat thermometer to check the internal temperature and ensure it's cooked to your liking.
3. How long should I rest a ribeye after cooking?
You should rest a ribeye for 10 minutes after cooking. This allows the juices to redistribute throughout the meat, resulting in a more tender and flavorful steak. Cover the steak loosely with aluminum foil to keep it warm while it rests.
4. What is the best way to slice a ribeye?
The best way to slice a ribeye is against the grain. This means slicing perpendicular to the muscle fibers of the steak. This will help tenderize the meat and make it easier to chew.
5. What are some good side dishes for a ribeye steak?
A bone-in ribeye deserves a side dish that complements its richness. Think creamy mashed potatoes, roasted asparagus, sauteed mushrooms, or a simple green salad. You can also get creative with your side dishes and try something new, like a grilled corn salad or a roasted red pepper and tomato salsa.
So there you have it, a comprehensive guide to cooking the perfect bone-in ribeye steak. Now go forth and conquer the kitchen! And remember, every steak is a journey, a testament to your culinary skills. Enjoy the process, savor the results, and most importantly, have fun! Happy cooking!
Everyone is watching

How to Cook Frozen Lobster Tails Perfectly: A Step-by-Step Guide
RecipesLobster. Just the word conjures up images of lavish meals, special occasions, and a taste of luxury. But let's...

Pigs in a Blanket Cooking Time: How Long to Bake for Perfect Results
RecipesAh, pigs in a blanket. Just the name conjures up images of those delightful little parcels of crispy pastry en...

Pork Fillet Cooking Time: How Long to Cook It Perfectly
RecipesPork fillet, or tenderloin as it's sometimes called, is a real favourite in our house. It's so versatile, and...

The Ultimate Guide to Tender, Juicy Pulled Pork
RecipesRight, let's talk pulled pork. It's one of those dishes that just screams "comfort food," doesn't it? I mean...

The Ultimate Guide to Cooking Sweet Potatoes: From Roasting to Mashing
RecipesSweet potatoes. Just the name conjures up images of warm, comforting dishes, bursts of vibrant color, and a to...