You’re looking for a simple, fast way to cook an egg, and you’ve got a microwave? You've come to the right place! We're not talking about those rubbery, overcooked eggs in a microwaveable pouch. We're aiming for something more…sophisticated, shall we say? Let’s dive into the world of microwave-cooked eggs, with a touch of personal experience and a dash of humour, of course.
I've been down this road, experimenting with various methods to achieve that perfect, runny yolk and a set white. Believe me, it's not always easy! There have been times where my egg exploded in the microwave, leaving a sticky mess that would make a toddler cry. But hey, we learn from our mistakes, right?
So, grab a cuppa, settle in, and let’s embark on this journey to mastering the art of microwave egg cookery. It’s not as intimidating as it sounds, I promise. You might even become a microwave egg master yourself!
(Part 1) The Essentials: What You’ll Need
You’d be surprised how little you need to cook an egg in the microwave. It’s not like you need a whole arsenal of kitchen gadgets. But there are a few essentials that make the process easier and more enjoyable:
1. A Microwave-Safe Container
First, you need a microwave-safe container. Don’t even think about using that fancy porcelain mug you got for Christmas. It’s going to end up looking like a ceramic explosion in there. Opt for a simple, plain bowl or mug. I’ve found a small, round bowl works best for me. And trust me, you want to avoid any sharp edges, as they can lead to a less-than-desirable egg explosion.
2. A Fork
Next up, you’ll need a fork. It’s not for eating the egg just yet (although it will come in handy later). We’re going to use it to give the egg a little bit of a…makeover. It's all about getting that perfect texture, remember?
3. An Egg
And finally, you’ll need the star of the show: an egg. Fresh is best, but let’s be realistic, we're all about convenience here. So, feel free to use whatever you have on hand. It's your egg, your rules.
(Part 2) The Pre-Microwave Prep: Setting the Stage
Now that we’ve got our essentials, let’s get down to business. This is where things get a bit…technical. But don’t worry, it’s not rocket science (although it might feel like it at times). I'm here to guide you through each step, from the simple to the more…adventurous.
1. The Water Method: For That Perfect Texture
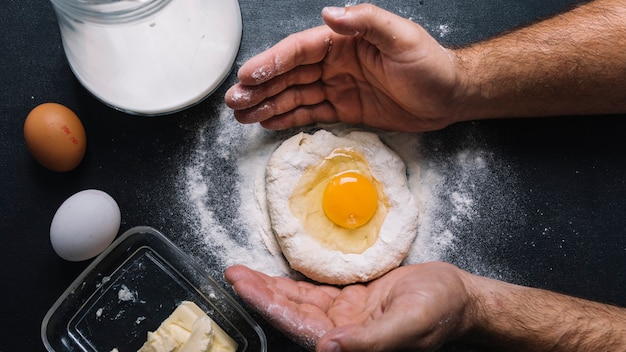
Right, we’re going to start with the water method. It’s a classic for a reason. Grab your egg and give it a little crack. Now, here’s the important bit: don’t dump it straight into your bowl! We want to create a bit of a steam bath for our egg. So, add a tablespoon or two of water to the bottom of your bowl first. Now, carefully crack your egg directly into the water. Don’t worry, it’s not as messy as it sounds! And it’s definitely a cleaner option than dealing with egg shells in your microwave.
2. The Fork Trick: For a Perfectly Runny Yolk
Okay, so now we’ve got our egg in the bowl, and the water is ready to go. This is where the fork comes in. You might think, “Why do I need to poke my egg with a fork? It’s already cracked, isn’t it?” Well, yes and no. It’s all about getting that perfect runny yolk. You see, if you leave the egg whole, the yolk tends to cook up too much in the microwave. So, take your fork and gently pierce the yolk a couple of times. Just a little poke, that’s all it takes. Don’t be afraid to get a little adventurous, but be careful not to break the yolk completely!
3. The Microwave Mayhem: Finding the Perfect Time
Now we’re getting to the fun part, the part where you can actually see your egg transform. But don’t go jumping for joy just yet. Here’s where it gets a little tricky. The perfect time for a microwave egg depends on the power of your microwave, the size of your egg, and how runny you want your yolk. Trust me, it’s a delicate dance. But don’t worry, I’ll give you a starting point.
4. A Safe and Sound Microwave
Before you press that “start” button, take a moment to step back and admire your masterpiece. Look at it with pride, because you’ve done it. You’ve prepped your egg like a pro. But there’s one more thing to do before you send it into the microwave abyss. It’s important to cover the bowl with a plate or some cling film. It’s not about keeping the heat in; it's about containing the inevitable steam. And yes, that’s right, steam! microwave eggs produce a lot of it. You wouldn't believe the mess it can make if you don't cover it! Remember, safety first!
(Part 3) The Microwave Adventure: Embark on the culinary journey

Ok, now we’re ready to go. But before you press that "start" button, let me tell you, you're about to embark on a journey of discovery. It's a bit like a wild ride, but a delicious one. Every microwave is different, so what works for me might not work for you. So, you'll have to be your own judge. Don’t worry, I'm here to guide you through each step. You got this!
1. The First 30 Seconds
Ok, it's time to start the microwave. It’s always a good idea to start with 30 seconds. This gives the egg a chance to start cooking without getting too overcooked. Just keep an eye on it. You’ll start to see some steam escaping from under the cover. Watch it. It's exciting, isn’t it? It’s like a little egg party happening in there. But we're not done yet.
2. The 15-Second Intervals
Right, 30 seconds are up. Now, it's time to check on your egg. Let’s peek inside. Take a look at the white. It should be starting to solidify. If you want a really runny yolk, you can stop there and enjoy your soft-boiled marvel. But if you want a slightly firmer yolk, we need to keep going. Keep adding 15 seconds at a time, and keep peeking. You'll see the white getting firmer and the yolk becoming slightly more opaque. But remember, it’s all about finding that sweet spot. Too much time, and you'll end up with a rubbery egg.
3. The Final Touches
Once the white is set to your liking, and the yolk has reached the desired level of firmness, it’s time to take the egg out of the microwave. This is where that fork comes back into play. Use it to carefully lift the egg out of the bowl. You’ll notice that the water underneath has been heated up. Be careful, it’s hot!
4. The Great Reveal
Alright, it’s time for the big reveal. We’ve cooked our egg, we’ve taken it out of the microwave, and now it’s time to see our creation. Carefully peel away the top of the egg with the fork. It's like unwrapping a gift, isn’t it? And voila! Your perfect microwave egg is ready to be enjoyed.
(Part 4) The Eggcellent Taste Test: The Moment of Truth
So, you've done it. You've cooked an egg in the microwave. It's time for the moment of truth. Take a bite. Savor the flavors. How does it taste? Is the yolk runny enough? Is the white firm enough? If you're not happy with the result, don't fret. It's all about experimentation. That's what makes this whole process so exciting. And who knows, you might just become an expert at cooking microwave eggs.
(Part 5) The Different Degrees of Doneness: Mastering the Spectrum
Right, so now that you've had a taste of microwave egg cookery, let's talk about the different degrees of doneness. There's a whole spectrum, from soft-boiled to hard-boiled, and everything in between. And the best part is, you can achieve it all in the microwave. I'll walk you through each one, sharing my tips and tricks along the way.
1. The Soft-boiled egg: For the Runny Yolk Enthusiasts
The soft-boiled egg is the holy grail of microwave egg cookery. It's all about that runny yolk with a perfectly set white. It's a true culinary masterpiece. To achieve this, you'll need to keep your cooking time short. Aim for 30 to 45 seconds. It's a delicate dance, so keep a close eye on your egg.
2. The Medium-Boiled Egg: A Happy Medium for Every Tastebud
If you want something a bit firmer than a soft-boiled egg, but not quite hard-boiled, then the medium-boiled egg is your go-to. It's the happy medium, with a slightly thicker yolk and a firm white. Aim for a cooking time of 45 to 60 seconds. Remember, it's all about finding that perfect balance.
3. The Hard-Boiled Egg: For the Ultimate Firmness
For those who prefer their yolk nice and firm, the hard-boiled egg is the way to go. It's a classic choice, perfect for sandwiches, salads, or just eating on its own. For this, you’ll want to cook your egg for 1 to 2 minutes. But be careful not to overcook it because it can become a bit rubbery.
(Part 6) The Art of Experimentation: Find Your Perfect Egg
So, there you have it. You’re now a microwave egg chef! But remember, this is just the beginning. The beauty of cooking eggs in the microwave is that you can always experiment. Play with the different cooking times and find what works best for you. You’ll be amazed at how versatile the microwave can be. It’s not just for reheating leftovers anymore!
(Part 7) Tips and Tricks from a Microwave Egg Connoisseur: The Insider Secrets
Now, let me share a few of my own personal tips and tricks for cooking the perfect microwave egg. It's all about finding those little details that make all the difference. And let me tell you, after years of experimenting, I've learned a thing or two. So, grab a pen and paper, because these are golden nuggets of wisdom!
1. Don’t Forget the Plate!
As I mentioned before, covering your bowl with a plate or cling film is essential. It's not just about keeping the heat in, it's about keeping the mess out. Microwave eggs produce a lot of steam, and it’s the last thing you want all over your microwave.
2. The Power of the Microwave
One of the biggest factors affecting cooking time is the power of your microwave. If you have a low-power microwave, you might need to cook your egg for a bit longer. If you have a high-power microwave, you might need to cook it for a shorter time. It’s always a good idea to start with shorter intervals and increase the time as needed.
3. Don’t Overcook It
Remember, it's always better to undercook your egg than overcook it. You can always pop it back into the microwave for a few more seconds if needed. But once it's overcooked, there's no going back.
4. The Clean-Up Crew
Once you've finished cooking your egg, it's time to give your bowl a good wash. The yolk can be a bit sticky, but with a bit of warm water and soap, it’s easy to clean up.
(Part 8) FAQs: Addressing the Common Concerns
Alright, so you’ve got all the tips and tricks, but there’s one more thing I want to address. You know, those little nagging questions that pop into your mind. Well, I’ve got the answers. I’ve been there, and I know just how you feel. So, let’s tackle those FAQs!
1. Can I Cook More Than One Egg at a Time?
Absolutely! You can cook multiple eggs at a time. Just make sure to give them enough space in the bowl. And remember, you’ll need to increase the cooking time accordingly. It’s a good idea to start with the same time for one egg and then increase the time in small increments until the eggs are cooked to your liking.
2. What If My Egg Explodes in the Microwave?
It happens. It’s the microwave egg equivalent of a kitchen disaster. But don’t fret! It’s not the end of the world. It usually happens when the egg is overcooked or when the bowl isn’t properly covered. The best thing to do is to make sure the bowl is properly covered and to check on the egg frequently. And if it does explode, just clean up the mess and try again.
3. What Can I Do with Microwave Eggs?
The possibilities are endless! You can use your microwave eggs in sandwiches, salads, breakfast bowls, or even as a topping for your toast. You can also make scrambled eggs, omelets, and frittatas in the microwave. Don’t be afraid to get creative and experiment.
4. Is it Safe to Cook Eggs in the Microwave?
Yes, it is safe to cook eggs in the microwave, as long as you follow the proper guidelines. Make sure you use a microwave-safe bowl, cover the bowl with a plate or cling film, and check on the egg frequently to prevent overcooking.
5. Can I Cook Other Foods in the Microwave?
Yes! The microwave is a great tool for cooking a variety of foods, not just eggs. You can cook vegetables, fish, chicken, and even some desserts in the microwave. Just make sure you use the appropriate cooking times and temperatures for the food you are preparing.
So, there you have it, your ultimate guide to cooking eggs in the microwave. Remember, it’s all about experimenting and finding what works best for you. Don’t be afraid to try new things and have fun with it. After all, who doesn’t love a quick and easy egg, especially when it’s cooked to perfection?
(Part 9) Microwave Egg Variations: Expanding Your Culinary Horizons
Now that you've mastered the basics of cooking eggs in the microwave, why not explore some variations? Here are a few ideas to get your creative juices flowing:
1. The Scrambled Egg: A Microwave Marvel
Scrambled eggs are a classic breakfast staple, and they’re surprisingly easy to make in the microwave. Simply crack your egg into a bowl, whisk it with a little milk or cream, and season with salt and pepper. Microwave for 30-60 seconds, stirring halfway through. Enjoy your fluffy, microwave-cooked scrambled eggs!
2. The Omelet: A Microwave Masterpiece
Don’t let the name fool you; you can make an omelet in the microwave! It’s a bit more involved than scrambled eggs, but it’s still achievable. Crack your egg into a bowl and whisk it with milk or cream. Add your favorite fillings, like cheese, vegetables, or ham. Microwave for 30-60 seconds, then carefully fold the omelet in half. Let it sit for a few minutes before enjoying.
3. The Frittata: A Microwave Feast
Frittatas are a delicious and versatile dish that can be made in the microwave. Similar to an omelet, start with whisked eggs and milk or cream. Add your favorite vegetables, cheese, and meat. Microwave for 1-2 minutes, then broil for a few minutes to get a crispy top.
4. The poached egg: A Microwave Miracle
Yes, you can even poach an egg in the microwave! While not quite as traditional, the results are surprisingly good. Add a tablespoon of water to a microwave-safe bowl. Crack an egg into the water, making sure to keep the yolk intact. Microwave for 30-60 seconds, or until the white is set and the yolk is still runny.
(Part 10) Microwave Egg Safety: A Word of Caution
While cooking eggs in the microwave is generally safe, it's important to be aware of some potential risks:
1. Egg Explosions
As we've discussed, egg explosions are a possibility. To minimize this risk, make sure your bowl is microwave-safe, cover it properly, and don't overcook the egg.
2. Overcooking
Overcooking can lead to a rubbery texture, so be sure to check on your egg frequently and stop cooking when it reaches the desired doneness.
3. Hot Steam
Microwave eggs produce a lot of steam, so be careful when removing the egg from the bowl. Use a fork or oven mitt to avoid burns.
By following these safety tips, you can enjoy delicious and safe microwave eggs. Happy cooking!
Everyone is watching

How to Cook Frozen Lobster Tails Perfectly: A Step-by-Step Guide
RecipesLobster. Just the word conjures up images of lavish meals, special occasions, and a taste of luxury. But let's...

Pigs in a Blanket Cooking Time: How Long to Bake for Perfect Results
RecipesAh, pigs in a blanket. Just the name conjures up images of those delightful little parcels of crispy pastry en...

Pork Fillet Cooking Time: How Long to Cook It Perfectly
RecipesPork fillet, or tenderloin as it's sometimes called, is a real favourite in our house. It's so versatile, and...

The Ultimate Guide to Cooking Delicious Frankfurters
RecipesLet's face it, we all love a good frankfurter. It's a classic, simple, and always satisfying. But let's be rea...

The Ultimate Guide to Tender, Juicy Pulled Pork
RecipesRight, let's talk pulled pork. It's one of those dishes that just screams "comfort food," doesn't it? I mean...