Part 1: Choosing the Right Turkey Breast
First things first: you need the right turkey breast. Think of it as the foundation for your masterpiece. You wouldn't start building a house on shaky ground, right? The same goes for turkey roasting. You want a plump, juicy turkey breast that's going to give you the best results.
Tips for choosing a turkey Breast
- Look for the "plump factor": Don't be afraid to give it a little squeeze. You want a turkey breast that feels firm and well-rounded, not skinny and shriveled. A good turkey breast should have some visible fat streaks under the skin, which will help keep it moist while cooking.
- Check the skin: The skin should be smooth and taut, not wrinkled or dry. This indicates a fresh turkey breast that's been handled well.
- Smell it: This is where things get a little personal, but trust your nose! The turkey breast should have a clean, fresh smell. If you notice any funky or sour smells, move on to the next one.
Part 2: Preparing the Turkey Breast
Alright, you've got your perfect turkey breast. Now it's time to get it ready for the oven. There are two main steps: brining and seasoning.
Step 1: Brining the Turkey Breast
Brining is a game-changer, trust me! It's the secret to juicy, tender turkey breast every time. Brining involves soaking the turkey breast in a salt water solution, which helps to retain moisture and prevent dryness during cooking. Think of it as giving the turkey a spa day before its big moment in the oven.
Brining Time:
For a 7 lb turkey breast, aim for a minimum of 4 hours of brining, but up to 12 hours is even better. The longer you brine, the more moisture you'll lock in. If you're short on time, you can skip brining, but your turkey breast might be a little drier.
Brining Solutions:
Here's a simple brining recipe you can try:
Ingredients:
- 1 gallon of cold water
- 1 cup kosher salt
- 1/2 cup granulated sugar
Instructions:
- Dissolve the salt and sugar in the cold water.
- Place the turkey breast in a large container or a brining bag.
- Pour the brine over the turkey breast, ensuring it's completely submerged.
- Refrigerate for at least 4 hours, up to 12 hours.
For a more flavorful brine, you can add herbs like thyme, rosemary, or sage, or even citrus zest.
Step 2: Seasoning the Turkey Breast
After your brining session, it's time to give your turkey breast a flavor boost. This is where you can really get creative and personalize your turkey breast.
Seasoning Tips:
- Don't be shy: Season generously! You can always add more seasoning later, but it's hard to take it away once it's cooked in.
- Go for even coverage: Rub the seasoning evenly over the entire turkey breast, including under the skin if you can. This will ensure that every bite is flavorful.
- Experiment with flavors: Try a classic combination of salt, pepper, garlic powder, and onion powder, or add a hint of paprika, chili powder, or even a touch of brown sugar for a sweet and savory twist.
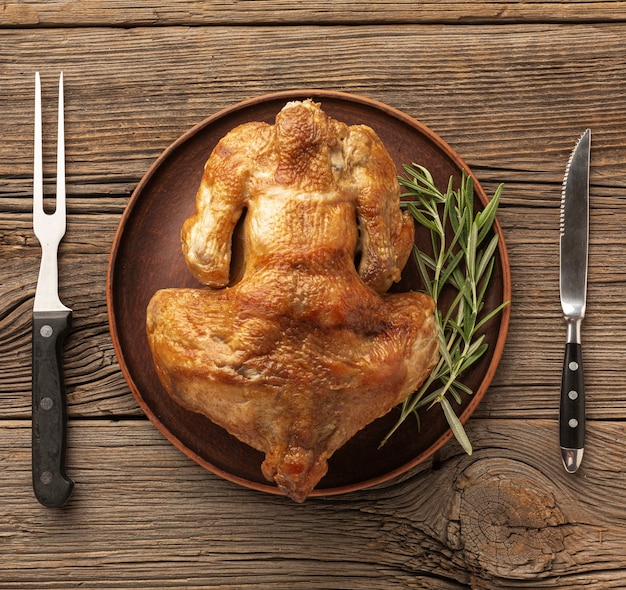
Part 3: Roasting the Turkey Breast
Now comes the fun part! Roasting a turkey breast is a simple process, but a few key steps make all the difference. Remember, we want that juicy, tender meat and crispy skin, and we're going to make it happen.
Step 1: Preheat Your Oven
Preheat your oven to 325°F (160°C). This is a good starting temperature for roasting a turkey breast. It allows the meat to cook slowly and evenly, preventing it from drying out.
Step 2: Choose the Right roasting pan
You want a roasting pan that's just big enough to hold your turkey breast comfortably. Don't crowd it! If your turkey breast is a bit long, you can trim the ends to fit the pan better. It's a common trick, and it won't affect the flavor.
Step 3: Use a Roasting Rack
A roasting rack is an essential tool for roasting turkey breast. It lifts the turkey breast off the bottom of the pan, allowing air to circulate around it, which helps to cook it more evenly and achieve that crispy skin we're aiming for.
Step 4: Roast the Turkey Breast
Place your seasoned and brined turkey breast on the roasting rack in the prepared pan. Roast it for about 2 to 2 1/2 hours, or until a meat thermometer inserted into the thickest part of the breast registers 165°F (74°C). This ensures that the meat is cooked through and safe to eat.
Temperature and cooking time:
Here's a quick table to help you estimate the roasting time based on the oven temperature:
| Oven Temperature | Cooking Time (7 lb breast) |
|---|---|
| 325°F (160°C) | 2-2 1/2 hours |
| 350°F (175°C) | 1 1/2-2 hours |
Keep in mind that these are just estimates. The actual cooking time may vary depending on the size and thickness of your turkey breast, as well as your oven's temperature. It's always best to use a meat thermometer to check for doneness.
Step 5: Basting for Extra Juiciness
To keep your turkey breast extra juicy, you can baste it every 30 minutes or so. Simply use a spoon to ladle the turkey drippings over the breast. This helps to keep the meat moist and tender. If you're using a water bath, you don't need to baste as often, as the steam helps with moisture retention.
Part 4: Checking for Doneness
You're nearing the end of your turkey roasting journey, and now it's time to check for doneness. We want to make sure that turkey breast is cooked through but not overcooked. There are a few ways to check, but the most accurate method is using a meat thermometer.
Using a Meat Thermometer
This is the gold standard for checking doneness. Insert the thermometer into the thickest part of the breast, ensuring it doesn't touch any bone. The turkey breast is cooked through when the thermometer registers 165°F (74°C). No guesswork, no worries.
Checking for Doneness by Pressing
You can also check for doneness by pressing on the breast. If it feels firm and springy, it's cooked through. If it feels soft and jiggly, it needs a bit more time in the oven. However, this method is less reliable than using a meat thermometer.
Checking for Doneness by Looking at the Juices
Another way to check for doneness is to look at the juices. When the turkey breast is cooked through, the juices should run clear. If they're still pink, it needs to cook a bit longer.
Part 5: Let It Rest
Once the turkey breast is cooked, it's time to give it a break. Don't carve it right away! Let it rest for 10-15 minutes before carving. This allows the juices to redistribute throughout the meat, making it even more tender and flavorful. Think of it as a little post-workout recovery time for your turkey breast.
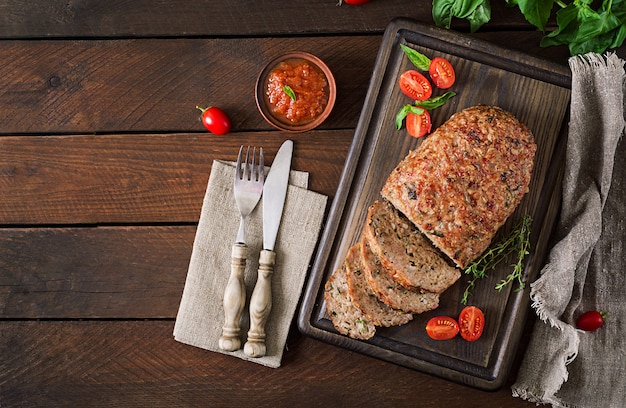
Part 6: Carving and Serving
The turkey breast is cooked, rested, and ready to be carved. It's time to show off your skills!
Carving Tips:
- Use a sharp knife: A sharp carving knife makes carving a breeze. Don't try to muscle through it with a dull knife; it will just make a mess.
- Carve along the grain: This helps to keep the meat intact and prevents it from tearing. Carve slices that are about 1/4 inch thick.
- Remove the skin: You can remove the skin before or after carving. If you remove it before carving, you can use it to make turkey stock or gravy.
Serving Suggestions:
Serve your roasted turkey breast with all your favorite sides. Here are a few ideas:
- mashed potatoes: A classic comfort food that always pairs well with turkey.
- Stuffing: A must-have for any thanksgiving feast, you can make it with bread, vegetables, herbs, and sausage for a hearty and flavorful side.
- Gravy: Make gravy from the turkey drippings for a rich and flavorful sauce. You can also buy gravy from the store for a quick option.
- Cranberry sauce: A tart and tangy side dish that complements the richness of the turkey breast.
Part 7: Storing Leftovers
If you have leftover turkey breast, you're in luck! You can store it in the refrigerator for up to 4 days. Just let it cool completely before storing it. You can also freeze leftover turkey breast for up to 2 months. To freeze it, wrap it tightly in plastic wrap and aluminum foil or put it in a freezer-safe bag. To defrost, just place it in the refrigerator overnight.
Part 8: Common Mistakes to Avoid
Over the years, I've learned a thing or two about roasting turkey breast, and I've seen my fair share of common mistakes. Here are a few things to avoid:
- Overcrowding the pan: Make sure your turkey breast has space to breathe. Don't cram it into a small pan, as this can lead to uneven cooking and soggy skin. Use a roasting rack for better air circulation.
- Not letting the turkey breast rest: Carving right away after removing the turkey breast from the oven can result in dry meat. Give it a 10-15 minute rest to allow the juices to redistribute. Patience is key!
- Overcooking the turkey breast: Turkey breast is delicate, so it's easy to overcook it. Use a meat thermometer to make sure it's cooked through but not dry. You can always cook it for a few minutes longer if you're unsure, but it's always better to undercook than overcook.
- Not basting the turkey breast: Basting the turkey breast with its juices or melted butter helps to keep it moist and tender. You can baste it every 30 minutes or so, but if you use a water bath, you don't really need to baste as much.
Part 9: FAQs
Here are some frequently asked questions about roasting a 7 lb turkey breast.
1. How long does it take to roast a 7 lb turkey breast?
It takes about 2 to 2 1/2 hours to roast a 7 lb turkey breast, but the cooking time can vary depending on the size and thickness of your turkey breast, as well as your oven's temperature. It's always best to use a meat thermometer to ensure that the turkey breast is cooked through.
2. Can I roast a turkey breast without brining it?
Yes, you can roast a turkey breast without brining it, but it won't be as juicy as a brined turkey breast. If you don't have time to brine your turkey breast, be sure to baste it regularly during cooking to help keep it moist. You could also try injecting a bit of butter or broth under the skin for added moisture.
3. What should I do if my turkey breast is overcooked?
If your turkey breast is overcooked, there isn't much you can do to save it. You can try to carve it into thin slices and serve it with gravy or other sauces to help mask the dryness. You might be better off using it for sandwiches or in another dish where the dryness won't be as noticeable. You can also shred it and use it in soups or casseroles.
4. What's the best way to carve a turkey breast?
The best way to carve a turkey breast is to use a sharp carving knife. First, remove the skin from the turkey breast. Then, slice the turkey breast into thin slices. If you're serving it whole, make sure to carve along the grain of the meat. This will make it easier to slice and eat. If you're using a carving knife for the first time, check out some online videos for tips.
5. What can I do with leftover turkey breast?
You can use leftover turkey breast in a variety of dishes. Here are a few ideas:
- turkey sandwiches: This is a classic way to use leftover turkey breast. You can use it in a simple turkey sandwich or get creative and add other ingredients like lettuce, tomato, cheese, and avocado. You can also use it to make a turkey salad sandwich.
- turkey soup: Add leftover turkey breast to your favorite soup recipe for a hearty and satisfying meal. You can also use it in a turkey noodle soup.
- Turkey casserole: Use leftover turkey breast in a casserole for a quick and easy meal. You can add other ingredients like vegetables, cheese, and pasta.
- Turkey enchiladas: Use leftover turkey breast in enchiladas for a delicious and comforting meal. You can add other ingredients like cheese, onions, and peppers.
- Turkey tacos: Use leftover turkey breast in tacos for a quick and easy meal. You can add other ingredients like cheese, lettuce, tomato, and avocado.
Part 10: Additional Tips
Roasting the Turkey Breast:
- Water bath: For extra moisture, you can use a water bath. This involves placing a roasting pan filled with water in the bottom of the oven, creating a steamy environment that helps to keep the turkey breast moist.
- Cover with foil: You can cover the turkey breast with foil for the first part of the cooking time to help keep it moist. Then, remove the foil for the last 30 minutes of cooking to allow the skin to crisp up.
Seasoning the Turkey Breast:
There are endless possibilities for seasoning a turkey breast. Here are a few ideas:
- Classic: Salt, pepper, garlic powder, onion powder
- Herb-infused: Rosemary, thyme, sage, oregano
- Citrusy: Lemon zest, orange zest, lemon juice
- Spicy: Cayenne pepper, paprika, chili powder
- Sweet and savory: Brown sugar, maple syrup, Dijon mustard
Additional Tips for a Juicy Turkey Breast:
- Use a meat thermometer: This is essential for ensuring that the turkey breast is cooked through. Don't rely on guessing or visual cues.
- Let the turkey breast rest: Don't carve it right away. Let it rest for 10-15 minutes to allow the juices to redistribute.
- Don't overcook: Turkey breast is delicate, so it's easy to overcook it. Use a meat thermometer to make sure it's cooked through but not dry. It's always better to undercook than overcook.
- Baste regularly: Basting the turkey breast with its juices or melted butter helps to keep it moist and tender. You can baste it every 30 minutes or so.
- Use a roasting rack: This allows air to circulate around the turkey breast, resulting in a more evenly cooked and crispy skin. It also prevents the bottom of the turkey from sitting in the juices, which can make it soggy.
Remember, roasting a turkey breast is all about balance: you want that perfect combination of juicy meat and crispy skin. Follow these tips and tricks, and you'll be on your way to creating a delicious and impressive turkey breast that everyone will love.
Part 11: Final Thoughts
I hope this article has given you the confidence to tackle roasting a 7 lb turkey breast. It's a simple process, and with a few key tips, you can create a delicious and impressive meal. Enjoy the process and the delicious results!
Oh, and don't forget to save some for yourself! There's nothing quite like a slice of perfectly roasted turkey breast, and I wouldn't want you to miss out. I usually have a little slice with some cranberry sauce, while I'm waiting for everyone else to arrive. It's a little indulgence that I can't resist.
Everyone is watching

How to Cook Frozen Lobster Tails Perfectly: A Step-by-Step Guide
RecipesLobster. Just the word conjures up images of lavish meals, special occasions, and a taste of luxury. But let's...

Pigs in a Blanket Cooking Time: How Long to Bake for Perfect Results
RecipesAh, pigs in a blanket. Just the name conjures up images of those delightful little parcels of crispy pastry en...

Pork Fillet Cooking Time: How Long to Cook It Perfectly
RecipesPork fillet, or tenderloin as it's sometimes called, is a real favourite in our house. It's so versatile, and...

The Ultimate Guide to Tender, Juicy Pulled Pork
RecipesRight, let's talk pulled pork. It's one of those dishes that just screams "comfort food," doesn't it? I mean...

The Ultimate Guide to Cooking Sweet Potatoes: From Roasting to Mashing
RecipesSweet potatoes. Just the name conjures up images of warm, comforting dishes, bursts of vibrant color, and a to...