Ah, shrimp. Those tiny crustaceans that can transform a simple meal into a culinary masterpiece – if you cook them right. You know the feeling – a picture-perfect plate of plump, juicy shrimp, perfectly cooked. But more often than not, we end up with rubbery, overcooked specimens, or worse, undercooked and potentially dangerous.
Been there, done that. I've spent countless hours in the kitchen experimenting, trying to nail the perfect shrimp cook. From flipping through cookbooks to seeking advice from seasoned chefs (okay, maybe just Google), I've learned a thing or two about these delicate crustaceans. Over time, I’ve developed a system, a method, a secret recipe (no, it’s not a sauce, just pure knowledge) that ensures my shrimp are always cooked to perfection.
And now, I'm ready to share my secrets with you. Get ready to kiss those rubbery shrimp goodbye and embrace the succulent, juicy, and oh-so-delicious world of perfectly cooked shrimp.
(Part 1) The Basics: Unveiling the Shrimp’s Inner Workings
Before we dive into cooking techniques, let's talk about the anatomy of a shrimp. This knowledge is key because it helps you determine cooking times, methods, and how to tell if they’re truly done.
Shrimp Anatomy 101: What Makes Shrimp Tick?
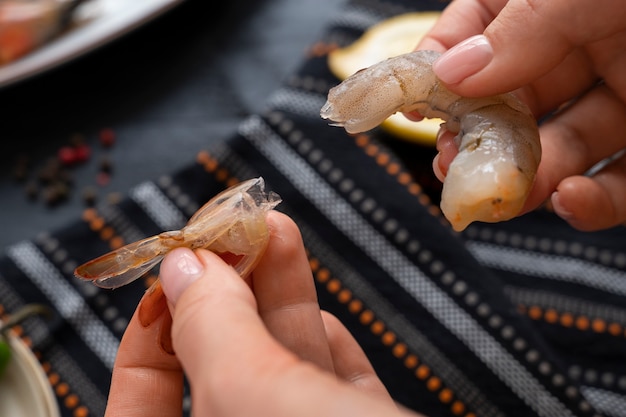
Shrimp, like all crustaceans, have a tough outer shell called an exoskeleton. This armor protects them, but it can also be a pain (literally) if it’s not cooked properly. This exoskeleton is the culprit behind those tough, rubbery shrimp you’ve encountered.
The good news is, the exoskeleton is also our guide to determining doneness. We'll use a simple trick called the “tail test” to judge whether your shrimp are cooked through.
(Part 2) The Tail Test: Your Ultimate shrimp guide
The tail test is a simple, fool-proof method for determining if your shrimp are cooked through. It’s fast, easy, and surprisingly accurate. No more guessing!
How to Master the Tail Test:
1. Observe the tail: Look closely at the shrimp's tail. If it's curled inwards and appears slightly opaque, it's done. If it's still straight and translucent, it needs more cooking time.
2. Touch the tail: Gently touch the tail. If it feels firm and springy, you're good to go. If it feels soft and squishy, it needs a bit more time on the heat.
3. Check the color: Cooked shrimp should turn a beautiful pink or orange, depending on the variety. If they are still gray or translucent, they require more cooking time.
What the Tail Tells Us:
The tail acts as a reliable indicator of doneness because it’s the last part of the shrimp to cook. When the tail is curled and opaque, it signifies that the entire shrimp has reached the safe internal temperature of 145°F.
(Part 3) Cooking Methods: Grill, Pan, or Boil?
Now that you’ve got the basics down, let’s delve into different cooking methods, each bringing its own unique flavor and texture to the table.
1. Grilling: Shrimp, Sunshine, and Flavor
Grilling shrimp is a fantastic way to add a smoky flavor and a beautiful char to your dish. It’s perfect for summer barbecues or any time you’re craving a touch of outdoor cooking magic.
How to Grill Shrimp Like a Pro:
1. Prepare the grill: Preheat your grill to medium-high heat. Make sure it’s clean and lightly oiled to prevent sticking.
2. Season your shrimp: Season your shrimp generously with salt and pepper. Add other spices or herbs if you like, such as garlic powder, paprika, or lemon zest.
3. Grill for 2-3 minutes per side: Place the shrimp on the grill and cook for about 2-3 minutes per side, or until they are pink and opaque. The tail should be curled inwards.
4. Don’t overcook: Shrimp cook quickly, so don't overcook them. Overcooked shrimp will be tough and rubbery.
2. Pan-Frying: Fast, Flavorful, and Easy
pan-frying shrimp is a quick and easy method that delivers a crispy exterior and a juicy interior. It’s perfect for weeknight dinners or when you want a delicious meal ready in a flash.
How to Pan-Fry Shrimp to Perfection:
1. Heat the pan: Heat a large skillet or frying pan over medium-high heat. Add a tablespoon or two of oil. You want the oil to be shimmering and hot before adding the shrimp.
2. Season your shrimp: Season your shrimp generously with salt and pepper. You can also add other spices or herbs. For a simple flavor boost, try a squeeze of lemon juice and a sprinkle of chopped fresh herbs like parsley or dill.
3. Cook for 2-3 minutes per side: Add the shrimp to the pan and cook for about 2-3 minutes per side, or until they are pink and opaque. The tail should be curled inwards.
4. Don’t overcrowd the pan: If you overcrowd the pan, the shrimp will steam instead of fry, resulting in a less appealing texture. Cook the shrimp in batches if necessary.
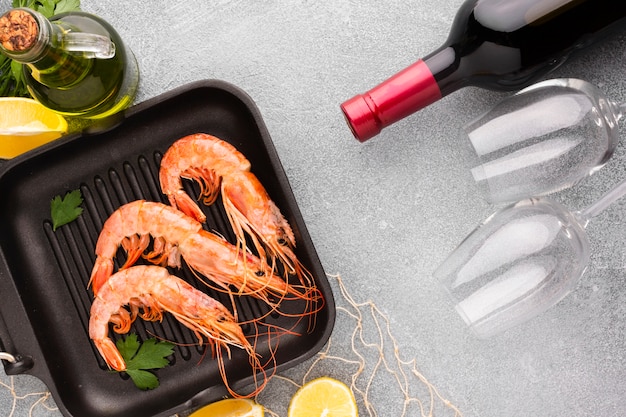
3. Boiling: Simple and Delicious
Boiling shrimp is a classic method that’s quick, easy, and perfect for preparing shrimp for salads or other dishes.
How to Boil Shrimp to Tender Perfection:
1. Bring water to a boil: Fill a large pot with water and bring it to a rolling boil. Add salt to season the water – about 1 tablespoon per quart.
2. Add shrimp: Gently add the shrimp to the boiling water. Avoid overcrowding the pot. You want the shrimp to have room to cook evenly.
3. Cook for 2-3 minutes: Cook the shrimp for 2-3 minutes, or until they turn pink and opaque. You can also test the doneness with the tail test.
4. Drain and serve: Use a slotted spoon to remove the shrimp from the pot and drain them in a colander. Serve immediately.
(Part 4) shrimp size Matters: Big, Medium, or Small?
The size of your shrimp can have a significant impact on cooking time. Larger shrimp, naturally, need more time to cook through than their smaller counterparts.
Shrimp Size Chart: Your Guide to Perfect Timing
| Shrimp Size | Approximate Count per Pound | Cooking Time (Grilling/Pan-Frying) | Cooking Time (Boiling) |
|---|---|---|---|
| Colossal | 4-6 | 4-5 minutes per side | 3-4 minutes |
| Jumbo | 8-12 | 3-4 minutes per side | 2-3 minutes |
| Large | 16-20 | 2-3 minutes per side | 1-2 minutes |
| Medium | 21-30 | 1-2 minutes per side | 1 minute |
| Small | 31-40 | 1 minute per side | 30-60 seconds |
How to Use the Chart:
This chart provides a general guideline for cooking time based on shrimp size. However, keep in mind that cooking times can vary depending on the thickness of your shrimp and your desired level of doneness. It’s always a good idea to start checking for doneness a minute or two before the recommended cooking time, especially when dealing with larger shrimp.
(Part 5) The Temperature Factor: How Heat Affects Doneness
Temperature is the other crucial factor in cooking shrimp. If you’re grilling or pan-frying, you want the heat to be high enough to create a nice char without burning the shrimp. If you’re boiling, you want the water to be at a rolling boil to cook the shrimp evenly and quickly.
Tips for Achieving the Perfect Temperature:
1. Grill: Preheat your grill to medium-high heat (around 400°F). You want to see a nice glow coming from the grill grates.
2. Pan-frying: Heat a large skillet or frying pan over medium-high heat. The oil should be shimmering and hot before adding the shrimp.
3. Boiling: Bring the water to a rolling boil before adding the shrimp. The water should be bubbling vigorously.
What Happens When the Temperature is Off?
If the temperature is too low, the shrimp will take longer to cook and may become rubbery. If the temperature is too high, the shrimp will cook too quickly and may burn before they have a chance to cook through.
(Part 6) Don’t Overcook: The Biggest Shrimp Mistake
The most common shrimp cooking mistake is overcooking. Overcooked shrimp are tough, rubbery, and taste dry. They're a culinary tragedy, a stark contrast to the juicy, flavorful shrimp we dream of.
Signs of Overcooked Shrimp:
1. Hard and rubbery texture: Overcooked shrimp will have a tough, rubbery texture, rather than a tender, juicy one.
2. Dry and flavorless: Overcooked shrimp will also be dry and flavorless. The moisture in the shrimp evaporates during cooking, resulting in a less flavorful bite.
3. Pink or orange color but translucent flesh: Overcooked shrimp may still be pink or orange, but the flesh will be opaque. It will look like it has been cooked, but it’s not as firm as it should be.
How to Avoid Overcooking:
1. Cook shrimp quickly: Shrimp cook quickly, so don’t overcook them. Use a timer to keep track of cooking time.
2. Use the tail test: The tail test is the best way to determine if your shrimp are done.
3. Start checking early: Start checking the shrimp for doneness a minute or two before the recommended cooking time. This will help you avoid overcooking, especially for larger shrimp.
(Part 7) Shrimp Inspiration: Beyond the Basic Recipe
Now that you’ve mastered the basics, let’s explore some creative shrimp recipes to elevate your culinary game.
1. Spicy Garlic Shrimp: A Burst of Flavor
This recipe is simple, flavorful, and incredibly easy to make. The garlic adds a pungent aroma, while the chili flakes add a touch of heat. It’s a perfect dish for those who love a little kick in their food.
Ingredients:
- 1 pound shrimp, peeled and deveined- 2 tablespoons olive oil- 4 cloves garlic, minced- 1/2 teaspoon red pepper flakes- Salt and pepper to taste- Chopped fresh parsley (optional)
Instructions:
1. Heat the olive oil in a large skillet over medium-high heat.
2. Add the shrimp and cook for 2-3 minutes per side, or until pink and opaque.
3. Add the garlic and red pepper flakes to the skillet and cook for 1 minute, or until fragrant.
4. Season with salt and pepper.
5. Garnish with chopped parsley and serve immediately over rice or noodles.
2. Lemon Herb Shrimp Skewers: A Summer Delight
These skewers are perfect for grilling or pan-frying. The lemon juice adds a bright acidity, while the herbs add a fresh flavor. They’re light, refreshing, and perfect for a summer barbecue.
Ingredients:
- 1 pound shrimp, peeled and deveined- 1 tablespoon olive oil- Juice of 1 lemon- 1 tablespoon chopped fresh herbs (such as parsley, dill, or thyme)- Salt and pepper to taste- Wooden skewers, soaked in water for 30 minutes
Instructions:
1. In a large bowl, combine the shrimp, olive oil, lemon juice, herbs, salt, and pepper.
2. Thread the shrimp onto the skewers, leaving a little space between each one.
3. Grill or pan-fry the skewers for 2-3 minutes per side, or until the shrimp are pink and opaque.
4. Serve immediately with a side of your favorite salad or grilled vegetables.
3. Coconut Shrimp: A Tropical Treat
This recipe is a twist on the classic dish. The coconut flakes create a crispy coating, while the dipping sauce adds a sweet and tangy flavor. It’s a fun and delicious way to enjoy shrimp.
Ingredients:
- 1 pound shrimp, peeled and deveined- 1 cup unsweetened shredded coconut- 1/2 cup all-purpose flour- 1/4 cup cornstarch- 1/2 teaspoon salt- 1/4 teaspoon black pepper- 1 egg, beaten- 1/4 cup milk- vegetable oil for frying- Sweet chili sauce for dipping (optional)
Instructions:
1. In a shallow dish, combine the flour, cornstarch, salt, and pepper.
2. In another shallow dish, combine the egg and milk.
3. In a third shallow dish, place the shredded coconut.
4. Dip each shrimp into the milk mixture, then the flour mixture, and finally the coconut mixture.
5. Heat the vegetable oil in a large skillet over medium-high heat.
6. Fry the shrimp for 2-3 minutes per side, or until golden brown and cooked through.
7. Drain the shrimp on paper towels and serve with sweet chili sauce for dipping.
(Part 8) shrimp faqs: Your Burning Questions Answered
I’ve compiled some of the most common questions about shrimp cooking to clear up any lingering doubts or concerns you may have.
1. How do I know if my shrimp is bad?
If you’re unsure about the freshness of your shrimp, here are a few signs to look for:
- Smell: fresh shrimp should have a mild, briny smell. If the shrimp smell ammonia-like, fishy, or sour, they’re bad.
- Appearance: Fresh shrimp should be firm and have a translucent, pearly gray color. If the shrimp are slimy, discolored, or have a mushy texture, they’re bad.
- Texture: Fresh shrimp should be firm and springy to the touch. If the shrimp are soft or mushy, they’re bad.
2. How long can I store shrimp in the fridge?
Fresh shrimp can be stored in the refrigerator for up to 2 days. To store shrimp properly, rinse them in cold water and pat them dry. Place the shrimp in a sealed container or plastic bag and store them in the coldest part of the refrigerator.
3. Can I freeze shrimp?
Yes, you can freeze shrimp for up to 3 months. To freeze shrimp, rinse them in cold water and pat them dry. Place the shrimp in a freezer-safe bag or container and freeze them for up to 3 months.
4. Can I cook frozen shrimp?
Yes, you can cook frozen shrimp. However, you may need to adjust the cooking time slightly. Frozen shrimp should be cooked until they are opaque and the tail is curled inwards.
5. What happens if I eat undercooked shrimp?
Eating undercooked shrimp can make you sick. Shrimp can carry bacteria that can cause food poisoning. Symptoms of food poisoning can include nausea, vomiting, diarrhea, abdominal cramps, and fever. If you experience any of these symptoms after eating shrimp, seek medical attention immediately.
Everyone is watching

How to Cook Frozen Lobster Tails Perfectly: A Step-by-Step Guide
RecipesLobster. Just the word conjures up images of lavish meals, special occasions, and a taste of luxury. But let's...

Pigs in a Blanket Cooking Time: How Long to Bake for Perfect Results
RecipesAh, pigs in a blanket. Just the name conjures up images of those delightful little parcels of crispy pastry en...

Pork Fillet Cooking Time: How Long to Cook It Perfectly
RecipesPork fillet, or tenderloin as it's sometimes called, is a real favourite in our house. It's so versatile, and...

The Ultimate Guide to Tender, Juicy Pulled Pork
RecipesRight, let's talk pulled pork. It's one of those dishes that just screams "comfort food," doesn't it? I mean...

The Ultimate Guide to Cooking Sweet Potatoes: From Roasting to Mashing
RecipesSweet potatoes. Just the name conjures up images of warm, comforting dishes, bursts of vibrant color, and a to...