For a long time, I thought making pasta at home was a culinary feat reserved for experienced chefs. I pictured perfectly smooth sheets of pasta, delicate spaghetti strands, and pillowy gnocchi, all seemingly impossibly complex. But life has a way of pushing you outside your comfort zone, and mine was the fear of homemade pasta. So, one day, I decided to roll up my sleeves, grab a cookbook, and dive headfirst into the world of fresh pasta. Let me tell you, it wasn't nearly as intimidating as I'd imagined. In fact, it was incredibly rewarding!
Today, I'm sharing my journey, my learnings, and my newfound passion for fresh pasta with you. This isn't just a recipe guide; it's a comprehensive exploration of homemade pasta – from understanding the essential ingredients to mastering the techniques, from choosing the perfect sauce to serving it up with style. So, grab a comfy spot, pour yourself a cuppa, and get ready to embark on this delicious adventure with me!
Part 1: The Allure of Homemade Pasta
Why Make Pasta at Home?
You might be wondering, "Why bother with homemade pasta when perfectly good pasta is readily available at the supermarket?" And you know, there's nothing wrong with store-bought pasta. It's convenient, affordable, and often delicious. But, trust me, making your own pasta unlocks a whole new level of enjoyment and satisfaction.
- Freshness and Flavor: The difference in texture and flavour is truly remarkable. Homemade pasta is bursting with fresh, vibrant flavour because it's made with simple, high-quality ingredients. The texture, oh my! It's so soft, chewy, and melts in your mouth. It's a world away from the sometimes slightly dry and starchy store-bought versions.
- Control over Ingredients: Making your own pasta gives you complete control over the ingredients. You can use organic flour, free-range eggs, or even experiment with different types of flours like spelt or kamut. It's a chance to tailor your pasta to your specific dietary needs and preferences.
- Creativity and Fun: Homemade pasta is a fun, creative outlet. You can experiment with shapes, colours, and fillings. It's a chance to get your hands dirty, explore your culinary side, and create something truly unique that reflects your personal style.
- Impress Your Guests: Let's be honest, there's something incredibly impressive about serving up a plate of homemade pasta. It's a culinary feat that always gets people talking and leaves them wanting more. It's a way to showcase your skills and impress even the most discerning palates.
- Satisfying Process: Making pasta is a meditative process. It's a chance to slow down, focus on the task at hand, and enjoy the simple pleasure of creating something delicious. It's a way to disconnect from the hustle and bustle of everyday life and connect with a more mindful and creative side of yourself.
Part 2: Essential Ingredients
The Flour: The Foundation of Your Pasta
The type of flour you use is crucial to the texture and flavour of your pasta. Different flours have different gluten levels and protein content, which affect how the dough behaves and the final outcome. Here's a breakdown of popular flours used for homemade pasta:
- "00" Flour (Doppio Zero): This finely ground flour is the classic choice for pasta making. It's soft, silky, and produces a smooth, delicate pasta with a luxurious mouthfeel.
- Semolina Flour: This coarser, more coarsely ground flour made from durum wheat is known for its slightly grainy texture and its ability to hold its shape during cooking. It gives pasta a satisfying chewiness.
- All-Purpose Flour: While not the ideal choice for pasta, all-purpose flour can be used in a pinch. It's not as fine as "00" flour, so your pasta may have a slightly chewier texture.
- Whole Wheat Flour: If you're looking for a healthier option, try whole wheat flour. It will add a nutty flavour and some extra fibre to your pasta. However, it can be a bit more challenging to work with because of its higher gluten content.
- Other Flours: You can also experiment with other flours like spelt, kamut, or even rice flour. Just remember that these flours will have different gluten levels, which may affect the texture of your pasta. Be prepared to adjust your dough consistency accordingly.
The Eggs: The Binding Agent
Eggs are the key to pasta's characteristic chewiness and elasticity. They act as a binder, holding the flour together to form a cohesive dough.
- Large Eggs: Use large eggs for the best results. You can substitute one large egg with two egg yolks for a richer pasta dough, adding a touch of luxuriousness.
- Room Temperature Eggs: Bring your eggs to room temperature before using them. This will help them incorporate better into the flour, resulting in a smoother and more consistent dough.
The Water: The Key to Hydration
Water plays a crucial role in pasta dough. It helps to activate the gluten in the flour, making it elastic and pliable.
- Cold Water: Use cold water to keep the gluten from developing too much, which can make your dough tough.
- Adding Water Gradually: Don't add all the water at once. Start with a little bit, then add more as needed until you have a smooth, cohesive dough. This ensures that the dough is properly hydrated without becoming too wet.
Optional Ingredients
While the basic pasta dough is made with flour, eggs, and water, you can add other ingredients to enhance the flavour or create unique pasta variations. Experiment and find what suits your taste!
- Olive Oil: Adding a tablespoon of olive oil to your pasta dough will make it more tender and prevent it from sticking. It also adds a subtle richness to the flavour.
- Salt: A pinch of salt adds flavour and helps to regulate the gluten development in the dough. It also enhances the flavour of the pasta itself.
- Herbs: Fresh herbs like parsley, basil, or oregano can be added to the dough for a burst of flavour. It's a great way to add a touch of freshness and complexity to your pasta.
- Spices: You can also experiment with spices like paprika, turmeric, or chilli flakes for a touch of heat or colour. It's a fun way to play with different flavour profiles and add a personal touch.
- Vegetables: Finely grated vegetables like carrots or zucchini can be incorporated into the dough for a healthy and colourful twist. It's a great way to sneak in extra nutrients and make your pasta more visually appealing.
Part 3: The Dough-Making Process
Bringing It All Together
Now comes the exciting part – making the pasta dough! This is where the magic begins!
- Combine the Flour and Salt: In a large bowl, whisk together the flour and salt. This ensures that the salt is evenly distributed throughout the dough.
- Create a Well: Make a well in the centre of the flour. This creates a space for the wet ingredients to be added.
- Add the Eggs and Water: Pour the eggs and water into the well.
- Start Mixing: Use a fork to gently whisk the eggs and water, gradually incorporating the flour from the sides. Be patient at this stage, and don't rush the process.
- Kneading the Dough: Once the dough starts to come together, turn it out onto a lightly floured surface and knead for about 10 minutes, or until it's smooth and elastic. This is where you develop the gluten structure, giving the pasta its characteristic chewiness.
- Resting the Dough: Wrap the dough in plastic wrap and let it rest at room temperature for at least 30 minutes. This allows the gluten to relax, making the dough easier to work with and resulting in a more tender pasta.
Tips for perfect pasta Dough
- Don't Overwork the Dough: Over-kneading can make your pasta dough tough and rubbery. Aim for a smooth, elastic dough, but don't overdo it.
- Keep the Dough Moist: If the dough feels dry, add a teaspoon of water at a time until it's smooth.
- Use a Flour-Dusted Surface: Keep your work surface lightly dusted with flour to prevent the dough from sticking. It's also a good idea to lightly dust the dough itself to prevent it from sticking to your hands.
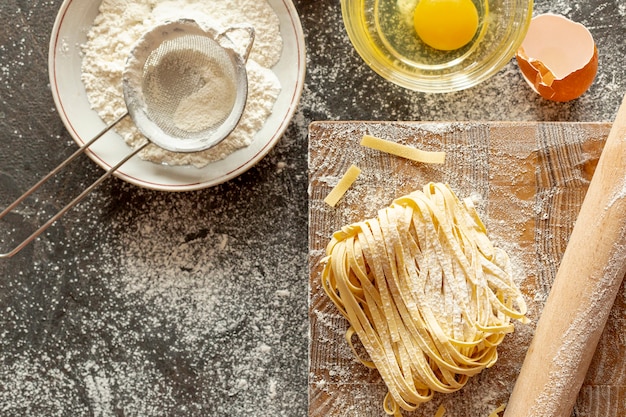
Part 4: Shaping Your Pasta
The Classics: Spaghetti, Fettuccine, and More
Once your dough has rested, you're ready to shape it into your pasta of choice! There's a whole world of pasta shapes to explore, each with its own unique characteristics.
- Rolling the Dough: Divide the dough into smaller pieces and use a pasta machine or rolling pin to roll it out into thin sheets.
- Cutting the Pasta: Use a pasta cutter or a sharp knife to cut the rolled-out dough into your desired shapes.
- Spaghetti: Roll the dough into a long sheet and cut it into thin strands.
- Fettuccine: Roll the dough into a long sheet and cut it into wider strands.
- Penne: Roll the dough into a long sheet, then use a penne cutter or a sharp knife to cut it into small tubes.
- Ravioli: Roll the dough into a thin sheet and cut it into squares. Place a filling in the centre of each square, fold the dough over, and crimp the edges to seal.
Beyond the Basics: Getting Creative with Shapes
Once you've mastered the basic shapes, feel free to experiment with different techniques to create unique pasta shapes.
- Homemade Pasta Machine: A pasta machine is a fantastic investment for creating consistent shapes. They come in various sizes and models, offering different levels of automation and functionality. They can also help to ensure that your pasta is rolled out evenly, resulting in a more consistent texture.
- Rolling Pin: If you don't have a pasta machine, you can use a rolling pin to roll out your dough. It takes a bit more effort and may require more patience, but it's a viable option for smaller batches of pasta.
- Pasta Cutters: Pasta cutters are essential tools for making different shapes, from spaghetti and fettuccine to ravioli and tortellini.
- Knives: A sharp knife can be used to cut various pasta shapes, especially when you don't have a pasta cutter.
- Molds: There are various pasta molds available that you can use to create intricate shapes like orecchiette or tortellini.
Part 5: Cooking Your Pasta
Boiling Water: The Perfect Bath
Now that your pasta is ready, it's time to cook it to perfection!
- Bring a Large Pot of Water to a Rolling Boil: Use a large pot so that there's plenty of room for the pasta to cook evenly.
- Add Salt: Generously salt the boiling water. This will season the pasta and help to prevent it from sticking together.
- Add the Pasta: Gently add the pasta to the boiling water, making sure to stir it immediately to prevent it from sticking together.
- Stir Frequently: Stir the pasta frequently to prevent it from sticking to the bottom of the pot.
- Cook Until Al Dente: Pasta is cooked "al dente" when it's still firm to the bite. This means that it's cooked through but still has a slight resistance when you bite into it.
- Drain the Pasta: Once the pasta is cooked, drain it in a colander.
Tips for cooking pasta
- Don't Overcook: Overcooked pasta will be mushy and bland. It's important to cook the pasta al dente, as this will ensure that it has a nice bite and doesn't become overly soft.
- Reserve Some pasta water: Save a cup of pasta water after draining the pasta. It can be used to thin out your sauce or to create a creamy texture. It's a secret ingredient for creating a more luscious and flavorful sauce.
- Don't Rinse the Pasta: Rinsing the pasta will wash away the starch, which helps to create a creamy sauce. This starch is essential for helping the sauce cling to the pasta, giving it a more flavorful and satisfying texture.
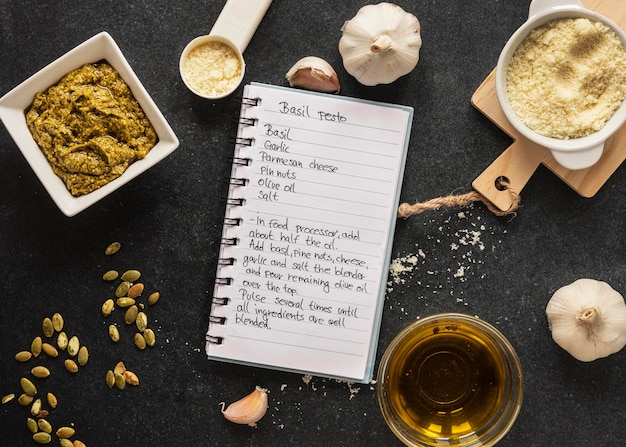
Part 6: Sauce Perfection: Finding Your Perfect Match
A World of Flavours: Exploring pasta sauces
Now comes the most exciting part – choosing the perfect sauce for your homemade pasta! The possibilities are endless, from classic Italian recipes to contemporary creations.
- Classic Tomato Sauces: Tomato sauces are a staple for pasta, offering a range of flavours and textures. You can go for a simple tomato sauce, a richer tomato sauce with meat, or even a vibrant tomato sauce with herbs and vegetables.
- Creamy Sauces: Creamy sauces add richness and decadence to pasta dishes. You can use cream, ricotta cheese, or even a combination of both to create a variety of creamy sauces.
- Oil-Based Sauces: Olive oil-based sauces are light and refreshing, perfect for showcasing the flavours of fresh herbs and vegetables. They can also be used as a base for more complex sauces.
- Meat-Based Sauces: Meat-based sauces add hearty flavour and protein to pasta dishes. You can use ground beef, sausage, or even a combination of meats to create a variety of flavorful sauces.
- Seafood Sauces: Seafood sauces are a delicious way to add a touch of the sea to your pasta. You can use fresh seafood like shrimp, mussels, or clams to create a variety of flavorful sauces.
Creating a Sauce from Scratch
Making your own pasta sauce is a rewarding experience.
- Sautéing: Sautéing onions, garlic, and other vegetables is a common starting point for many pasta sauces. This is where you develop the base flavour of the sauce.
- Simmering: Simmering the sauce for a long time allows the flavours to develop and meld. It's a chance to bring out the depth of the ingredients.
- Seasoning: Adjusting the seasoning with salt, pepper, and herbs is essential to create a well-balanced sauce.
Using Store-Bought Sauce
There's no shame in using store-bought pasta sauce. It's a convenient option when you're short on time.
- Enhance the Flavour: You can enhance the flavour of store-bought sauce by adding fresh herbs, spices, or a splash of wine. This helps to add a personal touch and elevate the flavour.
- Add Some Body: You can thicken the sauce by adding a tablespoon of cornstarch or flour. This will give the sauce a more luscious and satisfying texture.
Part 7: Serving with Style
Plating and Presentation
The way you present your pasta can make a big difference.
- Use a Beautiful Plate: Choose a plate that complements the colours of your pasta and sauce.
- Portion Size: Don't overload your plate. A generous portion is enough. It's about quality over quantity.
- Garnish: Add a garnish like fresh parsley, grated parmesan cheese, or a drizzle of olive oil to make your pasta look even more appealing. A simple garnish can elevate the visual appeal of the dish.
Pairing Pasta with Wine
Wine and pasta are a match made in heaven. The right wine pairing can enhance the flavours of your pasta dish.
- Tomato Sauces: Pair tomato-based sauces with red wines like Chianti or Pinot Noir.
- Creamy Sauces: Creamy sauces pair well with white wines like Chardonnay or Sauvignon Blanc.
- Oil-Based Sauces: Oil-based sauces can be paired with lighter red wines like Beaujolais or Pinot Grigio.
Part 8: The Pasta Pantry: Essential Tools
Making Your Pasta Dreams Come True
To make your pasta journey even smoother, consider investing in a few essential tools. These tools will make the pasta-making process easier and more enjoyable.
| Tool | Description |
|---|---|
| Pasta Machine | A pasta machine helps to roll out dough evenly and efficiently, ensuring perfectly shaped pasta. It takes the guesswork out of rolling out the dough and ensures consistency. |
| Rolling Pin | A rolling pin is a great alternative to a pasta machine, especially for small batches of pasta. It's a classic tool and can be used to create a variety of pasta shapes. |
| Pasta Cutter | A pasta cutter allows you to create different shapes, such as spaghetti, fettuccine, and tagliatelle. It's a must-have for those who want to experiment with different pasta shapes. |
| Sharp Knife | A sharp knife can be used to cut pasta into various shapes, especially when you don't have a pasta cutter. It's a versatile tool that can be used for a variety of tasks in the kitchen. |
| Pasta Molds | Pasta molds are available in various shapes, allowing you to create intricate pasta shapes like orecchiette or tortellini. They add a touch of elegance and creativity to your pasta dishes. |
| Large Pot | Use a large pot to cook the pasta evenly and prevent it from sticking together. A large pot ensures that there's plenty of room for the pasta to cook evenly. |
| Colander | A colander is essential for draining the cooked pasta. It's a staple in any kitchen and makes draining pasta quick and easy. |
FAQs
1. What if my pasta dough is too sticky?
If your pasta dough is too sticky, it's likely that you've added too much water. You can try adding a little more flour, a tablespoon at a time, until the dough is no longer sticky. It's important to add the flour gradually to avoid making the dough too dry.
2. What if my pasta dough is too dry?
If your pasta dough is too dry, it's likely that you haven't added enough water. Add a teaspoon of water at a time until the dough is smooth and pliable.
3. How do I know when my pasta is cooked al dente?
Pasta is cooked al dente when it's still firm to the bite. To test if it's cooked al dente, take a piece of pasta and bite into it. It should be firm but not hard. It should have a slight resistance when you bite into it.
4. What if my pasta sticks together during cooking?
If your pasta sticks together during cooking, it's likely that you didn't add enough salt to the boiling water. You can also try stirring the pasta frequently to prevent it from sticking.
5. What happens if I overcook my pasta?
Overcooked pasta will be mushy and bland. If you overcook your pasta, it's best to start again. It's important to keep a close eye on the pasta while it's cooking to ensure that it doesn't become overcooked.
That's it, my friends! My journey into the wonderful world of homemade pasta has been an absolute delight. Now, it's your turn. Grab your flour, eggs, and a touch of courage – and get ready to create your own pasta masterpieces!
Everyone is watching

How to Cook Frozen Lobster Tails Perfectly: A Step-by-Step Guide
RecipesLobster. Just the word conjures up images of lavish meals, special occasions, and a taste of luxury. But let's...

Pigs in a Blanket Cooking Time: How Long to Bake for Perfect Results
RecipesAh, pigs in a blanket. Just the name conjures up images of those delightful little parcels of crispy pastry en...

Pork Fillet Cooking Time: How Long to Cook It Perfectly
RecipesPork fillet, or tenderloin as it's sometimes called, is a real favourite in our house. It's so versatile, and...

The Ultimate Guide to Tender, Juicy Pulled Pork
RecipesRight, let's talk pulled pork. It's one of those dishes that just screams "comfort food," doesn't it? I mean...

The Ultimate Guide to Cooking Sweet Potatoes: From Roasting to Mashing
RecipesSweet potatoes. Just the name conjures up images of warm, comforting dishes, bursts of vibrant color, and a to...