Let’s be honest, there’s something undeniably satisfying about sinking your teeth into a perfectly cooked rack of ribs. The meat, so tender it practically melts in your mouth, the smoky aroma that fills the air, the delightful contrast of the crispy bark against the juicy, flavorful interior – it's a culinary experience that transcends the ordinary. I've been a rib enthusiast for years, and over that time, I've learned a thing or two about making those glorious ribs a regular part of my life. This isn’t just about grilling some meat, it's about understanding the science behind the meat, mastering the art of low and slow cooking, and unleashing your inner creativity with rubs, sauces, and sides.
So, consider this your comprehensive guide to conquering the world of country ribs. Whether you're a seasoned grill master or a curious newbie, I'm here to equip you with the knowledge and techniques needed to make ribs that will leave everyone begging for more. Ready to dive in?
(Part 1) Choosing the Right Ribs – The Foundation of Flavor

Just like you wouldn't build a house without a solid foundation, you can't expect to make great ribs without starting with the right cut of meat. Two main contenders reign supreme in the rib world: baby back ribs and spare ribs. Both offer unique flavor profiles and textures, making the choice a personal one.
baby back ribs: A Delicate Delight
Baby back ribs, often the preferred choice for their smaller size and tender meat, come from the upper part of the hog, making them leaner and less fatty than their spare rib counterparts. While this might sound like a disadvantage, it actually allows for a more delicate flavour profile that many find appealing. When I first started grilling, baby backs were my go-to, I loved their relatively quick cooking time and the melt-in-your-mouth tenderness that always impressed. Plus, they look incredibly impressive on the plate, a bonus for any aspiring grill master!
Spare Ribs: A Meatier, More Robust Option
Spare ribs, on the other hand, are meatier, boasting a higher fat content and a more robust flavor. They come from the lower part of the hog and are often considered more budget-friendly. Don't let their reputation for being a little tougher fool you! With the right cooking technique, spare ribs can achieve a level of tenderness that rivals even the most delicate baby backs. The extra fat renders down, creating a rich, deep flavor that's utterly irresistible.
I've encountered some truly epic spare ribs in my time, the kind where the meat falls off the bone with just a gentle tug. It's a true testament to the power of low and slow cooking, and a reminder that the extra fat isn't a downside, but a potential for greater flavor.
A Quick Comparison: Understanding the Differences
| Feature | Baby Back Ribs | Spare Ribs |
|---|---|---|
| Size | Smaller | Larger |
| Meat | Leaner | Meatier |
| Fat Content | Less fat | More fat |
| Texture | Tender | Tougher (but can be made tender) |
| Flavor | Delicate | Rich, deep flavor |
| Price | More expensive | Less expensive |
Ultimately, the decision of which rib to choose comes down to personal preference. If you’re looking for a quick and easy option with a delicate, tender flavor, baby back ribs are a great choice. But if you’re a fan of bold flavors and hearty meals, and you're not afraid to commit to a longer cooking time, spare ribs will certainly satisfy your cravings. No matter your choice, get ready for a flavor explosion!
(Part 2) The Art of the Rub: A Symphony of Spices
Now that you've chosen your ribs, let’s talk about the magic of the rub. It’s more than just a seasoning; it’s a flavour-bomb waiting to explode on your taste buds. The dry mix, applied generously to the meat before cooking, creates a crispy, delicious bark, adding a complex layer of flavor that's simply irresistible. Think of it as the first step in a culinary masterpiece.
While there are countless store-bought rubs available, I’m a firm believer in the power of creating your own. You don't need fancy ingredients or complicated recipes. Just a few simple spices and a bit of creativity, and you're on your way to crafting a rub that’s uniquely yours.
The Essential Ingredients: Building a Flavorful Foundation
- Salt: A must-have for enhancing the natural flavor of the meat. It helps to draw out moisture and create a tender, succulent result.
- Black Pepper: A classic for adding depth and a touch of heat. Opt for freshly ground pepper for the most intense flavour.
- Paprika: A versatile spice that brings a smoky flavour and a beautiful reddish hue to the ribs. You can choose from sweet or smoked paprika, depending on your desired flavor profile.
- Garlic Powder: Adds a savory punch and a hint of garlic aroma that's hard to resist.
- Onion Powder: Contributes a touch of sweetness and complexity. It’s a perfect addition to round out the flavour profile of your rub.
This is just the foundation. From here, you can unleash your creativity by incorporating your favorite spices. I love adding a touch of cayenne pepper for a hint of heat, or a sprinkle of brown sugar for a subtle sweetness. Experiment with different spice combinations and discover your unique flavor signature.
Tips for Applying the Rub: Maximizing Flavor
- Pat the Ribs Dry: This crucial step helps the rub adhere to the meat evenly, preventing it from turning into a paste. It also allows the spices to penetrate the meat more effectively.
- Be Generous: Don't shy away from the rub! The more you use, the more intense the flavour. Work it into the crevices of the meat for maximum impact.
- Rub it In: Get your hands dirty and massage that rub into the meat. Make sure it coats the ribs evenly, ensuring that every part of the meat gets its share of flavor.
- Let it Sit: Once you've generously rubbed the ribs, let them rest in the refrigerator for at least 30 minutes, or even overnight. This allows the spices to penetrate the meat, developing the beautiful flavors that make your ribs truly exceptional.
(Part 3) Low and Slow: The Secret to Tender, fall-off-the-bone ribs
Now we’re getting into the heart of rib cooking: low and slow. It’s not just a cooking method, it’s a philosophy! It’s about understanding the science of how heat transforms meat, and embracing the slow, deliberate approach that produces the most tender, succulent ribs imaginable.
The Science of Tenderness: Breaking Down Collagen
Ribs are tough cuts of meat, packed with collagen. This protein is the key to achieving that melt-in-your-mouth texture. The secret lies in breaking it down. When cooked at high heat, the meat dries out before the collagen has a chance to transform, leaving you with tough, chewy ribs. Low and slow cooking, however, allows the collagen to break down into gelatin, making the ribs incredibly tender and juicy.
The Perfect Temperature: A Gentle Touch for Tenderness
The ideal temperature for cooking ribs is around 225°F (107°C). It’s a gentle heat, designed to allow the collagen to break down without drying out the meat. It might seem slow, but trust me, it's the secret to those perfect, fall-off-the-bone ribs.
Choosing the Right Cooking Method: Your Options for Low and Slow
There are a few tried and true methods to achieve that perfect low and slow cook, each with its own unique characteristics:
- Smoker: The traditional method, smoking adds a depth of flavor that’s truly unmatched. The slow, smoky heat creates an incredible flavor profile, turning your ribs into a culinary masterpiece. But if you don’t own a smoker, don’t despair!
- Oven: Your oven can easily achieve that low and slow cook. Simply set your oven to 225°F (107°C) and let those ribs simmer away, developing a rich flavor and tender texture.
- slow cooker: A great hands-off option, perfect for busy days. Simply place the ribs in the slow cooker, set it to low, and let it do its magic, turning tough meat into tender perfection.
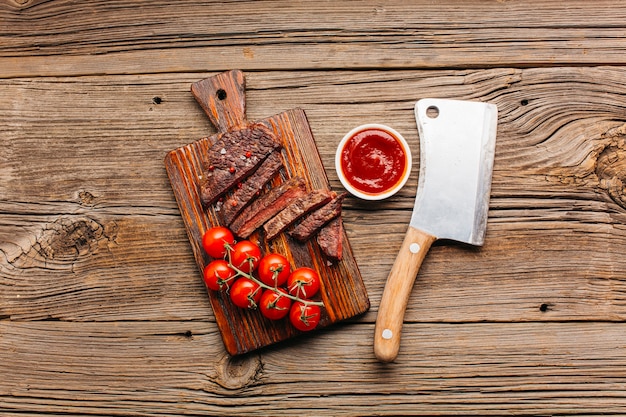
(Part 4) The Magic of Sauce: Elevating Your Ribs to New Heights
Let's talk about sauce. It’s not just an afterthought, it’s a crucial element that can elevate your ribs from good to great. But here’s the key: you don’t want to overpower the natural flavor of the ribs. The perfect sauce complements the meat, enhancing its deliciousness without masking its essence.
Types of rib sauce: A World of Flavors to Explore
Rib sauces come in a variety of styles, from sweet and tangy to spicy and smoky. Here are a few of the most popular types, each with its own unique personality:
- Kansas City Style: The classic, sweet and tangy sauce, often made with tomato ketchup, brown sugar, vinegar, and a blend of spices. It's a crowd-pleaser with a balanced flavor profile.
- Memphis Style: Known for its dry rub base and a strong vinegar tang, this sauce is often made with vinegar, tomato paste, and brown sugar. It offers a sharp, tangy flavor that's both refreshing and satisfying.
- Carolina Style: Unique and bold, this sauce features a tangy vinegar base and a touch of mustard, often made with vinegar, mustard, black pepper, and salt. Its sharp, vinegar-forward flavor is a distinctive characteristic.
- Texas Style: All about the smoke, this sauce is typically made with tomato ketchup, brown sugar, and a generous dose of liquid smoke. It adds a smoky depth that complements the flavor of the ribs beautifully.
When to Apply the Sauce: Timing is Everything
Here’s the thing about sauce: It’s best to apply it towards the end of the cooking process. Applying it too early can lead to burning and caramelization, creating an undesirable bitterness. Aim to apply the sauce during the last 30-60 minutes of cooking, allowing it to glaze and create a beautiful finish.
Tips for Applying Sauce: Achieving a Perfect Glaze
- Baste it: Use a basting brush to evenly coat the ribs with sauce. Be generous, but don't overdo it. You want a beautiful glaze, not a thick, gloppy layer.
- Add a Little at a Time: It's best to apply the sauce in small amounts, basting the ribs every 15-20 minutes. This ensures that the sauce doesn't burn and that the ribs achieve a rich, even glaze.
- Flip Those Ribs: Make sure to flip the ribs over during the basting process to ensure that both sides are evenly glazed and that you don't miss any spots.
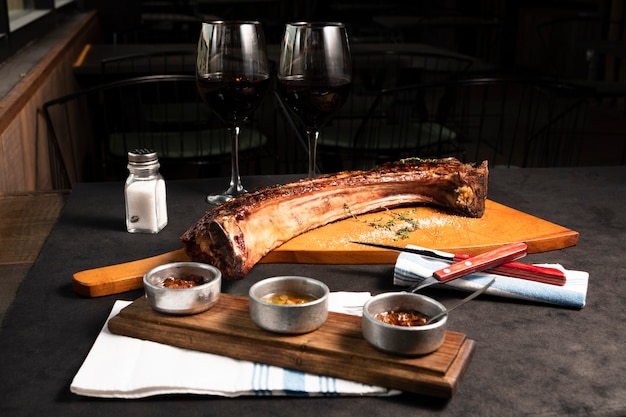
(Part 5) Don't Forget the Sides: Rounding Out Your Rib Feast
Now, your ribs are cooked to perfection, but to make it a truly unforgettable meal, you need some incredible sides. While classic barbecue staples like coleslaw, potato salad, and baked beans are always welcome, here are a few of my personal favorites:
- Mac and Cheese: The ultimate comfort food, creamy and cheesy mac and cheese is a perfect complement to the rich, smoky flavor of ribs.
- corn on the cob: A simple yet delicious side, grilled corn on the cob offers a touch of sweetness and freshness.
- grilled vegetables: Add a healthy and flavorful touch with grilled vegetables like bell peppers, onions, zucchini, or asparagus. The char adds a smoky flavor that complements the ribs beautifully.
- fruit salad: A refreshing and light side, a fruit salad adds a burst of sweetness and acidity to balance out the richness of the ribs.
(Part 6) The Final Touch: Resting and Serving Perfection
The ribs are cooked, the sides are ready, you’ve poured your heart and soul into this culinary adventure. Now it's time for the final touch – resting and serving!
Why You Should Rest Your Ribs: Unlocking Tenderness and Juiciness
Resting your ribs is a crucial step that shouldn’t be skipped! It allows the juices to redistribute throughout the meat, resulting in incredibly tender, juicy ribs. After you remove the ribs from the heat, let them rest, covered, for at least 15 minutes. They’ll stay warm and delicious, and the rest will make a world of difference in their texture.
Serving Up Perfection: A Feast for the Senses
When it comes to serving ribs, I prefer to keep things simple. I often serve them on a platter with a side of sauce for dipping, allowing guests to customize their experience. You can also serve them on individual plates with generous portions of your favorite sides.
And don't forget the napkins! These are messy eaters, so be prepared with plenty!
(Part 7) Tools of the Trade: Essential Equipment for Rib Success
You don't need a ton of fancy equipment to make amazing ribs, but having the right tools can definitely make the process easier and more enjoyable. Here’s a list of essentials that will elevate your rib game:
- meat thermometer: Essential for ensuring that your ribs are cooked to perfection. Aim for an internal temperature of 190°F (88°C) for those beautifully tender, juicy ribs.
- Grill or Smoker: If you’re serious about ribs, investing in a good grill or smoker is a worthwhile investment. It will give you the best results, both in terms of flavor and tenderness.
- Basting Brush: Essential for evenly coating those ribs with sauce, creating a beautiful, glossy finish. Look for a brush with sturdy bristles that won’t fall apart during the basting process.
- Grilling Gloves: A must-have for handling hot ribs and grill grates safely. They’ll protect your hands from burns and allow you to work confidently with your ribs.
- Cutting Board: A sturdy cutting board is essential for slicing those ribs cleanly and evenly. Choose one that’s big enough to accommodate the size of your ribs.
- Sharp Knife: A sharp knife is essential for slicing the ribs cleanly, making serving a breeze.
(Part 8) Beyond the Basics: Taking Your Rib Game to the Next Level
We’ve covered the essentials of rib cooking, but there’s always room for expansion. Here are a few extra tips and tricks that can elevate your ribs from good to exceptional:
- Bone-in vs. Boneless: There's a debate about which is better: bone-in or boneless ribs. Bone-in ribs are more traditional, offering a richer flavor and a more satisfying texture. Boneless ribs are easier to handle and cook, but they can be a little drier. Ultimately, it comes down to personal preference.
- The Importance of Smoke: Smoke adds an incredible depth of flavor to ribs. If you’re using a smoker, experiment with different woods to find your favorite flavor profile. Hickory, mesquite, and applewood are popular choices.
- Rib Racks: These can be helpful for keeping the ribs elevated and allowing for even cooking. They also make it easier to flip the ribs during the cooking process.
- Foil: Foiling your ribs during the first part of the cooking process can help to trap moisture and accelerate the tenderizing process. Just be sure to remove the foil for the last hour of cooking to allow the ribs to crisp up and develop a beautiful bark.
- The 3-2-1 Method: This popular method involves cooking the ribs for 3 hours wrapped in foil, 2 hours unwrapped with sauce, and 1 hour with more sauce. It's a great way to achieve tender, juicy ribs with a delicious glaze.
FAQs: Addressing Your Rib-Related Questions
Now, let’s address some frequently asked questions about ribs.
1. How Long Do Ribs Take to Cook?
The cooking time for ribs can vary depending on the size of the ribs, the cooking method, and the desired level of tenderness. But as a general rule, expect to cook ribs for 4-6 hours.
2. How Do I Know When Ribs Are Done?
The best way to tell if ribs are done is to check their internal temperature. The ideal temperature for ribs is 190°F (88°C). You can also tell if the ribs are done by their texture. They should be tender enough to pull apart with a fork.
3. Can I Freeze Ribs?
Yes, you can absolutely freeze ribs! Just wrap them tightly in plastic wrap and then place them in a freezer-safe bag. They'll stay good in the freezer for up to 3 months.
4. What Are the best ribs to Buy?
The best ribs are those that have a good amount of marbling and are free of excessive fat. Look for ribs that are a good, even colour, with no discoloration or bruising.
5. What Are the Most Important Things to Remember When Making Ribs?
The most important things to remember when making ribs are: choose the right cut, use a good rub, cook them low and slow, and don't be afraid to experiment!
You're now equipped with the knowledge and skills to conquer the world of country ribs. Go forth, embrace the art of low and slow cooking, and create rib masterpieces that will leave everyone wanting more!
Everyone is watching

How to Cook Frozen Lobster Tails Perfectly: A Step-by-Step Guide
RecipesLobster. Just the word conjures up images of lavish meals, special occasions, and a taste of luxury. But let's...

Pigs in a Blanket Cooking Time: How Long to Bake for Perfect Results
RecipesAh, pigs in a blanket. Just the name conjures up images of those delightful little parcels of crispy pastry en...

Pork Fillet Cooking Time: How Long to Cook It Perfectly
RecipesPork fillet, or tenderloin as it's sometimes called, is a real favourite in our house. It's so versatile, and...

The Ultimate Guide to Cooking Delicious Frankfurters
RecipesLet's face it, we all love a good frankfurter. It's a classic, simple, and always satisfying. But let's be rea...

The Ultimate Guide to Tender, Juicy Pulled Pork
RecipesRight, let's talk pulled pork. It's one of those dishes that just screams "comfort food," doesn't it? I mean...