Ah, brisket. The king of barbecue, the star of the smoker, the culinary challenge that makes even the most seasoned pitmasters sweat. Mastering brisket is a journey, a quest for smoky, juicy perfection. And it all starts with understanding the one factor that truly dictates its success: cooking time. Let me tell you, I've been on this journey for years, and I've learned a thing or two along the way. I've experimented with countless methods, from slow and low to hot and fast, and I've had my share of triumphs and, let's be honest, a few disasters. But, through it all, I've come to realise that getting the cooking time right is the cornerstone of a truly incredible brisket.
This guide isn't just about throwing some numbers at you. It's about breaking down the science behind the smoke, understanding the factors that influence cooking time, and giving you the tools to make informed decisions for your own brisket adventures. We'll delve into the anatomy of a brisket, explore the different cooking methods, and unravel the mysteries of achieving that perfect bark, tender, succulent meat, and melt-in-your-mouth fat. So grab a cuppa, settle in, and let's get started on this journey to brisket bliss.
(Part 1) The Anatomy of a Brisket
Before we even think about firing up the smoker, we need to understand what we're dealing with. A brisket, for those unfamiliar, is a cut of beef taken from the breast area of the cow. It's a tough muscle, packed with connective tissue and marbling, making it a prime candidate for long, slow cooking.
The Two Parts of a Brisket: Point and Flat
A whole brisket is actually two parts, each with its own unique characteristics:
- Point: This is the thicker, more rounded part, known for its rich marbling and flavour. It's the star of the show, yielding the most tender, melt-in-your-mouth meat. The point is often referred to as the "money muscle" because it's the most flavorful and tender part of the brisket.
- Flat: Leaner than the point, the flat is a long, flat section that's perfect for slicing thin and serving. It's less tender than the point but offers a more delicate flavour. The flat is a great option for slicing thin and using in sandwiches or salads.
Understanding the Marbling: The Key to Flavor and Tenderness
Marbling is the network of fat running throughout the meat. It's what gives brisket its rich flavour and adds to its tenderness as it cooks. The more marbling, the better! Look for a brisket with a good layer of fat on the top, and don't be afraid of a bit of marbling throughout. The fat melts down during cooking, basting the meat and making it incredibly juicy and flavorful.
(Part 2) Choosing the Right Brisket: A Foundation for Success
Now that we've dissected the brisket, let's talk about choosing one. This is a crucial step, as it sets the stage for your entire cooking experience.
The Grade Matters: Prime is King
The USDA grading system gives you a good indication of the quality of the meat. Prime brisket is the best, offering the most marbling and flavour. Select and Choice are also good options, but may be leaner. Steer clear of any brisket labelled 'commercial' or 'utility' as they'll be tough and lack flavour. Prime brisket is the most desirable due to its high level of marbling, which translates to a richer flavor and more tender texture.
Size and Shape: Finding the Right Fit
A whole brisket can weigh anywhere from 10 to 15 pounds. For a first-timer, I recommend starting with a smaller one, around 10-12 pounds. This will be easier to manage and cook evenly. Look for a brisket that's evenly shaped, with no large gaps or holes in the fat cap. A well-proportioned brisket will cook more evenly, ensuring that every part reaches the perfect temperature.
The Importance of Freshness: Ensuring Optimal Flavor
Get your brisket as fresh as possible. Look for a bright red colour, no discolouration, and a slight sheen to the fat cap. If you're buying it from a butcher, ask about the source and how long it's been in storage. Fresh brisket will have a brighter red color, a firm texture, and a pleasant aroma. Avoid any brisket that has a dull color, a slimy texture, or an off odor.
(Part 3) Preparing for the Cook: Setting the Stage for Success
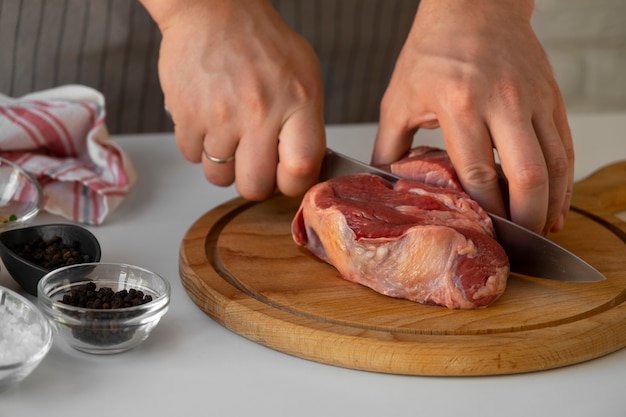
You've got your beautiful brisket, now it's time to get it ready for the smoker.
Trim the Fat: Balancing Flavor and Efficiency
Before you start, trim the fat cap to about 1/4 inch thick. You want a good layer of fat for flavour and moisture, but too much will create an uneven cook and a thick layer of rendered fat that's not very appetizing. Trimming the fat cap ensures that it renders evenly and prevents excessive fat buildup, which can make the brisket greasy and difficult to eat.
Seasoning is Key: Adding Flavor and Depth
Seasoning is where you get to be creative. My go-to is a simple rub of salt, pepper, garlic powder, and onion powder. Don't be afraid to experiment with other spices and herbs. The right seasoning will enhance the natural flavors of the brisket, creating a delicious bark and a flavorful interior.
The Rub Down: Creating a Flavorful Crust
Generously rub the seasoning all over the brisket, making sure to get it into every nook and cranny. This will create a delicious bark as it cooks. A good rub should be evenly distributed across the entire surface of the brisket, ensuring that every bite is flavorful and well-seasoned.
(Part 4) The Smoke Show: Setting Up Your Smoker
Now for the fun part: the smoking! This is where the magic happens, where the brisket takes on that signature smoky flavour.
Choosing Your Fuel: The Heart of the Smoke
I prefer hardwood charcoal for smoking brisket. It gives a consistent, long-burning heat and a deep, rich smoke flavour. Other options include wood chunks like hickory, pecan, or mesquite. Hardwood charcoal burns hotter and longer than briquettes, providing a consistent source of heat and smoke for the long brisket cook.
The Temperature is King: Low and Slow for Tenderness
The ideal smoking temperature for brisket is around 225-250°F. This low and slow approach allows the connective tissue to break down, resulting in tender, juicy meat. low and slow cooking is essential for breaking down the tough connective tissue in brisket, resulting in melt-in-your-mouth tenderness.
Monitoring the Smoke: A Symphony of Flavor
A good smoker thermometer is essential for monitoring the temperature. You'll also want to keep an eye on the smoke. It should be consistent and light, not thick and billowing. The smoke should be a light, wispy blue, indicating that the wood is burning efficiently and producing flavorful smoke.
(Part 5) Cooking Time: The Big Reveal
This is where the real work begins, the heart of brisket cooking. It's the time that truly determines the outcome.
Time is Relative, Not Absolute: Understanding the Variables
The cooking time for brisket can vary greatly depending on the size, cut, and your preferred method. Generally, plan for around 1 hour per pound of brisket. A 10-pound brisket will take roughly 10 hours. A larger brisket will require more time to cook through, while a smaller one will cook faster.
The Stall: Don't Panic! A Natural Part of the Process
You'll likely hit a 'stall' during the cook. This is when the brisket's internal temperature plateaus and refuses to budge. It's a natural part of the process, caused by the protein changing structure. The stall can last anywhere from 2 to 4 hours. The stall is a common occurrence in brisket cooking and is nothing to worry about. It's simply a period where the temperature levels out as the meat continues to cook slowly.
The Wrap: A Game Changer: Accelerating Tenderness
To help break the stall, try wrapping the brisket in butcher paper or foil. This creates a steamy environment that speeds up the cooking process and helps to tenderise the meat. Wrapping the brisket in butcher paper or foil creates a moist environment that helps to break the stall and speed up the cooking process. The steam helps to tenderize the meat and produce a more succulent result.
The Internal Temperature: Your Guide: The Sign of Doneness
The best way to judge the doneness of your brisket is with an instant-read thermometer. The target internal temperature is 195-205°F for a perfectly tender brisket. Checking the internal temperature is the most reliable way to determine if your brisket is done. Once it reaches the target temperature, it's ready to rest and be enjoyed.
(Part 6) Resting: The Final Touch
Don't be tempted to cut into your brisket immediately after it comes off the smoker. It needs some time to rest and redistribute its juices.
The Importance of Resting: Unlocking Maximum Tenderness
Resting the brisket for at least 2 hours is essential. This allows the moisture to reabsorb and the meat to become incredibly tender and flavorful. Resting allows the moisture to redistribute throughout the brisket, ensuring that each slice is tender and flavorful. It's an essential step in achieving that melt-in-your-mouth texture.
The Wrap Stays On: Maintaining Warmth and Moisture
Leave the brisket wrapped in its butcher paper or foil during the resting period. This will keep the meat warm and moist. Keeping the brisket wrapped helps to retain heat and moisture, preventing it from drying out during the resting period.
The Unwrapping: Revealing the Masterpiece
Once the resting period is over, carefully unwrap the brisket. You'll be greeted by a beautiful, juicy, and smoky masterpiece. Unwrapping the brisket after resting reveals a tender, juicy, and flavorful masterpiece, ready to be sliced and enjoyed.
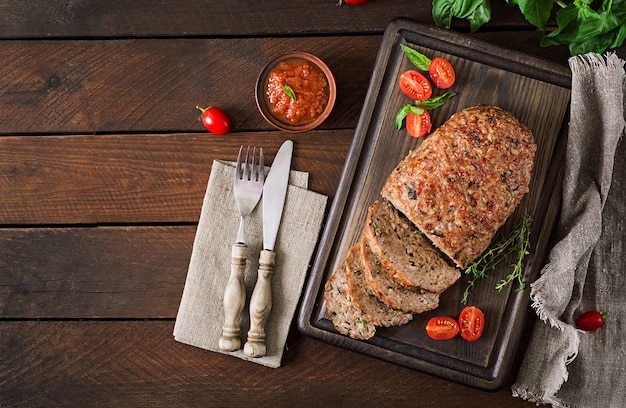
(Part 7) Slicing and Serving: The Grand Finale
You've conquered the smoke, the stall, and the rest. Now it's time to enjoy the fruits of your labour.
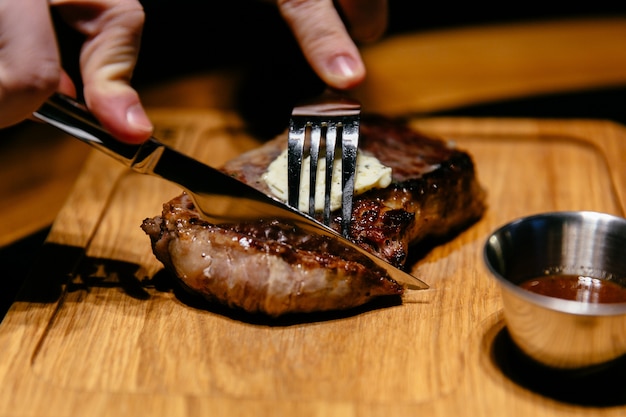
The Art of Slicing: Creating Perfect Bites
Slicing brisket is a skill in itself. You want to slice against the grain, creating thin, tender slices. The flat is typically sliced thin, while the point can be sliced thicker. Slicing against the grain ensures that the meat is tender and easy to chew. The flat is typically sliced thin for sandwiches or salads, while the point can be sliced thicker and enjoyed on its own.
The Sides That Complete the Feast: Complementary Flavors
No brisket is complete without a side dish or two. I love pairing it with creamy coleslaw, tangy baked beans, or crispy potato salad. The right sides can complement the smoky flavors of the brisket and create a balanced meal.
The Feast Begins: The Moment of Truth
Now you can finally indulge in the deliciousness. Each bite should be a symphony of smoky, tender, and juicy goodness. Take a moment to savor the aroma, the texture, and the flavors that have been created through hours of careful cooking.
(Part 8) Beyond the Basics: Elevating Your Brisket Game
Now that you have the basics down, let's explore some advanced techniques to elevate your brisket game.
The reverse sear: A Masterclass in Tenderness: Achieving Ultimate Tenderness and a crispy bark
The reverse sear method involves cooking the brisket at a low temperature for a longer time, then searing it at a high temperature to create a crispy bark. This technique is excellent for achieving a perfect balance of tenderness and flavour. By cooking the brisket at a low temperature for a longer period, the connective tissue breaks down completely, resulting in an incredibly tender texture. Then, searing it at a high temperature creates a delicious crispy bark that adds another layer of flavor and texture.
The texas crutch: A Shortcut to Tenderness: Speeding Up the Cooking Process
The Texas Crutch involves wrapping the brisket in foil during the cook to create a moist, steamy environment. This speeds up the cooking process and helps to tenderise the meat. Wrapping the brisket in foil creates a steamy environment, accelerating the cooking process and preventing the meat from drying out. This technique is especially helpful for breaking through the stall and ensuring a tender result.
The meat thermometer: Your Trusted Ally: The Key to Precision
A good meat thermometer is essential for monitoring the internal temperature of your brisket. It will ensure that you cook it to perfection, avoiding undercooked or overcooked meat. A meat thermometer is an indispensable tool for accurate temperature monitoring, ensuring that the brisket reaches the perfect internal temperature for optimal tenderness and safety.
(Part 9) Tips and Tricks from the Trenches: Mastering the Craft
Here are some of my favourite tips and tricks for crafting a winning brisket.
Water Pan: A Moistening Touch: Preventing Dryness
Adding a water pan to your smoker will help to create a humid environment, preventing the brisket from drying out. A water pan adds moisture to the smoker, creating a humid environment that helps to keep the brisket moist and prevents it from drying out during the long cooking process.
Sprays and Glazes: The Finishing Touches: Adding Flavor and Shine
A spritz of apple cider vinegar or a glaze made with apple juice or barbecue sauce during the last hour of cooking can add a burst of flavour to your brisket. A spritz of apple cider vinegar or a glaze adds a burst of flavor and shine to the brisket in the final stages of cooking. The vinegar can help to break down the surface of the meat, creating a more tender texture and a flavorful crust.
Don't Fear the Fat: The Source of Flavor and Moisture
The fat cap is your friend. It renders down during cooking, adding flavour and moisture to the meat. Don't be tempted to trim it all off. The fat cap is essential for flavor and moisture. As it renders down, it bastes the brisket, creating a rich, juicy, and flavorful result.
Patience is a Virtue: The Key to Brisket Success
Brisket cooking takes time. Don't rush the process. Let the smoker do its work, and you'll be rewarded with a melt-in-your-mouth masterpiece. Brisket cooking requires patience. Don't rush the process. Allow the smoker to work its magic, and you'll be rewarded with a tender, juicy, and flavorful brisket.
(Part 10) FAQs: Solving Your Brisket Dilemmas
Let's clear up some common questions about brisket cooking.
1. How do I know if my brisket is done?
The best way to know if your brisket is done is to check its internal temperature. It should reach 195-205°F for a perfectly tender brisket. You can also test it by probing it with a fork. It should feel very tender and pull apart easily.
2. What if my brisket is dry?
If your brisket is dry, it may have been cooked too long or not wrapped properly. Next time, try wrapping the brisket earlier in the cook or adding a water pan to your smoker. A dry brisket is often a sign of overcooking or insufficient moisture. Wrapping the brisket earlier in the cook or adding a water pan can help to retain moisture and prevent dryness.
3. Can I cook brisket in the oven?
Yes, you can cook brisket in the oven. Preheat the oven to 300°F and place the brisket in a roasting pan. Cook for about 4-5 hours, or until the internal temperature reaches 195-205°F. While a smoker is ideal for brisket, you can also cook it in the oven. A low oven temperature will allow the brisket to cook slowly and achieve tenderness.
4. How do I reheat brisket?
To reheat brisket, wrap it in foil and place it in a low oven (200°F) for about 30 minutes. You can also reheat it in a slow cooker on low for a few hours. Reheating brisket should be done gently to prevent drying it out. Foil wrapping and low heat help to retain moisture and ensure that the brisket stays tender.
5. Can I freeze brisket?
Yes, you can freeze cooked brisket. Wrap it tightly in plastic wrap and then in foil, and freeze for up to 3 months. To thaw, place the brisket in the refrigerator overnight. Freezing cooked brisket is a great way to save leftovers or prepare ahead for future meals. Wrap it tightly to prevent freezer burn and thaw it slowly in the refrigerator for the best results.
There you have it, folks. Your comprehensive guide to brisket cooking time. Remember, there's no magic formula, but with a solid understanding of the process, some patience, and a touch of culinary adventure, you can achieve brisket brilliance.
Everyone is watching

How to Cook Frozen Lobster Tails Perfectly: A Step-by-Step Guide
RecipesLobster. Just the word conjures up images of lavish meals, special occasions, and a taste of luxury. But let's...

Pigs in a Blanket Cooking Time: How Long to Bake for Perfect Results
RecipesAh, pigs in a blanket. Just the name conjures up images of those delightful little parcels of crispy pastry en...

Pork Fillet Cooking Time: How Long to Cook It Perfectly
RecipesPork fillet, or tenderloin as it's sometimes called, is a real favourite in our house. It's so versatile, and...

The Ultimate Guide to Cooking Delicious Frankfurters
RecipesLet's face it, we all love a good frankfurter. It's a classic, simple, and always satisfying. But let's be rea...

Wolf Meat Recipes: A Guide to Cooking Wild Game
RecipesLet's be honest, you don't see wolf meat at your local butcher shop every day. It's a bit of a wild card, but ...