Let's talk turkey, folks! Not just any turkey, mind you, but the kind that makes your mouth water and your family sing your praises. I'm talking about the ultimate, show-stopping, oven-roasted turkey – the kind that deserves a standing ovation. And trust me, after reading this guide, you'll be ready to deliver just that.
We're going to delve deep into every aspect of roasting a turkey, from picking the perfect bird to mastering the golden-brown skin. I'll share my personal tips and tricks, learned over years of experimenting in the kitchen (and let's be honest, a few burnt turkeys along the way!).
This guide isn't just about a recipe; it's about creating a Thanksgiving tradition, a Christmas centerpiece, or simply a delicious Sunday roast. It's about feeling confident in the kitchen and creating a dish that's truly memorable.
So, grab a cuppa, get comfy, and let's get started.
(Part 1) The Turkey: Choosing Your Bird
First things first: you need a decent turkey. This isn't the time to settle for a supermarket special. Head to your local butcher or a reputable farm shop. You'll be amazed by the difference in quality. Trust me, a high-quality bird makes a world of difference in taste and texture.
The Size Game
Now, deciding on the size. Don't be fooled by the temptation of a giant bird. A smaller turkey, around 10-12 pounds, will actually cook more evenly and with less drying out. Trust me, you'll be much happier with a perfectly cooked smaller bird than a dry, oversized one. Think about how many people you're feeding and choose accordingly. Remember, leftovers are great, but a perfectly cooked turkey is the goal!
What's That Stuff?
When you're picking your bird, you'll notice different types of turkey – fresh, frozen, and sometimes even brined. Here's the lowdown:
Fresh turkeys are great for roasting as they're moist and flavorful. However, they have a shorter shelf life, so plan your shopping accordingly.
frozen turkeys are a good option if you need to store the bird for a while. Just make sure to defrost it thoroughly before roasting. Give yourself ample time for defrosting, especially if you're using a large turkey. The general rule of thumb is to defrost it in the refrigerator for 24 hours per 5 pounds of turkey.
Brined turkeys have been soaked in a salt solution, making them extra juicy and flavorful. If you're short on time or just want an extra boost of flavor, go for a brined bird. However, you can also brine your own turkey at home (more on that later!).
(Part 2) Prep Work: Getting Your Bird Ready
Alright, you've got your turkey, now it's time to get it ready for the big roast. This part is crucial for ensuring a juicy, flavorful bird.
The Rinse
Start by rinsing the turkey thoroughly inside and out with cold water. This will remove any leftover feathers, debris, or packaging residue. You'll be surprised how much stuff you can find!
Pat It Dry
Next, pat the turkey dry with paper towels. This step is important for a crispy skin and even browning.
The Stuffing Story
Now, stuffing. This is a topic that sparks endless debates. Some people swear by it, while others prefer to stuff the turkey separately. My personal preference? Stuffing the turkey separately. This ensures that the stuffing cooks evenly and doesn't compromise the turkey's moisture.
However, if you're adamant about stuffing the turkey, make sure to use a well-seasoned stuffing and cook it to an internal temperature of 165°F (74°C). If you stuff the turkey, be sure to use a food thermometer to ensure the stuffing is cooked thoroughly.
(Part 3) The Flavor Factor: Seasoning Your Bird

Here's where the magic really happens. We're going to make this turkey sing with flavour.
Salt and Pepper
The basics are crucial. A generous amount of salt and pepper, both inside and out, will bring out the turkey's natural flavours. Don't be afraid to be generous with the salt – it's essential for bringing out the flavor and browning the skin.
Herbs and Spices
Now for the fun part! This is where you can get creative. Classic combinations include:
Rosemary, thyme, and garlic – a timeless classic that never disappoints.
Sage, onion, and lemon – a bright and citrusy flavour profile.
Paprika, cumin, and chili powder – for a southwestern kick.
Feel free to experiment with your favourite herbs and spices. You can even try a blend of different seasonings for a unique flavour profile. For a more intense flavour, try rubbing the seasoning under the skin of the turkey.
Don't Forget the Butter!
A generous amount of softened butter, rubbed all over the turkey, will enhance the flavour and ensure a delicious crispy skin. The butter will melt during roasting, creating a flavorful and moist coating for your turkey.
(Part 4) The Roasting Process: A Step-by-Step Guide
Time to get roasting! Here's a foolproof step-by-step guide that will help you achieve a perfect turkey every time.
Prepare the Oven
Preheat your oven to 325°F (163°C). This is the ideal temperature for slow and even roasting. A lower temperature ensures that the turkey cooks evenly and doesn't dry out.
The Bird's Nest
Place a roasting rack inside a large roasting pan. This will allow for good air circulation and ensure that the turkey cooks evenly.
Time to Go In
Carefully place the turkey on the roasting rack. Make sure the turkey fits comfortably and doesn't touch the sides of the pan.
The Moisture Trick
Pour a cup of water into the bottom of the roasting pan. This will create steam and prevent the turkey from drying out. The steam will help keep the turkey moist and tender. You can also add other aromatics like onions, carrots, or celery to the pan for extra flavor.
Basting Time
During roasting, periodically baste the turkey with the pan juices. This will keep the skin moist and prevent it from drying out. Basting helps to keep the turkey moist and ensures that the skin browns evenly.
Checking for Doneness
The turkey is done when the internal temperature reaches 165°F (74°C) in the thickest part of the thigh. Use a meat thermometer to check for doneness. A meat thermometer is essential for ensuring that the turkey is cooked through. Don't rely solely on the visual cues of the skin.
Resting is Key
Once the turkey is cooked, let it rest for at least 15 minutes before carving. This will allow the juices to redistribute, resulting in a more succulent and flavorful turkey. Resting is crucial for allowing the juices to redistribute throughout the meat. This ensures that the turkey is moist and juicy when you carve it.
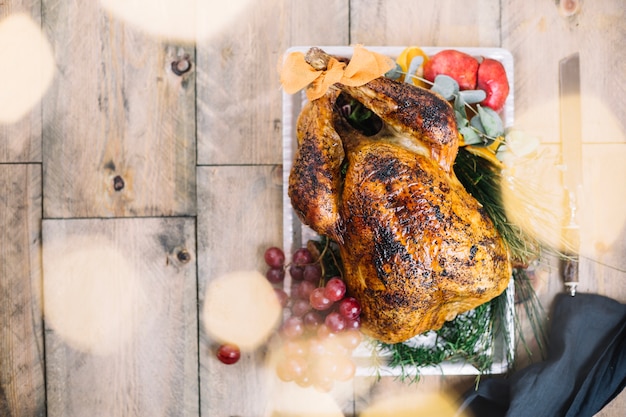
(Part 5) The Secret to Crispy Skin
You know that golden-brown, crispy skin everyone craves? It's all about a little trick.
High Heat, Little Time
Towards the end of the cooking time, increase the oven temperature to 400°F (204°C) for 15-20 minutes. This will give the skin a chance to crisp up nicely. The higher temperature will help to brown the skin and make it crispy.
The Pat-Down Technique
While the turkey is roasting, use a spoon or a baster to remove excess fat from the pan. This will prevent the skin from becoming soggy. Removing the excess fat will help the skin to brown and crisp up.
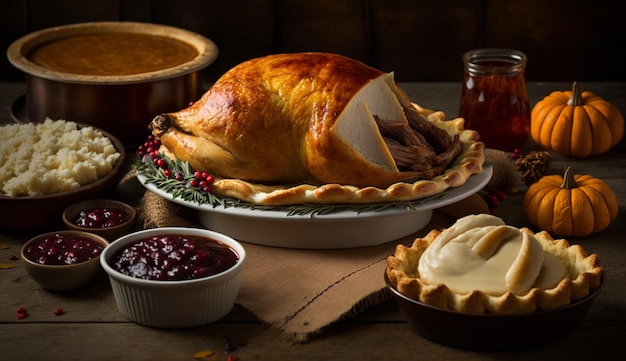
(Part 6) The Flavor Boost: Gravy Magic
Gravy is the perfect accompaniment to a roast turkey. It adds richness and flavour to every bite.
Pan Drippings, Your Secret Weapon
The key to delicious gravy is using the turkey's pan drippings. They're packed with flavor.
Thickening Up the Magic
Use a cornstarch slurry (cornstarch mixed with cold water) or flour to thicken the gravy. Be sure to add the slurry slowly, stirring constantly until the gravy reaches your desired consistency. You can also use a roux, which is a mixture of butter and flour, to thicken the gravy.
(Part 7) Turkey Trouble-Shooting: Dealing with Issues
Don't worry, even the most seasoned cooks have turkey-related mishaps. Here's what to do if things go a bit sideways:
The Dry Bird Dilemma
If your turkey is a bit dry, add a little more liquid to the roasting pan. You can also use a meat thermometer to check for doneness more frequently.
The Burnt Skin Blues
If the skin is burning too quickly, reduce the oven temperature or cover the turkey with foil. Covering the turkey with foil will prevent the skin from burning while still allowing it to cook.
The Overcooked Tragedy
If you've overcooked the turkey, there's not much you can do to fix it. However, you can still salvage the situation by carving the turkey and serving it with a flavorful sauce or gravy.
(Part 8) turkey leftovers: Delicious Second Chances
Leftover turkey is a blessing, not a curse! There are endless possibilities.
Sandwiches, Salads, and More
turkey sandwiches, turkey salads, turkey soup, and even turkey pot pie are all delicious ways to use up leftover turkey.
Freezing for Later
You can also freeze leftover turkey for later use. Just make sure to wrap it tightly in plastic wrap and store it in an airtight container. Freezing leftover turkey is a great way to save it for later use in other dishes.
(Part 9) Brining: A Juiciness Boost
If you want to take your turkey to the next level, brining is the way to go. It involves soaking the turkey in a salt solution, which helps to retain moisture and add flavour.
The Brining Basics
To brine a turkey, dissolve salt in a large container of cold water. Add aromatics like herbs, spices, or citrus fruits for extra flavor. Submerge the turkey in the brine for at least 4 hours, but ideally overnight. A typical brine solution consists of about 1 cup of salt per gallon of water.
Brining Tips
Make sure the turkey is completely submerged in the brine. Refrigerate the brine and turkey during the entire process. Don't forget to rinse the turkey thoroughly after brining before roasting. Brining is a great way to ensure a juicy and flavorful turkey, but it does require some planning.
(Part 10) roasting tips: A Final Checklist
Here's a quick checklist to ensure a perfectly roasted turkey:
Choose a fresh or frozen turkey, ideally around 10-12 pounds.
Rinse the turkey thoroughly and pat it dry.
Season the turkey generously with salt, pepper, and your favorite herbs and spices.
Roast the turkey at 325°F (163°C) for about 15 minutes per pound.
Baste the turkey periodically with the pan juices.
Check for doneness with a meat thermometer.
Let the turkey rest for at least 15 minutes before carving.
(Part 11) FAQs: Your Turkey Questions Answered
Let's address some common questions about roasting a turkey:
1. How Long Does It Take to Roast a Turkey?
The roasting time depends on the size of the turkey. Generally, it takes about 15 minutes per pound at 325°F (163°C). For example, a 12-pound turkey would take about 3 hours to roast.
2. How Do I Know When the Turkey is Done?
The turkey is done when the internal temperature reaches 165°F (74°C) in the thickest part of the thigh. Use a meat thermometer to check for doneness. You should also check the internal temperature of the stuffing, if you're stuffing the turkey, to ensure it reaches 165°F (74°C).
3. Can I Stuff the Turkey?
You can, but it's safer to stuff the turkey separately. This ensures that the stuffing cooks evenly and doesn't compromise the turkey's moisture. If you stuff the turkey, make sure to stuff it loosely, so that the stuffing can cook evenly. You can also cook the stuffing separately in a baking dish.
4. What If the Turkey is Dry?
If the turkey is dry, you can add a little more liquid to the roasting pan. You can also cover the turkey with foil for the last part of the cooking time.
5. What Can I Do with Leftover Turkey?
There are endless possibilities for leftover turkey. You can make sandwiches, salads, soup, pot pie, and more. You can also freeze leftover turkey for later use.
(Part 12) The Final Word: A Thanksgiving Triumph
Now, you've got all the knowledge you need to conquer that thanksgiving turkey (or any other roast turkey occasion). Remember, confidence is key.
This is about more than just a recipe; it's about creating a delicious memory, a feeling of accomplishment, and a delicious dinner that brings your loved ones together.
So, go forth and roast! You've got this.
(Part 13) A Visual Guide
Here is a table that summarizes the key steps involved in roasting a turkey:
| Step | Description |
|---|---|
| Choosing the Turkey | Select a fresh or frozen turkey, ideally around 10-12 pounds. |
| Preparing the Turkey | Rinse the turkey thoroughly and pat it dry. Season generously with salt, pepper, and herbs and spices. |
| Roasting the Turkey | Preheat the oven to 325°F (163°C). Place a roasting rack in a large roasting pan and place the turkey on the rack. Pour a cup of water into the pan. Roast for about 15 minutes per pound. |
| Basting and Checking for Doneness | Baste the turkey periodically with the pan juices. Check for doneness with a meat thermometer; the internal temperature should reach 165°F (74°C) in the thickest part of the thigh. |
| Resting the Turkey | Let the turkey rest for at least 15 minutes before carving. |
| Making Gravy | Use the pan drippings to make a delicious gravy. Thicken with cornstarch slurry or flour. |
This visual guide provides a clear and concise overview of the process, making it easy to follow.
Remember, roasting a turkey can be a rewarding experience, and following these tips will help you create a delicious and impressive dish that everyone will enjoy. Happy roasting!
Everyone is watching

Corn on the Cob: The Ultimate Guide to Perfectly Cooked Ears
Healthy MealsAh, corn on the cob. Just the name evokes images of sunny days, barbecues, and that sweet, juicy flavour that ...

Perfect Pork Roast Oven Cooking Time: A Guide to Delicious Results
Healthy MealsThere's something truly satisfying about a perfectly roasted pork. The aroma alone is enough to make your mout...

Ham Cooking Time: How Long to Bake, Smoke, or Boil a Delicious Ham
Healthy MealsAh, ham. It's a classic, isn't it? A real crowd-pleaser, especially around holidays. And when done right, it'...

Scallops: The Ultimate Guide to Perfect Cooking
Healthy MealsAh, scallops. Those delicate, sweet, and utterly delicious morsels of the sea. They hold a special place in my...

Spaghetti Squash: The Ultimate Guide to Cooking and Serving
Healthy MealsRemember that time you saw spaghetti squash at the supermarket, looking all bumpy and strange, and thought, "W...