You're after the secret to melt-in-your-mouth, fall-off-the-bone brisket, aren't you? I get it. There's nothing quite like it, that heavenly combination of smoky flavour, tender meat, and juicy goodness. Trust me, I've spent years in the kitchen, experimenting and refining, and I'm here to share my secrets with you. This isn't just a recipe, it's a journey, a deep dive into the world of brisket. So, grab a cuppa, settle in, and let's get started!
Part 1: The Brisket: A Cut Above the Rest
First things first, let's talk about the star of the show: the brisket. It's not just a piece of meat, it's a culinary treasure. Now, you might be thinking, "Brisket? Isn't that a bit…tough?" Well, that's where the magic lies. It's all about the marbling, that beautiful network of fat that gives it its rich flavour and renders down to juicy goodness. Just like a good steak, a great brisket has a story to tell, and that story starts with the cut.
1.1. Understanding the Cut: Point vs. Flat
There are two main cuts of brisket: the point and the flat. The point, with its generous layer of fat, is the most flavorful, boasting a deep, rich taste. Think of it as the king of the brisket world. However, it can be a bit tougher than its leaner counterpart, the flat. The flat is leaner and tends to cook more evenly, making it a good choice for those who prefer a less intense flavour. Personally, I'm a point fan. I love that intense, rich flavour that comes from all that fat. It's like a little bit of heaven on a plate, believe me.
But here's the thing, it doesn't have to be a choice between point or flat. You can actually buy a whole packer brisket which includes both cuts, connected together. This gives you the best of both worlds - the flavourful richness of the point and the leaner, more even cooking of the flat. It's a real win-win situation!
1.2. Choosing the Right Brisket: The Meat Matters
Now, when you're choosing your brisket, you're essentially looking for a piece of meat with a story. A good brisket should tell a tale of good breeding and proper care. Look for a good marbling. You want that fat running through the meat, creating that beautiful, almost spiderweb-like pattern. It's this fat that will render down, contributing to the incredible juiciness and flavour. The colour should be a deep red, almost a bit purplish, indicating a brisket that's been well-aged and cared for.
And, as much as you might be tempted, avoid those pre-trimmed briskets. They're usually leaner, and you'll lose that essential fat for flavour and tenderness. Go for the whole deal, my friend, and let's get cooking!
Part 2: Prepping the Beast: Getting Ready to Cook

Now that you've got your perfect brisket, it's time to get it ready for its big moment. Think of this as a spa treatment for your meat, a little pampering before the real magic happens.
2.1. Trimming: Removing the Excess
First, give your brisket a good trim. You don't need to be a surgeon, just remove any big chunks of fat. You want to leave a nice even layer, enough to keep the meat juicy and flavorful, but not so much that it's overwhelming. Think of it like removing the unnecessary bits, leaving only the good stuff to shine. A good rule of thumb is to leave about a quarter-inch layer of fat on the brisket.
2.2. Seasoning: The Art of Flavor
Now comes the fun part: seasoning. This is where you get to unleash your inner culinary artist. You can go with a simple salt and pepper rub, or get creative with your own blends. Personally, I like to add a little smoked paprika, garlic powder, and onion powder for a kick of flavour. The key here is to create a rub that complements the rich flavour of the brisket.
Here's a tip: apply the rub generously all over the brisket, ensuring every inch is coated. You want that seasoning to penetrate deep into the meat, creating a symphony of flavours as it cooks.
Part 3: The Art of the Slow Cook: Building Flavor and Tenderness
Alright, we've got our seasoned brisket, ready to go. Now, let's talk about the real heart of this recipe: the slow cook. This is where the magic happens, where the tough fibers break down and the flavours meld together to create a culinary symphony.
3.1. The Smoker: The King of Brisket
If you're a true brisket enthusiast, you've got to try it on a smoker. There's nothing quite like the smoky aroma that permeates the meat, creating a depth of flavour that's simply unmatched. It's a truly transformative experience, and I'm not exaggerating. Imagine standing by the smoker, inhaling that intoxicating scent, and knowing that a masterpiece is being created.
But remember, smoking a brisket is a commitment. It's not a quick and easy task. You'll need to maintain a consistent temperature around 225-250 degrees Fahrenheit (107-121 degrees Celsius) for hours on end. But trust me, the reward is worth it. The flavour is simply unparalleled.
3.2. The Oven: A Reliable Alternative
Now, if you don't have a smoker, don't worry. A good old oven can still produce a fantastic brisket. Just remember, low and slow is the key. We're talking 225-250 degrees Fahrenheit (107-121 degrees Celsius) for hours on end.
For the oven method, simply place your seasoned brisket in a roasting pan, fat side up. Add a cup of water to the bottom of the pan to create steam, which will help keep the meat moist. Pop it in your preheated oven and let it cook for 4-6 hours, depending on the size of your brisket. The goal here is to create a tender, flavorful masterpiece, and that takes time, my friend. Patience is key.
Part 4: The Wrap: The Secret to Juicy Perfection
After a few hours of cooking, your brisket will start to soften, and that's when you know it's time for the wrap. This is a crucial step, one that takes your brisket from good to truly amazing.
4.1. The Power of the Foil: Locking in Moisture
The wrap helps create a steamy environment, allowing the meat to cook even more evenly and lock in all that juicy goodness. It's like a cozy blanket for your brisket, keeping it warm and happy. Use heavy-duty aluminum foil, wrap your brisket tightly, and pop it back in the oven for another couple of hours. This is where you'll really see that magic happen.
4.2. The barbecue sauce: A Finishing Touch
While the brisket is wrapped, you can get your barbecue sauce ready. This is your chance to add another layer of flavour, a final touch of magic. You can use your favourite store-bought sauce, or create your own. Either way, make sure it's a good quality sauce that's not too thick or too runny.
Now, here's a little secret: I like to brush my brisket with barbecue sauce during the last hour of cooking. This allows the sauce to caramelize, creating a delicious, sticky glaze. But, this is entirely optional, just remember to watch it closely to prevent burning.
Part 5: The Rest: A Moment of Relaxation
After the wrap, it's time to let your brisket rest. Yes, you read that right: rest. This is crucial for allowing the juices to redistribute throughout the meat, creating that ultimate tenderness and juiciness. Allow the brisket to cool slightly in the foil before slicing and serving. This is also a good time to get your side dishes ready, because once you taste this brisket, you'll be ready to feast.
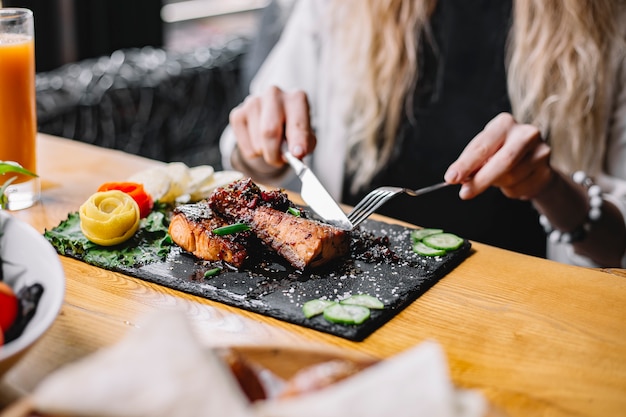
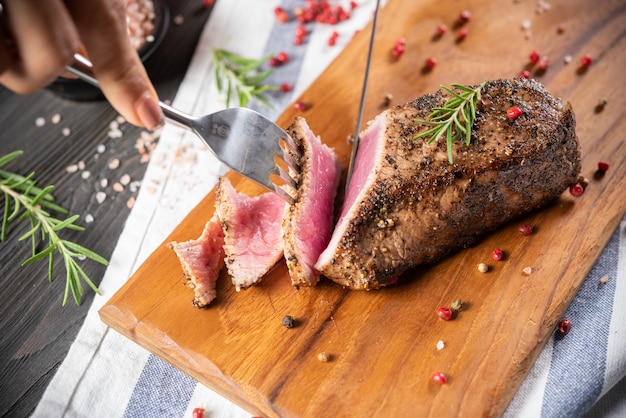
Part 6: The Slice: Unlocking the Juicy Goodness
Now comes the moment of truth: the slice. Take your rested brisket, and using a sharp knife, slice it against the grain. This means slicing perpendicular to the long muscle fibers, which results in tender, bite-sized pieces. If you slice with the grain, the meat will be tough and chewy. So remember, against the grain, my friend, against the grain.
Part 7: Serving: A Culinary Symphony
Alright, your masterpiece is complete. Now it's time to serve it up. And trust me, this brisket deserves more than just a simple plate. Get creative with your presentation, use a beautiful platter, maybe even add some garnishes like chopped chives or parsley. This is a showstopper, folks, and it deserves to be treated as such.
7.1. The Sides: A Perfect Complement
Of course, no brisket is complete without a fantastic array of sides. Think creamy mashed potatoes, tangy coleslaw, or a hearty baked bean casserole. These sides will not only complement the richness of the brisket but also create a well-balanced and satisfying meal.
And don't forget the sauce! A good barbecue sauce can really elevate your brisket experience. Whether it's smoky, sweet, or spicy, make sure you have a sauce that complements the flavours of your brisket.
Part 8: The Verdict: A Brisket to Remember
So there you have it, my ultimate guide to tender, juicy beef brisket. This isn't just a recipe, it's a journey. It's about understanding the meat, mastering the slow cook, and embracing the joy of creating something truly special. Trust me, once you taste this brisket, you'll understand what all the fuss is about. It's a flavour explosion, a testament to the magic of slow cooking, and a masterpiece that will leave your guests begging for seconds.
FAQs
Q1: What kind of wood should I use for smoking?
For a classic brisket flavour, I recommend hickory or mesquite wood. These woods impart a smoky, slightly sweet flavour that complements the meat beautifully. You can also experiment with other woods like pecan or oak, depending on your preference.
Q2: How do I know when my brisket is done?
The best way to check is with a meat thermometer. You want the internal temperature of the brisket to reach 190-205 degrees Fahrenheit (88-96 degrees Celsius). The brisket should be tender enough to pull apart with a fork.
Q3: Can I freeze leftover brisket?
Absolutely! Leftover brisket freezes beautifully. Simply wrap it tightly in plastic wrap and foil, and store it in the freezer for up to 3 months. When you're ready to eat, thaw the brisket in the refrigerator overnight and reheat it in the oven.
Q4: What can I do with leftover brisket?
There are so many possibilities! You can use leftover brisket to make sandwiches, tacos, or even a hearty chili. It's also delicious shredded and served over rice or pasta. The possibilities are endless, so get creative and experiment with different flavours.
Q5: What if my brisket is a bit dry?
It happens! Sometimes, even with all the best intentions, your brisket can end up a little dry. If this happens, don't despair! There are a few things you can do. First, try adding a little bit of liquid to your serving plate, like beef broth or barbecue sauce. This will help rehydrate the meat and add extra flavour. You can also try slicing the brisket thinly and serving it on a bun with your favorite toppings.
Q6: What is the best way to store a brisket before cooking?
Keep your brisket refrigerated until you're ready to cook it. Store it in the refrigerator for 3-5 days. Avoid freezing it beforehand, as it can affect the texture and flavour of the meat.
Q7: How long does it take to cook a brisket?
The cooking time for a brisket depends on its size and the cooking method. A 10-pound brisket can take anywhere from 8 to 12 hours, while a smaller 5-pound brisket might only need 6-8 hours. It's always best to check the internal temperature of the brisket to ensure it's cooked through.
Q8: What are some tips for achieving a smoky flavour in the oven?
While an oven can't fully replicate the magic of a smoker, you can still achieve a smoky flavour. One popular technique is to use wood chips. Soak wood chips in water for 30 minutes, then drain them and place them in a foil packet on the bottom of the oven. As the oven heats up, the wood chips will release smoke, adding a subtle smoky flavour to your brisket. You can also try using smoked paprika in your rub to add a smoky depth to the flavour.
Q9: What are some alternative methods for cooking brisket?
While smoking and oven cooking are the most common methods, you can also cook brisket in a slow cooker or a dutch oven. Both of these methods produce a tender, flavorful brisket. However, you may need to adjust the cooking time depending on your chosen method and the size of the brisket.
There you have it. Now you have everything you need to create your own brisket masterpiece. So go forth, my friends, and let your culinary adventure begin!
Everyone is watching

Corn on the Cob: The Ultimate Guide to Perfectly Cooked Ears
Healthy MealsAh, corn on the cob. Just the name evokes images of sunny days, barbecues, and that sweet, juicy flavour that ...

Perfect Pork Roast Oven Cooking Time: A Guide to Delicious Results
Healthy MealsThere's something truly satisfying about a perfectly roasted pork. The aroma alone is enough to make your mout...

Ham Cooking Time: How Long to Bake, Smoke, or Boil a Delicious Ham
Healthy MealsAh, ham. It's a classic, isn't it? A real crowd-pleaser, especially around holidays. And when done right, it'...

Scallops: The Ultimate Guide to Perfect Cooking
Healthy MealsAh, scallops. Those delicate, sweet, and utterly delicious morsels of the sea. They hold a special place in my...

Spaghetti Squash: The Ultimate Guide to Cooking and Serving
Healthy MealsRemember that time you saw spaghetti squash at the supermarket, looking all bumpy and strange, and thought, "W...