Right, let's talk about roasting a chicken. It's a classic dish, isn't it? Something that everyone should be able to knock out, but sometimes it's a bit hit and miss, isn't it? You've got all those fiddly bits, all that stuff about timing and temperature, and let's not forget about the dreaded dry chicken.
So, I thought I'd put together a little guide for you, based on years of trial and error in my own kitchen. I'm not claiming to be some kind of culinary genius, mind you, but I have learned a few things along the way. I'm talking about how to get that crispy skin, juicy meat, and those glorious golden-brown bits that you just can't resist. Let's get started, shall we?
(Part 1) Choosing the Right Bird
The first thing you need to do is pick out your bird. You don't want to just grab the first one you see, do you? You need to be selective. I always go for a free-range chicken, they seem to have a better flavour, you know? Look for one with good, plump legs and a nice, full breast. It should feel firm to the touch, not floppy. And make sure you have a good look at the skin - it should be smooth and blemish-free.
Size Matters
A good rule of thumb is to aim for a chicken that weighs around 1.5 kg (3.3 lbs). This is a good size for feeding a family of four. If you're feeding a larger crowd, you'll need to choose a bigger chicken.
The "Freshness Factor"
Always check the "use-by" date on the packaging. A fresh chicken will have a firm texture and a pleasant aroma. Avoid any chicken that looks discoloured or has a strong, unpleasant smell.
Organic vs. Free-Range
There's a lot of debate about organic vs. free-range chickens. While organic chickens are raised without antibiotics and hormones, they are often smaller and can be more expensive. Free-range chickens have access to the outdoors, which can contribute to a more robust flavour. Ultimately, the choice is up to you, but consider your budget and your preferences.
(Part 2) Prepping the Chicken
Alright, you've got your chicken, now what? Well, you need to prep it for the oven. This means taking out the giblets, which are those little bits of organs packed inside the cavity, and giving it a good rinse. You might want to pat it dry with kitchen paper too, just to get rid of any excess moisture.
Patting the Chicken Dry
This is important, really. It helps to get that crispy skin, and it also prevents the chicken from steaming in the oven. I mean, no one wants a soggy chicken, right?
Seasoning the Chicken
Now, here’s the fun part - seasoning! I always like to start with a good rub of salt and pepper. It’s a classic for a reason! But you can be a bit more adventurous if you like. I’ve been known to add a pinch of paprika, or even some garlic powder. You can also try rubbing some herbs under the skin, like rosemary or thyme. It gives the chicken a lovely flavour.
A Word on Salt
Don't be shy with the salt! Salt helps to draw out moisture from the chicken, which in turn helps to create crispy skin.
Stuffing the Cavity
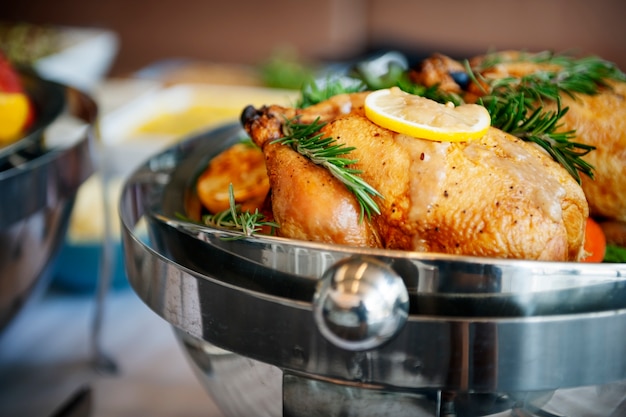
Now, here’s where you can really get creative. Stuffing the chicken cavity is a great way to add extra flavour. You can use anything you like, really. I’m partial to a good lemon and herb stuffing. Just slice up a lemon and some herbs like rosemary and thyme, chuck them in there, and you’re good to go. You can also use onion, garlic, and even some vegetables like carrots and celery. Just make sure to pack it in nice and snug.
A Note on Stuffing
Stuffing can make the cooking time a bit longer, so be sure to factor that into your calculations. You can also cook the stuffing separately, which is a good idea if you want to ensure it's cooked through.
(Part 3) Getting the Oven Ready
Right, now that your chicken is prepped and ready to go, let’s get the oven fired up. I always preheat my oven to 180 degrees Celsius (350 Fahrenheit). It’s important to get it nice and hot so the chicken cooks evenly.
(Part 4) Roasting the Chicken
Okay, you’re ready to go! Pop your chicken into the oven and let it roast. Now, here’s the tricky part, the timing. It really depends on the size of your chicken. A smaller one will cook faster than a bigger one, obviously. But a good rule of thumb is about 1 hour and 15 minutes for a 1.5 kg chicken.
Checking the Temperature
But don’t just rely on the timing, you need to check the temperature too. I always use a meat thermometer to make sure the chicken is cooked through. You want the internal temperature to reach 74 degrees Celsius (165 Fahrenheit). If it’s not quite there, just pop it back in the oven for a bit longer.
Basting the Chicken
Now, here’s a little tip. About halfway through the cooking time, you can baste the chicken with some of the juices from the bottom of the roasting pan. This helps keep the skin nice and moist, and it gives it a lovely golden colour.
Using a Basting Brush
A basting brush is a really handy tool. It allows you to evenly distribute the juices over the entire surface of the chicken.
Don't Over-Baste
Basting too often can make the skin soggy. Just one or two bastings should be enough.
(Part 5) Resting the Chicken
Right, you’ve got a beautifully roasted chicken, but don’t rush to carve it up straight away. You need to let it rest for about 15 minutes. This allows the juices to redistribute throughout the meat, resulting in a juicy and tender chicken. You can cover it loosely with some foil to keep it warm while it rests.
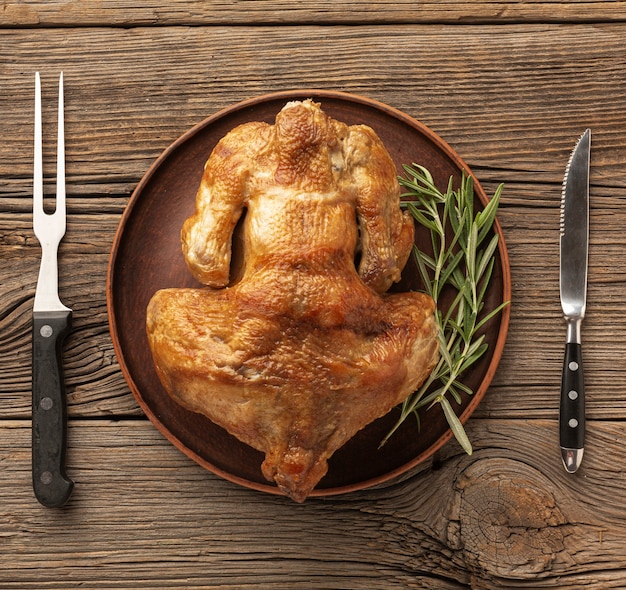
(Part 6) Carving the Chicken
Now, here’s where things get a bit more tricky. Carving a chicken can be a bit daunting, especially if you’re not used to it. But don’t worry, I’ve got you covered!
Using the Right Tools
First, you’ll need the right tools. A sharp carving knife is essential, and a good carving fork is helpful too. You can also use a poultry shears to cut through the bones, if you’re feeling fancy.
Step-by-Step Guide to Carving
Okay, here’s how to do it:
1. Remove the legs. Use your carving knife to cut along the joint between the leg and the body.
2. Remove the thighs. Cut the thighs off the legs at the joint.
3. Remove the wings. Cut the wings off at the joint.
4. Remove the breast. Cut down the breastbone to separate the two breast halves.
5. Carve the breast. Cut the breast into slices.
Tips for Carving
Use a cutting board to prevent mess.
Hold the chicken firmly with your carving fork.
Cut against the grain of the meat for tender slices.
Don’t be afraid to ask for help if you’re struggling.
(Part 7) Serving the Chicken
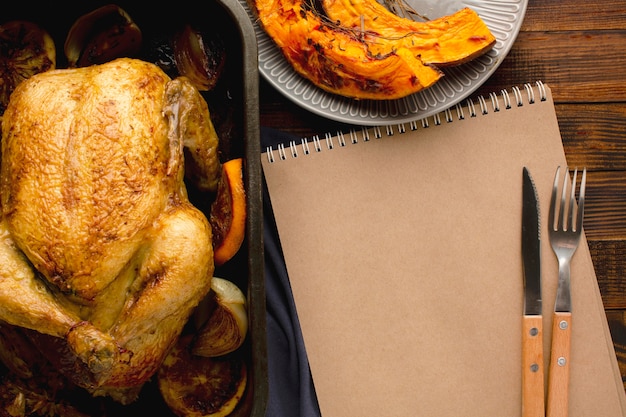
And finally, you’re ready to serve! Arrange your beautifully carved chicken on a platter, and serve it with all the trimmings. I always like to serve it with roast potatoes, some green beans, and a generous amount of gravy. You can also add a side salad or some bread rolls. And don’t forget to enjoy those delicious, golden-brown bits!
Creating a Feast
roast chicken is a wonderfully versatile dish. You can serve it with a variety of sides, depending on your preferences. Some other ideas include:
sweet potato mash
Roasted Root Vegetables
Green Salad with a Lemon Vinaigrette
Stuffed Mushrooms
(Part 8) Leftovers and Storage
Okay, you've got your roast chicken dinner and it was all delicious, but you probably have some leftovers, right? Don’t worry, you can make a whole load of yummy dishes with leftover roast chicken. I'll tell you a little about that later.
Storing Leftover Chicken
But first, let’s talk about storage. You need to store your leftover chicken properly to make sure it doesn’t go bad. Wrap it up tightly in cling film or put it in an airtight container. Then pop it in the fridge, where it’ll keep for up to 3 days.
Using Leftover Chicken
Now, let’s talk about those leftovers. You can make all sorts of things with leftover roast chicken. You can use it to make sandwiches, salads, soups, or even a delicious chicken pie.
Here are some ideas:
- chicken salad: Mix the chicken with mayonnaise, celery, onion, and some chopped herbs. You can serve it on bread, crackers, or lettuce leaves.
- Chicken Soup: Make a delicious chicken soup by simmering the leftover chicken with vegetables like carrots, celery, and onions in a broth.
- Chicken Pasta: Use the leftover chicken in a creamy pasta dish with your favourite sauce.
- Chicken and Vegetable Stir-Fry: Mix the chicken with some chopped vegetables and stir-fry in a pan with your favourite sauce.
- chicken tacos: Shred the chicken and use it to make delicious tacos with your favourite toppings.
(Part 9) Tips and Tricks for roasting chicken
Now, here are a few tips and tricks I've learned over the years to make your roast chicken even better.
Don’t Overcook the Chicken
Remember, it’s easy to overcook a chicken. If you're not sure, check the temperature with a meat thermometer.
Keep an Eye on the Chicken
Keep a close eye on your chicken while it’s roasting. You might need to adjust the cooking time, depending on the size of the chicken and your oven.
Experiment with Different Seasonings
Don’t be afraid to experiment with different seasonings. You can add herbs like rosemary, thyme, and sage. You can also try adding a pinch of garlic powder, paprika, or even some chili flakes.
Use a Roasting Rack
A roasting rack is a really helpful tool. It lifts the chicken up off the bottom of the roasting pan, which allows air to circulate around it and helps to get that crispy skin.
Make a Pan Sauce
Once your chicken is cooked, you can make a delicious pan sauce from the drippings in the roasting pan. Just add some flour, wine, and stock, and simmer until thickened.
A Pan Sauce Recipe
Here's a quick and easy pan sauce recipe:
1 tablespoon flour
1/2 cup dry white wine
1 cup chicken stock
Salt and pepper to taste
Instructions:
1. Add the flour to the roasting pan and whisk it into the drippings.
2. Pour in the wine and stock, scraping up any browned bits from the bottom of the pan.
3. Bring the sauce to a boil, then reduce the heat and simmer for 5-10 minutes, or until the sauce has thickened.
4. Season with salt and pepper to taste.
Use a Roasting Pan with a Lid
I like to use a roasting pan with a lid. This helps to keep the chicken moist during the cooking process.
(Part 10) FAQs
Here are some questions people often ask me about roasting a chicken:
What’s the Best Way to Store a Chicken Before Roasting?
It’s best to store your chicken in the fridge until you're ready to cook it.
What if My Chicken Is Frozen?
If your chicken is frozen, you need to defrost it completely before roasting. You can defrost it in the fridge overnight, or you can defrost it in cold water.
How Long Should I Roast a Chicken?
The cooking time will vary depending on the size of the chicken. A good rule of thumb is about 1 hour and 15 minutes for a 1.5 kg chicken.
What Temperature Should I Roast a Chicken?
It’s best to roast a chicken at 180 degrees Celsius (350 Fahrenheit).
How Do I Know When My Chicken Is Cooked?
The best way to tell if your chicken is cooked is to use a meat thermometer. The internal temperature should reach 74 degrees Celsius (165 Fahrenheit).
So, there you have it, my little guide to roasting a perfect whole chicken. It may seem a bit daunting, but I promise you, it’s really not that hard. Just follow these steps, and you’ll be enjoying a delicious roast chicken dinner in no time!
Everyone is watching

Corn on the Cob: The Ultimate Guide to Perfectly Cooked Ears
Healthy MealsAh, corn on the cob. Just the name evokes images of sunny days, barbecues, and that sweet, juicy flavour that ...

Perfect Pork Roast Oven Cooking Time: A Guide to Delicious Results
Healthy MealsThere's something truly satisfying about a perfectly roasted pork. The aroma alone is enough to make your mout...

Ham Cooking Time: How Long to Bake, Smoke, or Boil a Delicious Ham
Healthy MealsAh, ham. It's a classic, isn't it? A real crowd-pleaser, especially around holidays. And when done right, it'...

Scallops: The Ultimate Guide to Perfect Cooking
Healthy MealsAh, scallops. Those delicate, sweet, and utterly delicious morsels of the sea. They hold a special place in my...

Spaghetti Squash: The Ultimate Guide to Cooking and Serving
Healthy MealsRemember that time you saw spaghetti squash at the supermarket, looking all bumpy and strange, and thought, "W...