london broil. It's a cut of beef that seems to be shrouded in a bit of mystery. Is it a steak? Is it a roast? Well, it's a bit of both, really. But when cooked right, it can be absolutely divine! I'm not a fancy chef, just someone who loves a good roast and has spent years trying out different ways to cook London broil. And I'll tell you, oven-baking it at 400 degrees is the absolute best way to get it perfect.
This guide is my personal playbook for perfecting this simple yet versatile dish. It's full of tips, tricks, and even some of my favorite recipes. I'm going to share all my secrets, so get ready to transform this humble cut of meat into a real showstopper. Let's dive in!
(Part 1) The Cut and the Basics
What is London Broil?
London broil, in a nutshell, is a cut of beef taken from the flank or round, often the top round. It's a tough cut, which means it needs to be cooked slowly and with some love to bring out its tenderness. That's where the oven comes in, my friend.
Why 400 Degrees?
400 degrees Fahrenheit is the magic number for oven-baking London broil. It's hot enough to give you a beautiful sear and a juicy interior, but not so hot that it dries out the meat.
Understanding the Process
The secret lies in achieving a perfect crust on the outside. A good sear doesn't just give the meat a fantastic flavor, it helps lock in all those precious juices. Then, it's all about slow cooking in the oven until the meat is tender and cooked just the way you like it.
(Part 2) choosing the right cut
Alright, let's talk about the star of the show - the London broil itself. You can't just grab any random piece of beef and expect it to be a hit. There's a bit of an art to it, but don't worry, I'll guide you through it.
Top Round vs. flank steak
London broil comes from either the top round or flank steak. Top round is leaner and more tender, making it a good choice if you want a less chewy texture. Flank steak, on the other hand, has a stronger flavor and a more pronounced grain, resulting in a bit more chewiness.
Personally, I love the flavor of flank steak. It just adds a little extra oomph to the dish. But at the end of the day, it comes down to your personal preference.
What to Look For
No matter which cut you choose, you want to look for a piece of meat that's marbled, meaning it has a good amount of fat distributed throughout. This ensures that the meat stays juicy and tender during cooking. Think of it as the meat's built-in moisturizer!
(Part 3) Getting Ready for Baking

Now that we've got our London broil sorted, it's time to prep it for the oven. Don't stress, this isn't some complicated procedure, just a few simple steps to make sure you're getting the best out of your meat.
1. Trim the Fat
First things first, trim away any excess fat. You want to leave a thin layer of fat on the meat, but too much fat will just render and make your roast greasy. We want delicious, not greasy!
2. Tenderise the Meat
Now, here's where things get interesting. London broil can be a little tough, so it's always a good idea to tenderize it before cooking.
- Pounding
- Marinating
You can do this by pounding the meat with a meat mallet, or by marinating it for a few hours. Marinating is my personal favorite because it not only tenderizes the meat, but it also infuses it with tons of flavor.
3. Seasoning
Time for some seasoning magic! This is your chance to add your own unique flavour profile to your London broil.
- Salt and Pepper
- Herbs and Spices
- Garlic Powder
A good sprinkle of salt and pepper is always a classic, but you can also get creative with herbs and spices. Garlic powder is a personal favorite of mine. It adds a lovely depth of flavor. Don't be afraid to experiment, my friend!
(Part 4) The Baking Process
Finally, we're ready to bake our London broil. This is the exciting part, where all the prep comes together and we create something truly delicious.
1. Preheat the Oven
First things first, preheat your oven to 400 degrees Fahrenheit. Make sure it's fully heated before you put the meat in, otherwise, you won't get that lovely crust. That golden crust is key!
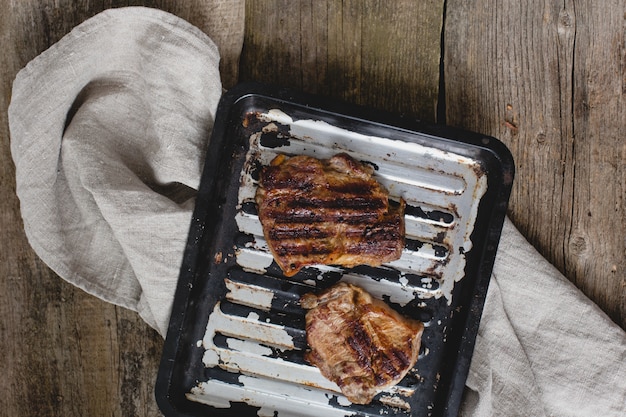
2. Sear the Meat
Now, this is a crucial step. A good sear creates a delicious crust and helps lock in the juices.
- cast iron skillet
- High Heat
- Brown Both Sides
I use a cast iron skillet for this because it holds heat beautifully. Heat your skillet over high heat, then sear the meat for 2-3 minutes per side. You want a nice, even browning on both sides.
3. Bake the Meat
Once your meat is seared, it's time to bake it.
- Roast Pan
- Bake Time (15-20 Minutes per Pound)
- Rest the Meat
Transfer the meat to a roasting pan and bake it for 15-20 minutes per pound. Remember, this is just a guideline, so use a meat thermometer to make sure the meat is cooked to your liking. Once it's done, take the meat out of the oven and let it rest for 10 minutes before slicing it. This allows the juices to redistribute and makes for a more tender and flavorful roast. You've earned a rest, so the meat deserves one too!
(Part 5) cooking times and Temperatures
Alright, let's talk about the crucial part - cooking times and temperatures. This is where you get to decide how you want your London broil to be cooked.
internal temperatures
This is where a good meat thermometer comes in handy. It takes the guesswork out of cooking and ensures you get a perfect result every time. No more overcooked or undercooked disasters!
Here's a handy table to help you out:
| Doneness | Internal Temperature (°F) |
|---|---|
| Rare | 125-130 |
| Medium Rare | 130-135 |
| Medium | 140-145 |
| Medium Well | 150-155 |
| Well Done | 160 |
Adjusting Cooking Time
The cooking time can vary depending on the thickness of your London broil and your desired level of doneness. Remember to use a meat thermometer to check the internal temperature of the meat. It's the key to perfection!
(Part 6) Marinades for Extra Flavour
Now, marinades are like the secret sauce to a great London broil. They not only add incredible flavour but also help tenderize the meat.
Classic Marinade
Here's a classic marinade that never fails to impress:
- 1/2 cup soy sauce
- 1/4 cup red wine vinegar
- 2 tablespoons Worcestershire sauce
- 1 tablespoon olive oil
- 1 teaspoon garlic powder
- 1 teaspoon black pepper
- 1 teaspoon dried thyme
Combine all the ingredients in a bowl and whisk until well blended. Pour the marinade over the London broil and let it sit in the fridge for at least 2 hours, or even better, overnight. The longer, the better!
Other Flavourful Options
Don't be afraid to get creative with your marinades! Here are a few other options:
- Honey Garlic
- Teriyaki
- Citrus Herb
- Spicy Chipotle
Experiment with different flavours to find your personal favourites. There's no wrong way to be delicious!
(Part 7) Serving and Slicing
Alright, your London broil is cooked to perfection, the aroma is filling your kitchen, and now you're ready to slice it and serve it up.
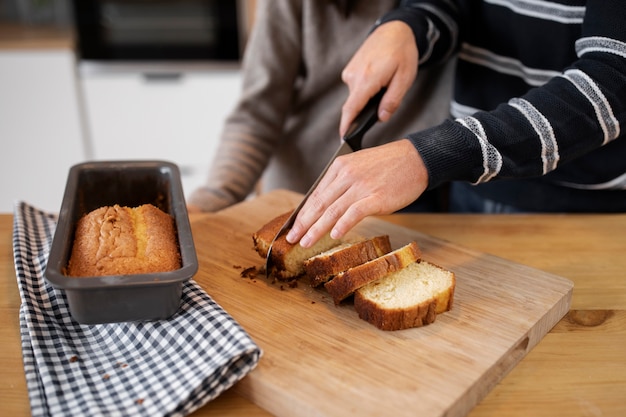
Slicing
Once the meat has rested for 10 minutes, slice it against the grain. This will help tenderize the meat and make it easier to chew. Slice it about 1/4 inch thick, or thicker if you prefer. Don't be shy about those slices!
Serving Suggestions
Now, this is where your creativity can really shine.
- roast vegetables
- mashed potatoes
- Green Salad
- rice pilaf
London broil pairs beautifully with a variety of sides. I love to serve it with roasted vegetables, mashed potatoes, and a green salad. You can also try a rice pilaf or a creamy polenta. It's a perfect match for any delicious side dish.
(Part 8) Leftover Magic
Let's face it, sometimes you end up with leftovers. But don't fret, leftover London broil is just as delicious as the first time around.
Storage
Store any leftover London broil in an airtight container in the refrigerator for up to 3 days.
Reheating Options
There are a few ways you can reheat your leftover London broil.
- Oven
- Microwave
- Pan-Frying
You can reheat it in the oven, microwave, or pan-fry it. I prefer pan-frying because it gives the meat a nice crispy texture. It's like a second chance for a delicious sear!
(Part 9) Tips and Tricks from a seasoned Chef
Alright, time for some insider secrets from a fellow London broil enthusiast.
1. Don't Overcook
London broil is best cooked to medium-rare or medium. Overcooked London broil can be tough and dry. We want juicy, not chewy!
2. Let the Meat Rest
Allowing the meat to rest for 10 minutes before slicing is essential for a tender and flavorful roast.
3. Slicing is Key
Always slice against the grain. This makes the meat easier to chew and more tender. It's all about the texture!
4. Embrace Leftovers
Leftover London broil is fantastic in sandwiches, salads, or even tacos. Don't let those leftovers go to waste!
5. Experiment with Flavours
Don't be afraid to get creative with your marinades and seasoning. There's a whole world of flavor waiting to be explored!
FAQs
1. Can I use a different cut of meat for London broil?
While London broil traditionally refers to flank or top round, you can definitely experiment with other cuts, like skirt steak or even chuck roast. Just keep in mind that the cooking times and temperatures might vary. Get creative and see what works for you!
2. How do I know if my London broil is cooked to my liking?
Using a meat thermometer is the best way to determine the doneness of your London broil. Refer to the internal temperature chart provided in Part 5 for a guide. It's the key to cooking perfection!
3. Can I grill london broil instead of baking it?
Absolutely! grilling london broil is a great option, especially if you're looking for a smoky flavour. Just be sure to sear it well on both sides before grilling. Bring on the smoky goodness!
4. Can I marinate london broil for more than 24 hours?
It's generally not recommended to marinate meat for longer than 24 hours, as it can start to break down the protein structure and make the meat mushy. We want tender, not mushy!
5. What are some good side dishes to serve with London broil?
London broil pairs well with a variety of sides, including roasted vegetables, mashed potatoes, green salads, rice pilaf, creamy polenta, and even pasta salads. The options are endless!
Everyone is watching

Corn on the Cob: The Ultimate Guide to Perfectly Cooked Ears
Healthy MealsAh, corn on the cob. Just the name evokes images of sunny days, barbecues, and that sweet, juicy flavour that ...

Perfect Pork Roast Oven Cooking Time: A Guide to Delicious Results
Healthy MealsThere's something truly satisfying about a perfectly roasted pork. The aroma alone is enough to make your mout...

Scallops: The Ultimate Guide to Perfect Cooking
Healthy MealsAh, scallops. Those delicate, sweet, and utterly delicious morsels of the sea. They hold a special place in my...

Ham Cooking Time: How Long to Bake, Smoke, or Boil a Delicious Ham
Healthy MealsAh, ham. It's a classic, isn't it? A real crowd-pleaser, especially around holidays. And when done right, it'...

Spaghetti Squash: The Ultimate Guide to Cooking and Serving
Healthy MealsRemember that time you saw spaghetti squash at the supermarket, looking all bumpy and strange, and thought, "W...