Alright, folks, gather 'round! I'm going to let you in on my secret recipe for the most tender, melt-in-your-mouth corned beef brisket you've ever tasted, cooked to perfection in the oven. This isn't just a recipe, it's a journey – a culinary adventure with twists and turns, like finding that perfect hidden gem in a bustling marketplace. It's all about selecting the right ingredients, applying the right techniques, and adding a dash of love and personal touch. So, grab your favourite mug, make yourself a cuppa, and let's get cooking!
(Part 1) The Anatomy of a Brisket - A Journey Begins
Choosing Your Brisket - A Masterful Selection
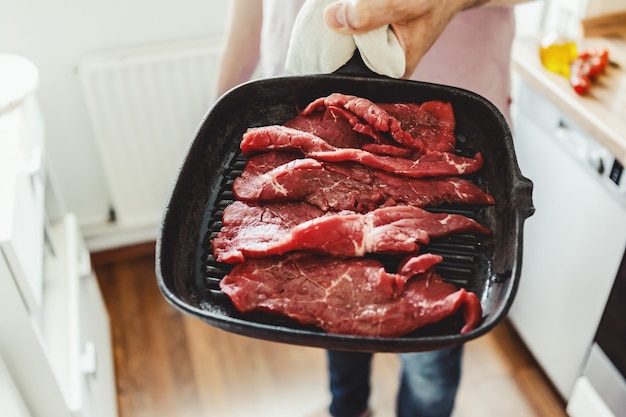
The first step in this delicious adventure is choosing the right brisket. We're talking about a full-pack brisket here, not those flimsy pre-packaged ones. You want a good, hefty chunk of meat, bursting with flavour, ready to be transformed into culinary magic. Look for a brisket with a generous layer of fat, known as the "fat cap." Don't be afraid of the fat! It's the key to a moist and succulent brisket. Think of it as a natural insulator, keeping the meat juicy throughout the long cooking process. And, as a bonus, you can always trim off any excess fat later.
Point vs. Flat: Understanding the Two Sides
Now, here's where things get interesting. A brisket has two main sections: the point and the flat. The point is the more fatty, marbled part, often referred to as the "deck." It's got a more pronounced grain, which makes it naturally tender. The flat, on the other hand, is leaner with a more even grain, resulting in a more intense flavour. For the ultimate brisket experience, I recommend going for a whole brisket that includes both point and flat. This ensures a beautiful blend of tenderness and flavour, a symphony of textures and tastes.
Pre-brined or Not? A Question of Choice
Alright, you've got your brisket, but now you face a crucial decision: pre-brined or not? This is entirely a matter of personal preference. I'm a firm believer in starting with fresh brisket and brining it myself. It gives me full control over the flavour profile and the saltiness. Plus, the process of creating your own brine is a rewarding one, allowing you to experiment with different aromatics and spices. But, if time is of the essence, a pre-brined brisket can be a great shortcut. Just make sure to check the sodium content and adjust your seasoning accordingly.
(Part 2) Brining: The Art of Hydration
Why Brine? The Science of Deliciousness
Brining isn't just a fancy word for soaking. It's a process that transforms your brisket, taking it from ordinary to extraordinary. Imagine it as a spa for your meat, where it's pampered with moisture and salt, resulting in a brisket that's impossibly juicy and tender. The salt in the brine draws out the moisture, then redistributes it throughout the meat, making it incredibly flavorful and succulent.
My Secret Brine Recipe - The Heart of the Flavor
Over the years, I've perfected a simple, yet magical brine recipe. It's a blend of salt, sugar, and aromatic herbs and spices that creates a symphony of flavour.
- 1 gallon of water - The foundation of our brine, providing the liquid medium for the magic to happen.
- 1 cup kosher salt - The key to hydration and flavour, allowing the meat to absorb moisture and develop a rich taste.
- 1/2 cup brown sugar - Adds sweetness and depth of flavour, complementing the saltiness and creating a beautiful balance.
- 2 bay leaves - A subtle yet essential touch, adding a warm, earthy aroma that complements the overall flavour.
- 1 teaspoon black peppercorns - Provides a peppery kick that adds a touch of warmth and complexity.
- 1 teaspoon coriander seeds - Offers a warm, citrusy note that adds depth and dimension to the flavour profile.
- 1 teaspoon allspice berries - Introduces a subtle sweetness and a hint of spice, rounding out the flavour.
Brining Time: The Right Dose of Patience
I usually brine my brisket for 12-24 hours, but you can push it up to 48 hours for even more intense flavour. The key is to ensure the brisket is completely submerged in the brine. And don't forget to refrigerate it! A cold brine is crucial for maintaining freshness and preventing bacteria growth.
(Part 3) The Rub - The Finishing Touch
Building the Flavor Profile - The Art of Seasoning
Okay, your brisket is beautifully brined, now it's time to give it that extra boost of flavour with a good rub. This is where your creativity comes in, where you add your personal touch, and where the magic truly begins.
My Go-To Rub: A Symphony of Flavors
After years of experimenting, I've landed on a rub that I simply adore. It's a combination of sweet, smoky, and savoury flavours that perfectly complement the brisket, bringing out its natural essence.
- 2 tablespoons brown sugar - A touch of sweetness, adding depth and balancing the saltiness.
- 2 tablespoons smoked paprika - Adds a smoky depth that enhances the natural flavours of the brisket.
- 1 tablespoon garlic powder - A punch of flavour, adding a warm, garlicky aroma.
- 1 tablespoon onion powder - Adds a sweet, oniony flavour that enhances the overall complexity.
- 1 tablespoon dried thyme - A subtle yet crucial touch, providing a touch of herbal freshness.
- 1 tablespoon black pepper - A peppery kick that adds warmth and complexity to the flavour.
- 1 tablespoon salt - Essential for enhancing flavour and adding a touch of saltiness.
- 1 teaspoon cayenne pepper (optional) - For those who like a little heat, a touch of cayenne pepper adds a spicy kick.
Rubbing It In: A Gentle Massage
Take your brined brisket and pat it dry with paper towels. Now, take your rub and generously coat the brisket, making sure to work it into all the crevices and nooks. You want a thick layer of rub, but don't overdo it. A little goes a long way. This is where you embrace the tactile element of cooking – a gentle massage of flavours onto the brisket, preparing it for its transformation.
(Part 4) The Oven Bake: The Alchemy of Time and Heat
Preheating the Oven: Setting the Stage
Now, your rubbed brisket is ready for its oven transformation. I like to bake my brisket at a low temperature, around 275°F (135°C). This slow and steady cooking method allows the tough connective tissues to break down, rendering the fat and creating that succulent, melt-in-your-mouth texture.
Getting the Brisket Ready: The Right Foundation
Before you pop the brisket into the oven, it's important to give it a proper foundation. I like to place it on a roasting rack inside a large roasting pan. This allows the hot air to circulate evenly around the brisket, ensuring even cooking. Plus, it catches any drippings that fall off the brisket, which you can use later to make a delicious gravy.
The Baking Process: A Dance of Patience
Now, pop your brisket into the preheated oven and set a timer for 5-6 hours, or until the brisket is fork-tender. You'll know it's ready when you can easily pierce it with a fork, and the fat has rendered out, creating a beautiful, glistening surface.
(Part 5) The Rest: A Crucial Pause
Let it Rest: A Time for Rejuvenation
Okay, your brisket is cooked, but hold your horses! Before you get slicing, it's crucial to let the brisket rest for at least 30 minutes, and up to an hour. This allows the juices to redistribute throughout the meat, resulting in a more evenly moist and tender brisket.
Keeping it Warm: Maintaining the Magic
While the brisket is resting, keep it warm by wrapping it in a few layers of foil. Place it in a preheated oven or a slow cooker to maintain its warmth and prevent it from cooling down too quickly.
(Part 6) Slicing and Serving: The Grand Finale
Slicing the Brisket: The Art of Precision
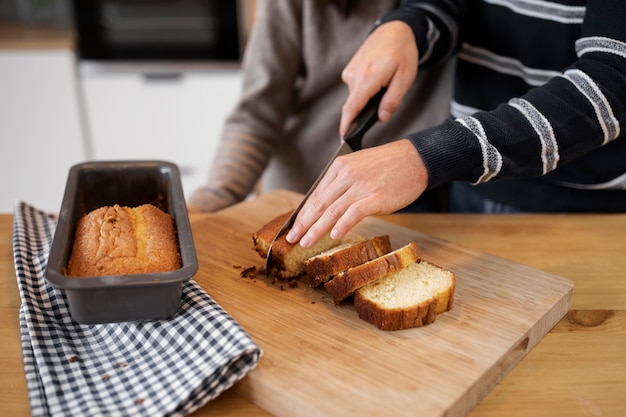
Now, the moment of truth: slicing the brisket. Take your time, be patient, and use a sharp carving knife. I like to slice the brisket against the grain. This helps to break down those tough muscle fibers, making the brisket even more tender and easier to eat. You can slice it as thinly or as thickly as you like.
Serving It Up: A Culinary Masterpiece
There's no right or wrong way to serve a corned beef brisket. Personally, I love it with a side of mashed potatoes, a hearty colcannon, or some roasted vegetables. You can also add some tang with mustard or horseradish, depending on your preference.
Don't Forget the Drippings: Liquid Gold
Remember those drippings I mentioned earlier? Don't throw them away! They're liquid gold. Skim off any excess fat, add some flour and water, and simmer until thickened. This homemade gravy will add a whole new layer of flavour to your brisket.
(Part 7) Frequently Asked Questions
1. Can I make this brisket ahead of time?
Absolutely! This is a great recipe for meal prepping. You can cook the brisket, let it rest, slice it, and store it in the refrigerator for up to 3 days. When you're ready to serve, reheat it in a low oven or a slow cooker.
2. What if my brisket is still tough after 6 hours?
It's possible your brisket needs a little more time. Don't worry, keep cooking it until it's fork-tender. It's better to err on the side of overcooking than undercooking.
3. Can I use a different cut of meat?
You can, but I recommend sticking to a full-pack brisket. Other cuts of meat, like chuck roast or short ribs, won't have the same texture or flavour.
4. Can I freeze the cooked brisket?
Yes, you can freeze cooked brisket for up to 3 months. Wrap it tightly in plastic wrap and then aluminum foil. When you're ready to reheat it, defrost it in the refrigerator overnight and then reheat it in the oven or a slow cooker.
5. What are some other things I can do with the leftover brisket?
The possibilities are endless! You can use leftover brisket in sandwiches, salads, soups, or even tacos. Get creative and see what you can come up with.
(Part 8) Final Thoughts
Well, there you have it – my ultimate guide to oven-baked corned beef brisket. I hope this has been helpful and inspired you to try this delicious dish. Just remember to relax, have fun, and enjoy the process. And don't be afraid to experiment with different rubs and seasonings to find your perfect flavour combination. Happy cooking!
Everyone is watching

Corn on the Cob: The Ultimate Guide to Perfectly Cooked Ears
Healthy MealsAh, corn on the cob. Just the name evokes images of sunny days, barbecues, and that sweet, juicy flavour that ...

Perfect Pork Roast Oven Cooking Time: A Guide to Delicious Results
Healthy MealsThere's something truly satisfying about a perfectly roasted pork. The aroma alone is enough to make your mout...

Ham Cooking Time: How Long to Bake, Smoke, or Boil a Delicious Ham
Healthy MealsAh, ham. It's a classic, isn't it? A real crowd-pleaser, especially around holidays. And when done right, it'...

Scallops: The Ultimate Guide to Perfect Cooking
Healthy MealsAh, scallops. Those delicate, sweet, and utterly delicious morsels of the sea. They hold a special place in my...

Spaghetti Squash: The Ultimate Guide to Cooking and Serving
Healthy MealsRemember that time you saw spaghetti squash at the supermarket, looking all bumpy and strange, and thought, "W...