(Part 1) The Onion: Your Foundation
Slicing for Success: Precision is Key
Now, let’s talk slicing. Getting that perfect, uniform thickness is absolutely crucial. My secret weapon? A mandoline. This handy tool is a lifesaver for achieving perfectly even slices, ensuring every onion ring cooks consistently. But don’t fret if you don’t have one – a sharp chef’s knife will work just fine. Just be extra careful, those onions can be slippery! Once your onions are sliced, separate the rings. You want them to be individual and distinct, ready to be transformed into crispy perfection.(Part 2) The Batter: The Secret Weapon
Buttermilk: The Magic Ingredient
Buttermilk is the key! It adds a subtle tangy flavor that complements the onion beautifully. More importantly, buttermilk creates a lighter, airier batter that crisps up incredibly well. It’s also a secret weapon for keeping the onion rings tender on the inside – a delicious contrast to the crispy exterior.My Go-To Batter Recipe: A Culinary Classic
Here’s my classic buttermilk batter recipe. It’s a tried-and-true formula, but feel free to adjust it to your personal taste. You can experiment with different herbs and spices, but this is a great starting point:Ingredients: 1 cup buttermilk 1 cup all-purpose flour 1/2 teaspoon baking powder 1/4 teaspoon salt 1/4 teaspoon black pepper 1/4 teaspoon paprika (optional)Instructions:1. Whisk together the dry ingredients in a large bowl. This step ensures a well-combined batter. 2. Gradually add the buttermilk, whisking constantly. You want to avoid overmixing – just combine the ingredients until you have a smooth batter with a few subtle lumps.3. Let the batter rest for 15 minutes before using. This gives the gluten in the flour a chance to relax, resulting in a lighter, crispier batter.(Part 3) The Breadcrumbs: The Crispy Crunch
Choosing the Right Breadcrumbs: The Foundation for Crunch
Not all breadcrumbs are created equal. You want breadcrumbs that are finely ground and absorb oil well. I typically use plain, unseasoned breadcrumbs, but feel free to experiment with flavored varieties or add your own herbs and spices.The Double-Dip Technique: Mastering the Crunch
To ensure those onion rings are coated in breadcrumbs from head to toe, I use the double-dip technique. It’s simple and effective. First, dip the battered onion rings in the breadcrumbs, making sure they're completely coated. Then, dip them back into the batter, and give them another good coating of breadcrumbs. This double-dip method creates an extra layer of crunch and helps prevent the breadcrumbs from falling off during frying.(Part 4) The Frying: The Crux of It All
Now it’s time for the moment of truth, the heart of the operation: the frying. This is where patience and precision are key. We're aiming for those perfect onion rings – crispy on the outside, tender on the inside.Choosing the Right Oil: The Foundation for Flavor
First, we need the right oil. I recommend using a neutral-tasting oil with a high smoke point, like vegetable oil or canola oil. Avoid olive oil – it's prone to smoking at high temperatures, which can affect the flavor of your onion rings.The Temperature Matters: Precision is Key
The temperature of the oil is crucial. Too low, and your onion rings will absorb too much oil, resulting in a greasy mess. Too high, and they'll burn before they have a chance to cook through. The ideal temperature for frying onion rings is around 350-375°F (175-190°C).Fry in Batches: The Secret to Even Cooking
To ensure even cooking, fry your onion rings in batches. Don't overcrowd the pan – it will lower the temperature of the oil, resulting in those dreaded soggy onion rings.The Frying Time: Achieving Crispy Perfection
Cook those onion rings for 2-3 minutes per side, or until they're golden brown and crispy. They should be cooked through and no longer translucent.(Part 5) Resting: The Final Touch
Once your onion rings are fried to perfection, it’s time to let them rest. This is crucial for letting the excess oil drain and allowing the rings to cool and solidify, maintaining that perfect crispy texture.The Right Technique: Draining for Maximum Crunch
I like to transfer the fried onion rings to a wire rack placed over a baking sheet lined with paper towels. This lets the oil drain away while keeping the rings nice and crisp.Avoid Overcrowding: Letting Them Breathe
Make sure you don’t overcrowd the rack. The onion rings need space to breathe and cool properly, ensuring they don't become soggy.(Part 6) The Dipping Sauce: The Finishing Touch
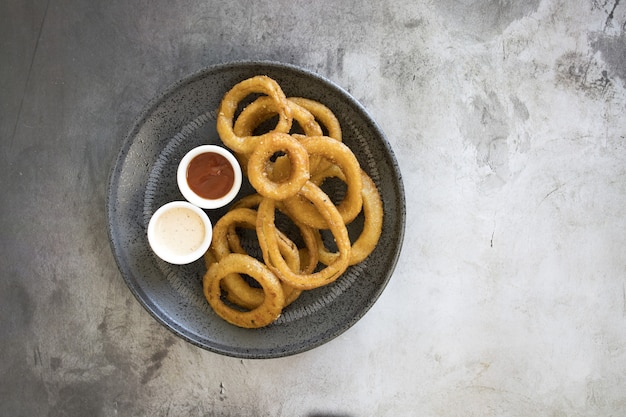
You’ve got your perfectly crispy onion rings, now it's time to elevate them with the perfect dipping sauce. I'm a firm believer that a good dipping sauce can make or break an onion ring experience.My Top Dipping Sauce Picks: Elevating the Onion Ring
Here are my top picks for dipping sauces that complement the deliciousness of onion rings: Classic Ranch: A creamy and tangy classic, always a crowd-pleaser. It’s the perfect balance of richness and tang, perfectly complementing the crispy onion rings. Honey Mustard: The sweet and tangy flavor of honey mustard is a great counterpoint to the savory onion rings. It provides a delightful sweetness that cuts through the richness of the rings. Spicy Aioli: This creamy garlic sauce with a kick of heat adds a satisfying layer of flavor and spice. It’s a great option for those who like a little heat with their onion rings. bbq sauce: The smoky, tangy flavor of BBQ sauce is a perfect complement to the savory onion rings. It adds a depth of flavor that really elevates the onion rings. Blue Cheese Dressing: For those who enjoy a bit of boldness, a creamy blue cheese dressing adds a pungent flavor that's surprisingly delicious with onion rings. It’s a more adventurous choice, but it can be a truly delicious pairing.(Part 7) Variations and Twists: Unleash Your Creativity
Now that you’ve mastered the basic recipe, it’s time to get creative! There are endless possibilities for adding your own twist to onion rings.Flavourful Additions: Experimenting with Taste
Seasoned Breadcrumbs: Get creative with your breadcrumbs. Add herbs like rosemary, thyme, or parsley, or experiment with spices like garlic powder, onion powder, paprika, or cayenne pepper. You can even add a touch of sweetness with brown sugar or a sprinkle of cinnamon for a truly unique flavor. Herbed Batter: Infuse your batter with fresh herbs like dill, chives, or cilantro for an extra layer of flavor. These herbs can add a fresh, vibrant flavor that complements the onion beautifully. Sweet and Spicy: Give your onion rings a sweet and spicy kick by adding a pinch of brown sugar or maple syrup to the batter. The sweetness balances the spice for a truly addictive flavor combination.Creative Ideas: Taking Onion Rings to the Next Level
Panko Onion Rings: Replace the regular breadcrumbs with panko breadcrumbs for an extra crispy exterior. Panko breadcrumbs create a lighter, crispier coating that's perfect for those who want maximum crunch. Fried Onion Ring Stacks: Stack multiple onion rings on top of each other and fry them for a visually stunning and delicious treat. This is a fun and impressive way to serve onion rings, perfect for entertaining. Mini Onion Rings: Cut your onions into smaller rings for bite-sized, snackable goodness. Mini onion rings are perfect for parties or for a quick and easy snack.(Part 8) Serving Suggestions: A Versatile Culinary Star
Now that you’ve got your perfect onion rings, it’s time to figure out how to serve them. They’re incredibly versatile and can be enjoyed in countless ways.A Classic Side: The Perfect Complement
Onion rings are a classic side dish for burgers, hot dogs, or any other grilled fare. They add a delicious crunch and savory flavor that complements those hearty meals.A Snacking Delight: A Satisfying Treat
Onion rings are also fantastic as a snack. They’re perfect for parties, game days, or simply as a satisfying treat. They can be a perfect alternative to chips or pretzels, offering a unique flavor and texture.A Star Attraction: Center Stage
Don’t be afraid to put onion rings front and centre! They can be a star attraction in any dish. Try them atop a juicy burger, as a topping for a salad, or as a filling for a sandwich. The possibilities are truly endless!(Part 9) Storage and Leftovers: Keeping Your Onion Rings Delicious
You’ve got those crispy onion rings all prepped and ready to go, but what about leftovers? Don't worry, they’re easy to store and enjoy later.The Best Way to Store: Maintaining that Crispy Texture
To keep those onion rings crispy, store them in an airtight container at room temperature for up to a day. Avoid refrigerating them, as this can make them soggy.Reheating Tips: Bringing Back that Crispy Glory
If you have leftover onion rings, the best way to reheat them is in a preheated oven at 350°F (175°C) for 5-7 minutes. This will help them regain their crispy texture without becoming soggy.FAQs: Answers to Your Burning Questions
Q: What’s the best way to prevent onion rings from getting soggy?
The key is to let the onion rings drain thoroughly after frying and to store them in an airtight container at room temperature. Avoid refrigerating them, as this can make them soggy.
Q: How can I make sure my onion rings are cooked through?
Make sure the oil is hot enough and fry the onion rings for 2-3 minutes per side, or until they're golden brown and crispy. They should be cooked through and no longer translucent. You can also test the onion rings with a toothpick – if it comes out clean, they are cooked through.
Q: Can I make onion rings ahead of time?
Yes, you can make the batter and breadcrumb the onion rings ahead of time. Just store them in an airtight container in the refrigerator for up to 24 hours before frying. This allows you to have the onion rings ready to go when you need them.
Q: What are some creative variations for onion rings?
Get creative with your seasonings, batters, and breadcrumb coatings. Try adding herbs, spices, or even sweet ingredients like brown sugar or maple syrup. You can also experiment with different types of breadcrumbs, like panko, for a different texture. The possibilities are truly endless!
Q: Can I use other types of onions for onion rings?
While white onions are ideal for onion rings, you can use yellow onions as an alternative. Avoid red onions, as they are too soft and can lead to mushy rings. Ultimately, the best onion for your onion rings will depend on your personal preference.
Now you’ve got all the knowledge you need to create the best onion rings of your life! Remember, practice makes perfect, so don’t be afraid to experiment and find what works best for you. Happy frying!Everyone is watching

Corn on the Cob: The Ultimate Guide to Perfectly Cooked Ears
Healthy MealsAh, corn on the cob. Just the name evokes images of sunny days, barbecues, and that sweet, juicy flavour that ...

Perfect Pork Roast Oven Cooking Time: A Guide to Delicious Results
Healthy MealsThere's something truly satisfying about a perfectly roasted pork. The aroma alone is enough to make your mout...

Ham Cooking Time: How Long to Bake, Smoke, or Boil a Delicious Ham
Healthy MealsAh, ham. It's a classic, isn't it? A real crowd-pleaser, especially around holidays. And when done right, it'...

Scallops: The Ultimate Guide to Perfect Cooking
Healthy MealsAh, scallops. Those delicate, sweet, and utterly delicious morsels of the sea. They hold a special place in my...

Spaghetti Squash: The Ultimate Guide to Cooking and Serving
Healthy MealsRemember that time you saw spaghetti squash at the supermarket, looking all bumpy and strange, and thought, "W...