Ah, the humble turkey breast. A culinary blank canvas, promising a delicious centerpiece for any festive gathering. But oh, the pressure! We've all been there, staring at that raw, unassuming bird, wondering if we'll manage to turn it into a triumph or a culinary disaster. Well, fret no more, my friends. I'm here to share my hard-earned wisdom, gleaned from years of turkey-related triumphs and a few, let's say, "interesting" experiences.
This guide is your one-stop shop for mastering the art of cooking a turkey breast to perfection. We'll cover everything from choosing the right bird to the most foolproof cooking methods, with helpful tips and tricks along the way. So grab your apron, get your ingredients ready, and let's embark on this culinary adventure together!
(Part 1) Choosing Your Turkey Breast: A Quest for Quality
The first step in this journey is selecting the right turkey breast. It's like choosing a partner – you want one that's going to be both reliable and delicious! You've got two main options: a whole turkey breast or individual turkey breasts.
Whole Turkey Breasts: The Classic Choice
A whole turkey breast is a classic choice for a reason. It offers a good amount of meat, perfect for feeding a crowd. Plus, you can often find whole turkey breasts on sale, especially during the festive season. However, you'll need a bit more space in your oven, and you'll have to carve it after cooking, which can be a bit tricky for a beginner. I remember my first attempt at carving a whole turkey breast – it felt like I was wrestling with a wild beast! But with a little practice, it becomes a breeze.
Individual Turkey Breasts: Convenience at Your Fingertips
If you're looking for a more convenient option, individual turkey breasts are the way to go. They're typically smaller, making them ideal for smaller gatherings or if you're just cooking for yourself and a few friends. They're also super easy to cook and carve, making them a great choice for beginner cooks. Personally, I'm a big fan of individual turkey breasts, especially during the week, when I'm craving a delicious and easy meal. Just pop one in the oven, and dinner is ready in no time!
The Art of Choosing the Right Bird: Don't Just Grab the First One You See!
Once you've decided on a whole turkey breast or individual breasts, you're ready to pick your bird. But don't just grab the first one you see. Take your time and choose wisely!
- Check the Date: Look for a turkey breast with a recent "use by" date. You want a fresh bird, not one that's been hanging around in the chiller for too long. You can usually find the "use by" date on a sticker attached to the packaging.
- Feel the Texture: The skin should be smooth and firm. Avoid turkey breasts with any tears or punctures, as these can harbour bacteria. A good turkey breast will have a plump, well-defined shape, indicating it's been handled with care.
- Don't Be Afraid to Ask: If you're not sure about a particular turkey breast, don't hesitate to ask the butcher for help. They're experts and will be happy to help you choose the perfect bird. They can also give you tips on how to prepare and cook your turkey breast for the best results.
(Part 2) Prepping Your Turkey Breast: Getting Ready for the Oven
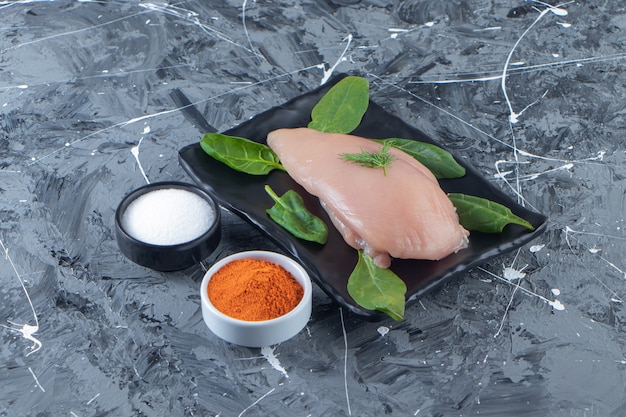
You've got your perfect turkey breast – congratulations! Now it's time to get it ready for the oven. This is a crucial step, and it'll make all the difference in how your turkey breast turns out.
A Quick Rinse and Pat Dry: First Steps to Flavor
Start by rinsing the turkey breast under cold water. This helps remove any loose bits and gets rid of any lingering bacteria. Then, pat it dry with paper towels. A dry turkey breast will cook more evenly and develop a lovely crispy skin.
The Art of Brining: A Secret to Tenderness
Now, here's where things get interesting. Brining is a technique that involves soaking the turkey breast in a salt-water solution for a few hours. It helps to retain moisture and create a succulent, flavourful turkey.
I know what you're thinking – "brining? That sounds like a lot of work!" But trust me, it's worth it. The difference is absolutely noticeable. Your turkey breast will be unbelievably juicy and tender. It's like the difference between a dry, overcooked piece of chicken and a succulent, melt-in-your-mouth masterpiece. But if you're short on time, you can skip the brining step. Your turkey breast will still be delicious, but it might not be quite as moist and flavourful.
My Favourite Brine Recipe: A Simple and Effective Blend
Here's my go-to brine recipe. It's simple, effective, and produces stunningly delicious results. You'll need:
- 1 gallon of cold water
- 1 cup kosher salt
- 1/2 cup granulated sugar
- 1 tablespoon black peppercorns
- 1 tablespoon dried thyme
Simply combine all the ingredients in a large bowl or container. Make sure the turkey breast is completely submerged in the brine. Cover it and refrigerate for at least 4 hours, or even overnight, for the best results. The longer you brine, the more flavorful and juicy your turkey breast will be.
A Touch of Butter and Seasoning: Enhancing the Flavour Profile
Once the turkey breast has been brined (or if you're skipping the brine), it's time to give it a flavour boost. Rub a generous amount of softened butter all over the skin. The butter will help keep the turkey moist and adds a beautiful golden colour.
Next, sprinkle the turkey breast generously with your favourite seasonings. I prefer a simple combination of salt, pepper, paprika, and garlic powder. You can also use herbs like rosemary, thyme, or sage. Get creative and experiment with different flavour combinations until you find your favourite! For a more intense flavour, you can try rubbing the seasonings directly into the meat.
(Part 3) Cooking Your Turkey Breast: The Key to Perfection
Finally, it's time to cook that gorgeous turkey breast! You've got a few options, each with its own advantages and disadvantages. We'll explore the most popular methods, so you can choose the one that best suits your needs and preferences.
The Oven: A Classic for a Reason
The oven is a classic method for cooking turkey breast. It's simple, reliable, and produces consistently delicious results. But remember, oven temperatures can vary, so always check your turkey breast with a meat thermometer to ensure it's cooked through.
To cook your turkey breast in the oven, preheat your oven to 325°F (160°C). Place the turkey breast in a roasting pan and cook for about 1 hour and 30 minutes, or until the internal temperature reaches 165°F (74°C).
The Roasting Pan: A Must-Have for Even Cooking
The roasting pan is your best friend when cooking a turkey breast in the oven. It provides a deep, even cooking environment, ensuring that the turkey breast cooks evenly and doesn't dry out. You can also add vegetables to the roasting pan, like potatoes, carrots, and onions, for a delicious and convenient one-pan meal.
If you're not using a roasting pan, you can place the turkey breast on a wire rack set over a baking sheet. This allows for air to circulate around the turkey breast, resulting in crispier skin and even cooking.
The Meat Thermometer: Your Essential Tool
A meat thermometer is an absolute must-have when cooking any kind of poultry. It's the only way to ensure that your turkey breast is cooked through and safe to eat.
Insert the meat thermometer into the thickest part of the turkey breast, making sure not to touch any bones. The internal temperature should reach 165°F (74°C) for safe consumption. Don't rely solely on visual cues, like the colour of the meat or the juices running clear. A meat thermometer is the only way to guarantee that your turkey breast is cooked to the right temperature.
Resting Time: Crucial for Tenderness
Once your turkey breast is cooked, it's tempting to carve it right away and dig in. But resist the urge! Resting the turkey breast for about 10-15 minutes allows the juices to redistribute throughout the meat, making it even more tender and delicious. It's a little trick that makes a big difference in the final outcome.
The instant pot: A Modern Marvel
For those who prefer faster cooking, the Instant Pot is a game-changer. It uses pressure cooking to cook your turkey breast in a fraction of the time. Plus, you can achieve amazing results without the need for a roasting pan.
To cook your turkey breast in an Instant Pot, use the "manual" or "pressure cook" setting. Cook for 15 minutes for a 3-4 pound turkey breast, and adjust the cooking time accordingly for larger breasts. You can also add some broth or water to the Instant Pot to help keep the turkey breast moist.
The Grill: A Summertime Favourite
If you're cooking outdoors during the warmer months, the grill is a fantastic way to cook your turkey breast. It adds a smoky flavour and creates a beautifully crispy skin.
To grill your turkey breast, preheat your grill to medium heat. Place the turkey breast on the grill and cook for about 30-40 minutes, or until the internal temperature reaches 165°F (74°C). Make sure to keep an eye on the turkey breast and flip it occasionally to ensure even cooking.
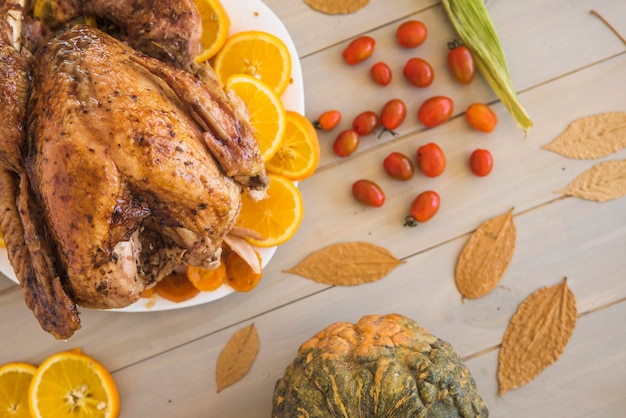
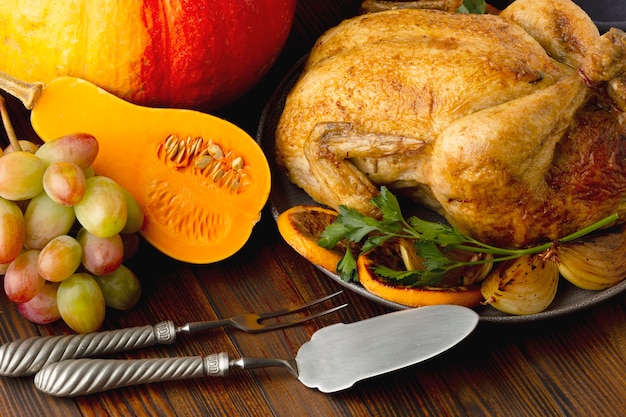
(Part 4) Carving Your Turkey Breast: A Skill Worth Mastering
Your turkey breast is cooked to perfection – well done! Now it's time to carve it and enjoy the fruits of your labour. Don't worry, it's easier than it looks. Just follow these simple steps.
Tools of the Trade: Gather Your Equipment
You'll need a sharp carving knife to make clean, precise cuts. A carving fork is also helpful for holding the turkey breast in place while you carve it. You can also use a cutting board to protect your countertop from scratches and make carving easier.
The First Cut: Finding the Breastbone
Start by locating the breastbone. It's the long, thin bone that runs down the center of the turkey breast. Place your hand on the turkey breast and feel for the breastbone. It's usually quite prominent and easy to find.
Cutting the Breastbone: Divide and Conquer
Once you've located the breastbone, use your carving knife to cut along both sides of it. This will separate the turkey breast into two halves.
Cutting Against the Grain: The Key to Tender Slices
Now, cut across the grain of the turkey breast. This means cutting perpendicular to the muscle fibers. This will create tender, juicy slices that melt in your mouth. If you cut with the grain, the slices will be tough and chewy.
Serving Time: Let the Feast Begin!
Your turkey breast is now beautifully carved! Arrange the slices on a platter and serve with your favourite sides.
(Part 5) Leftovers: A Culinary Treasure Trove
Let's face it, sometimes you end up with more turkey breast than you can eat in one sitting. But don't despair! Leftovers are a culinary treasure trove. They're perfect for creating delicious meals that will satisfy your taste buds without breaking the bank.
Turkey Breast Salad: A Refreshing and Healthy Option
Leftover turkey breast is perfect for a refreshing and healthy salad. Simply slice the turkey breast into thin strips and toss it with your favourite greens, vegetables, and dressing. Some of my favourite combinations include:
- Spinach, cherry tomatoes, red onion, crumbled feta cheese, and a lemon vinaigrette
- Mixed greens, sliced cucumber, avocado, toasted almonds, and a balsamic vinaigrette
- Romaine lettuce, shredded carrots, dried cranberries, walnuts, and a honey mustard dressing
Turkey Breast Sandwiches: A Simple and Satisfying Meal
A turkey breast sandwich is a classic for a reason! It's simple to make, satisfying, and perfect for a quick lunch or dinner. You can use leftover turkey breast in any kind of sandwich. Here are a few of my favourites:
- A classic turkey breast and Swiss cheese sandwich on toasted rye bread with a little bit of mustard
- A turkey breast and cranberry sauce sandwich on sourdough bread with a dollop of mayonnaise
- A turkey breast and avocado sandwich on multigrain bread with a sprinkle of salt and pepper
Turkey Breast Soup: A Hearty and Comforting Dish
Leftover turkey breast can be transformed into a hearty and comforting soup. You can use it as the base for a traditional turkey noodle soup, or get creative and experiment with different flavours.
Here's a simple recipe that always hits the spot:
- Sauté some chopped onion, celery, and carrots in a large pot with olive oil.
- Add the leftover turkey breast, chopped into bite-sized pieces.
- Pour in some chicken broth and simmer until the turkey is heated through.
- Add your favourite noodles and cook until they're tender.
- Season with salt and pepper to taste.
You can also add other vegetables to your soup, like diced potatoes, peas, or corn.
(Part 6) Storage: Keeping Your Turkey Breast Fresh
You've cooked your turkey breast to perfection and enjoyed a delicious meal. Now, it's time to store any leftovers properly. This will help you enjoy them later and avoid food poisoning!
Refrigerator: The Ideal Storage for Leftovers
The refrigerator is the best place to store your leftover turkey breast. Make sure to store it in an airtight container to prevent it from drying out. You can also store your leftover turkey breast in a resealable plastic bag.
Freezing: Saving Your Turkey Breast for Later
If you know you're not going to eat all of your leftover turkey breast within a few days, you can freeze it. Simply wrap the turkey breast tightly in plastic wrap and place it in a freezer-safe bag. Make sure to squeeze out as much air as possible from the bag before sealing it.
frozen turkey breast can last for up to 3 months. When you're ready to use it, thaw it in the refrigerator overnight. You can also thaw frozen turkey breast in the microwave, but it's best to do so on a low setting and check it frequently to prevent it from overcooking.
(Part 7) Tips and Tricks: Elevate Your Turkey Breast Game
Now that you've got the basics down, let's spice things up with some tips and tricks that will elevate your turkey breast game from good to great. These are the secrets that will impress your friends and family, and make you a true turkey breast maestro.
The Power of Brining: Unlocking a World of Flavor
Remember the brining technique we talked about earlier? It's a game-changer, adding incredible flavour and moisture to your turkey breast. If you've never tried it, I strongly encourage you to give it a shot. You won't regret it!
Herbs and Spices: A Symphony of Flavour
Don't be afraid to experiment with herbs and spices when seasoning your turkey breast. You can use a simple combination of salt and pepper, or get creative and add a touch of rosemary, thyme, sage, or garlic powder. You can also use pre-made spice blends, like Italian seasoning or poultry seasoning. Remember, a bit of experimentation can lead to incredible culinary discoveries.
The Secret to Crispy Skin: Achieving that Golden Crunch
We all love that crispy turkey skin, right? Here's how to achieve that golden crunch:
- Pat the turkey breast dry with paper towels before cooking. This helps create a crispy skin.
- Rub the skin with a little bit of olive oil or butter. This will help the skin brown and crisp up.
- Make sure the turkey breast is not overcrowded in the roasting pan. This will allow air to circulate around the turkey breast and help the skin crisp up.
- If you're cooking the turkey breast in the oven, try flipping it halfway through cooking. This will ensure that both sides get crispy. You can also use a roasting rack to elevate the turkey breast and allow air to circulate around it.
Don't Forget the Sides: Completing the Culinary Masterpiece
Your turkey breast is the star of the show, but don't forget about the supporting cast! Some delicious sides that complement a turkey breast perfectly include:
- Roasted vegetables, like potatoes, carrots, and Brussels sprouts
- Cranberry sauce
- Stuffing
- Gravy
- mashed potatoes
You can also serve your turkey breast with a green salad, a fruit salad, or a selection of cheeses.
(Part 8) FAQs: Answering Your Turkey Breast Questions
You've got questions, I've got answers. Here are some of the most common questions about cooking turkey breast, along with my expert advice.
1. Can I Cook a Turkey Breast From Frozen?
It's not recommended to cook a turkey breast from frozen. It will take much longer to cook and could end up dry and tough. The best approach is to thaw the turkey breast in the refrigerator overnight before cooking.
If you're in a hurry, you can thaw the turkey breast in cold water. Place the turkey breast in a sealed bag and submerge it in a bowl of cold water. Change the water every 30 minutes to ensure that it stays cold. It will take about 30 minutes to thaw a 3-4 pound turkey breast in cold water.
2. How Long Should I Cook a Turkey Breast?
The cooking time for a turkey breast will depend on its size and the cooking method you're using. As a general rule of thumb, a 3-4 pound turkey breast will take about 1 hour and 30 minutes to cook in a 325°F (160°C) oven.
Always use a meat thermometer to check the internal temperature of the turkey breast. It should reach 165°F (74°C) for safe consumption. If you're using an Instant Pot, the cooking time will be much shorter, typically around 15 minutes for a 3-4 pound turkey breast.
3. What Happens if My Turkey Breast is Overcooked?
Overcooked turkey breast will be dry and tough. If you're worried about overcooking your turkey breast, you can use a meat thermometer to monitor the internal temperature.
Another option is to cook the turkey breast to a lower internal temperature, such as 160°F (71°C). It's important to note that cooking turkey breast to a lower internal temperature can increase the risk of food poisoning. If you choose to cook your turkey breast to a lower temperature, be sure to serve it immediately and store any leftovers in the refrigerator for no longer than 3 days.
4. How Do I Keep My Turkey Breast Moist?
To keep your turkey breast moist, you can brine it before cooking. You can also use a cooking method that helps retain moisture, such as roasting in a roasting pan or cooking in an Instant Pot.
Another helpful tip is to baste the turkey breast during cooking. This involves pouring the pan juices over the turkey breast every 30 minutes or so. Basting helps keep the turkey breast moist and develops a delicious flavour. You can also add some butter or broth to the pan to help keep the turkey breast moist.
5. Can I Reheat Leftover Turkey Breast?
Yes, you can reheat leftover turkey breast. The best way to reheat turkey breast is in the oven. Place the turkey breast in a baking dish and cover it with foil. Bake it in a 325°F (160°C) oven for about 15-20 minutes, or until it's heated through.
You can also reheat turkey breast in the microwave. Place the turkey breast on a microwave-safe plate and cover it with a damp paper towel. Heat it on high for about 1 minute per pound.
Just remember to always reheat turkey breast until it's steaming hot. This will ensure that it's safe to eat.
There you have it, folks! My ultimate guide to cooking a delicious turkey breast. With these tips and tricks, you'll be well on your way to becoming a turkey breast maestro. So, go forth and conquer the culinary world!
Everyone is watching

Corn on the Cob: The Ultimate Guide to Perfectly Cooked Ears
Healthy MealsAh, corn on the cob. Just the name evokes images of sunny days, barbecues, and that sweet, juicy flavour that ...

Perfect Pork Roast Oven Cooking Time: A Guide to Delicious Results
Healthy MealsThere's something truly satisfying about a perfectly roasted pork. The aroma alone is enough to make your mout...

Ham Cooking Time: How Long to Bake, Smoke, or Boil a Delicious Ham
Healthy MealsAh, ham. It's a classic, isn't it? A real crowd-pleaser, especially around holidays. And when done right, it'...

Scallops: The Ultimate Guide to Perfect Cooking
Healthy MealsAh, scallops. Those delicate, sweet, and utterly delicious morsels of the sea. They hold a special place in my...

Spaghetti Squash: The Ultimate Guide to Cooking and Serving
Healthy MealsRemember that time you saw spaghetti squash at the supermarket, looking all bumpy and strange, and thought, "W...