Let’s be honest, there’s nothing quite like a perfectly cooked steak. That satisfying sizzle, the irresistible aroma, the melt-in-your-mouth tenderness…it’s a culinary masterpiece, and I’m here to help you create it in your own kitchen. Over the years, I’ve learned a thing or two about steak. I’ve had my fair share of overcooked disasters, but I’ve also discovered some secrets that have transformed my steak game. So, buckle up, because this is your ultimate guide to cooking steak indoors, and we’re going to cover it all, from choosing the right cut to mastering the art of the perfect sear.
(Part 1) The Cut: Choosing Your Steak
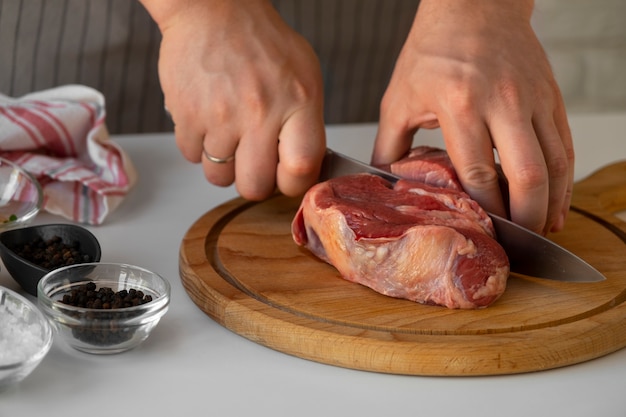
The first step to a truly delicious steak is selecting the right cut. Think of it like picking your team for a football match – you wouldn’t send a striker to play goalkeeper, would you? Every cut has its own strengths and weaknesses, and knowing which one to choose can make all the difference. Let’s delve into some popular options and what makes them special.
Popular Cuts: Unveiling the Steak Stars
- Sirloin: A classic choice, sirloin offers a good balance of flavour and tenderness. It’s a versatile cut, suitable for grilling, pan-frying, or even broiling. Personally, I find it shines when cooked on a hot griddle or cast iron pan. You’ll get a nice, even sear and a juicy interior.
- Rib-eye: Ah, the ribeye. This is where things get decadent. It’s all about the marbling – those beautiful streaks of fat that give it a rich, buttery flavour. It's like the quarterback of the steak world, a true star player. For me, the ribeye is best enjoyed cooked medium-rare to medium. Overcooking can make it dry, which would be a culinary tragedy.
- filet mignon: Now, we’re talking luxury. Filet mignon is the "Rolls Royce" of steaks, known for its super-tender, lean texture. It’s often served as a special occasion dish, but be warned, it can be a bit pricey. But hey, sometimes you just deserve a little extravagance!
- new york strip: This cut is a bit more substantial, offering a nice balance of fat and lean meat. It holds its shape well during cooking, making it ideal for pan-searing or grilling. A New York strip is a classic for a reason.
Choosing the Right Thickness: Finding the Sweet Spot
The thickness of your steak plays a crucial role, especially if you’re cooking it on the stovetop. For me, a 1-inch thick steak is the sweet spot. It’s thick enough to get a beautiful sear, but not so thick that it takes forever to cook. If you’re grilling, you can go for a thicker cut – the extra thickness helps retain moisture over the heat.
The Importance of Marbling: A Symphony of Flavour
Marbling is the secret ingredient to a juicy, flavourful steak. It’s those streaks of fat that melt during cooking, adding incredible richness and moisture. Look for cuts with good marbling, where the fat is evenly distributed throughout the meat. It’s like the perfect harmony in a culinary symphony!
Don't be afraid to experiment with different cuts. I've discovered some unexpected gems along the way. You might find your new favourite steak hiding in plain sight!
(Part 2) The Prep: Getting Ready for the Show
You’ve got your steak, you’re feeling confident, but we’re not quite ready to hit the stove yet. We need to get our star player in prime condition before it takes center stage. It’s all about the details, and they make a big difference in the final result.
Bring It to Room Temperature: Let It Breathe
You might think, “Why bother?”. Well, it’s all about even cooking. A cold steak will cook unevenly, resulting in a raw center and a well-done exterior. So, give it a chance to breathe! Take it out of the fridge at least 30 minutes before you plan to cook it and let it come to room temperature. Trust me, your steak will thank you for it.
Pat It Dry: A Little TLC
Now, let’s get rid of any excess moisture. This is a crucial step because it allows the steak to get a nice sear. When moisture sits on the surface, it prevents the pan from getting hot enough to create that beautiful brown crust. Pat your steak dry with paper towels, making sure you remove any lingering moisture.
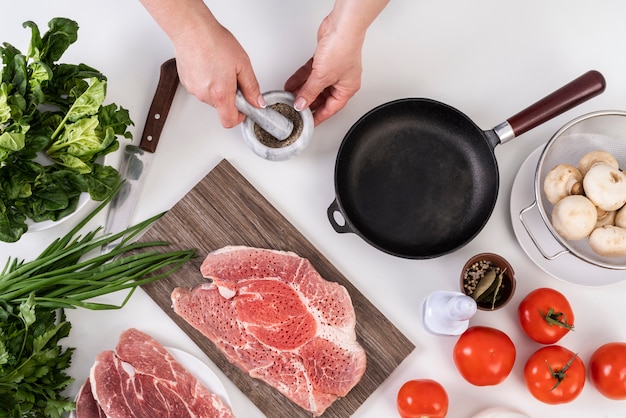
Seasoning: Don't Be Shy
Now, for the fun part: seasoning! This is where you get to be creative. I usually stick to the classics – salt and pepper. But don’t be afraid to experiment with other spices like garlic powder, onion powder, paprika, or even a pinch of cayenne pepper for a kick. The key is to use a generous amount of seasoning, especially salt. It draws out the moisture and enhances the flavour of the steak, creating a delicious crust. Remember, I always season my steak after patting it dry. This helps the seasoning stick better and create a more flavorful crust.
Now, you’re ready to cook!
(Part 3) The Cooking: It's Time to Shine
We’ve done the prep work, now it’s showtime. Remember, you’re not just cooking a piece of meat, you’re creating a masterpiece. So, let’s talk about how to bring out the best in your steak. We'll explore two popular methods: stovetop cooking and grilling.
The Stovetop: Searing to Perfection
For me, the stovetop is where it’s at. There’s nothing quite like the satisfying sizzle of a steak hitting a scorching hot pan. First, get your pan blazing hot. We’re talking searing hot, so much so that you can feel the heat radiating from the pan. Next, add a touch of oil – just enough to coat the bottom of the pan. I love using high-quality olive oil, it adds a beautiful flavour. Now, gently place your steak in the pan and resist the urge to move it around! Let it sit for a few minutes. You’ll see that delicious sear develop, that’s what we want. This is where patience is key.
The Flipping: It's an Art
Okay, now for the flipping. You want to flip the steak only once, giving it plenty of time to develop a crust on both sides. When you flip, use a good quality spatula, one that won't tear the meat. I like to use a thin, flexible spatula, it gives me more control and helps to prevent sticking.
Don't Forget the Sides: A Touch of Char
Once you’ve got a beautiful sear on both sides, it’s time to cook the edges. I like to tilt the pan slightly and use the spatula to push the steak around, getting a nice char on the sides. It adds a delicious smoky flavour and completes the sear.
Temperature Check: Finding Your Doneness
Now, you can use a meat thermometer to check the internal temperature. This is where you’ll find your steak’s sweet spot. Here’s a quick cheat sheet for common doneness levels:
| Doneness | Internal Temperature (°F) |
|---|---|
| Rare | 125-130 |
| Medium-rare | 130-135 |
| Medium | 140-145 |
| Medium-well | 150-155 |
| Well-done | 160 |
Remember, doneness is a personal preference, so cook your steak to your liking.
Resting: Let It Cool Down
Once your steak is cooked to your liking, it’s time to let it rest. Cover it with aluminium foil for at least 5-10 minutes. This allows the juices to redistribute throughout the meat, resulting in a more tender and flavourful steak. You’ll have a beautifully juicy and flavourful steak, ready to enjoy.
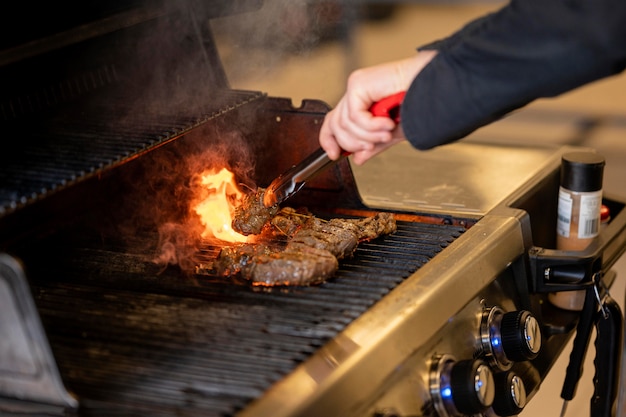
The Grill: Master of the Flames
Now, let’s move on to grilling. If you’re a fan of that smoky flavour, a grill is your weapon of choice. For a good barbecue-style steak, you need a hot grill. Preheat it to high heat for about 10 minutes, allowing the grates to heat up thoroughly. Then, you’re ready to go. Just like with the stovetop, place your steak on the grill and let it sear without moving it for a few minutes. You’ll want to get those beautiful grill marks.
The reverse sear: A Different Approach
For those who like to push the boundaries, try the reverse sear. It’s a bit more complex, but it often results in a more evenly cooked steak. The idea is to cook the steak slowly at a lower temperature (around 250°F), then finish it off with a hot sear to get that beautiful crust. This method ensures that the steak is cooked through without becoming dry. It’s a little more hands-off, but the results are worth the effort.
No matter your chosen method, the most important thing is to listen to the steak. Watch for colour changes, keep an eye on the internal temperature, and trust your instincts.
(Part 4) Sauces: The Finishing Touch
Your steak is perfectly cooked, but it needs that final flourish, that extra something special. The right sauce can take your steak from good to exceptional. It’s about finding the perfect complement to enhance the flavours, not overwhelm them.
Classic Combinations: Elevating the Flavour Profile
- Béarnaise Sauce: This classic French sauce is a creamy, tangy delight. Made with egg yolks, butter, and tarragon, it’s a perfect match for filet mignon, adding a touch of elegance and sophistication.
- Mushroom Sauce: For those who love the earthy richness of mushrooms, this is your go-to. A simple combination of sautéed mushrooms, a touch of red wine, and a creamy base, it adds depth and complexity to ribeye or sirloin steaks. It’s a match made in culinary heaven.
- Peppercorn Sauce: A peppery, tangy sauce that adds a little kick to any steak. The punch of black peppercorns paired with a creamy base, it’s a classic for a reason. You can adjust the spice level to your preference, adding more or less peppercorn to taste.
Simple and Delicious: Effortless Elegance
Don’t want to spend ages making a complicated sauce? No problem. Sometimes, the simplest solutions are the most delicious. Here are a few simple options that are packed with flavour:
- Garlic Herb Butter: This is a classic for a reason. Simply melt butter and mix in some chopped garlic and herbs like rosemary, thyme, or parsley. It’s quick, easy, and incredibly flavourful.
- Red Wine Reduction: A splash of red wine simmered in a pan with a little butter, reduced until it thickens. It’s simple, elegant, and adds a touch of sophistication to your steak. You can add a sprinkle of herbs for extra flavour.
Don’t be afraid to experiment with different sauces, try new combinations, and see what you like best. You might discover your new signature sauce!
(Part 5) Sides: What Complements Your Steak?
A good steak deserves a worthy companion. It’s about creating a balanced and delicious meal. The right side dish can enhance the flavors of your steak and elevate your entire culinary experience.
Starchy Staples: Comfort and Deliciousness
- mashed potatoes: This classic comfort food side is always a crowd-pleaser. You can get creative with different herbs and spices. I love adding a bit of truffle oil for a touch of luxury and sophistication.
- Roasted Potatoes: Crispy on the outside and fluffy on the inside, roasted potatoes are a simple yet satisfying side dish. Season them generously with salt, pepper, and herbs, and they’ll become the perfect accompaniment to your steak. I like to use a combination of rosemary, thyme, and garlic for a beautiful aroma and flavour.
- Asparagus: This seasonal vegetable is a light and refreshing complement to steak. Grill it or roast it for a smoky flavour that pairs perfectly with the rich taste of the meat.
Fresh and Bright: Adding a Burst of Flavour
- Green Salad: A refreshing contrast to the rich flavours of the steak. Use a vinaigrette dressing for a light and tangy flavour that will balance out the richness of the meal.
- grilled vegetables: Adding some colour and flavour to your plate with grilled peppers, zucchini, or eggplant is a delicious and healthy choice. The grilling process brings out the sweetness of the vegetables and adds a smoky flavour that complements the steak.
The beauty of cooking steak is that it lends itself to so many different sides. Experiment, find what you love, and create a meal that reflects your taste and preferences.
(Part 6) Tools: The Kitchen Arsenal
You’ve got the skills, you’ve got the ingredients, but to cook the perfect steak, you need the right tools. They’re your weapons of choice in the culinary battlefield.
Essential Equipment: The Must-Haves
- Cast Iron Pan: A cast iron pan is a must-have for searing steaks. It heats up quickly and retains heat well, creating a beautiful crust and those mouthwatering sear marks.
- Meat Thermometer: A meat thermometer is essential for achieving the perfect doneness. It takes the guesswork out of cooking and ensures that your steak is cooked to your liking. It’s a game-changer.
- Spatula: You need a good quality spatula that won't tear the steak while flipping. I recommend a thin, flexible spatula that can slide under the steak easily, preventing sticking and ensuring even cooking.
- Tongs: Tongs are great for flipping the steak on the grill or moving it around in the pan. They provide a secure grip and help prevent the steak from slipping and getting unevenly cooked.
Optional Extras: Taking Your Steak Game to the Next Level
- Grill: If you enjoy grilling, you’ll need a grill. There are many different types of grills, from gas to charcoal. Experiment to find what you prefer. Each type of grill has its unique flavour profile and cooking style.
- Sous Vide Cooker: If you’re looking for an extra level of precision, a sous vide cooker can help you cook steak to the exact temperature. It ensures that the steak is cooked evenly throughout, resulting in a perfectly tender and juicy result.
Don’t feel pressured to have all the fancy gadgets, but the right tools can definitely make your steak-cooking journey smoother and more enjoyable.
(Part 7) Troubleshooting: Solving Those Cooking Woes
We’ve all been there. Even the most experienced cooks encounter those moments when things don’t go according to plan. But don’t worry, I’m here to help you navigate those cooking challenges.
Steak Sticking to the Pan: A Common Culprit
This is a common problem, especially with a hot pan. The solution is to ensure your pan is hot enough and well-oiled. The oil creates a barrier between the steak and the pan, preventing sticking. And remember, don’t move the steak around too much in the first few minutes. Let it develop a crust before you attempt to flip it. Patience is key.
Unevenly Cooked Steak: A Matter of Temperature
If your steak is cooking unevenly, it could be because it’s not at room temperature or your pan isn’t hot enough. Make sure the steak is at room temperature before you start cooking, and preheat your pan to a high temperature. A hot pan ensures that the steak sears quickly and evenly.
Overcooked Steak: The Enemy of Tenderness
We’ve all been there. The most common cause of overcooked steak is simply not checking the internal temperature. Use a meat thermometer to ensure your steak is cooked to your liking. Don’t rely on guesswork, it’s better to be safe than sorry. And remember, it’s always better to err on the side of undercooked than overcooked. You can always cook it a bit longer, but you can’t undo overcooking.
Dry Steak: A Loss of Moisture
A dry steak is a culinary tragedy. It can be caused by overcooking, not enough marbling, or not letting it rest long enough. To avoid a dry steak, cook it to the correct temperature, choose a well-marbled cut, and let it rest for 5-10 minutes after cooking. Resting allows the juices to redistribute, resulting in a more tender and flavorful steak.
Undercooked Steak: A Matter of Preference
If your steak is undercooked, simply put it back in the pan or on the grill for a few more minutes until it reaches the desired doneness. Don’t worry, it’s better to err on the side of undercooked than overcooked!
Don’t be afraid to make mistakes. Every mistake is a learning opportunity. And remember, practice makes perfect. So, keep trying, keep experimenting, and you’ll soon be a steak-cooking master!
(Part 8) FAQs: Your Steak Questions Answered
Q: What’s the best way to store steak?
A: Store steak in the coldest part of your refrigerator, wrapped tightly in plastic wrap or in an airtight container. It can last for 3-5 days. Make sure to use a good quality plastic wrap to prevent freezer burn.
Q: Can I freeze steak?
A: Yes, you can freeze steak for up to 6 months. Wrap it tightly in plastic wrap or freezer paper, then place it in a freezer-safe bag. Thaw it in the refrigerator for 24 hours before cooking. Freezing can affect the texture slightly, but it’s a good way to preserve steak for later use.
Q: How can I tell if steak is spoiled?
A: Spoiled steak will have a slimy texture and a strong, unpleasant odour. If you’re unsure, it’s best to discard it. Always trust your senses when it comes to food safety.
Q: What’s the best way to clean a cast iron pan?
A: Wash your cast iron pan with hot water and a little soap, then dry it thoroughly. You don’t need to use harsh chemicals, and avoid putting it in the dishwasher. The heat of the pan will burn off any remaining food particles. To season the pan, rub it with a thin layer of oil and heat it over low heat until the oil is absorbed.
Q: How can I make my steak more tender?
A: Choose a tender cut of meat, like filet mignon or rib-eye. You can also use a meat tenderizer or marinade to help break down the muscle fibres. And remember, letting the steak rest after cooking helps to redistribute the juices, resulting in a more tender steak.
Now, go forth and conquer the world of steak. You’ve got all the knowledge you need to cook a steak that will leave everyone saying, “Wow! You really know your steak!”
Everyone is watching

Corn on the Cob: The Ultimate Guide to Perfectly Cooked Ears
Healthy MealsAh, corn on the cob. Just the name evokes images of sunny days, barbecues, and that sweet, juicy flavour that ...

Perfect Pork Roast Oven Cooking Time: A Guide to Delicious Results
Healthy MealsThere's something truly satisfying about a perfectly roasted pork. The aroma alone is enough to make your mout...

Scallops: The Ultimate Guide to Perfect Cooking
Healthy MealsAh, scallops. Those delicate, sweet, and utterly delicious morsels of the sea. They hold a special place in my...

Ham Cooking Time: How Long to Bake, Smoke, or Boil a Delicious Ham
Healthy MealsAh, ham. It's a classic, isn't it? A real crowd-pleaser, especially around holidays. And when done right, it'...

Spaghetti Squash: The Ultimate Guide to Cooking and Serving
Healthy MealsRemember that time you saw spaghetti squash at the supermarket, looking all bumpy and strange, and thought, "W...