There's something about a perfectly grilled ny strip steak that just screams summertime. It's the ultimate symbol of a relaxed weekend barbecue, a delicious centerpiece for a casual dinner party, or a simple but satisfying weeknight meal. But getting it right on the grill can be a bit of a dance, especially if you're aiming for that mouthwatering medium-rare finish. I've been grilling for years, and I've learned a thing or two about getting that perfect sear and cooking time, avoiding the dreaded overcooked disappointment. So, let's dive into the world of the NY Strip and unlock the secrets to grilling it like a pro.
(Part 1) The Steak: Choosing Your Weapon
1.1 The Cut
First things first, the star of the show: the steak itself. A good NY Strip steak is like a blank canvas for grilling artistry. You want to choose a steak that's about 1.5-2 inches thick. Too thin and it'll cook too quickly, potentially ending up dry and tough. Too thick, and you'll run the risk of uneven cooking, with a charred exterior and a raw interior. Look for a steak with good marbling, those little streaks of fat that'll give your steak that incredible flavour and keep it juicy. Think of them like little pockets of flavour that melt throughout the steak as it cooks, creating a symphony of taste. If you can find a dry-aged steak, that's a real treat, it'll have a deeper flavour and a more intense taste, but it's a bit more of a splurge.
1.2 The Temperature
Before you even start grilling, it's important to let your steak come to room temperature. This ensures even cooking and prevents the steak from getting cold spots, which can lead to uneven cooking and a chewy texture. Take it out of the fridge for about 30 minutes before you start grilling. While it’s resting, get your grill good and hot. Aim for around 450°F (232°C). You can check the temperature with a grill thermometer.
(Part 2) The Prep: Getting Ready to Grill
2.1 Pat It Down
You want your steak dry, so pat it down with a paper towel. This will help you get a nice sear on the outside and prevent any steam build-up, which can make the steak tough. Moisture is the enemy of a good sear, so ensure your steak is as dry as possible.
2.2 Seasoning
Now, this is where you get to be creative. A simple salt and pepper is a classic, but don't be afraid to experiment! You can add garlic powder, onion powder, paprika, or even a pinch of cayenne for a little kick. I love using a blend of herbs like rosemary, thyme, and oregano. Just rub your chosen seasoning liberally onto both sides of the steak, make sure you get it all the way into the edges.
I have a little trick I use to ensure even seasoning: After rubbing the seasoning on, I press the steak gently into a plate with a few holes, like a cooling rack. This helps the seasoning to adhere better and prevents it from falling off during grilling.
2.3 Oil It Up
Brush a little olive oil onto both sides of the steak. This helps create a nice, crispy crust and prevents the steak from sticking to the grill grates. Olive oil adds a touch of richness to the crust and enhances the flavour of the steak.
(Part 3) The Grill: The Dance Begins
3.1 Getting a Good Sear
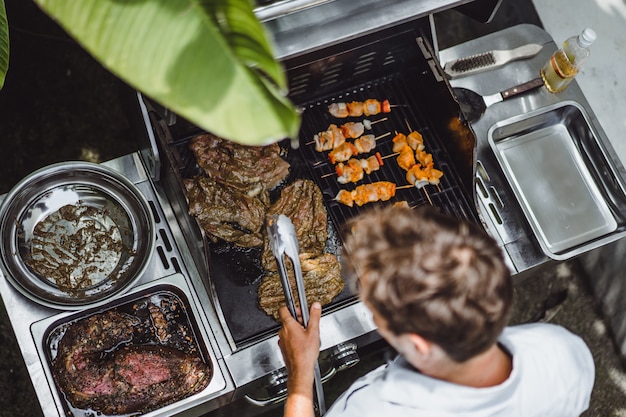
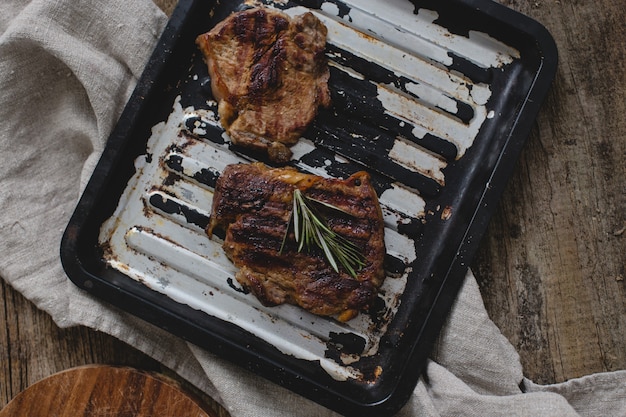
Okay, your grill is hot, your steak is ready, now it's showtime! Place your steak directly over the hot coals or burner, and let it sear for 2-3 minutes per side. You want a nice, even, dark brown crust. Don't move it around too much, let it sit and get that perfect sear.
The sear is crucial, it creates that delicious crust and seals in the juices. You’ll know it’s ready when you can easily lift the steak from the grill without it sticking.
3.2 The Flip
After the first sear, flip the steak. It’s tempting to peek and see how it’s cooking, but resist the urge. Just flip it over and let it sear on the other side for another 2-3 minutes. You'll notice that those beautiful grill marks will start appearing, like little stripes on your steak. These grill marks aren’t just for show, they help to create even cooking and add a smoky flavour.
(Part 4) The Technique: To Grill or to Rotate?
4.1 The 90-Degree Turn
Here’s a little trick I’ve learned: after you’ve seared both sides, rotate the steak by 90 degrees. This helps create those beautiful criss-cross grill marks, which are not only aesthetically pleasing but also help to lock in moisture. The rotation ensures that the heat is distributed evenly across the entire steak, resulting in a more evenly cooked and juicy final product.
4.2 The Indirect Heat
You’ve got a beautiful sear, but now it’s time to cook the steak through. Move the steak to a cooler part of the grill, or if you're using charcoal, push the coals to the sides to create an indirect heat zone. Keep an eye on the internal temperature of the steak. You can use a meat thermometer to check, or you can use the old-fashioned finger-test method. I tend to use a thermometer, it's more precise and less messy.
If you’re using a gas grill, you can adjust the heat by turning down the burners. It's important to find that sweet spot where the steak cooks through without burning.
(Part 5) The Temperature: Finding the Right Level
5.1 The Temperature Chart
Here’s a little table to help you determine the ideal internal temperature for your steak:
| steak doneness | Internal Temperature (°F) | Internal Temperature (°C) |
|---|---|---|
| Rare | 125-130 | 52-54 |
| Medium-Rare | 130-135 | 54-57 |
| Medium | 135-140 | 57-60 |
| Medium-Well | 140-145 | 60-63 |
| Well-Done | 145 | 63 |
Personal preference plays a big role here. I prefer my NY Strip medium-rare, with a rosy center and a juicy texture. It's all about finding the balance between a tender, juicy steak and a safe internal temperature.
(Part 6) The Rest: Patience is Key
6.1 Letting It Rest
Once the steak has reached your desired temperature, take it off the grill and let it rest for 5-10 minutes before slicing and serving. This gives the juices a chance to redistribute, resulting in a more tender, juicy steak. You can loosely cover the steak with foil to keep it warm while it rests.
6.2 What to Serve It With
A juicy NY Strip steak is the star of the show, but you can't forget about the supporting cast! I love serving my steak with roasted vegetables, a simple salad, and creamy mashed potatoes. Or, you can go with a classic side like fries or baked beans.
Remember, the key is to create a balance of flavors and textures. A rich, savory steak paired with a crisp, refreshing salad is a classic combination for a reason.
(Part 7) The Little Extras: Going the Extra Mile
7.1 A Little Butter
For a truly luxurious touch, you can add a pat of butter to the top of the steak while it’s resting. The heat from the steak will melt the butter and create a rich, flavorful sauce. You can also add some fresh herbs, like thyme or rosemary, to the butter for an extra boost of flavor.
7.2 Herbs and Spices
Get creative with your seasonings! Add a sprig of rosemary or thyme to the grill while you’re cooking. You can also add a pinch of smoked paprika or chili powder to your seasoning blend.
Experiment with different flavour combinations to find your favorite. Remember, a little goes a long way when it comes to spices.
(Part 8) The Mistakes to Avoid
8.1 Overcrowding the Grill
Don’t try to cook multiple steaks at once. If you overcrowd the grill, you'll lower the temperature and your steaks won't get that nice sear. The grill needs to be hot enough to sear the steak quickly and create a crispy crust.
8.2 Prodding the Steak
Resist the urge to poke or prod your steak while it's cooking. This can cause the juices to escape and make your steak tough. Patience is key here, let the steak cook undisturbed.
8.3 Overcooking the Steak
It’s easy to overcook a steak. Use a meat thermometer to check the internal temperature and take it off the grill when it reaches your desired level. Overcooked steak is dry and chewy, so it's crucial to cook it to the desired doneness.
(Part 9) FAQs
Here are a few common questions about grilling NY Strip steaks:
9.1 What is the best way to cook a NY Strip steak on a gas grill?
For a gas grill, you’ll want to preheat the grill to high heat. Use a grill thermometer to check the temperature, aiming for around 450°F (232°C). Then, follow the same steps as you would for a charcoal grill, making sure to sear the steak on both sides before moving it to a cooler part of the grill to finish cooking.
9.2 What if my steak is too thin?
If your steak is thin, you’ll want to cook it faster, but be careful not to overcook it. Aim for 1-2 minutes per side for a thin steak. You can also use a cast-iron skillet on the stovetop to get a nice sear.
9.3 How do I know if my steak is cooked to my liking?
The best way to determine the doneness of your steak is by using a meat thermometer. However, if you don't have a thermometer, you can use the old-fashioned finger-test method:
- Press your thumb and forefinger together. The feel of the muscle beneath your thumb is similar to the texture of a rare steak.
- Press your thumb and middle finger together. This feels similar to a medium-rare steak.
- Press your thumb and ring finger together. This feels similar to a medium steak.
- Press your thumb and pinky finger together. This feels similar to a medium-well steak.
Remember, this is just a guide, and the feel of the steak can vary depending on the thickness of the cut. It's always a good idea to check with a thermometer for a more precise result.
9.4 Can I use a marinade for my NY Strip steak?
Absolutely! Marinades can add flavor and tenderize your steak. Just be sure to marinade for at least 30 minutes, or up to 24 hours for maximum flavor.
Marinades can also help to create a more flavorful crust. When choosing a marinade, look for a balance of acids, such as lemon juice or vinegar, and oils, which help to tenderize and add moisture to the steak.
9.5 What are some other cuts of beef that are good for grilling?
NY Strip is a classic, but there are plenty of other cuts of beef that are perfect for grilling. Some other great options include:
- Ribeye: Known for its rich marbling and buttery flavor, ribeye is a great choice for grilling.
- filet mignon: A leaner cut with a tender texture, filet mignon is best cooked to medium-rare or medium.
- T-bone: A combination of a NY Strip and a filet mignon, T-bone steaks are perfect for those who love a little bit of everything.
- flank steak: A tougher cut that benefits from marinating and grilling over high heat, flank steak is best sliced thinly after cooking.
- skirt steak: Similar to flank steak, skirt steak is a flavorful cut that is often marinated and grilled quickly.
Just remember, each cut has a different cooking time, so be sure to adjust your grilling time accordingly.
That's it! I hope this guide helps you grill the perfect NY Strip steak. It's a delicious and satisfying meal, and the key is to have fun with it! Experiment with different seasonings, sides, and cooking techniques to find your perfect combination. Enjoy the grilling process, and happy eating!
Everyone is watching

Corn on the Cob: The Ultimate Guide to Perfectly Cooked Ears
Healthy MealsAh, corn on the cob. Just the name evokes images of sunny days, barbecues, and that sweet, juicy flavour that ...

Scallops: The Ultimate Guide to Perfect Cooking
Healthy MealsAh, scallops. Those delicate, sweet, and utterly delicious morsels of the sea. They hold a special place in my...

Spaghetti Squash: The Ultimate Guide to Cooking and Serving
Healthy MealsRemember that time you saw spaghetti squash at the supermarket, looking all bumpy and strange, and thought, "W...

Salmon Cooking Times: Perfect Guide for Every Recipe
Healthy MealsLet me tell you, cooking salmon is an art form. It's all about getting that perfect balance: juicy and tender,...

Ham Cooking Time: How Long to Bake, Smoke, or Boil a Delicious Ham
Healthy MealsAh, ham. It's a classic, isn't it? A real crowd-pleaser, especially around holidays. And when done right, it'...