Ah, sliders! Those little bundles of burger joy, perfect for a casual gathering or a satisfying solo lunch. But getting them just right – that juicy, flavorful centre encased in a crisp exterior – can sometimes feel like a culinary gamble. Fear not, my fellow slider enthusiasts, because I'm here to share my secrets to achieving oven-baked slider perfection every time. We'll delve into the world of sliders, exploring everything from the best patties to the ultimate guide for cooking times, and even some handy tips and tricks along the way. Get ready for a tasty journey, because we're about to embark on a quest for the ultimate slider experience!
(Part 1) The Slider Showdown: Choosing Your Patty Powerhouse
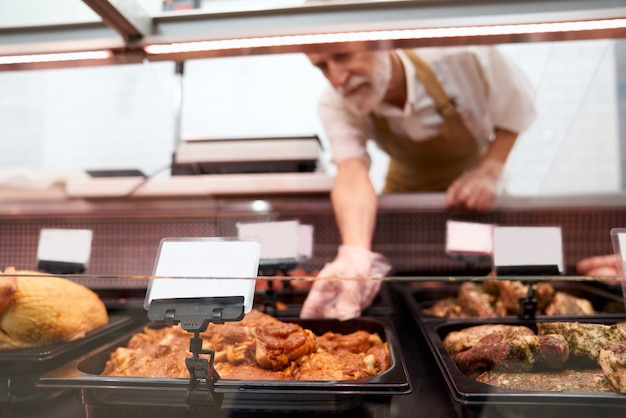
First, let's pick our weapons, our slider heroes – the patties themselves. This isn't a one-size-fits-all situation; it's about personal preference and the kind of flavor profile you're aiming for. So, let's break down some of the most popular contenders, shall we?
1.1 The Classic Beef Burger: A Timeless Favorite
We can't talk about sliders without acknowledging the granddaddy of them all – the classic beef burger. It's your go-to for a hearty, satisfying slider. Look for ground beef with a good fat content, around 80/20, to ensure juicy, flavorful patties. Personally, I prefer a slightly coarse grind for added texture, but that's just my two cents. The key to a great beef slider is a good sear, which is why baking is a fantastic option, allowing for a beautifully crispy exterior without drying out the inside.
1.2 The Pork Powerhouse: A Smoky Sensation
Now, if you crave a slider that delivers a punch of flavor and a hint of smoky goodness, pork is your champion. I love using ground pork shoulder for this, but you can also find pre-made patties at the supermarket. Just make sure they're well-seasoned. A little spice and a touch of sweetness – that's the secret to a winning pork slider. Pork, with its natural fat content, cooks beautifully in the oven, resulting in a tender, flavorful slider that's sure to please.
1.3 The Chicken Champion: A Light and Lean Option
For a lighter, leaner option, chicken sliders are a fantastic choice. Ground chicken is incredibly versatile, lending itself to a variety of flavor profiles. You can season it with your favorite herbs and spices, or even mix in finely chopped vegetables for extra crunch. Just make sure not to overcook it – you want it to stay juicy and tender. Chicken sliders bake beautifully in the oven, creating a crispy exterior while retaining the moisture within.
1.4 Beyond Meat: The Vegetarian Delight
Let's not forget the veggie-lovers! Beyond Meat and other plant-based burger patties have really upped their game in recent years. They offer a meaty texture and flavor that's hard to resist. These patties are usually already seasoned, but feel free to add your own personal touch. Plant-based sliders often require a slightly different approach in the oven, as they tend to be more delicate. It's essential to keep a close eye on them to ensure they don't dry out.
(Part 2) Slider Prep: Getting Ready for the Oven
Now that you've chosen your slider superstars, it's time to prep them for their oven adventure. This is where the real magic happens, ensuring your sliders are cooked to perfection, with a golden-brown crust and a juicy, tender interior. Let's delve into the details, shall we?
2.1 Forming the Perfect Patties
Take your chosen ground meat and gently shape it into uniform patties. I like to make them about 3-4 inches in diameter and about half an inch thick. Remember, they'll shrink a bit during cooking. Now, here's a handy tip: make a small indentation in the centre of each patty. This prevents puffing up during cooking, leading to more even cooking.
2.2 Seasoning with Finesse
This is where you make your sliders truly your own. Salt and pepper are always a good starting point, but feel free to experiment. I'm a big fan of a pinch of paprika, garlic powder, and onion powder for a deeper flavor. Season both sides of the patties generously. You can also add a touch of Worcestershire sauce or a dash of hot sauce for extra zing.
2.3 Resting for Perfection
Here's a tip that makes a huge difference: let those seasoned patties rest in the fridge for about 30 minutes. This allows the flavors to meld and prevents the patties from drying out during cooking. While they're chilling, you can get started on prepping the rest of your slider fixings. This resting time is crucial, especially for larger patties, as it allows the proteins to relax, ensuring a more tender and flavorful final product.
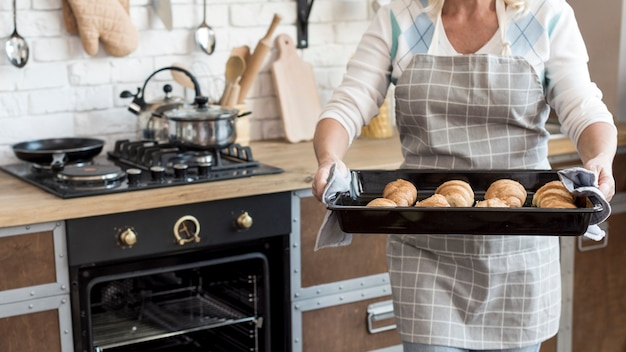
(Part 3) Oven-Baking Basics: The Key to Success
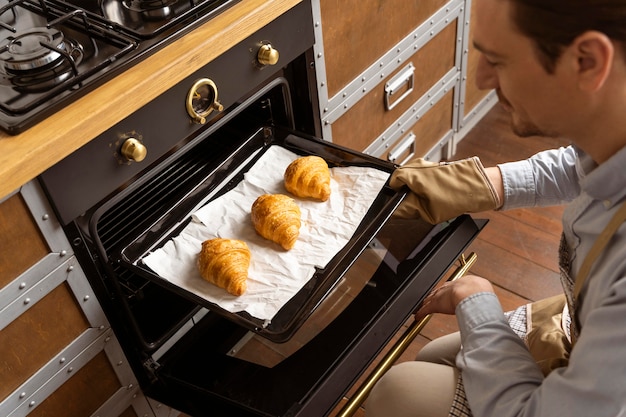
Time to get those sliders into the oven. The beauty of baking sliders is that it's a pretty hands-off approach. You just need to ensure you have the right setup and temperature. Let's explore the essential oven-baking secrets.
3.1 Choosing the Right Oven Rack
When oven-baking sliders, rack placement matters. I recommend placing your rack in the middle position of your oven. This ensures that the sliders are evenly cooked from all sides. It also allows for better heat circulation, preventing hot spots that can lead to uneven cooking.
3.2 The Magic Number: Oven Temperature
The golden rule for oven-baking sliders is to preheat your oven to 400°F (200°C). This high temperature creates a nice crispy exterior while keeping the interior juicy and tender. The key is to achieve that perfect balance of browning and moisture, and this temperature helps to achieve just that.
3.3 Avoiding the "Stick-to-the-Rack" Dilemma
Before you pop those sliders into the oven, it's a good idea to line your baking sheet with parchment paper or foil. This prevents the sliders from sticking to the rack and makes cleanup a breeze. It also allows for easier flipping if you decide to go that route, preventing the patties from sticking to the sheet.
(Part 4) Cooking Times: The Slider Timetable
Now, here's the moment you've been waiting for – the slider cooking times! Remember that these are just guidelines, and cooking times can vary depending on the thickness of your patties and the type of oven you have. It's always a good idea to check the internal temperature of your sliders with a meat thermometer to ensure they are cooked to your desired level of doneness.
4.1 Beef Sliders: The Classic Timetable
For those classic beef sliders, aim for a cooking time of about 10-12 minutes per side. For a well-done burger, you'll want the internal temperature to reach 160°F (71°C). If you prefer your burger medium, aim for an internal temperature of 145°F (63°C). The key is to ensure the centre of the patty is cooked through without becoming dry. A meat thermometer is your best friend in this process, ensuring consistent results every time.
4.2 Pork Sliders: A Little Longer in the Oven
Pork sliders generally take a bit longer to cook. Aim for about 15-20 minutes per side, depending on the thickness of your patties. You're looking for an internal temperature of 145°F (63°C) for pork. Pork is known for its flavorful fat content, and this extra cooking time helps to render that fat, resulting in a juicier, more tender slider.
4.3 Chicken Sliders: Short and Sweet
Chicken sliders are quick and easy. Cook them for about 8-10 minutes per side, or until the internal temperature reaches 165°F (74°C). Remember, overcooked chicken can become dry, so keep an eye on it. Chicken sliders are a great option for those who prefer a lighter, more delicate flavour. It's important to ensure that the chicken is cooked through to prevent foodborne illness.
4.4 Beyond Meat: Following the Instructions
For plant-based sliders, it's best to follow the instructions on the packaging. These patties usually cook a bit quicker, but it's best to err on the side of caution and check the internal temperature to ensure they're cooked through. Plant-based patties can sometimes be more delicate than their meat counterparts, requiring careful attention to ensure they don't dry out or become tough.
(Part 5) The Flip-Flop Debate: One Side or Two?
Now, you might be wondering, should you flip your sliders in the oven? Well, there are two schools of thought on this, and both have their merits.
5.1 The Single-Sided Approach: The No-Flip Method
Some people prefer to leave their sliders undisturbed in the oven. This method allows for a nice crispy crust on the bottom and a more even cook overall. Just make sure your baking sheet is evenly spaced, so the sliders don't touch and cook properly. This method is great for those who want a crispy, caramelized bottom and a more tender centre.
5.2 The Double-Sided Approach: Flipping for Uniformity
Others prefer to flip their sliders halfway through the cooking time. This ensures that both sides get a chance to develop that golden-brown crust. Just be careful when flipping, as the patties might be a bit fragile. This method works particularly well for thicker patties, ensuring that both sides are cooked evenly. It's important to use a spatula that's large enough to support the entire patty, preventing it from breaking apart during flipping.
(Part 6) Mastering the Slider Toppings: The Delicious Details
Alright, your sliders are cooked to perfection, now it's time for the grand finale – the toppings. This is where you can unleash your culinary creativity. There are no rules, just a world of deliciousness waiting to be explored.
6.1 Classic Toppings: The Tried and True
Let's start with the classics – the toppings that never disappoint. You have your lettuce, tomato, onion, pickles, and cheese. A slice of cheddar, a generous helping of Swiss, or even a dollop of blue cheese – it's all up to you. These classics are staples for a reason – they complement the burger beautifully and provide a satisfying textural contrast.
6.2 Beyond the Basics: Adventures in Flavour
Now, let's get adventurous. Think about adding caramelized onions, crispy bacon, or even a dollop of guacamole for a touch of spice. Don't be afraid to experiment with different sauces too – a drizzle of sriracha mayo, a tangy bbq sauce, or even a sprinkle of jalapeno flakes. The key is to find flavour combinations that excite your taste buds and complement your chosen slider patty.
6.3 The Power of Presentation: Making it Look as Good as It Tastes
Don't forget about presentation! Make those sliders look as good as they taste. I like to use mini buns – they're the perfect size for sliders and look extra cute on a plate. You can also use toothpicks to keep the toppings from sliding off. A little effort in presentation can elevate the entire dining experience, making your sliders even more appealing.
(Part 7) The Slider Sidekick: Delicious Accompaniments
Of course, no slider feast is complete without some delicious accompaniments. These are the side dishes that elevate your slider experience to the next level.
7.1 Crisp and Crunchy: french fries, Onion Rings, and More
What's a slider without a side of crispy fries? You can never go wrong with classic French fries, or if you're feeling fancy, try some sweet potato fries or onion rings. These crispy, salty sides provide a delightful contrast to the juicy, flavorful sliders, creating a symphony of textures and tastes.
7.2 Fresh and Light: Salads and Coleslaw
For a lighter touch, a fresh salad or a creamy coleslaw is a perfect compliment to the richness of the sliders. I like to make a simple salad with greens, cherry tomatoes, and a light vinaigrette. Salads and coleslaw offer a refreshing counterpoint to the heavier elements of the sliders, balancing the meal and providing a burst of freshness.
7.3 Tangy and Spicy: pickled onions, Chutneys, and Salsas
Add a touch of tangy and spicy flavour with some pickled onions, chutneys, or salsas. These make a great accompaniment to the richness of the sliders. These tangy and spicy accompaniments add depth and complexity to the overall flavour profile of the meal, creating a truly satisfying culinary experience.
(Part 8) Slider Success Stories: From My Kitchen to Yours
You know what? I just love sharing my slider adventures. Over the years, I've learned a few things, and I've had some epic slider experiences that I want to share with you. These stories are a testament to the joy of experimenting and learning in the kitchen, and hopefully, they'll inspire you to try new things and create your own slider masterpieces.
8.1 The Time I Conquered the “Burnt Slider” Crisis
One time, I was in a rush to get sliders on the table for a party. I forgot to line my baking sheet, and you can guess what happened – burnt sliders! It was a total disaster. But, that's when I learned the importance of lining your baking sheet with parchment paper or foil. It's a simple tip, but it makes all the difference. This experience taught me the importance of being prepared and taking those extra few minutes to ensure a successful outcome.
8.2 The Slider Experiment That Went Down in History
I also had a memorable slider experiment that I'm still talking about. I decided to make sliders with a blend of ground beef, ground pork, and some finely chopped jalapenos. It was a hit! The flavours were incredible, and the jalapenos added a little bit of heat. It's a recipe that's become a family favourite. This experiment highlights the joy of culinary exploration, of trying new things and discovering unexpected flavour combinations.
8.3 The Slider Party That Took the Cake
One time, I threw a slider party for my friends, and it was a total blast. I made a whole spread of sliders, with different toppings and sides. It was a slider smorgasbord, and everyone loved it. It's a great way to have fun with food and get creative in the kitchen. This story reminds us that food is best enjoyed with friends and loved ones, and that a little culinary creativity can go a long way in creating a memorable experience.
(Part 9) FAQs: Your Slider Questions Answered
I have a feeling you might have a few questions about slider cooking, so let's get into the FAQs. This section provides answers to some of the most common queries about slider preparation and cooking.
9.1 What happens if my sliders are overcooked?
Overcooked sliders can become dry and tough. If you've overcooked them, there's not much you can do. But next time, make sure you keep an eye on them and check the internal temperature with a meat thermometer. Overcooking is a common problem, but it's easily avoidable with careful monitoring and the use of a meat thermometer. It's always better to err on the side of caution and check the doneness of your sliders frequently.
9.2 Can I make sliders ahead of time?
You can definitely make sliders ahead of time. Just form the patties, season them, and refrigerate them for up to a day. When you're ready to cook them, simply take them out of the fridge and let them come to room temperature before baking. This is a great way to save time and effort, especially when planning a gathering. It's important to allow the patties to come to room temperature before baking, as this ensures more even cooking and prevents the patties from becoming cold in the oven.
9.3 How do I make sure my sliders stay juicy?
To keep sliders juicy, avoid overcooking them. Don't press down on the patties while they're cooking, as this will force out the juices. Also, using a ground meat with a good fat content will help keep the patties moist. These simple techniques can make a huge difference in the texture and tenderness of your sliders.
9.4 What’s the best way to store leftover sliders?
Leftover sliders can be stored in an airtight container in the fridge for up to 3-4 days. You can reheat them in the oven or microwave. It's important to store them properly to maintain their freshness and prevent spoilage. When reheating, it's best to do so gently to avoid drying out the patties.
9.5 What are some other ways to cook sliders?
Besides oven-baking, you can also cook sliders on the grill, in a skillet, or even in a slow cooker. Each method has its own advantages and disadvantages, so experiment to find what works best for you. Exploring different cooking methods can expand your culinary horizons and lead to new and exciting slider experiences.
Everyone is watching

Corn on the Cob: The Ultimate Guide to Perfectly Cooked Ears
Healthy MealsAh, corn on the cob. Just the name evokes images of sunny days, barbecues, and that sweet, juicy flavour that ...

Perfect Pork Roast Oven Cooking Time: A Guide to Delicious Results
Healthy MealsThere's something truly satisfying about a perfectly roasted pork. The aroma alone is enough to make your mout...

Ham Cooking Time: How Long to Bake, Smoke, or Boil a Delicious Ham
Healthy MealsAh, ham. It's a classic, isn't it? A real crowd-pleaser, especially around holidays. And when done right, it'...

Scallops: The Ultimate Guide to Perfect Cooking
Healthy MealsAh, scallops. Those delicate, sweet, and utterly delicious morsels of the sea. They hold a special place in my...

Spaghetti Squash: The Ultimate Guide to Cooking and Serving
Healthy MealsRemember that time you saw spaghetti squash at the supermarket, looking all bumpy and strange, and thought, "W...